
2.4 SWAP HOW TO... NOT DONE 56K Take a nap...
#1
 04-26-2008, 03:20 AM


Join Date: Apr 2007
Location:
Posts: 1,885
Likes: 0
Received 0 Likes
on
0 Posts
ALWAYS READ THIS TOP POST FIRST
Thanks for hanging in there with this guys.
I think that I'm getting to the point that I have made most the revisions and It's about 90% done.
At this point I need to know:
1. What else you would like to know about the 2.4 and the swap itself.
2. Does everything make sence??? Do I have to re-word anything to make it better understandable.
3. Do I have to simplify anything like make more step by step???
4. Does the layout look good???
Feel free to be honest with me and I will do what I can to make this the best 2.4 swap howto on the internet... most other sites you would have to dig threw 1000 post of arguing just to figure out what really has to be done or relieson you knowing what your doing to a point and is vauge with instructions.
Thanks for you help...
Jeremy
Reminder to self... need to update / add:
more info about using the srt-4 turbofold.
get more pics of parts
tool list
#2
04-26-2008, 03:23 AM
Join Date: Apr 2007
Location:
Posts: 1,885
Likes: 0
Received 0 Likes
on
0 Posts
[align=center]This is the most compleate 2.4 swap how-to: online.[/align][align=center]HOW TO: SWAP A 2.4 INTO YOUR NEON[/align]
Disclaimer: I will not be held responsible for any and all injury, death, break down, problem, or any action that may have caused engine failure due to following these steps.
First off I would like to say that this swap can be as easy or hard as you make it. Lets get real, pulling a motor is not fun, I recruited a friend to stand around just so I could cuss at him. If you do not have the tools to do the job don’t even think about it. There are a few tools that you will need that most people do not have. Also if you do not have a torque wrench, have no clue what a torque wrench is, or do not know how to use one. DO NOT DO THIS SWAP. Expect for this swap to take anywhere from 6 hours for the elite to 15+ hours for someone that has never done a swap before, however this is only if you have all your ducks in a row, expect a week or more if you don't. The swap took Josh and I about 20 hours. Expect to run into some problems, remember this motor was never designed to go into a Neon. Also expect to have some extra cash on hand if any problems do arise.
This is close to a step by step How to as I can make and is a work in process, I have pulled information from personal experience and many other sources on the internet including but not limited to the org, 1gn. com and most of all Russ AKA PurpleNeon on the org, he is a weath of info and knows more about the 2.4 swap then anyone I know. In all attempts I have tried to use my own words when describing something I have researched on. If for any reason a part is unclear or does not make sense please PM me and I will try to explain it and try to add it orword it in the how to.
With that said this How To: directly explains how to swap a Chrysler 2.4 N/A motor into a 95-99 Dodge/Plymouth Neon. Also please use fsm, chiltons, or other service manual for proper torqueing patterns and torque requirements.
I will include information and pricing sections at the bottom further explaining things like using SRT-4 internals and turboing a 2.4. At a later date.
PARTS LIST
For further explination of why you will be using these parts over others and information on each partplease read
Why dowe use ____ Part??? in the Information section.
1. 2.4 liter DOHC from a 1995 – 2002 Chrysler made vehicle.
2.2.0 Transmission from a Neon.
3. 2.0 DOHC intake manifold.
4. 2.0 DOHC Exhaust Manifold.
5. 2.0 DOHCCoolant hardlines.
6. 2.0 DOHC PCM
7. 2.0 DOHC wiring harness.
8. 2.0 Underdrive pulley.
9. PT Cruiser water outlet neck. And o-ring.
10. PT cruiser alternator brackets.
11. 2.4 Stratus motor mount.
12. 2.0 to 2.4 side motor mount adapter.
13. 24lbs injectors OR Second gen neon, 58psi fuel pressure regulator.
14. DOHC hood.
15. EGR block off kit.
16. 2.0 DOHC TPS and IAC solenoid.
OTHER THINGS YOU MAY WANT TO PICK UP.
New clutch
New thermostat
New timing belt
New timing belt tentioner and tentioner pulley
New oil pump. You can use the srt-4 pump witch flows more oil but you will also need the oil pan and oil pickup tube.
New water pump
Booger bushings
Motor mount inserts
Semi-solid – solid bobble strut
2001 - 2002 PT Cruiser Power Steering bracket.
2.0 DOHC cams.
2.0 REMOVAL
This section is included for beginers who have never removed a neon motor... I intend for this section to stay... otherwise it would be a 2.4 install how-to and not a 2.4 swap how-to. Removal is a part of the swap. Also I have writen this removal and how-to instructing people to remove the engine and transmission together. You can leave the transmission in the car however if you have a non-modular clutch and are using the stock 2.4 oiling system it is not advisable... I also wrote it this way for people to learn more about there cars, by removing everything up front the person will learn more about there car and how it is put together... If you feel like you can leave the transmission and just pull the motor, be my guest... But I still feel it to be adviseable to pull both.
1. Remove Battery, and battery tray. Should always be done first. Set PDC up and out of the way.
2. Jack car up and place on jack stands, does not have to be too high just high enough to get wheels off the ground. Remember to chuck rear wheels, and set e-brake.
3. Drain all fluids. IE… Oil, Coolant, and transmission oil. Remember to replace drain plugs and close drain **** on radiator. Please recycle used oil and fluids appropriately…
4. If your car is equipped with a bobble strut unbolt it from the K-Frame while you’re still under the car.
5. While fluids are draining, remove front wheels.
6. Remove cotter pin, along with nut cover, spring washer. (DO NOT reuse cotter pin.)
7. Have a buddy get into car and hold brakes while you use a 32mm Axel nut socket to remove the axle nut… This will have to be done with air tools or a breaker bar…
8. Remove clevis bolt from knuckle. This is annoying because one side is 15mm and the other is 18mm. Check for wear, if it shows any wear get rid of it.
9. Unbolt end of Tie-Rod from steering knuckle.
10. Insert long pry rod into k-frame and push down on the lower control arm until ball joint pops out of the steering knuckle. This may take some bouncing on the pry bar, just be careful.
11. At this point you should be able to move the knuckle around until you can get the axle out of the steering knuckle, have a friend hold the one end that just came out of the knuckle and do not allow axel end to hit anything or hang.
12. Slide under car and pop axel out of transmission using a large flat blade screwdriver or other prying device. Do not allow this end to hang or knock into anything or get contaminated with dirt or grease. I would suggest wrapping a t-shirt around the axel stubs. Set axles aside as you will not be needing them for a while.
13. If you would like, you can now pop the ball joint back into the steering knuckle and loosely put the clevis bolt back in and put tires back on vehicle. This comes in handy if you are using a chain lift or will need to move car while the motor is out. Completely up to you. It will also allow you to drop the car back down and if you are short like me will be easier to reach things in the engine bay.
14. Remove hood. 4 bolts, 10mm this however is optional you can find other ways of keeping it out of the way, however I have seen some nasty pics of what the hood latch does to peoples heads.
15. Remove upper and lower radiator hoses. If your car is equipped with an auto transmission also disconnect the two coolant lines that lead to radiator.
16. Remove radiator fans.
17. Remove radiator. Set somewhere safe (Josh and I learned this the hard way, twice.)
18. Disconnect wires from starter.
19. Remove PCM. Set somewhere safe and away from immediate work area.
20. Follow PCM harness, you will fine two plugs a white and black one. One will lead to the motor the other to the front clip wiring harness, disconnect both at this time.
21. Disconnectshifter cables from transmission. Use two flat blade screwdrivers to carefully pry upward using equal amount of force on both sides. (DO NOT damage the bushings if you do not plan on replacing with either $140 dollar shifter cables or booger bushings)
then remove the 2 clips that hold down the shifter cables to the shifter cable bracket. Remove the Vehicle speed sensor located on the top back of the transmission near where the bobble bracket connects to the transmission.
22. Disconnect heater hoses. Some coolant will still remain.
23. Disconnect throttle body linkage. If you own an ATX then disconnect the auto-kick down cable at this time as well, along with the cruise control cable and servo.
24. Disconnect clutch cable if you own a manual transmission.
25. Disconnect vacuum hard-line from Throttle body that goes in between intake manifold and leads to evap purge solenoid. Remove evap purge solenoid as well at this time it is mounted on the passenger side motor mount. No need to remove hard-line now if you plan on reusing it, it may snap.
26. Remove hose leading from thermostat housing to over flow bottle.
27. Properly bleed fuel system, by removing gas cap and using a nail or screwdriver to push in shroder valve on fuel rail. Caution may squirt fuel, use towel or eye protection.
28. Remove fuel line from fuel rail and upper hard fuel line located on the firewall. Push in on white parts of clips and slide off.
29. Disconnect power steering reservoir from back of head.
30. Disconnect power steering pump from front of motor. Both the pump and reservoir can now be moved to back corner of engine bay hanging over passenger fender.
31. Disconnect exhaust manifold from exhaust at the collector/doughnut. If you own an aftermarket header any longer then the pacesetter you will want to remove it from the back of the head at this time.
32. Bolt chain to back of block.
33. Remove front motor mount and motor mount bracket from motor and radiator support for clearance.
34. If your car is equipped with A/C unbolt it and use a metal hanger to hang it from the lower radiator support. DO NOT let A/C pump hang from hoses.
35. Loop other side of motor chain threw middle two intake manifold runners and stick bolt threw chain.
36. Connect hoist to engine chain and slightly tighten.
37. Unbolt passenger side and transmission motor mount bolts. Also remove front motor mount bolt. The motor is now free, so be careful.
38. Carefully remove motor you will need to lower motor to clear the transmission mount bracket. Removing the transmission mount bracket from transmission will further help getting the motor out. Twist and tilt motor so that the transmission is facing down a bit to get it completely out.
39. Lower motor to the ground, allowing it to stand on the oil pan.
PARTS NEEDED FROM 2.0
Now that we have the motor out and sitting on the ground, we need a few parts off of it.
If you just pulled a 2.0 DOHC you will need to remove the:
1. Intake manifold
2. Exhaust manifold
3. Starter
4. Coolant hard lines
5. Wiring harness
6. Alternator
7. Thermostat housing
8. Knock sensor
If you just pulled a 2.0 SOHC you will need to remove the starter and alternator. (You can use the wiring harness but you will have to do further wiring mods to make it work.) Even if you do not plan on using the SOHC wiring harness I would suggest removing it, you may need the wiring plugs later in the swap.
REMOVAL OF TRANSMISSION FROM 2.0
Now that you have all the parts off the 2.0 that you will need It’s time to crack the transmission. Below is a list of how to remove the 3 different types of transmissions and what you will need from each.
REMEMBER YOU SHOULD ALWAYS USE A NEW CLUTCH WITH THIS SWAP DUE TO DIFFERENT POWER LEVELS IN THE TWO MOTORS.
MODULAR CLUTCH
If you have a modular clutch you will have to remove the inspection plate on the transmission to gain access to the 4 clutch to drive plate bolts (DO NOT DO NOT DO NOT LOSE THESE BOLTS) after removing all 4 remove all bolts holding the transmission to the motor and separate motor from transmission. You will further need the drive plate and drive plate bolts, and transmission shield, that is bolted to the block with one 10mm bolt.
NON-MODULAR CLUTCH
If you have the non-modular clutch just remove all the bolts holding the transmission to the block and separate. You then will have to remove the flexplate, clutch then the flywheel to gain access to the transmission shield.
AUTOMATIC TRANSMISSON
If you own an automatic transmission you will have to once again remove the inspection plate from the bottom of the transmission and remove the 4 torque converter to drive plate bolts. (DO NOT DO NOT DO NOT LOSE THESE BOLTS) After that remove the bolts that hold the transmission to the block and separate transmission from block. You will further need the drive plate and transmission shield.
Now would be the best time to get the 2.4 block on a motor stand.
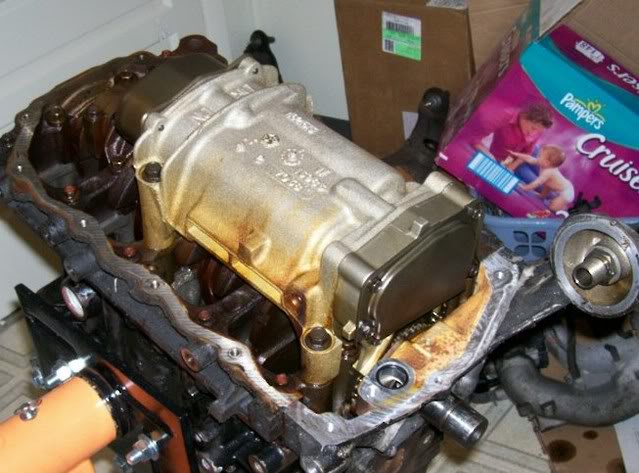
Also it would be a good time to completely strip the 2.4 down to the bear block.
YOU MUST ALSO REMOVE THE 2.4 HARMONIC BALANCER USING THE CORRECT 3 JAW PULLER.
REMOVING THE 2.4 BALANCE SHAFTS
let’s talk about the 2.4 balance shafts.
As with the Chrysler 2.0 the 2.4 is internally balanced meaning there is no need for a harmonic balancer or any other type of balancer. However Chrysler being the intorvators they are decided to put what they called balance shafts in the 2.4. I’m telling you now YOU DO NOT NEED THEM, and there robbing power from your new motor, due to parasitic loss. It’s your choice weather to remove them or not, however most that are serious and want some decent power remove them.
So you ask how I remove the 2.4’s balance shafts.
1. If you have the motor on a motor stand flip it around, oil pan up. If you do not have a motor stand you can get creative with the engine hoist. And do it from below.
2. Remove oil pan.
3. Remove oil pick up. DO NOT LOSE THE O-RING.
4. Start off buy cutting the chain, using what ever you have handy, I used a Dremal tool with a cut off wheel.
Now you have 2 options at this point. You can leave it how it is and you will regain the power lost by the chain slowing the crank down or if you’re serious about power you can do a few more steps and completely remove the balance shafts and lose some weight. HOWEVER YOU WILL HAVE TO SPEND 25 MORE CENTS AT ACE’S IF YOU DO DECIDE TO REMOVE THEM COMPLETELY. If you just want to regain the power and not remove them completely stop here.
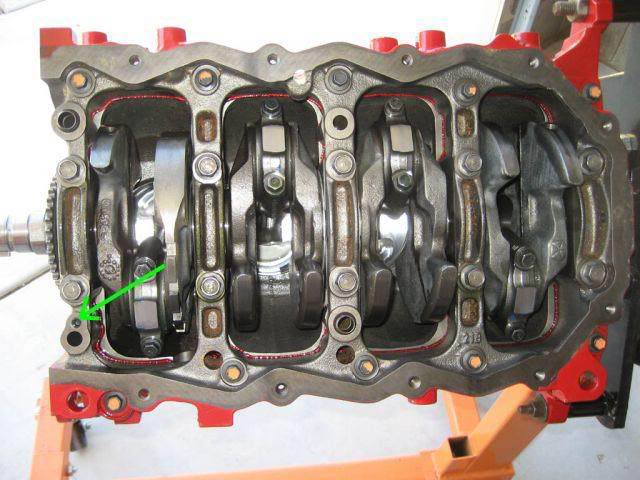
5. Remove the 4 bolts that hold the balance shafts in place there long, so just keep cranking they will come out. YOU DO NOT HAVE TO REPLACE THESE BOLTS AND ARE TO LONG IF YOU TRY.
6. Go to the hardware store and get a 1/4-20 set screw I used a 3/8 inch length.
7. See picture: where the red circle is use Allen wrench to slowly insert set screw.
NOTE: THIS HOLE IS NOT TAPPED, THE SET SCREW IS THE PERFECT SIZE TO TAP THIS HOLE. IT WILL TAKE SOME TIME AND A STEADY HAND. GO VERY SLOWLY AND IF IT SEEMS LIKE YOU CANT GET ANY FURTHER BACK OUT A HAIR AND TRY AGAIN, I HAD TO USE A LONG 6MM SOCKET TO HELP TURN THE ALLEN WRENCH TO KEEP IT GOING.
8. After getting setscrew in place remove and use pipe cleaner to reach up and remove any metal filings that may have came off.
9. Use plenty of red loc-tight to ensure set screw stays in place.
10. Replace oil pick up tube (don’t forget that o-ring)
11. Install new oil pan gasket or reuse if it looks good.
12. Re-install oil pan using correct torqeing procedure.
13. Flip motor back around. (Make sure you lock your stand in place if using a motor stand.
You have now removed the balance shafts have a beer.
INSTALLING CAMS, WATER PUMP, OIL PUMP, TIMING BELT AND TENTIONERS
You should at the very least install a new water pump, timing belt and timing belt tensioner. Remember to properly torque all bolts to there proper tension.
1. Start off by removing the timing belt cover.
2. IMPORTANT: ROTATE MOTOR TILL MOTOR IS IN TIME AND BOTH CRANK AND CAM TIMING MARKS LINE UP.
3. Take off timing belt by loosening tensioner wheel.
4. Remove idler pulley.
5. Remove cam pulleys.
6. Take back timing belt cover off.
7. Remove water pump and replace with new pump.
8. Remove timing belt tensioner and ideler pulley and replace with new one. ***Please note that you have options here, please see bottom information section for details***
9. Remove oil pump and replace with new.
***Please note that you have options here, please see bottom information section for details***
Ok while the timing belt is off you will now have to choose between 2.0 cams and the stock 2.4 cams.
2.4 cams are designed for low end torque... as are their intakes. The 2.0 cams edge out the 2.4 cams for power. If you have 2.0 cams, run them. They were only profiled like this to get the heavier mid-sized family cars like the stratus going. If you plan on swapping to 2.0 cams or any after market cams follow these instructions.
1. Take off valve cover. Go hose it off with degreaser if you like.
2. Useyour service manualto properly remove cam caps.
REMOVING THEM IN ANYOTHER ORDER COULD WARP CAMS AND CAM JOURNALS. TAKE NOTE OF ARROWS ON CAM CAPS AND LAY THEM ON A TOWEL IN ORDER AND FACING SAME DIRECTION THAT YOU TOOK THEM OUT TO INDEX HOW THEY GO BACK IN THE HEAD.
3. CAREFULLY LIFT CAMS STRAIGHT UP AND OUT OF THE HEAD.
4. Clean and inspect 2.0 cams use brake clean, and lint free cloth.
5. Using plenty of cam lube or new motor oil to lube all cam journals and lobes.
6. Install new cam bearings on to 2.0 cams.
7. Lower cams into place. BE VERY CAREFUL AND GENTAL. MAKE SURE TIMING HOLES FACE UP, THEY ARE ABOUT 6 INCHES AFTER THE CAM GEARS PAST THE FIRST SET OF LOBES.
8. Replace cam caps in proper direction and toruqeing sequence as you removed them.
9. Using black perminete marker, draw a line on from the top of the cam magnet the whole width of the cam magnet and then a bit on to the cam. This will be your reference point when you turn the cam magnet 90 degrees.
10. Remove the cam magnet.
11. Using a dremel with a cut off wheel, completely cut off the two locating nipples on the back of the cam magnet.
12. Put blue loc-tight on the cam magnet bolt.
13. Re-aline cam magnet using the lines that you drew in step 9.
14. Rotate cam magnet 90 degrees in a clockwise direction.
15. Tighten cam magnet bolt. Remember you are tightening plastic to metal. DO NOT OVER TIGHTEN, IT WILL SNAP THE MAGNET. Get it hand tight then another little turn to get it snug.
16. Re-install valve cover, preferably using new gasket.
IF YOU DID NOT USE THE 2.0 DOHC CAMS RESUME INSTRUTIONS HERE…
17. Re-install back timing belt cover.
18. Re-install cam gears.
19. Re-install new timing belt idler pulley.
20. Re-install timing belt. Follow these instructions. [align=left]
[/align][align=left]HOW TO TIME A 2.4[/align][align=left]NOTE THAT THIS TIMING PROCEEDURE DIRECTLY EXPLAINS HOW TO TIME A SRT MACHANICAL TENTIONER... WHICH SHOULD BE USED OVER THE HYDROLIC VERSION...
1. The crank pulley should already be at TDC from earlier.[/align][align=left]
2. The cam pulleys should be relatively close to in time from earlier but may need some moving around if you installed the 2.0 cams.[/align][align=left]
3. Set the exhaust cam pulley 1/2 notch before (down) timing mark on intake cam timing mark.[/align][align=left]
4. Install timing belt. Starting at the crankshaft, go around the water pump sprocket, idler pulley, camshaft sprockets and then around the tensioner. You may need to rotate the tensioner by turning the tensioner pulley clockwise until it moves over.[/align][align=left]
5. Move the exhaust camshaft sprocket counterclockwise to align marks and take up slack in the belt.[/align][align=left]
6. Insert a long 1/4’’ drive extension end into the square opening located in the middle of the belt tensioner pulley. Rotate the top plate of tensioner pulleyCOUNTERCLOCKWISE. The tensioner pulley will move against the belt and the tensioner setting notch will eventually start to move clockwise. Watching the movement of the setting notch, continue rotating the top plate counterclockwise until the setting notch is aligned with the spring tang. Using the 1/4’’ drive extension to prevent the top plate from moving, torque the tensioner lock bolt to 220 in.lbs. Setting notch and spring tang should remain aligned after lock bolt is torque.[/align][align=left]
7. Rotate crankshaft CLOCKWISE 2 complete rotations to verify timing. [/align][align=left][/align][align=left]IF YOU GO PAST THE CRANK TIMING MARKS THE SECOND TIME AROUND. DO NOT ROTATE CRANK COUNTER-CLOCKWISE. GO AROUND 2 MORE TIMES AND GO SLOW WHEN APROCHING TDC.
DO NOT EVER EVER EVER ROTATE THE MOTOR COUNTERCLOCKWISE IT WILL MAKE VERIFICATION OF TIMING IMPOSSIBLE.
8. Verify that the spring tang is within the little window. If so then the timing belt install is complete. If not you will have to repeat step 6-7 till correct.
9. Install outer timing belt cover.
Time to take the motor off the motor stand. You are now going to have to work on the motor while it is being supported by the motor hoist, so be careful.
[/align][align=left]TIME TO INSTALL THE TRANSMISSION
[/align][align=left]I will break this down into how to install each transmission.
It is also highly recommended to use a new clutch if possible.
NON-MODULAR CLUTCH
1. Install transmission plate.[/align][align=left]
2. Install flywheel to crank, use new bolts.[/align][align=left]
3. Using alignment tool align new clutch plate and flex plate and install bolts.[/align][align=left]
4. On the transmission side make sure you have cleaned the inside of the bell housing the best you can. Make sure to wipe off transfer shaft, fork, fork pivot point, and pivot point on fork.[/align][align=left]
5. With a clean hand, wipe a very minute amount of white lithium grease on transfer shaft of transmission, and pivot point.[/align][align=left]
6. Install new throw out bearing.[/align][align=left]
7. Position block low to ground and lift transmission into place. Replace top transmission bolts along with back bolts. The lower ones and front ones will come later.
MODULAR CLUTCH
1. Install transmission plate.[/align][align=left]
2. Install drive plate using plenty of blue loc-tight.[/align][align=left]
3. On the transmission side make sure you have cleaned the inside of the bell housing the best you can. Make sure to wipe off transfer shaft, fork, fork pivot point, and pivot point on fork.[/align][align=left]
4. With a clean hand, wipe a very minute amount of white lithium grease on transfer shaft of transmission, and pivot point.[/align][align=left]
5. Install new throw out bearing.[/align][align=left]
6. The drive plate will only line up one way find out what way it lines up and mark back of modular clutch and back of drive plate at one of the holes that line up.[/align][align=left]
7. Install new modular clutch into transmission, onto the transfer shaft.[/align][align=left]
8. Position block low to ground and lift transmission into place. Replace top transmission bolts along with back bolts. The lower ones and front ones will come later.[/align][align=left]
9. Having a friend turn motor over using crank. Line up the holes using the marks you made in step 6. Insert and hand tighten all four clutch to drive plate blots using plenty of blue loc-tight.[/align][align=left]
10. Tighten the absolute hell out of these four bolts using a criss cross pattern.
AUTOMATIC TRANSMISSION
1. Install transmission plate.[/align][align=left]
2. Install drive plate using plenty of blue loc-tight.[/align][align=left]
3. Install torque converter to drive plate. Tighten the absolute hell out of the four bolts using plenty of blue loc-tight.[/align][align=left]
4. Position block low to ground and lift transmission into place. Replace top transmission bolts along with back bolts. The lower ones and front ones will come later.
[/align][align=left][/align][align=left][/align][align=left]FRONT MOTOR MOUNT INSTALLATION AND MODIFICATION[/align][align=left]
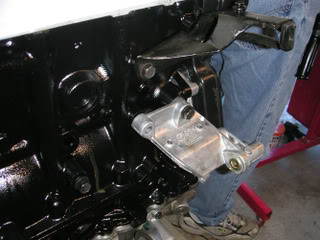
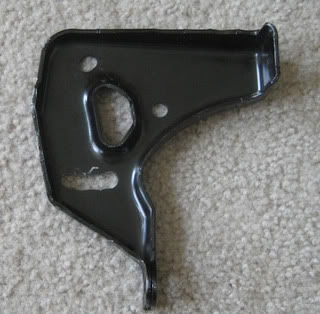
[/align][align=left]Ok the transmission is on now we have to take care of the front motor mount. [/align][align=left][/align][align=left]You will be using the 2.0 front motor mount bracket; however it will not work without some modification due to it hitting the 2.4’s oil pan. You will have to cut the front motor mount bracket as seen below for it to fit.

Ok now that the front motor mount is taken care of you can now install it along with the clutch inspection plate. Start all 4 bolts for the front motor mount, two in the block and two in the transmission. Tighten all 4 bolts down using blue loc-tight.
Ok now install the starter and that will be the last of the transmission bolts as well.
[/align][align=left][/align][align=left]INSTALLING ACCESSORIES[/align][align=left][/align][align=left]Now that all that fun is done, lets move on to getting the rest of the block ready.[/align][align=left]
1. Install PT alternator lower and upper alternator brackets. And install alternator just like the 2.0 mounts.
2. Install PT water outlet tube using proper O-Ring.[/align][align=left]
3. Install 2.0 knock sensor. There are two ways to do this. You can remove the 2.4 knock sensor and use that hole for the 2.0 knock sensor; this however will require you to cut the 2.0 intake manifold middle support bars to. Or you can remove the 2.4 knock sensor and install the 2.0 DOHC knock sensor right about where the 2.0 goes, you will have to lengthen the knock sensor wires on the harness but that’s easier then cutting those support braces.[/align][align=left]
4. Install cam position sensor plug facing down.[/align][align=left]
5. Install 2.0 DOHC coolant hard lines.[/align][align=left]
6. Install 2.0 DOHC intake manifold. Don’t forget to bolt the hard lines to the intake manifold, and to install your EGR block off plates.[/align][align=left]
7. Install 2.0 DOHC thermostat housing; make sure to use a new thermostat.[/align][align=left]
8. Install 2.4 side motor mount bracket.[/align][align=left]
9. Install 2.4 side motor mount adapter to 2.4 side motor mount bracket.[/align][align=left]
NOTE: That I have not installed the fuel rail and injectors yet, it will get in the way when you lift the motor back up.
[/align][align=left][/align][align=left]WIRING HARNESS[/align][align=left][/align][align=left]You can do the wiring harness many ways. Do the obvious ones first if you not familiar with how the wiring harness connects. If you run into problems with plugs not fitting you will have to go back to your old 2.0 motor and get the plugs that fit, make sure to clip them about 6 inches back on the 2.0, then cut the plug on the 2.4 wiring harness and SOLDER new plug into place, make sure to match wires up using the same color wires. And either shrink wrap or use electrical tape all soldered connections. IF YOU ARE NOT GOOD AT SOLDERING FIND SOMEONE THAT IS. [/align][align=left][/align][align=left]Below is instructions on how to do all wiring modifications for the 2.4 swap at the PCM plug. This only includes how to swap thecoil pack wires and injector wires.
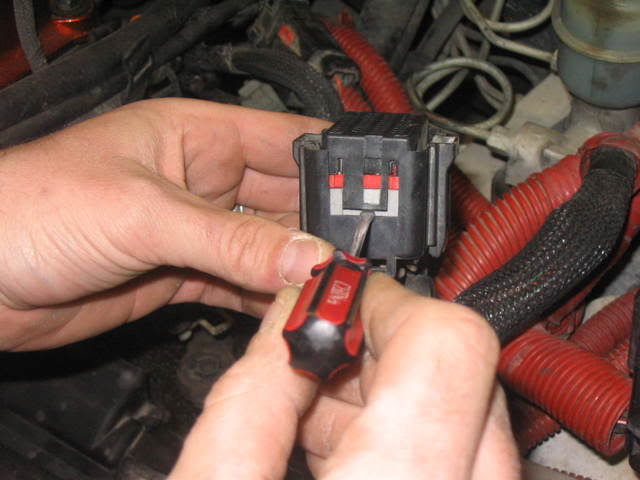
[/align][align=left][/align][align=left]1.Locatebig blackclip tha plugs into PCM it will look something like this.[/align][align=left][/align][align=left]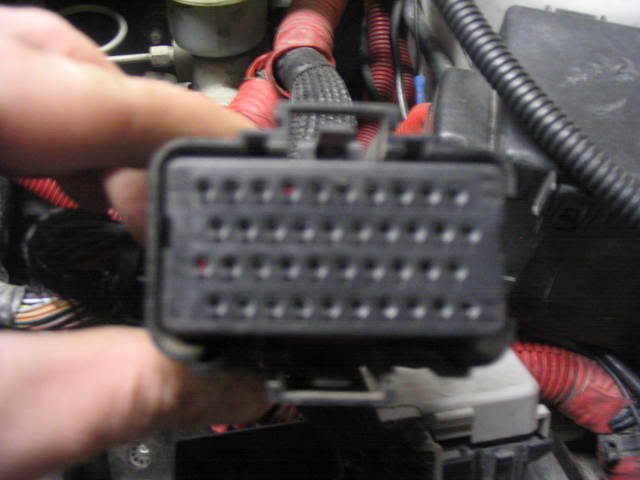 [/align]
2.Take small flat blade screwdriver and pry bottom pin protectorplate out and then up. Be careful not tosnap this just be gentle. The other side has the same clip and is not accesable, I had to play with it forbit to get the other side to come loose.
This is where you pry.
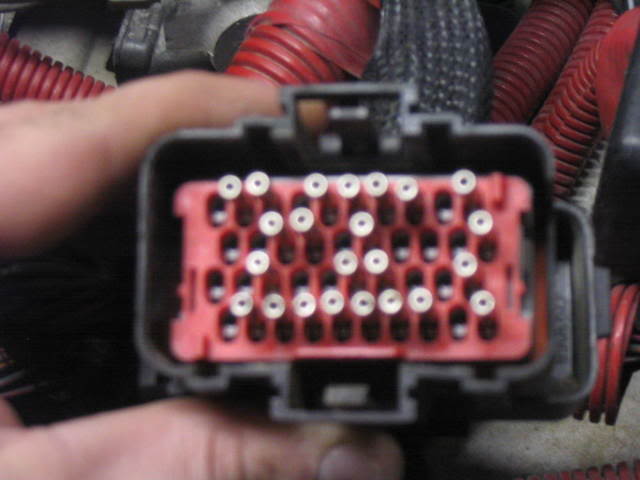
After you get the bottome plate off This is what it should look like.
3.Oknow look at thepicture below.
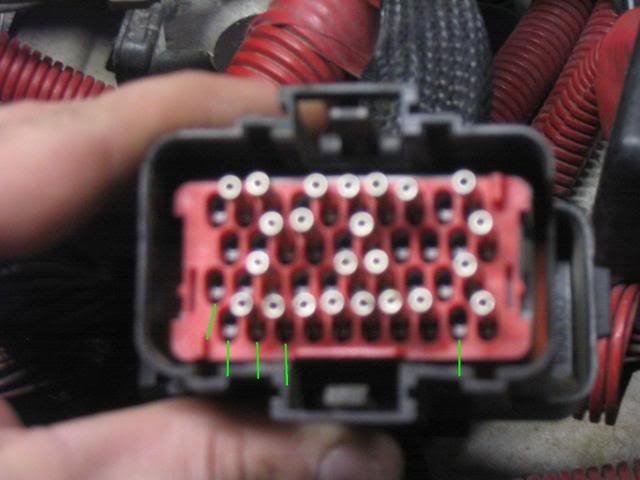
There are small silver tabs that hold each pin in place I have a green linepointing to some of these tabs each hole whether it has a pin or not.
Bytaking asmall screwdriver in one hand and gently pulling back you will be able to use another small screwdriver to push that pin down and out of the connector allowing it to be pushed back into the connector in a different location.
This picture shows you where each pin number is.
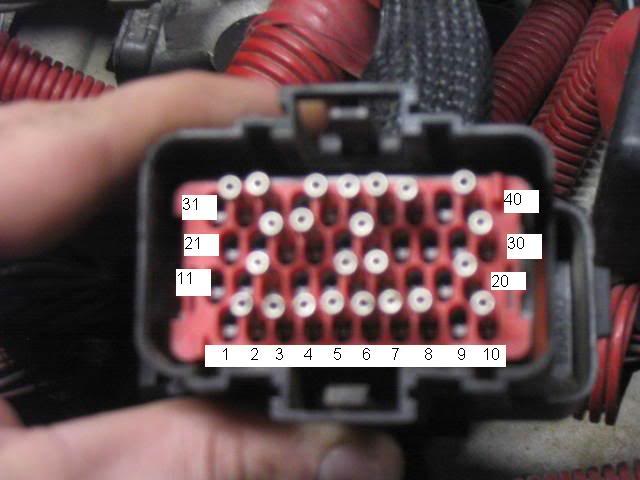
4. Now that you know how to remove the pins and where each pin is you are going to have to move some wires around.
Find pin 2 and 3
Pin 2should be Black and Grey
Pin 3 should be Dark Blue and Tan
Removeboth wires and switch them. Put pin 2 in pin 3's spot and pin 3 in pin 2's spot.
You just swaped the outer 2 coil pack wires.See its easy.
Nowlets take care of the fuel injector plugs.
It's going to get a little more confuesing but just dont read ahead and go slow. And do exactly as I say.
1.Move pin 7 to 16
2.Then take 16's original wire and move it to 13
3.Then take 13's original wire and move it to 17
4.Then take 17's original wire and move itto 7
So after your done.
Pin7 should be Tan
Pin 13 should be Light Blue/Brown
Pin 16 should be Yellow/White
Pin 17 should be White/Dark Blue
You justmovedall the injector plugs down one. It willnow appearstock up front. You now willNOT have to extend the injector plugs or move them down one. Just install the injector plugs where there supposed to normally.
INSTALLING 2.4 INTO CAR
[align=left]1. First we are going to have to do some things up in the engine bay. Start off by CLEANING YOUR DAMN ENGINE BAY! Make sure all lines like transmission shifter cables, throttle body linkage, power steering assembly and wiring are all out of the way.[/align][align=left]
2. Bolt chain to block low on the back of the block and threw the intake manifold like before this will allow you to tilt the block at the right angle to install motor, if you do not have a tilt box for your engine hoist.[/align][align=left]
3. Lift 2.4 in the air, high enough to clear the radiator support.[/align][align=left]
4. Tilt motor transmission side down.[/align][align=left]
5. Lower motor into engine bay
[/align][align=left][/align][align=left]BE CAREFUL OF HEATER LINES!!![/align][align=left]
[/align][align=left]6. Set motor all the way down on the ground.[/align][align=left]
7. For ease of install, install transmission mount that you took off transmission while taking 2.0 out into its place running bolt threw and getting it close to all the way threw, however do not tighten it all the way.[/align][align=left]
8. Lift motor off ground, lining up transmission to the transmission motor mount you just installed. And start the bolts that hold it in place, after getting all the bolts in tighten them all down. Now tighten transmission motor mount threw bolt.[/align][align=left]
9. Lift motor more until the new 2.0 to 2.4 side motor mount adapter is lined up with the passenger side motor mount. Slide new bolt that came with adapter, and fully tighten nut on back of new threw bolt.[/align][align=left]
10. Get front motor mount bolts started into the radiator support. Get the front motor mount threw bolt started and tightened down most the way. Tighten front motor mount bolts down now and then tighten the threw bolt.[/align][align=left]
11. Re-install bobble strut. If you had an automatic transmission you are doing a MTX swap also you will have to get a lower bobble bracket from a guy that makes one that bolts around the K-member you can email him at fattirebicycles@yahoo.com[/align][align=left]
12. Install exhaust manifold and reconnect exhaust, if using a different manifold modifications may have to be made to downpipe for it to work. [/align][align=left][/align][align=left]DO NOT RUN CAR LONGER THEN 30 SECONDS WITHOUT EXHAUST HOOKED UP TO MANIFOLD. YOU MAY BURN THE EXHUAST VALVES.[/align][align=left]
13. Install 24lb. injectors using small amount of Vaseline on injector o-rings OR 2 nd gen 58 psi fuel pressure regulator. [/align][align=left][/align][align=left]ONE OR THE OTHER NOT BOTH.[/align][align=left][/align][align=left]
14. Install fuel rail. And fuel line.[/align][align=left]
15. Install injector wiring harness.
16. Install coil pack. And connect wiring harness.[/align][align=left]
17. Install new spark plugs gapped to .035’’.[/align][align=left]
18. Install spark plug wires. Make sure to use DOHC spark plug wires as the SOHC plugs are different.[/align][align=left]
19. Install throttle body, and connect wiring harness.[/align][align=left]
20. Install clutch cable. Don’t forget the dust cover.[/align][align=left]
21. Install transmission shifter cables, or kickdown cable. Good time for some new booger bushings. Don't forget to reconnect the Vehicle speed sensor located at the back of the top of the tranny near where the bobble strut connects to the tranny.
[/align][align=left]
22. Install throttle body linkage.[/align][align=left]
23. Install heater hoses. Also reconnect brake booster vac line and evap vac line.[/align][align=left]
24. Install PCM.[/align][align=left]
25. Reconnect motor wiring harness to PCM. Don’t forget those two clips that go from the PCM wiring harness to the cabin wiring harness and motor wiring harness.[/align][align=left]
26. Install thermostat housing hose from thermostat housing to coolant overflow tank.[/align][align=left]
27. Install radiator.[/align][align=left]
28. Install lower and upper radiator hoses, you may need to cut about a half an inch off one of the hoses, however we did not have to. If you have a half radiator the hoses work fine. Also if you have Automatic transmission, do not forget to hook up the other two coolant lines.[/align][align=left]
29. Install A/C and all A/C lines.[/align][align=left]
30. Install under drive pulley.[/align]
POWER STEERING [align=left]
Ok now on to installing the power steering stuff. This is the most debated part of the swap and can be the hardest as well. [/align][align=left]You can:
[/align]
1. Use the PT power steering bracket; witch will bolt to the 2.4 just fine however the power steering pump will sit 1/2 inch in. You will have to make a spacer that will move the pump 1/2 inch, some people use washers some get spacers machined. Now the PT bracket will not allow for adjustment so you will have to slot the two mounting holes so you will have adjustment.
2001-2002 PT Crusier power steering bracket 4668468AA $7.09
Heres what it looks like after it has been slotted. And then pump installed to bracket.
[align=left]Note that the bottom pic is of a slotted srt-4 bracket with a power steering pump attached. The above pic is of a 01-02 PT bracket witch allows more room for adjustment. But you get the idea.[/align]
 [align=left]
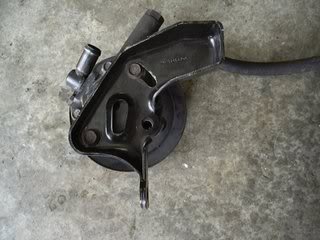 [/align]
2. Buy a kit from SuperD, which is custom made to work, however his kit is 250 bucks. But it comes with a custom side motor mount adapter, power steering bracket, ac bracket that has been modified, and a pre-cut front motor mount. You can reach him at Sperformance117@gmail.com[align=left][/align][font="calibri"][size="3"]3. ModernPerformance is also in the development stages of making a power steering bracket.
4. Some people make custom brackets like seen below.
[IMG]http://i265.photobucket.com/albums/ii218/earboy2003/24
Disclaimer: I will not be held responsible for any and all injury, death, break down, problem, or any action that may have caused engine failure due to following these steps.
First off I would like to say that this swap can be as easy or hard as you make it. Lets get real, pulling a motor is not fun, I recruited a friend to stand around just so I could cuss at him. If you do not have the tools to do the job don’t even think about it. There are a few tools that you will need that most people do not have. Also if you do not have a torque wrench, have no clue what a torque wrench is, or do not know how to use one. DO NOT DO THIS SWAP. Expect for this swap to take anywhere from 6 hours for the elite to 15+ hours for someone that has never done a swap before, however this is only if you have all your ducks in a row, expect a week or more if you don't. The swap took Josh and I about 20 hours. Expect to run into some problems, remember this motor was never designed to go into a Neon. Also expect to have some extra cash on hand if any problems do arise.
This is close to a step by step How to as I can make and is a work in process, I have pulled information from personal experience and many other sources on the internet including but not limited to the org, 1gn. com and most of all Russ AKA PurpleNeon on the org, he is a weath of info and knows more about the 2.4 swap then anyone I know. In all attempts I have tried to use my own words when describing something I have researched on. If for any reason a part is unclear or does not make sense please PM me and I will try to explain it and try to add it orword it in the how to.
With that said this How To: directly explains how to swap a Chrysler 2.4 N/A motor into a 95-99 Dodge/Plymouth Neon. Also please use fsm, chiltons, or other service manual for proper torqueing patterns and torque requirements.
I will include information and pricing sections at the bottom further explaining things like using SRT-4 internals and turboing a 2.4. At a later date.
PARTS LIST
For further explination of why you will be using these parts over others and information on each partplease read
Why dowe use ____ Part??? in the Information section.
1. 2.4 liter DOHC from a 1995 – 2002 Chrysler made vehicle.
2.2.0 Transmission from a Neon.
3. 2.0 DOHC intake manifold.
4. 2.0 DOHC Exhaust Manifold.
5. 2.0 DOHCCoolant hardlines.
6. 2.0 DOHC PCM
7. 2.0 DOHC wiring harness.
8. 2.0 Underdrive pulley.
9. PT Cruiser water outlet neck. And o-ring.
10. PT cruiser alternator brackets.
11. 2.4 Stratus motor mount.
12. 2.0 to 2.4 side motor mount adapter.
13. 24lbs injectors OR Second gen neon, 58psi fuel pressure regulator.
14. DOHC hood.
15. EGR block off kit.
16. 2.0 DOHC TPS and IAC solenoid.
OTHER THINGS YOU MAY WANT TO PICK UP.
New clutch
New thermostat
New timing belt
New timing belt tentioner and tentioner pulley
New oil pump. You can use the srt-4 pump witch flows more oil but you will also need the oil pan and oil pickup tube.
New water pump
Booger bushings
Motor mount inserts
Semi-solid – solid bobble strut
2001 - 2002 PT Cruiser Power Steering bracket.
2.0 DOHC cams.
2.0 REMOVAL
This section is included for beginers who have never removed a neon motor... I intend for this section to stay... otherwise it would be a 2.4 install how-to and not a 2.4 swap how-to. Removal is a part of the swap. Also I have writen this removal and how-to instructing people to remove the engine and transmission together. You can leave the transmission in the car however if you have a non-modular clutch and are using the stock 2.4 oiling system it is not advisable... I also wrote it this way for people to learn more about there cars, by removing everything up front the person will learn more about there car and how it is put together... If you feel like you can leave the transmission and just pull the motor, be my guest... But I still feel it to be adviseable to pull both.
1. Remove Battery, and battery tray. Should always be done first. Set PDC up and out of the way.
2. Jack car up and place on jack stands, does not have to be too high just high enough to get wheels off the ground. Remember to chuck rear wheels, and set e-brake.
3. Drain all fluids. IE… Oil, Coolant, and transmission oil. Remember to replace drain plugs and close drain **** on radiator. Please recycle used oil and fluids appropriately…
4. If your car is equipped with a bobble strut unbolt it from the K-Frame while you’re still under the car.
5. While fluids are draining, remove front wheels.
6. Remove cotter pin, along with nut cover, spring washer. (DO NOT reuse cotter pin.)
7. Have a buddy get into car and hold brakes while you use a 32mm Axel nut socket to remove the axle nut… This will have to be done with air tools or a breaker bar…
8. Remove clevis bolt from knuckle. This is annoying because one side is 15mm and the other is 18mm. Check for wear, if it shows any wear get rid of it.
9. Unbolt end of Tie-Rod from steering knuckle.
10. Insert long pry rod into k-frame and push down on the lower control arm until ball joint pops out of the steering knuckle. This may take some bouncing on the pry bar, just be careful.
11. At this point you should be able to move the knuckle around until you can get the axle out of the steering knuckle, have a friend hold the one end that just came out of the knuckle and do not allow axel end to hit anything or hang.
12. Slide under car and pop axel out of transmission using a large flat blade screwdriver or other prying device. Do not allow this end to hang or knock into anything or get contaminated with dirt or grease. I would suggest wrapping a t-shirt around the axel stubs. Set axles aside as you will not be needing them for a while.
13. If you would like, you can now pop the ball joint back into the steering knuckle and loosely put the clevis bolt back in and put tires back on vehicle. This comes in handy if you are using a chain lift or will need to move car while the motor is out. Completely up to you. It will also allow you to drop the car back down and if you are short like me will be easier to reach things in the engine bay.
14. Remove hood. 4 bolts, 10mm this however is optional you can find other ways of keeping it out of the way, however I have seen some nasty pics of what the hood latch does to peoples heads.
15. Remove upper and lower radiator hoses. If your car is equipped with an auto transmission also disconnect the two coolant lines that lead to radiator.
16. Remove radiator fans.
17. Remove radiator. Set somewhere safe (Josh and I learned this the hard way, twice.)
18. Disconnect wires from starter.
19. Remove PCM. Set somewhere safe and away from immediate work area.
20. Follow PCM harness, you will fine two plugs a white and black one. One will lead to the motor the other to the front clip wiring harness, disconnect both at this time.
21. Disconnectshifter cables from transmission. Use two flat blade screwdrivers to carefully pry upward using equal amount of force on both sides. (DO NOT damage the bushings if you do not plan on replacing with either $140 dollar shifter cables or booger bushings)
then remove the 2 clips that hold down the shifter cables to the shifter cable bracket. Remove the Vehicle speed sensor located on the top back of the transmission near where the bobble bracket connects to the transmission.
22. Disconnect heater hoses. Some coolant will still remain.
23. Disconnect throttle body linkage. If you own an ATX then disconnect the auto-kick down cable at this time as well, along with the cruise control cable and servo.
24. Disconnect clutch cable if you own a manual transmission.
25. Disconnect vacuum hard-line from Throttle body that goes in between intake manifold and leads to evap purge solenoid. Remove evap purge solenoid as well at this time it is mounted on the passenger side motor mount. No need to remove hard-line now if you plan on reusing it, it may snap.
26. Remove hose leading from thermostat housing to over flow bottle.
27. Properly bleed fuel system, by removing gas cap and using a nail or screwdriver to push in shroder valve on fuel rail. Caution may squirt fuel, use towel or eye protection.
28. Remove fuel line from fuel rail and upper hard fuel line located on the firewall. Push in on white parts of clips and slide off.
29. Disconnect power steering reservoir from back of head.
30. Disconnect power steering pump from front of motor. Both the pump and reservoir can now be moved to back corner of engine bay hanging over passenger fender.
31. Disconnect exhaust manifold from exhaust at the collector/doughnut. If you own an aftermarket header any longer then the pacesetter you will want to remove it from the back of the head at this time.
32. Bolt chain to back of block.
33. Remove front motor mount and motor mount bracket from motor and radiator support for clearance.
34. If your car is equipped with A/C unbolt it and use a metal hanger to hang it from the lower radiator support. DO NOT let A/C pump hang from hoses.
35. Loop other side of motor chain threw middle two intake manifold runners and stick bolt threw chain.
36. Connect hoist to engine chain and slightly tighten.
37. Unbolt passenger side and transmission motor mount bolts. Also remove front motor mount bolt. The motor is now free, so be careful.
38. Carefully remove motor you will need to lower motor to clear the transmission mount bracket. Removing the transmission mount bracket from transmission will further help getting the motor out. Twist and tilt motor so that the transmission is facing down a bit to get it completely out.
39. Lower motor to the ground, allowing it to stand on the oil pan.
PARTS NEEDED FROM 2.0
Now that we have the motor out and sitting on the ground, we need a few parts off of it.
If you just pulled a 2.0 DOHC you will need to remove the:
1. Intake manifold
2. Exhaust manifold
3. Starter
4. Coolant hard lines
5. Wiring harness
6. Alternator
7. Thermostat housing
8. Knock sensor
If you just pulled a 2.0 SOHC you will need to remove the starter and alternator. (You can use the wiring harness but you will have to do further wiring mods to make it work.) Even if you do not plan on using the SOHC wiring harness I would suggest removing it, you may need the wiring plugs later in the swap.
REMOVAL OF TRANSMISSION FROM 2.0
Now that you have all the parts off the 2.0 that you will need It’s time to crack the transmission. Below is a list of how to remove the 3 different types of transmissions and what you will need from each.
REMEMBER YOU SHOULD ALWAYS USE A NEW CLUTCH WITH THIS SWAP DUE TO DIFFERENT POWER LEVELS IN THE TWO MOTORS.
MODULAR CLUTCH
If you have a modular clutch you will have to remove the inspection plate on the transmission to gain access to the 4 clutch to drive plate bolts (DO NOT DO NOT DO NOT LOSE THESE BOLTS) after removing all 4 remove all bolts holding the transmission to the motor and separate motor from transmission. You will further need the drive plate and drive plate bolts, and transmission shield, that is bolted to the block with one 10mm bolt.
NON-MODULAR CLUTCH
If you have the non-modular clutch just remove all the bolts holding the transmission to the block and separate. You then will have to remove the flexplate, clutch then the flywheel to gain access to the transmission shield.
AUTOMATIC TRANSMISSON
If you own an automatic transmission you will have to once again remove the inspection plate from the bottom of the transmission and remove the 4 torque converter to drive plate bolts. (DO NOT DO NOT DO NOT LOSE THESE BOLTS) After that remove the bolts that hold the transmission to the block and separate transmission from block. You will further need the drive plate and transmission shield.
Now would be the best time to get the 2.4 block on a motor stand.
Also it would be a good time to completely strip the 2.4 down to the bear block.
YOU MUST ALSO REMOVE THE 2.4 HARMONIC BALANCER USING THE CORRECT 3 JAW PULLER.
REMOVING THE 2.4 BALANCE SHAFTS
let’s talk about the 2.4 balance shafts.
As with the Chrysler 2.0 the 2.4 is internally balanced meaning there is no need for a harmonic balancer or any other type of balancer. However Chrysler being the intorvators they are decided to put what they called balance shafts in the 2.4. I’m telling you now YOU DO NOT NEED THEM, and there robbing power from your new motor, due to parasitic loss. It’s your choice weather to remove them or not, however most that are serious and want some decent power remove them.
So you ask how I remove the 2.4’s balance shafts.
1. If you have the motor on a motor stand flip it around, oil pan up. If you do not have a motor stand you can get creative with the engine hoist. And do it from below.
2. Remove oil pan.
3. Remove oil pick up. DO NOT LOSE THE O-RING.
4. Start off buy cutting the chain, using what ever you have handy, I used a Dremal tool with a cut off wheel.
Now you have 2 options at this point. You can leave it how it is and you will regain the power lost by the chain slowing the crank down or if you’re serious about power you can do a few more steps and completely remove the balance shafts and lose some weight. HOWEVER YOU WILL HAVE TO SPEND 25 MORE CENTS AT ACE’S IF YOU DO DECIDE TO REMOVE THEM COMPLETELY. If you just want to regain the power and not remove them completely stop here.
5. Remove the 4 bolts that hold the balance shafts in place there long, so just keep cranking they will come out. YOU DO NOT HAVE TO REPLACE THESE BOLTS AND ARE TO LONG IF YOU TRY.
6. Go to the hardware store and get a 1/4-20 set screw I used a 3/8 inch length.
7. See picture: where the red circle is use Allen wrench to slowly insert set screw.
NOTE: THIS HOLE IS NOT TAPPED, THE SET SCREW IS THE PERFECT SIZE TO TAP THIS HOLE. IT WILL TAKE SOME TIME AND A STEADY HAND. GO VERY SLOWLY AND IF IT SEEMS LIKE YOU CANT GET ANY FURTHER BACK OUT A HAIR AND TRY AGAIN, I HAD TO USE A LONG 6MM SOCKET TO HELP TURN THE ALLEN WRENCH TO KEEP IT GOING.
8. After getting setscrew in place remove and use pipe cleaner to reach up and remove any metal filings that may have came off.
9. Use plenty of red loc-tight to ensure set screw stays in place.
10. Replace oil pick up tube (don’t forget that o-ring)
11. Install new oil pan gasket or reuse if it looks good.
12. Re-install oil pan using correct torqeing procedure.
13. Flip motor back around. (Make sure you lock your stand in place if using a motor stand.
You have now removed the balance shafts have a beer.
INSTALLING CAMS, WATER PUMP, OIL PUMP, TIMING BELT AND TENTIONERS
You should at the very least install a new water pump, timing belt and timing belt tensioner. Remember to properly torque all bolts to there proper tension.
1. Start off by removing the timing belt cover.
2. IMPORTANT: ROTATE MOTOR TILL MOTOR IS IN TIME AND BOTH CRANK AND CAM TIMING MARKS LINE UP.
3. Take off timing belt by loosening tensioner wheel.
4. Remove idler pulley.
5. Remove cam pulleys.
6. Take back timing belt cover off.
7. Remove water pump and replace with new pump.
8. Remove timing belt tensioner and ideler pulley and replace with new one. ***Please note that you have options here, please see bottom information section for details***
9. Remove oil pump and replace with new.
***Please note that you have options here, please see bottom information section for details***
Ok while the timing belt is off you will now have to choose between 2.0 cams and the stock 2.4 cams.
2.4 cams are designed for low end torque... as are their intakes. The 2.0 cams edge out the 2.4 cams for power. If you have 2.0 cams, run them. They were only profiled like this to get the heavier mid-sized family cars like the stratus going. If you plan on swapping to 2.0 cams or any after market cams follow these instructions.
1. Take off valve cover. Go hose it off with degreaser if you like.
2. Useyour service manualto properly remove cam caps.
REMOVING THEM IN ANYOTHER ORDER COULD WARP CAMS AND CAM JOURNALS. TAKE NOTE OF ARROWS ON CAM CAPS AND LAY THEM ON A TOWEL IN ORDER AND FACING SAME DIRECTION THAT YOU TOOK THEM OUT TO INDEX HOW THEY GO BACK IN THE HEAD.
3. CAREFULLY LIFT CAMS STRAIGHT UP AND OUT OF THE HEAD.
4. Clean and inspect 2.0 cams use brake clean, and lint free cloth.
5. Using plenty of cam lube or new motor oil to lube all cam journals and lobes.
6. Install new cam bearings on to 2.0 cams.
7. Lower cams into place. BE VERY CAREFUL AND GENTAL. MAKE SURE TIMING HOLES FACE UP, THEY ARE ABOUT 6 INCHES AFTER THE CAM GEARS PAST THE FIRST SET OF LOBES.
8. Replace cam caps in proper direction and toruqeing sequence as you removed them.
9. Using black perminete marker, draw a line on from the top of the cam magnet the whole width of the cam magnet and then a bit on to the cam. This will be your reference point when you turn the cam magnet 90 degrees.
10. Remove the cam magnet.
11. Using a dremel with a cut off wheel, completely cut off the two locating nipples on the back of the cam magnet.
12. Put blue loc-tight on the cam magnet bolt.
13. Re-aline cam magnet using the lines that you drew in step 9.
14. Rotate cam magnet 90 degrees in a clockwise direction.
15. Tighten cam magnet bolt. Remember you are tightening plastic to metal. DO NOT OVER TIGHTEN, IT WILL SNAP THE MAGNET. Get it hand tight then another little turn to get it snug.
16. Re-install valve cover, preferably using new gasket.
IF YOU DID NOT USE THE 2.0 DOHC CAMS RESUME INSTRUTIONS HERE…
17. Re-install back timing belt cover.
18. Re-install cam gears.
19. Re-install new timing belt idler pulley.
20. Re-install timing belt. Follow these instructions. [align=left]
[/align][align=left]HOW TO TIME A 2.4[/align][align=left]NOTE THAT THIS TIMING PROCEEDURE DIRECTLY EXPLAINS HOW TO TIME A SRT MACHANICAL TENTIONER... WHICH SHOULD BE USED OVER THE HYDROLIC VERSION...
1. The crank pulley should already be at TDC from earlier.[/align][align=left]
2. The cam pulleys should be relatively close to in time from earlier but may need some moving around if you installed the 2.0 cams.[/align][align=left]
3. Set the exhaust cam pulley 1/2 notch before (down) timing mark on intake cam timing mark.[/align][align=left]
4. Install timing belt. Starting at the crankshaft, go around the water pump sprocket, idler pulley, camshaft sprockets and then around the tensioner. You may need to rotate the tensioner by turning the tensioner pulley clockwise until it moves over.[/align][align=left]
5. Move the exhaust camshaft sprocket counterclockwise to align marks and take up slack in the belt.[/align][align=left]
6. Insert a long 1/4’’ drive extension end into the square opening located in the middle of the belt tensioner pulley. Rotate the top plate of tensioner pulleyCOUNTERCLOCKWISE. The tensioner pulley will move against the belt and the tensioner setting notch will eventually start to move clockwise. Watching the movement of the setting notch, continue rotating the top plate counterclockwise until the setting notch is aligned with the spring tang. Using the 1/4’’ drive extension to prevent the top plate from moving, torque the tensioner lock bolt to 220 in.lbs. Setting notch and spring tang should remain aligned after lock bolt is torque.[/align][align=left]
7. Rotate crankshaft CLOCKWISE 2 complete rotations to verify timing. [/align][align=left][/align][align=left]IF YOU GO PAST THE CRANK TIMING MARKS THE SECOND TIME AROUND. DO NOT ROTATE CRANK COUNTER-CLOCKWISE. GO AROUND 2 MORE TIMES AND GO SLOW WHEN APROCHING TDC.
DO NOT EVER EVER EVER ROTATE THE MOTOR COUNTERCLOCKWISE IT WILL MAKE VERIFICATION OF TIMING IMPOSSIBLE.
8. Verify that the spring tang is within the little window. If so then the timing belt install is complete. If not you will have to repeat step 6-7 till correct.
9. Install outer timing belt cover.
Time to take the motor off the motor stand. You are now going to have to work on the motor while it is being supported by the motor hoist, so be careful.
[/align][align=left]TIME TO INSTALL THE TRANSMISSION
[/align][align=left]I will break this down into how to install each transmission.
It is also highly recommended to use a new clutch if possible.
NON-MODULAR CLUTCH
1. Install transmission plate.[/align][align=left]
2. Install flywheel to crank, use new bolts.[/align][align=left]
3. Using alignment tool align new clutch plate and flex plate and install bolts.[/align][align=left]
4. On the transmission side make sure you have cleaned the inside of the bell housing the best you can. Make sure to wipe off transfer shaft, fork, fork pivot point, and pivot point on fork.[/align][align=left]
5. With a clean hand, wipe a very minute amount of white lithium grease on transfer shaft of transmission, and pivot point.[/align][align=left]
6. Install new throw out bearing.[/align][align=left]
7. Position block low to ground and lift transmission into place. Replace top transmission bolts along with back bolts. The lower ones and front ones will come later.
MODULAR CLUTCH
1. Install transmission plate.[/align][align=left]
2. Install drive plate using plenty of blue loc-tight.[/align][align=left]
3. On the transmission side make sure you have cleaned the inside of the bell housing the best you can. Make sure to wipe off transfer shaft, fork, fork pivot point, and pivot point on fork.[/align][align=left]
4. With a clean hand, wipe a very minute amount of white lithium grease on transfer shaft of transmission, and pivot point.[/align][align=left]
5. Install new throw out bearing.[/align][align=left]
6. The drive plate will only line up one way find out what way it lines up and mark back of modular clutch and back of drive plate at one of the holes that line up.[/align][align=left]
7. Install new modular clutch into transmission, onto the transfer shaft.[/align][align=left]
8. Position block low to ground and lift transmission into place. Replace top transmission bolts along with back bolts. The lower ones and front ones will come later.[/align][align=left]
9. Having a friend turn motor over using crank. Line up the holes using the marks you made in step 6. Insert and hand tighten all four clutch to drive plate blots using plenty of blue loc-tight.[/align][align=left]
10. Tighten the absolute hell out of these four bolts using a criss cross pattern.
AUTOMATIC TRANSMISSION
1. Install transmission plate.[/align][align=left]
2. Install drive plate using plenty of blue loc-tight.[/align][align=left]
3. Install torque converter to drive plate. Tighten the absolute hell out of the four bolts using plenty of blue loc-tight.[/align][align=left]
4. Position block low to ground and lift transmission into place. Replace top transmission bolts along with back bolts. The lower ones and front ones will come later.
[/align][align=left][/align][align=left][/align][align=left]FRONT MOTOR MOUNT INSTALLATION AND MODIFICATION[/align][align=left]
[/align][align=left]Ok the transmission is on now we have to take care of the front motor mount. [/align][align=left][/align][align=left]You will be using the 2.0 front motor mount bracket; however it will not work without some modification due to it hitting the 2.4’s oil pan. You will have to cut the front motor mount bracket as seen below for it to fit.
Ok now that the front motor mount is taken care of you can now install it along with the clutch inspection plate. Start all 4 bolts for the front motor mount, two in the block and two in the transmission. Tighten all 4 bolts down using blue loc-tight.
Ok now install the starter and that will be the last of the transmission bolts as well.
[/align][align=left][/align][align=left]INSTALLING ACCESSORIES[/align][align=left][/align][align=left]Now that all that fun is done, lets move on to getting the rest of the block ready.[/align][align=left]
1. Install PT alternator lower and upper alternator brackets. And install alternator just like the 2.0 mounts.
2. Install PT water outlet tube using proper O-Ring.[/align][align=left]
3. Install 2.0 knock sensor. There are two ways to do this. You can remove the 2.4 knock sensor and use that hole for the 2.0 knock sensor; this however will require you to cut the 2.0 intake manifold middle support bars to. Or you can remove the 2.4 knock sensor and install the 2.0 DOHC knock sensor right about where the 2.0 goes, you will have to lengthen the knock sensor wires on the harness but that’s easier then cutting those support braces.[/align][align=left]
4. Install cam position sensor plug facing down.[/align][align=left]
5. Install 2.0 DOHC coolant hard lines.[/align][align=left]
6. Install 2.0 DOHC intake manifold. Don’t forget to bolt the hard lines to the intake manifold, and to install your EGR block off plates.[/align][align=left]
7. Install 2.0 DOHC thermostat housing; make sure to use a new thermostat.[/align][align=left]
8. Install 2.4 side motor mount bracket.[/align][align=left]
9. Install 2.4 side motor mount adapter to 2.4 side motor mount bracket.[/align][align=left]
NOTE: That I have not installed the fuel rail and injectors yet, it will get in the way when you lift the motor back up.
[/align][align=left][/align][align=left]WIRING HARNESS[/align][align=left][/align][align=left]You can do the wiring harness many ways. Do the obvious ones first if you not familiar with how the wiring harness connects. If you run into problems with plugs not fitting you will have to go back to your old 2.0 motor and get the plugs that fit, make sure to clip them about 6 inches back on the 2.0, then cut the plug on the 2.4 wiring harness and SOLDER new plug into place, make sure to match wires up using the same color wires. And either shrink wrap or use electrical tape all soldered connections. IF YOU ARE NOT GOOD AT SOLDERING FIND SOMEONE THAT IS. [/align][align=left][/align][align=left]Below is instructions on how to do all wiring modifications for the 2.4 swap at the PCM plug. This only includes how to swap thecoil pack wires and injector wires.
[/align][align=left][/align][align=left]1.Locatebig blackclip tha plugs into PCM it will look something like this.[/align][align=left][/align][align=left]
[/align]2.Take small flat blade screwdriver and pry bottom pin protectorplate out and then up. Be careful not tosnap this just be gentle. The other side has the same clip and is not accesable, I had to play with it forbit to get the other side to come loose.
This is where you pry.
After you get the bottome plate off This is what it should look like.
3.Oknow look at thepicture below.
There are small silver tabs that hold each pin in place I have a green linepointing to some of these tabs each hole whether it has a pin or not.
Bytaking asmall screwdriver in one hand and gently pulling back you will be able to use another small screwdriver to push that pin down and out of the connector allowing it to be pushed back into the connector in a different location.
This picture shows you where each pin number is.
4. Now that you know how to remove the pins and where each pin is you are going to have to move some wires around.
Find pin 2 and 3
Pin 2should be Black and Grey
Pin 3 should be Dark Blue and Tan
Removeboth wires and switch them. Put pin 2 in pin 3's spot and pin 3 in pin 2's spot.
You just swaped the outer 2 coil pack wires.See its easy.
Nowlets take care of the fuel injector plugs.
It's going to get a little more confuesing but just dont read ahead and go slow. And do exactly as I say.
1.Move pin 7 to 16
2.Then take 16's original wire and move it to 13
3.Then take 13's original wire and move it to 17
4.Then take 17's original wire and move itto 7
So after your done.
Pin7 should be Tan
Pin 13 should be Light Blue/Brown
Pin 16 should be Yellow/White
Pin 17 should be White/Dark Blue
You justmovedall the injector plugs down one. It willnow appearstock up front. You now willNOT have to extend the injector plugs or move them down one. Just install the injector plugs where there supposed to normally.
INSTALLING 2.4 INTO CAR
[align=left]1. First we are going to have to do some things up in the engine bay. Start off by CLEANING YOUR DAMN ENGINE BAY! Make sure all lines like transmission shifter cables, throttle body linkage, power steering assembly and wiring are all out of the way.[/align][align=left]
2. Bolt chain to block low on the back of the block and threw the intake manifold like before this will allow you to tilt the block at the right angle to install motor, if you do not have a tilt box for your engine hoist.[/align][align=left]
3. Lift 2.4 in the air, high enough to clear the radiator support.[/align][align=left]
4. Tilt motor transmission side down.[/align][align=left]
5. Lower motor into engine bay
[/align][align=left][/align][align=left]BE CAREFUL OF HEATER LINES!!![/align][align=left]
[/align][align=left]6. Set motor all the way down on the ground.[/align][align=left]
7. For ease of install, install transmission mount that you took off transmission while taking 2.0 out into its place running bolt threw and getting it close to all the way threw, however do not tighten it all the way.[/align][align=left]
8. Lift motor off ground, lining up transmission to the transmission motor mount you just installed. And start the bolts that hold it in place, after getting all the bolts in tighten them all down. Now tighten transmission motor mount threw bolt.[/align][align=left]
9. Lift motor more until the new 2.0 to 2.4 side motor mount adapter is lined up with the passenger side motor mount. Slide new bolt that came with adapter, and fully tighten nut on back of new threw bolt.[/align][align=left]
10. Get front motor mount bolts started into the radiator support. Get the front motor mount threw bolt started and tightened down most the way. Tighten front motor mount bolts down now and then tighten the threw bolt.[/align][align=left]
11. Re-install bobble strut. If you had an automatic transmission you are doing a MTX swap also you will have to get a lower bobble bracket from a guy that makes one that bolts around the K-member you can email him at fattirebicycles@yahoo.com[/align][align=left]
12. Install exhaust manifold and reconnect exhaust, if using a different manifold modifications may have to be made to downpipe for it to work. [/align][align=left][/align][align=left]DO NOT RUN CAR LONGER THEN 30 SECONDS WITHOUT EXHAUST HOOKED UP TO MANIFOLD. YOU MAY BURN THE EXHUAST VALVES.[/align][align=left]
13. Install 24lb. injectors using small amount of Vaseline on injector o-rings OR 2 nd gen 58 psi fuel pressure regulator. [/align][align=left][/align][align=left]ONE OR THE OTHER NOT BOTH.[/align][align=left][/align][align=left]
14. Install fuel rail. And fuel line.[/align][align=left]
15. Install injector wiring harness.
16. Install coil pack. And connect wiring harness.[/align][align=left]
17. Install new spark plugs gapped to .035’’.[/align][align=left]
18. Install spark plug wires. Make sure to use DOHC spark plug wires as the SOHC plugs are different.[/align][align=left]
19. Install throttle body, and connect wiring harness.[/align][align=left]
20. Install clutch cable. Don’t forget the dust cover.[/align][align=left]
21. Install transmission shifter cables, or kickdown cable. Good time for some new booger bushings. Don't forget to reconnect the Vehicle speed sensor located at the back of the top of the tranny near where the bobble strut connects to the tranny.
[/align][align=left]
22. Install throttle body linkage.[/align][align=left]
23. Install heater hoses. Also reconnect brake booster vac line and evap vac line.[/align][align=left]
24. Install PCM.[/align][align=left]
25. Reconnect motor wiring harness to PCM. Don’t forget those two clips that go from the PCM wiring harness to the cabin wiring harness and motor wiring harness.[/align][align=left]
26. Install thermostat housing hose from thermostat housing to coolant overflow tank.[/align][align=left]
27. Install radiator.[/align][align=left]
28. Install lower and upper radiator hoses, you may need to cut about a half an inch off one of the hoses, however we did not have to. If you have a half radiator the hoses work fine. Also if you have Automatic transmission, do not forget to hook up the other two coolant lines.[/align][align=left]
29. Install A/C and all A/C lines.[/align][align=left]
30. Install under drive pulley.[/align]
POWER STEERING [align=left]
Ok now on to installing the power steering stuff. This is the most debated part of the swap and can be the hardest as well. [/align][align=left]You can:
[/align]
1. Use the PT power steering bracket; witch will bolt to the 2.4 just fine however the power steering pump will sit 1/2 inch in. You will have to make a spacer that will move the pump 1/2 inch, some people use washers some get spacers machined. Now the PT bracket will not allow for adjustment so you will have to slot the two mounting holes so you will have adjustment.
2001-2002 PT Crusier power steering bracket 4668468AA $7.09
Heres what it looks like after it has been slotted. And then pump installed to bracket.
[align=left]Note that the bottom pic is of a slotted srt-4 bracket with a power steering pump attached. The above pic is of a 01-02 PT bracket witch allows more room for adjustment. But you get the idea.[/align]
[align=left][/align] 2. Buy a kit from SuperD, which is custom made to work, however his kit is 250 bucks. But it comes with a custom side motor mount adapter, power steering bracket, ac bracket that has been modified, and a pre-cut front motor mount. You can reach him at Sperformance117@gmail.com[align=left][/align][font="calibri"][size="3"]3. ModernPerformance is also in the development stages of making a power steering bracket.
4. Some people make custom brackets like seen below.
[IMG]http://i265.photobucket.com/albums/ii218/earboy2003/24
#3
04-27-2008, 02:49 AM
Join Date: Apr 2007
Location:
Posts: 1,885
Likes: 0
Received 0 Likes
on
0 Posts
#4
04-27-2008, 02:59 AM

Record Breaker
Join Date: Apr 2007
Location: Sand Springs Oklahoma
Posts: 1,619
Likes: 0
Received 0 Likes
on
0 Posts
#5
04-28-2008, 07:18 PM


#7
04-29-2008, 12:40 AM

Record Breaker
Join Date: Mar 2008
Location: Erlanger, Kentucky
Posts: 1,539
Likes: 0
Received 0 Likes
on
0 Posts
Trending Topics
#8
04-29-2008, 09:40 PM

Record Breaker
Join Date: Dec 2006
Location: Baltimore, Maryland
Posts: 1,216
Likes: 0
Received 0 Likes
on
0 Posts
#9
05-22-2008, 02:18 PM

Join Date: Mar 2008
Location: Kahzakstan
Posts: 396
Likes: 0
Received 0 Likes
on
0 Posts
I must say that on my atx sohc when I pulled the motor out I took it out from the top with my dads Cherry Picker, it took me2 and a halfhours to take the intake manifold off,disconnect all the sensors and harnesses,remove starter and remove all mount and bolts to the motor including torque converter bolts and I had the motor out and swinging on the cherry picker. also while waiting for my radiator to drain I worked on my 95 motor that I am swapping in, Iremoved the torque converter,removed the pully and water pump got it all ready to go in before my old motor was even out.
I really do not see the bennifit of taking the transmission out with the motor as I would have to remove transmission mount bolts, k frame,cv-joints (axles) and steering rods and tires. Thats an added 2 hours onto what I've allready done.
I really really don't see a reason why anyone who is remotly familiar with a Neon would go this route pulling everything off the front end of the car when it is so much faster and easier to leave the transmission and axles in the car. Jeremy and Boxer were both working on this car so how the hell did they spend 15-20 hours pulling the motor? I did it while talking to friends and taking breaks to go look at houses with my wife. I'm not saying I'm fast because I'm not I was taking my time and if I can do it then I think 99% of everybody who knows how to turn a wrench can do it.
I respect Jeremy and Boxer alot but I feel pulling the transmission and motor out the bottum of the car is an exagerated witch hunt which could lead to many hours of nearly killing the person who is holding the light for you out of frustration and just alot of work that doesn't need to be done.
If you had to take everything off the car in the front no wonder it took 15 hours+.
#10
05-22-2008, 03:18 PM
Join Date: Apr 2007
Location:
Posts: 1,885
Likes: 0
Received 0 Likes
on
0 Posts
Ok I dont know where you got that you have to drop it out the bottom... or that you have to remove the k-frame or any of that junk... Simply put try taking just the block out with a non-modular clutch, its a difficult task... now try putting a 2.4 with the oiling system that is compleatly different and makes getting the block in there even more of a chore... And on top of things if you do have a non-modular clutch you would damage the hell out of the clutch trying to butt the block up againsts it with the motor swinging around and you trying to line up the transfer shaft of the transmission with the clutch... Good luck with that...
basicly due to the oiling system that the 2.4 has stock, baring the srt oiling system, it makes the process more difficult then its worth... if you have a modular clutch its a compleatly different story... but if your a beginer it's just easyer and you learn more about your car by just dropping both... it also gives you a chance to clean everything in the engine bay... if you are experianced enuf to pull just the block and leave the transmission then be my guest... this how to is mostly for the guys who have never done a swap in there life... if it wasent i wouldent have even included the removal of the motor part...
basicly due to the oiling system that the 2.4 has stock, baring the srt oiling system, it makes the process more difficult then its worth... if you have a modular clutch its a compleatly different story... but if your a beginer it's just easyer and you learn more about your car by just dropping both... it also gives you a chance to clean everything in the engine bay... if you are experianced enuf to pull just the block and leave the transmission then be my guest... this how to is mostly for the guys who have never done a swap in there life... if it wasent i wouldent have even included the removal of the motor part...