
46rh to NV3500 Swap (5.2L 4x4)
#1
 03-03-2009, 07:54 PM

I picked up the NV3500 transmission, transfer case, brake/clutch pedal assembly, master/slave cylinders and lines, flywheel, clutch, and interior trim piece from a guy on my local craigslist for $450. It came out of a 1996 Dakota with 92,xxx miles on it that was totaled.
To start the swap, I pulled the seats, center console, and 4x4 lever trim peice out of the truck to make room to work.


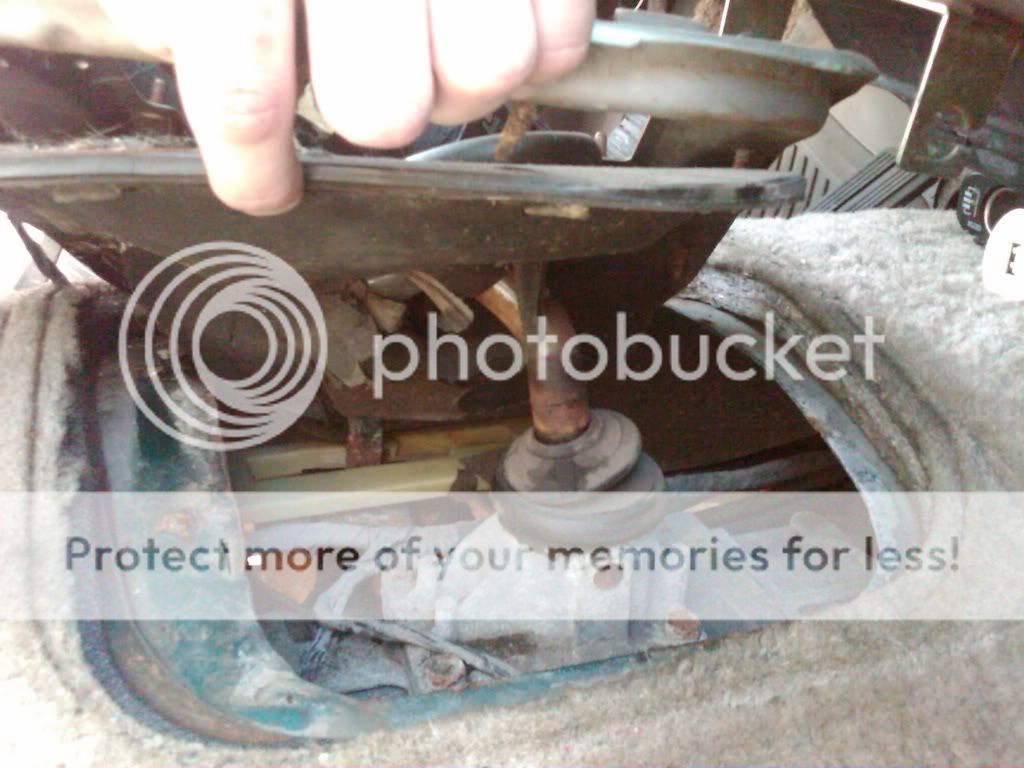
Next (and this is where you get to learn from my mistake), I layed out the new shifter plate to mark the hole to cut in the floor pan for the trans shifter.


Unfortunatley I picked the wrong piece to mark the hole and ended up cutting out too big a hole. Luckily I have a mig welder, which fixed the problem the best I could.

(I'm not the best welder, but I'm learning... and if you look close at the bottom right corner, I may have kind of sorta caught the carpet on fire)
Anyone trying this swap in the future should use the rubber part of the trim pieces to mark the hole (its just a simple round hole... mine won't ever be quite right, but nobody will ever see it)
...This is as far as I got today. Tomorrow I'm gonna swap the pedals out and pull the automatic transmission out. I'll keep this post updated each day until I finish.
***EDIT***
Since the swap, I have found out that the factory hole in the floorpan looks like this (so basically, my first hole before I welded it up would have worked out fine)...
I'm going to keep mine exactly how it is now cause it works for me, this is more of an FYI.
To start the swap, I pulled the seats, center console, and 4x4 lever trim peice out of the truck to make room to work.
Next (and this is where you get to learn from my mistake), I layed out the new shifter plate to mark the hole to cut in the floor pan for the trans shifter.
Unfortunatley I picked the wrong piece to mark the hole and ended up cutting out too big a hole. Luckily I have a mig welder, which fixed the problem the best I could.
(I'm not the best welder, but I'm learning... and if you look close at the bottom right corner, I may have kind of sorta caught the carpet on fire)
Anyone trying this swap in the future should use the rubber part of the trim pieces to mark the hole (its just a simple round hole... mine won't ever be quite right, but nobody will ever see it)
...This is as far as I got today. Tomorrow I'm gonna swap the pedals out and pull the automatic transmission out. I'll keep this post updated each day until I finish.
***EDIT***
Since the swap, I have found out that the factory hole in the floorpan looks like this (so basically, my first hole before I welded it up would have worked out fine)...
I'm going to keep mine exactly how it is now cause it works for me, this is more of an FYI.
Last edited by 95_318SLT; 05-15-2010 at 05:53 PM.
#2
03-04-2009, 07:40 PM
Today I did the pedal swap. It was straight forward and easy, but rather time consuming (maybe just cause I took so many pictures though :P)
I started by taking apart the dash until I completely unblocked the pedals. It may not have been neccessary, but it sure gave me more room to work.
Dashtornapart.jpg?t=1236212795
Next, I removed the old brake pedal. All you have to do is unclip it from the brake master cylinder and pull the top bolt out that it pivots on.
PedalAssemblyBefore.jpg?t=1236212764
BrakePedalRemoved.jpg?t=1236212847
Old brake pedal next to new brake pedal...
newbrakepedal.jpg?t=1236212867
Next, I located the hole that the clutch master cylinder needs to go through. This hole already exists, there is a large rubber grommet filling it in. (I had used that grommet to run the power wire for my amplifier as you can see in the picture, I guess now I'll need to come up with another way to route the wire.)
Holeformastercyl.jpg?t=1236212934
After unplugging the hole, I took the front left tire off and pulled back the splash shield to access the hole from the other side.
mastercylaccess.jpg?t=1236213124
Next, I mounted the clutch master cylinder mount plate on the side of the pedal mount, again the holes already existed, it was just a matter of bolting it on. Then I slid the master cylinder into place from the outside, and then gave it a quarter turn to secure it in the mount.
slidingmastercylintohole2.jpg?t=1236213193
Once secured, I pushed the rubber grommet on the master cylinder into place.
slidingmastercylintohole.jpg?t=1236213321
Next, I hooked up the reservior to the master cylinder. I have yet to secure it to the firewall, but it is in place. I plan on using a couple self tapping screw to secure it down.
mastercylinstalled.jpg?t=1236213425
(As you can see above, I took the hydraulic lines off the master cylinder to make installation easier... DONT DO THIS!!! The hydraulics are not designed to be serviceable and bleeding it was a PITA)
reservoir.jpg?t=1236213440
Finally, I hung the pedals and connected them to the 2 master cylinders. The wire harness is also there to plug in the safety switch that only lets you crank the engine with the clutch pedal is depressed (Its the green harness 4 pictures up in the upper left corner or you can kind of see part of it in the picture below on the far left side). I tested it after installing the pedals and it works.
newpedalsinstalled2.jpg?t=1236213525
newpedalsinstalled.jpg?t=1236213541
**EDIT**
Since this write up I have found out that that the reason the cruise control didn't work after the swap was because I grounded the P/N switch so the engine could start (this is discussed later in the thread). Since the P/N switch was grounded, the computer thought the truck was always in park or neutral, so it wouldn't activate the cruise control!! So what I did to fix this is I plugged the clutch saftey harness back into the bypass it was originally plugged into, and I rerouted the P/N switch wire to to the clutch pedal's safety switch that is now unplugged. I ran the wire into one pin on the harness and grounded the other pin. This now tells the computer the truck is in park/neutral when the clutch is depressed, and when it is no longer depressed, the computer thinks its in gear! Also, to plug it into the harness, I found another harness from a donor truck and spliced the wires into it. Here are some pics:
DSCN0527.jpg?t=1258937272
DSCN0526.jpg?t=1258937328
DSCN0525.jpg?t=1258937347
********
Tommorrow I'll tackle the transmission swap and then its just a matter of hooking up the hydraulic lines, bleeding the clutch, and putting the truck back together.
Last edited by 95_318SLT; 05-15-2010 at 05:52 PM.
#3
03-05-2009, 07:33 PM
So I started the transmission swap today. The 46rh is out of the truck but I ran into a number of problems that prevented me from installing the NV3500 today. Unfortunatley I have no pictures of todays progress because when my trans cooling hose broke it soaked the whole underside of the truck in 5 quarts of ATF and I stayed covered in it and did not want to ruin my camera. But here is what I accomplished today...
I started by removing the front and rear driveshafts, and then unbolted and removed the transfer case. Next, to access the transmission to engine block bolts, I removed both front wheels and inner fender wells. This also gave me access to remove the Y-pipe. Next I removed the Y-pipe, unbolted the transmission from the engine, and put a jack under the transmission pan. Next I unbolted the transmission to crossmember nuts and jacked the transmission up a couple inches. Then I unbolted the crossmember from the frame and slid it back as far as it could go (until it hit the torsion bar crossmember). Next I lowered the transmission enough to reach all the wiring harnesses/trans cooler lines/shifter linkage and finished dropping the transmission out.
After the transmission is out, you can remove everything that the manual does not need... the cooler lines can go, the TV cable can go, and the harness for the overdrive/torque converter lockup solenoid can go.
That was all of the easy parts... now is where the problems start...
First, (and I should have thought of this beforehand) the NV3500 is about 7 inches shorter than the 46rh, so the driveshafts won't work. (I'm going to have a custom one made at a local shop cause none of the local junkyards had the length I need)
Second, the automatic's flexplate requires different length crankshaft mounting bolts and a different crankshaft position sensor than the manual's flywheel. Any autoparts store or hardware store will stock the necessary bolts, just match the flexplate bolt's thread pattern and get 1 inch long bolts instead of the 1/2 inch bolts in the flexplate.
The next setback was not really a problem, but it put my work to a finish for the day. I had to get the flywheel resurfaced and by the time I got it back and figured out it wouldnt work with the crankshaft position sensor it was getting dark and cold. Tomorrow I will try to get some pictures going again and get the swap finished.
Last edited by 95_318SLT; 05-15-2010 at 05:52 PM.
#4
03-06-2009, 12:58 PM
Well today showed no progress. I'll add one more thing to my list of problems from yesterday... Anyone attempting this swap in the future needs to get the pilot bearing sleeve that fits the pilot bearing into the crankshaft. I have to wait til tomorrow afternoon to finish cause the local part stores don't stock it.
**Edit** I found one more interested fact today... The transfer cases for the manual and automatics are not directly swappable. The input shafts are different lengths. This didn't turn out to be a problem cause the NV3500 I bought came with one, but I thought I'd share that as a neccessary thing to look into if anyone decides to tackle this swap.
**Edit** I found one more interested fact today... The transfer cases for the manual and automatics are not directly swappable. The input shafts are different lengths. This didn't turn out to be a problem cause the NV3500 I bought came with one, but I thought I'd share that as a neccessary thing to look into if anyone decides to tackle this swap.
Last edited by 95_318SLT; 05-15-2010 at 05:51 PM.
#5
03-07-2009, 10:21 PM
Well today didn't show much more progress than yesterday. I got the sleeve for the pilot bearing I need and got that installed into the end of the crankshaft.
PilotBearingandSleeve-1.jpg?t=1236482535
After getting that installed I installed the flywheel (I had to get longer grade 8 bolts than the ones that held the flex plate on).
Flywheel.jpg?t=1236481970
Next, I slid the clutch plate and alignment tool into the pilot bearing.
Clutch.jpg?t=1236482032
Next I went to bolt down the clutch cover to the flywheel and thats where the problems began. There wasn't much left of the threads in the flywheel, and one of them stripped all the way out (and the sad part is they're only supposed to be tightened to 30 ft*lbs of torque). So I had to pull of the clutch and unbolt the flywheel. Since I already paid to get the flywheel resurfaced at a machine shop I went ahead and drilled, tapped and installed helicoils in the holes, but I have to wait for the thread lock to dry to make sure the helicoils set properly, so I'll continue here tomorrow.
On a brighter note, I did get the new crankshaft position sensor (because the flywheel uses a different one than the flex plate) and I got that installed. I also got some more interior work done and started putting stuff back together. On the interior I went ahead and removed the auto shifter. I also took out the O/D button and replaced it with a spare peice of sheet metal I spray painted black. I also took out the "P N R D 2 1" peice of the instrument panel and broke off the needle and painted over the letters/numbers to make it black. I'll get pictures of that tomorrow.
Last edited by 95_318SLT; 05-15-2010 at 05:51 PM.
#6
03-09-2009, 09:38 PM
Well, I have no pictures of the transmission install cause I was on a time crunch and couldn't stop to take pictures, but it went fairly smooth, so there's not much to say about it cause after the clutch is in, the rest of it goes back in almost exactly the same way as the automatic would have. All factory brackets from the automatic still worked. Here is a list of the things that did need "modifying":
1) The park/neutral switch is still monitored by the computer so the computer needs to be "fooled" into thinking the automatic transmission is still in park (even though its not in the truck anymore). I accomplished this by taking the park/neutral switch harness, stripping the wire (its the middle wire of the 3) and grounding it to the frame.
2) The back up lamp switch is different and I'll have to update on this topic when I figure out how to fix it.
3) The NV3500 is exactly 7 inches shorter than the 46rh, so a longer driveshaft is needed in back and a shorter one is needed in front. (Getting one custom made is about half the price of getting one at the dealership. None of the local junkyards had one so I can't say if a used one would be the best bet.)
Tomorrow I will get some pictures of the finished job. If anyone tries to tackle this swap in the future, take everything I've said into consideration and plan ahead and the whole swap can be done in a weekend. Mine took longer cause I was playing it by ear and had to wait on parts several times. I'll also give an update for what codes the computer throws about the automatic transmission, but so far it's running right.
**EDIT**
Save yourself a headache and a lot of trouble and replace the input shaft and output shaft seals. Also, clean up the shift tower plate and put RTV gasket maker on the metal side. The rubber side doesn't need any RTV.
Last edited by 95_318SLT; 05-15-2010 at 05:50 PM.
#7
03-10-2009, 08:06 PM
Here are some pics of the finished interior (except I'm gonna repaint the new shifter trim piece cause it doesn't quite match).
DSCN0159.jpg?t=1236729645
DSCN0161.jpg?t=1236729798
lol, since ya'll decided to comment on how short my 4x4 shifter was, I took the old one and the new one and hacked them both up and made one long one with about a 45* bend in it to clear the dash :P
DSCN0162.jpg?t=1236729813
(I have the caps for the shifter *****, but I'm not gonna put them in until I paint the trim piece so I don't have to pry them back out)
No more P R N D 2 1...
DSCN0165.jpg?t=1236729920
And no more automatic shifter lever...
DSCN0167.jpg?t=1236729972
Last edited by 95_318SLT; 05-15-2010 at 05:49 PM.
Trending Topics
#9
06-15-2009, 12:50 PM
And one other thing to mention... my cruise control does not work right now, and I haven't bothered trying to fix it yet, but I believe the reason it quit working is from grounding the park/neutral switch... it won't activate cruise control if it thinks its in park or neutral!!! What I'm going to do to fix it is put the park/neutral switch on a swtich on the dash so I can turn it on and off as needed.
**EDIT**
This problem was solved, I posted the solution back in post #2
******
I still haven't gotten around to trying to get the back up lamps working either, but I'll update on those two things as soon as I figure them out.
**EDIT**
This problem was also solved... turned out my switch was bad and all that needed to happen was to take the other 2 wires from the P/N switch harness (these are the reverse light wires) and plug them into the new transmission's reverse light switch. If you can find the harness to splice the wires into it makes it very easy!!
********
**EDIT**
This problem was solved, I posted the solution back in post #2
******
I still haven't gotten around to trying to get the back up lamps working either, but I'll update on those two things as soon as I figure them out.
**EDIT**
This problem was also solved... turned out my switch was bad and all that needed to happen was to take the other 2 wires from the P/N switch harness (these are the reverse light wires) and plug them into the new transmission's reverse light switch. If you can find the harness to splice the wires into it makes it very easy!!
********
Last edited by 95_318SLT; 05-15-2010 at 05:48 PM.
#10
08-19-2009, 08:42 PM
So here is the list of parts that are needed...
- Transmission
- Transfer Case (if 4x4)
- Brake/Clutch pedal assembly with hardware
- Hydraulics (master cyl, lines, and slave cyl... comes as an assembled, non-serviceable unit)
- Flywheel (engine specific)
- Bolts - Flywheel to crankshaft (same thread pattern as flex plate bolts, must be 1 inch long and grade 8)
- Bolts - Pressure plate to Flywheel (don't remember the pattern or length, but they must also be grade 8)
- Clutch kit (clutch plate, pressure plate, throwout bearing, pilot bearing)
- Pilot Bearing Sleeve (Best to get it direct from Dodge.. PN 5300 9180 for 3.9L and 5.2L)
- Manual transmission specific crankshaft position sensor
- Rear driveshaft (if you can't find a factory one, you can get one custom made... needs to be 7 inches longer)
- Front driveshaft (if 4x4... if you can't find a factory one, you can get one custom made... needs to be 7 inches shorter)
Last edited by 95_318SLT; 05-15-2010 at 05:45 PM.

