
Diy multi-meter 101
#1
 03-06-2009, 11:44 PM


Join Date: Mar 2009
Location: Western PA
Posts: 48
Likes: 0
Received 0 Likes
on
0 Posts
We all have one in our tool box but, do we really know how to use it, read on for a short course in MULTI METER 101.
A multimeter is one of the most basic trouble shooting tools you can use to track down an electrical problem in any vehicle. With a good service manual and a cheap digital multimeter trouble codes (DTCs) in newer computer controlled cars can be diagnosed. Below are basic instructions for using your multimeter.
Step1
Turn on multimeter and connect probes (if necessary). The negative probe is black and the positive will be red. For some applications this is important, while for others, it does not matter.
Step2
Use the probes to measure resistance by placing one on each side of the component to be measured. For this function, the probes are interchangeable. The item being repaired should be turned off and the multimeter set to resistance, which may be symbolized by a horseshoe- shaped icon. Note the numbers on the display; this is the resistance measured in ohms. Some mult-imeters have the ability to check for continuity, or unbroken connections and wiring. This is checked in the same way as resistance except the meter is set to continuity (symbolized by a series of diminishing curved lines). Continuity is indicated with a tone.
Step3
Measuring voltage requires the electricity to be on in the device being measured. To measure DC voltage, set the multimeter to VDC. Touch the negative (black) probe to ground and positive (red) probe to the point in the circuit where DC voltage is to be checked. The voltage reading in volts will register on the display with a - symbol indicating voltage towards ground; a + symbol may or may not be displayed to indicate voltage moving away from ground. To measure AC voltage, set the multimeter to VAC. The reading will also be in volts although there is no direction to AC voltage.
Step4
Checking diodes is accomplished by setting the multimeter to diode check, which may be symbolized with an arrow against a vertical line. Turn the device off, and measure the diode by placing the negative probe on the cathode of the diode (frequently indicated by a stripe around the end of the diode) and the positive probe on the anode (unmarked) side. Most multi-meters will first make a tone, like when indicating continuity, and then display the voltage drop across the diode. This varies with the diode type, but it is typically between .5 and .75 voltages.
Step5
Reading capacitance, on meters equipped with this option, requires removing the capacitor from the circuit unless the meter measures "in circuit capacitance." This is almost always a feature only found in meters designed for this purpose. After removing the capacitor, set the meter to capacitance, which is often symbolized by a curved line and a vertical line. Some capacitors have a positive and negative side; others do not. If there is a negative side, it will be indicated by a stripe or even - symbols, and the negative probe should be placed on that lead, positive on the other. If a negative side is not indicated then probe orientation will not matter. Capacitance measurement will take several seconds to register and will display in farads.
Step6
Turn the meter off when not in use and store probes so they will not be damaged.
#2
03-06-2009, 11:46 PM
Join Date: Mar 2009
Location: Western PA
Posts: 48
Likes: 0
Received 0 Likes
on
0 Posts
OHMS, it's a word we hear all the time when testing electrical problems on our rigs, but just what are OHMS and what was his law. Read on to learn more.
Ohm's Law
Algebra 101
The diagrams below are simplified illustrations to show the algebraic equivalent of three possible equations each. Using the diagram on the left as an example, you have the following possibilities:
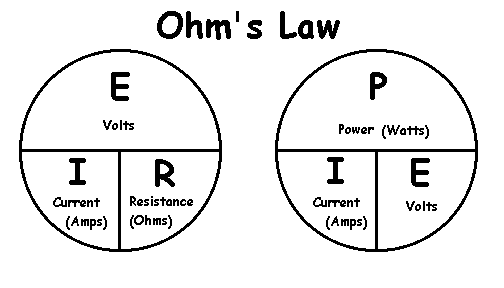
You can use the Ohm's Law calculator to figure any unknown value as long as you have two known values to work with. For example, if you want to know how much current a 100 watt lamp in a 12 volt circuit will draw, you can calculate it easily because you already have two values; 100 watts (P /power) and 12 volts (E). As indicated in the circle on the right, power is divided by either current (I) or voltage (E) P � E = I. Therefore the equation would be written as follows: 100 � 12 = 8.333 amps.
Now if you were curious (for what ever reason) as to how much resistance (R) this 100 watt lamp offered to the same circuit, you would use the circle on the left. It indicates that resistance (R) is found by dividing the voltage (E) by the current (I) E � I = R. You have already determined the current of the lamp in the first step, so you would take that value and write the equation as follows: 12 � 8.333 = 1.44 ohms (darn near a short! ...Guess that's why it glows so bright!). As you can see, any unknown value can be found by using any combination of the Ohm's Law diagrams.
If you were calculating the current for auxiliary lights, all you need to do is multiply the amps you calculated by the number of lamps you are planning to install and you will have the total current draw. Bear in mind that because you will be using these at night, you will have to add the current of the headlights (on high beam), so if you have high powered H4s, you can use Ohm's Law to determine their amperage. Remember it might also be cold and raining, so better add the heater and windshield wipers too, these can be estimated by the fuse rating of their circuits. If you have a CB add another 8 amps to be safe. The sum of all these will be the total draw of your accessories under worst case conditions. It is best to always leave yourself a 25 amp margin to insure that there is enough power for your fuel pump, computer and engine management system, and your battery can have whatever is left over to keep it at full charge (just in case you stall it out in the boonies after hours of four wheeling on a cold rainy night).
Ohm's Law
Algebra 101
The diagrams below are simplified illustrations to show the algebraic equivalent of three possible equations each. Using the diagram on the left as an example, you have the following possibilities:
You can use the Ohm's Law calculator to figure any unknown value as long as you have two known values to work with. For example, if you want to know how much current a 100 watt lamp in a 12 volt circuit will draw, you can calculate it easily because you already have two values; 100 watts (P /power) and 12 volts (E). As indicated in the circle on the right, power is divided by either current (I) or voltage (E) P � E = I. Therefore the equation would be written as follows: 100 � 12 = 8.333 amps.
Now if you were curious (for what ever reason) as to how much resistance (R) this 100 watt lamp offered to the same circuit, you would use the circle on the left. It indicates that resistance (R) is found by dividing the voltage (E) by the current (I) E � I = R. You have already determined the current of the lamp in the first step, so you would take that value and write the equation as follows: 12 � 8.333 = 1.44 ohms (darn near a short! ...Guess that's why it glows so bright!). As you can see, any unknown value can be found by using any combination of the Ohm's Law diagrams.
If you were calculating the current for auxiliary lights, all you need to do is multiply the amps you calculated by the number of lamps you are planning to install and you will have the total current draw. Bear in mind that because you will be using these at night, you will have to add the current of the headlights (on high beam), so if you have high powered H4s, you can use Ohm's Law to determine their amperage. Remember it might also be cold and raining, so better add the heater and windshield wipers too, these can be estimated by the fuse rating of their circuits. If you have a CB add another 8 amps to be safe. The sum of all these will be the total draw of your accessories under worst case conditions. It is best to always leave yourself a 25 amp margin to insure that there is enough power for your fuel pump, computer and engine management system, and your battery can have whatever is left over to keep it at full charge (just in case you stall it out in the boonies after hours of four wheeling on a cold rainy night).