
Dak Convertible Frame off Build Thread
#1
 01-29-2014, 01:16 PM


Hello all,
I've been a way for a bit, and I'm finally getting back to finishing off the restoration of my wife's convertible.
When I first started this project, the plan was to simply drop the low mileage drivetrain from a truck we had owned since the mid 90's into a relatively rust free truck (which had some problems). I figured it was easier and cheaper to do this than doing a complete re-skin and paint of the original truck.
Well... one then led to another.
Some of you may relate to the whole thing....
"Hmmm This looks good now, but it makes the other stuff look like crap.... Hmmm I should fix that too while I'm at it...."
Partly due to need, and mainly due to me being a bit fussy, it turned into a frame off project with costs far exceeding the original plan. LOL
Some of this have been touched on in other threads, but I thought it would be best to start a true build thread/summary and keep it in one place.
I'll be posting photos and info soon.
Coffee break is over and the truck is waiting.
Stay tuned.
DISCLAIMER: THIS IS NOT MEANT TO BE A "HOW TO".
YOU SHOULD BE COMPETENT AND HAVE THE NEEDED SKILLS BEFORE YOU TACKLE THIS TYPE OF PROJECT.
BY READING THIS THREAD, YOU ARE THEREBY AGREEING, TO USE ANY INFO YOU LEARN, AT YOUR OWN RISK.
Last edited by RobertMc; 01-29-2014 at 06:02 PM.
#2
01-29-2014, 04:48 PM
Alright.. back to the beginning.
This is the truck I have owned since the mid 90's.
She had been sitting for a long time at this point, waiting for planned rust repair.
A combination of living in a road salt region, and those useless plastic fender flares did her in.
Mechanically she was fine when parked, but unfortunately, as I later discovered, she had suffered by sitting for so long.
After pricing out what the sheet metal etc. would cost to repair it correctly, I decided to find another truck to get sheet metal from.
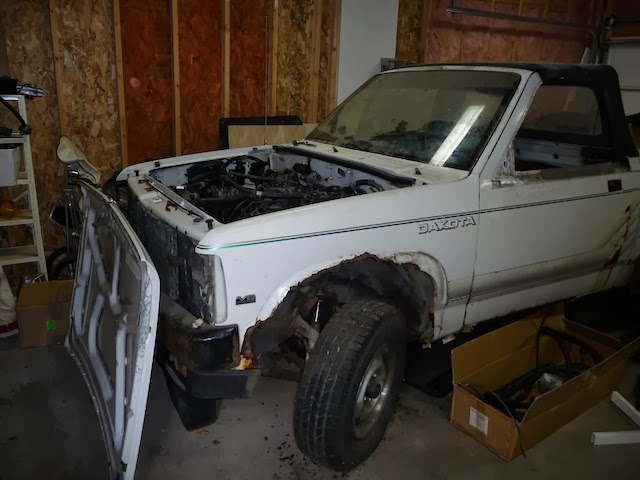
The truck I found looked ok on the outside but she had some problems.
She had high mileage, and drivetrain was more or less done.
The spider gears in the front diff had broken teeth, passenger door window motor was missing, she had a badly faded interior, her dash was cracked in a bunch of places etc etc. BUT... her body was relatively rust free.
This is it.

This is the truck I have owned since the mid 90's.
She had been sitting for a long time at this point, waiting for planned rust repair.
A combination of living in a road salt region, and those useless plastic fender flares did her in.
Mechanically she was fine when parked, but unfortunately, as I later discovered, she had suffered by sitting for so long.
After pricing out what the sheet metal etc. would cost to repair it correctly, I decided to find another truck to get sheet metal from.
The truck I found looked ok on the outside but she had some problems.
She had high mileage, and drivetrain was more or less done.
The spider gears in the front diff had broken teeth, passenger door window motor was missing, she had a badly faded interior, her dash was cracked in a bunch of places etc etc. BUT... her body was relatively rust free.
This is it.
Last edited by RobertMc; 01-29-2014 at 05:02 PM.
#3
01-29-2014, 05:38 PM
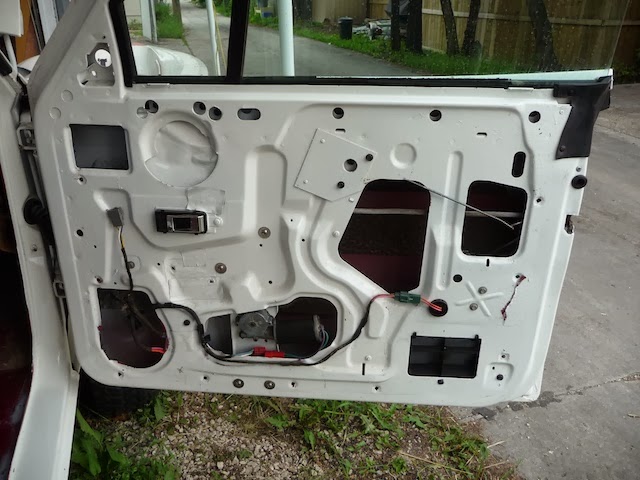
Passenger window motor is missing so I need to fix that.
May as well pull the door apart and refurb it.
Drill the rivets for the motor, clean, paint, lube, install.
Repeat for all the removable bits on the door until done.
EDIT:
I should mention that I selected the best door glass from the four I had.
Getting them out is a HUGE pain.
The window motors were riveted in, which is ok by itself.
Just drill the rivets out and replace with bolts and fender washers that fit tight like the rivets did.
If I remember correctly (it was 2 years ago), to get the main glass out i had to remove the small fixed windows first.
If I remember correctly it was:
A) lower main glass
B) Drill out rivets and remove the bolts for dividing bar/track that divides the main glass and the fixed glass.
C) Remove 2 bolts from the plate inside the door, that holds the bottom of the fixed glass.
D) Remove fixed glass
E) rotate main glass to disengage from actuator and lift out.
Reverse process to re-install.... or something like that... :P
The one problem I haven't solved, yet, is the belt line weather stripping.
That's the weather stripping where the glass lowers into the door.
The hardtop dakota ones are too short, and the convertible ones are no longer made. (like most everything else dak convertible specific)
I 'think' that one for a dodge ram may work if modified.
It's long enough. Once the truck is on the road I'll be working on that.
I'm also looking into a way to make some new weather stripping for the top, or possibly get some made. That's also for the end of this long project.... never say die.
Last edited by RobertMc; 01-29-2014 at 11:27 PM.
#4
01-29-2014, 05:57 PM
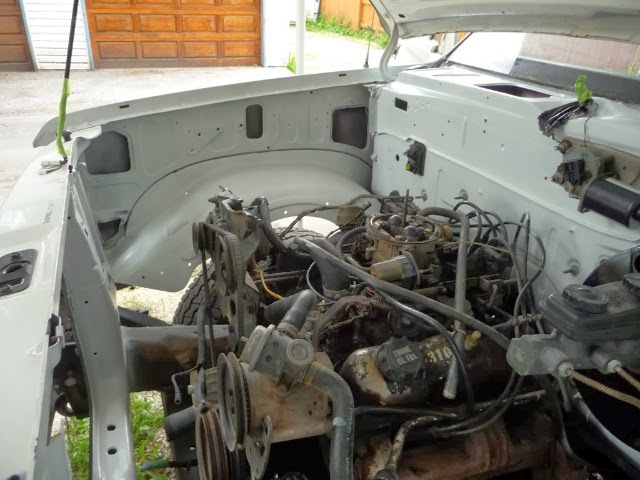
Alright.. time to pull the "good" motor from truck 1.
Start with this:
Stripped out the, radiator, hoses, engine harness and other engine compartment bits to ease the process. I need to remove them anyhow for spare parts. I also disconnected the transmission linkage, wiring and vacuum lines.

After everything else was ready (including removing the transfer case), I supported the transmission with a transmission jack, and removed the transmission mount.
Removing the mount allowed me to lift the transmission up slightly so that I could get the transmission crossmember out. The crossmember is designed with angled ends, so you need to lift it upwards a bit to get it out.
I also removed the front wheels and lowered the front of truck onto blocks.
This not only gave me extra vertical room for the lift, but also improved the angle so that the engine and transmission could come out as one unit.
Unfortunately I don't have any photos of the actual lifting in progress. Too busy doing it, to think about photos. :P
After it was out. it was time to separate the transmssion from the engine and send the engine, transmission + transfer case out to the shops.

Start with this:
Stripped out the, radiator, hoses, engine harness and other engine compartment bits to ease the process. I need to remove them anyhow for spare parts. I also disconnected the transmission linkage, wiring and vacuum lines.
After everything else was ready (including removing the transfer case), I supported the transmission with a transmission jack, and removed the transmission mount.
Removing the mount allowed me to lift the transmission up slightly so that I could get the transmission crossmember out. The crossmember is designed with angled ends, so you need to lift it upwards a bit to get it out.
I also removed the front wheels and lowered the front of truck onto blocks.
This not only gave me extra vertical room for the lift, but also improved the angle so that the engine and transmission could come out as one unit.
Unfortunately I don't have any photos of the actual lifting in progress. Too busy doing it, to think about photos. :P
After it was out. it was time to separate the transmssion from the engine and send the engine, transmission + transfer case out to the shops.
Last edited by RobertMc; 01-29-2014 at 11:32 PM.
#5
01-29-2014, 06:36 PM
This is where it got "ugly".
I had planned to get a new chain put into the transfer case.
But, water had got inside, and it needed to be rebuilt.
In addition the transmssion had signs of possible failure in the near future.
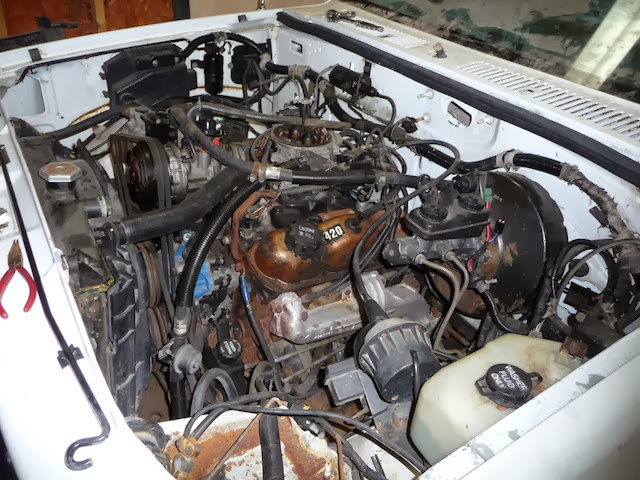
So.. the transmission was rebuilt with the best parts I could get, including a performance valve kit. (The kit shifts harder, which increases life expectancy, and evidently also allows fluid flow when the transmission is in park, unlike the original)
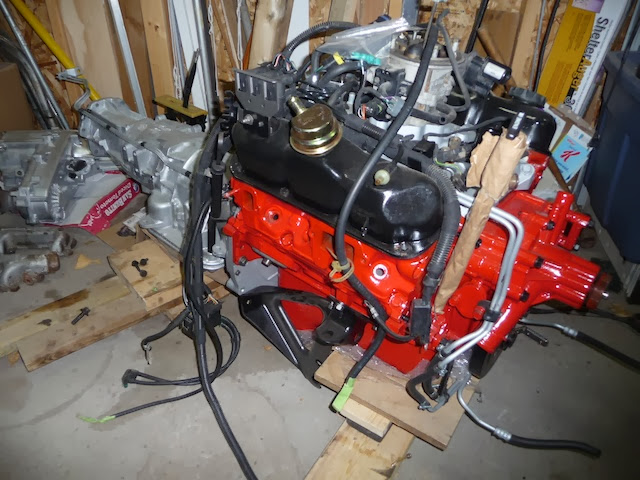
The engine had some cam wear, the seals were dried out, and lacked power. Since I was already down the rabbit hole... I figured "WTF why not see what happens if the shop does much like it does to the 318 ?"
So flat top pistons, new rings, bearings, cam, cylinders bored out, heads shaved etc.
BAM !! ... This is no longer a cheap simple "parts swap"
I figure "Oh well we love the truck so what the heck"
So after waaay too many bits of coloured paper changed hands, I ended up with this.
Note to Self: Learn how to rebuild engines.

To help improve things further I got a great deal on one of the last Edelbrock exhaust manifolds made for the 3.9
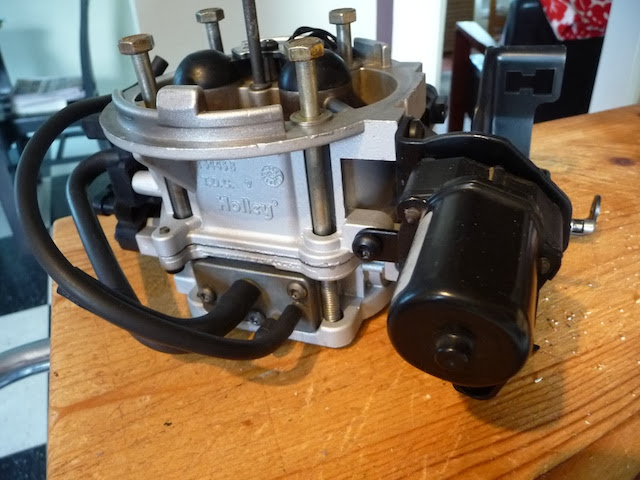
In the future I want to put a Mopar performance intake on it, but at this point I'm sticking the original throttle body and intake on it.
The TB was bringing the whole engine down so I rebuilt it with a kit and cleaned it up:

I then cleaned/repaired all the vacuum lines and engine wiring harness as needed. Black cloth hockey tape replaced all the old factory harness tape that was crumbling apart.
Some of the hoses were fine but didn't look 100% black anymore.
One great method in some cases is to use a small amount of acetone on a rag to wipe them down. Done correctly, it removes the surface oxidization.
Done wrong acetone will eat/destroy the rubber.
All connectors were thoroughly cleaned and dielectric used as needed:
Now that that is done, it's time to remove the other engine+transmission from the rust free cab.
I had planned to get a new chain put into the transfer case.
But, water had got inside, and it needed to be rebuilt.
In addition the transmssion had signs of possible failure in the near future.
So.. the transmission was rebuilt with the best parts I could get, including a performance valve kit. (The kit shifts harder, which increases life expectancy, and evidently also allows fluid flow when the transmission is in park, unlike the original)
The engine had some cam wear, the seals were dried out, and lacked power. Since I was already down the rabbit hole... I figured "WTF why not see what happens if the shop does much like it does to the 318 ?"
So flat top pistons, new rings, bearings, cam, cylinders bored out, heads shaved etc.
BAM !! ... This is no longer a cheap simple "parts swap"
I figure "Oh well we love the truck so what the heck"
So after waaay too many bits of coloured paper changed hands, I ended up with this.
Note to Self: Learn how to rebuild engines.
To help improve things further I got a great deal on one of the last Edelbrock exhaust manifolds made for the 3.9
In the future I want to put a Mopar performance intake on it, but at this point I'm sticking the original throttle body and intake on it.
The TB was bringing the whole engine down so I rebuilt it with a kit and cleaned it up:
I then cleaned/repaired all the vacuum lines and engine wiring harness as needed. Black cloth hockey tape replaced all the old factory harness tape that was crumbling apart.
Some of the hoses were fine but didn't look 100% black anymore.
One great method in some cases is to use a small amount of acetone on a rag to wipe them down. Done correctly, it removes the surface oxidization.
Done wrong acetone will eat/destroy the rubber.
All connectors were thoroughly cleaned and dielectric used as needed:
Now that that is done, it's time to remove the other engine+transmission from the rust free cab.
Last edited by RobertMc; 01-29-2014 at 11:31 PM.
#6
01-29-2014, 07:17 PM
Now it get's evenmore ugly.... or nicer... depending on your perspective.
Have you ever looked at something at thought.. "To do this job 'right' I really should do 'X' too" ?
Well.....
I figured that, since the engine+trans+transfer case was all redone, I should really go all out and make the rest of the mechanical stuff 'like new'.
The existing pitman and idler arm, and one wheel hub, were basically new.
So after a bunch of more coloured paper changed hands, I had 1 new hub, 2 new front drive axles, all new ball joints and bushings.
Sandblast the control arms, steering knuckles etc.... paint... ready
Oh.. wait... what about the front middle axle (from the original truck which had less miles).....?
So I dismantled that, checked it all out, cleaned, repainted and re-assembled it.:

That should be it.... I can reassemble the front end and drop the engine in... should be driving the truck soon. :P
Have you ever looked at something at thought.. "To do this job 'right' I really should do 'X' too" ?
Well.....
I figured that, since the engine+trans+transfer case was all redone, I should really go all out and make the rest of the mechanical stuff 'like new'.
The existing pitman and idler arm, and one wheel hub, were basically new.
So after a bunch of more coloured paper changed hands, I had 1 new hub, 2 new front drive axles, all new ball joints and bushings.
Sandblast the control arms, steering knuckles etc.... paint... ready
Oh.. wait... what about the front middle axle (from the original truck which had less miles).....?
So I dismantled that, checked it all out, cleaned, repainted and re-assembled it.:
That should be it.... I can reassemble the front end and drop the engine in... should be driving the truck soon. :P
Last edited by RobertMc; 01-29-2014 at 10:39 PM.
#7
01-29-2014, 08:03 PM
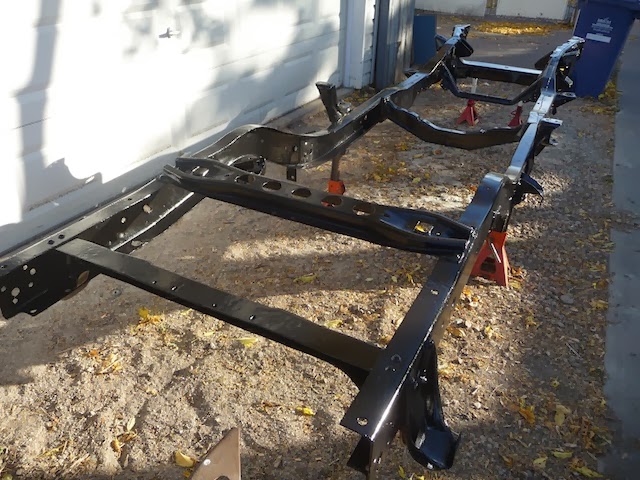
Driving the truck soon ? LOL don't make me laugh....
So what happens when the rest of the front end looks great and the frame doesn't ?
Especially if the complete interior and and engine is already removed from the cab ?
You decide to strip and paint the frame of course ! :P
I had some friends help me lift the box off the frame, but I needed to come up with some other method for the cab.
In the end, I actually DROPPED the frame from the cab.
Yeah.. dropped.. not lifted.
I put some large 24" truck jack stands under the cab (in addition to the ones already under the frame), and securely strapped a transmission jack to the front of the frame.
I then, unbolted the cab, and LOWERED the frame away from the cab.
Since the rear axle and wheels were still attached, I could use the transmission jack as the front wheels, and 'simply' rolled the frame backwards from under the cab.
Then I did something stupid. Or maybe more stupid.. depending on your perspective.
I, along with the help of my wife, manually stripped the paint, undercoating and rust from the frame.
BTW: Undercoating sucks.. It not only holds moisture to the frame, it's a hassle to remove and does little to reduce noise.
If you ever restore a vehicle.....don't apply more undercoating. Just wash your vehicle more often, and use something interior matting to sound proof a vehicle if needed.

DON"T DO THIS !, unless you live on the moon and can't get it sandblasted for a reasonable price.
The cost of the rolloc sanding disks, wire wheels, a bag of blasting beads, and the time involved, was NOT worth it.
For a small bit more, I could have had the local large industrial blasting shop do the job. And we could have spent our time on better things.
Like..... painting the frame with RustBullet, to the accompaniment of the local racing fuel plant exploding a few miles away.
Seriously.
We were in the middle of painting the frame and.... "BOOOM.. whaaa ??? My god.. look at that fireball !"


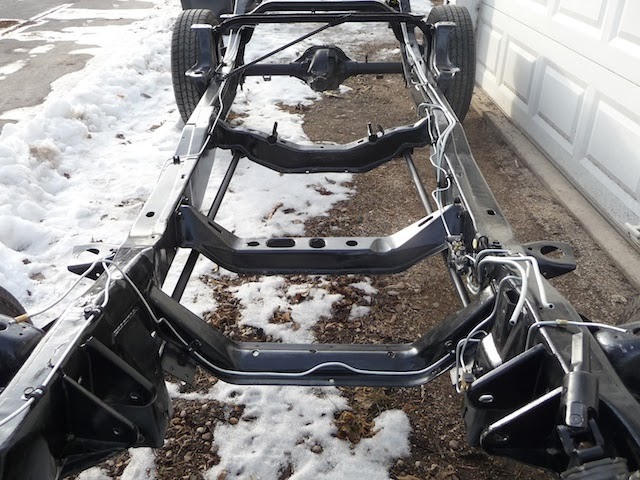
On to the back axle:
I decided to use the axle that was from the second truck, thinking it appeared in better shape.
WRONG... after striping the paint with a wire wheel and painting it, I discovered the planetary gears in the diff were damaged.
Luckily, after checking the micrometer, I found the planetaries from the other would fit along with the shims I had.
Install the gears, put in some new synthetic gear oil, and I moved on to the leaf springs.
Some people say you shouldn't wast time painting leaf springs because the paint fails quickly.
I ignored that and did it anyhow. I figure I can always get under there and touch them up as needed.
the leaf springs use 3 bushings each side. 2 in the spring and one in the shackle.
I installed some new 'energy suspension' urethane bushing in the leaf springs themselves, and then got some OEM shackles (they come with bushings installed and I gave up finding a aftermarket replacement) from the dealer.
I then re-installed the springs and rear axle, with new bolts from the local spring shop. (see photos on next post)
So what happens when the rest of the front end looks great and the frame doesn't ?
Especially if the complete interior and and engine is already removed from the cab ?
You decide to strip and paint the frame of course ! :P
I had some friends help me lift the box off the frame, but I needed to come up with some other method for the cab.
In the end, I actually DROPPED the frame from the cab.
Yeah.. dropped.. not lifted.
I put some large 24" truck jack stands under the cab (in addition to the ones already under the frame), and securely strapped a transmission jack to the front of the frame.
I then, unbolted the cab, and LOWERED the frame away from the cab.
Since the rear axle and wheels were still attached, I could use the transmission jack as the front wheels, and 'simply' rolled the frame backwards from under the cab.
Then I did something stupid. Or maybe more stupid.. depending on your perspective.
I, along with the help of my wife, manually stripped the paint, undercoating and rust from the frame.
BTW: Undercoating sucks.. It not only holds moisture to the frame, it's a hassle to remove and does little to reduce noise.
If you ever restore a vehicle.....don't apply more undercoating. Just wash your vehicle more often, and use something interior matting to sound proof a vehicle if needed.
DON"T DO THIS !, unless you live on the moon and can't get it sandblasted for a reasonable price.
The cost of the rolloc sanding disks, wire wheels, a bag of blasting beads, and the time involved, was NOT worth it.
For a small bit more, I could have had the local large industrial blasting shop do the job. And we could have spent our time on better things.
Like..... painting the frame with RustBullet, to the accompaniment of the local racing fuel plant exploding a few miles away.
Seriously.
We were in the middle of painting the frame and.... "BOOOM.. whaaa ??? My god.. look at that fireball !"
On to the back axle:
I decided to use the axle that was from the second truck, thinking it appeared in better shape.
WRONG... after striping the paint with a wire wheel and painting it, I discovered the planetary gears in the diff were damaged.
Luckily, after checking the micrometer, I found the planetaries from the other would fit along with the shims I had.
Install the gears, put in some new synthetic gear oil, and I moved on to the leaf springs.
Some people say you shouldn't wast time painting leaf springs because the paint fails quickly.
I ignored that and did it anyhow. I figure I can always get under there and touch them up as needed.
the leaf springs use 3 bushings each side. 2 in the spring and one in the shackle.
I installed some new 'energy suspension' urethane bushing in the leaf springs themselves, and then got some OEM shackles (they come with bushings installed and I gave up finding a aftermarket replacement) from the dealer.
I then re-installed the springs and rear axle, with new bolts from the local spring shop. (see photos on next post)
Last edited by RobertMc; 01-29-2014 at 11:05 PM.
Trending Topics
#8
01-29-2014, 08:33 PM
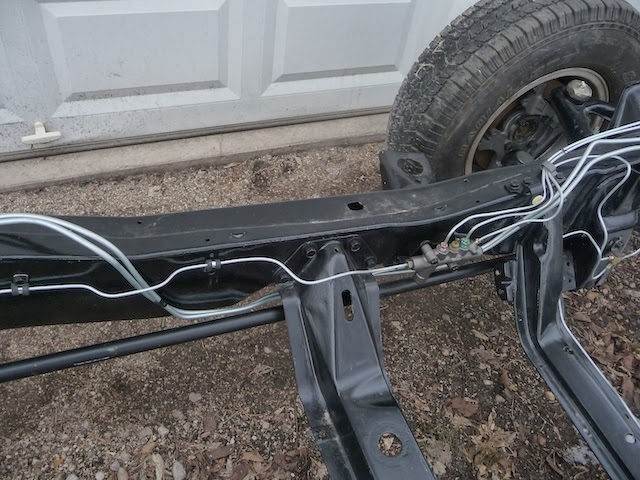
With a nice shiny frame goes some new fuel and brake lines.
I bought 2 bulk rolls in the correct sizes, and made them up.
I came up with a trick to allow me to match the originals almost exactly.
I made the first bend and then used a zip tie to hold both the new and the original lines together.
Bend.. zip tie... bend.. zip tie... repeat until done.
I did tight bends with a tubing bender and gradual ones by hand.
Flaring the brake lines was done nomally.
To make exact copies of the oem flared ends on the FUEL LINES, I used a same double flare tool used on the brake lines..... BUT I just did the first part of the process of creating a double flare. By testing on some extra line, I was able to get the same type of flare the oem fuel line had.

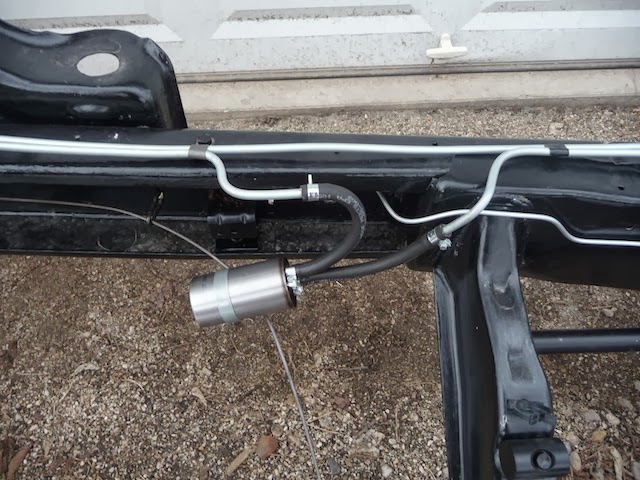
The RWAL Abs unit was a bit of a pain.
Replacements are VERY expensive, even if you can find one available.
The big problem is, even if your old unit works, the bleeder is likely seized.
Professionals might use a torch to get the bleeder hot enough to get it loose.
But in this case, it would likely damage this abs unit internally.
The bleeder broke on this one, even after a lot of care was taken.
In the end I had a friend who owns a machine shop, ACCURATELY, drill out the bleeder screw.
It actually came down the the last couple thou before the piece was fully out.
I hope I didn't waste that much effort on a non working abs unit. hehe
That cutoff fitting is the old one, just waiting for the new hose line to the axle.
New inline filter with Fuel injection hose and clamps...
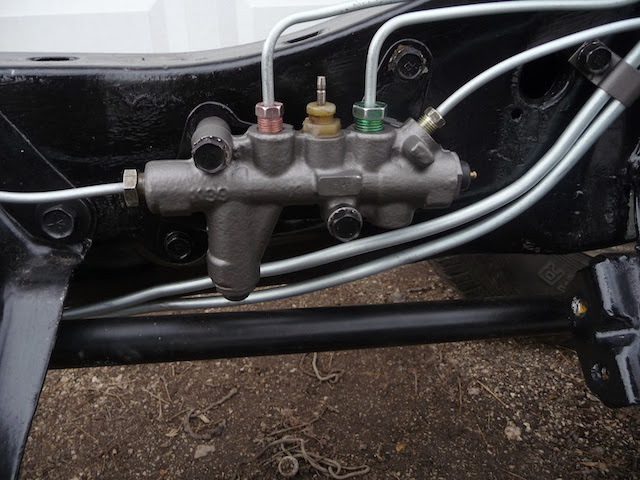
Metering Valve all cleaned up....
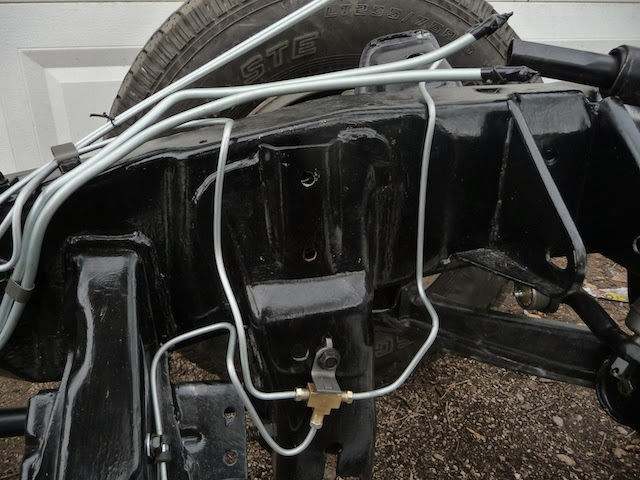
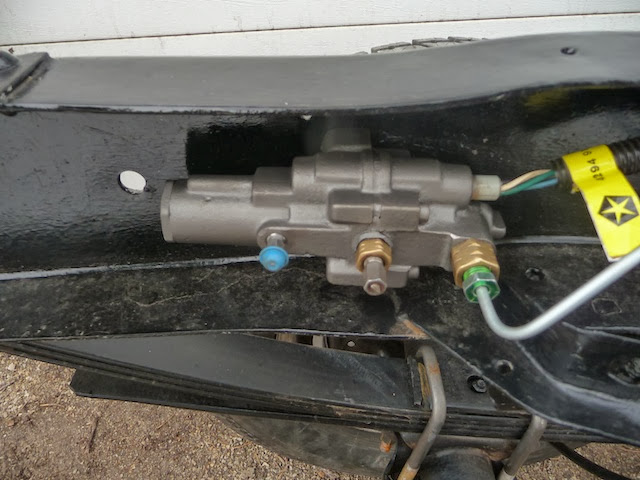
Steering gear all cleaned up and checked.... (makeshift plugs protecting against contamination)

I bought 2 bulk rolls in the correct sizes, and made them up.
I came up with a trick to allow me to match the originals almost exactly.
I made the first bend and then used a zip tie to hold both the new and the original lines together.
Bend.. zip tie... bend.. zip tie... repeat until done.
I did tight bends with a tubing bender and gradual ones by hand.
Flaring the brake lines was done nomally.
To make exact copies of the oem flared ends on the FUEL LINES, I used a same double flare tool used on the brake lines..... BUT I just did the first part of the process of creating a double flare. By testing on some extra line, I was able to get the same type of flare the oem fuel line had.
The RWAL Abs unit was a bit of a pain.
Replacements are VERY expensive, even if you can find one available.
The big problem is, even if your old unit works, the bleeder is likely seized.
Professionals might use a torch to get the bleeder hot enough to get it loose.
But in this case, it would likely damage this abs unit internally.
The bleeder broke on this one, even after a lot of care was taken.
In the end I had a friend who owns a machine shop, ACCURATELY, drill out the bleeder screw.
It actually came down the the last couple thou before the piece was fully out.
I hope I didn't waste that much effort on a non working abs unit. hehe
That cutoff fitting is the old one, just waiting for the new hose line to the axle.
New inline filter with Fuel injection hose and clamps...
Metering Valve all cleaned up....
Steering gear all cleaned up and checked.... (makeshift plugs protecting against contamination)
Last edited by RobertMc; 01-29-2014 at 09:28 PM.
#9
01-29-2014, 08:36 PM
The standard fuel tank is horribly small, considering how much fuel these trucks drink.
I got lucky and found a 22 gal tank in the only gen 1 dak left in the local auto wrecking yards.
The fuel filler neck had a bit of minor rust, but the hoses were past their prime.
I found a good matching piece of filler neck fuel hose for the larger one.
For the smaller vent hose, I bought a short piece of arctic fuel pump hose which matched the size needed (End of a roll cost me a few bucks)
I would have used the ultra high grade arctic fuel hose for the large one, but unfortunately it's only available in standard sizes. (that's likely why they can charge so much for normal filler neck hose)
The filler neck/tank grommit was replaced, the steel neck repainted, the fuel pump cleaned and pressure tested, and the in-tank 'teabag' fuel filter replaced. (the filter is cheap at rockauto)
I replaced the crap oem spring clamps for good quality stainless gear type one.

I then stripped the bottom of the cab with a wire wheel and, like the frame, painted it with Rustbullet paint.
I hope this stuff is as good as they say...
I also cleaned up and painted the engine bay, top coating it with a colour matched spray bomb from the local professional auto paint store.
The frame was then rolled into the garage and the cab remounted, in reverse of the method I used to remove it.

I got lucky and found a 22 gal tank in the only gen 1 dak left in the local auto wrecking yards.
The fuel filler neck had a bit of minor rust, but the hoses were past their prime.
I found a good matching piece of filler neck fuel hose for the larger one.
For the smaller vent hose, I bought a short piece of arctic fuel pump hose which matched the size needed (End of a roll cost me a few bucks)
I would have used the ultra high grade arctic fuel hose for the large one, but unfortunately it's only available in standard sizes. (that's likely why they can charge so much for normal filler neck hose)
The filler neck/tank grommit was replaced, the steel neck repainted, the fuel pump cleaned and pressure tested, and the in-tank 'teabag' fuel filter replaced. (the filter is cheap at rockauto)
I replaced the crap oem spring clamps for good quality stainless gear type one.
I then stripped the bottom of the cab with a wire wheel and, like the frame, painted it with Rustbullet paint.
I hope this stuff is as good as they say...
I also cleaned up and painted the engine bay, top coating it with a colour matched spray bomb from the local professional auto paint store.
The frame was then rolled into the garage and the cab remounted, in reverse of the method I used to remove it.
Last edited by RobertMc; 01-29-2014 at 09:48 PM.
#10
01-29-2014, 08:38 PM
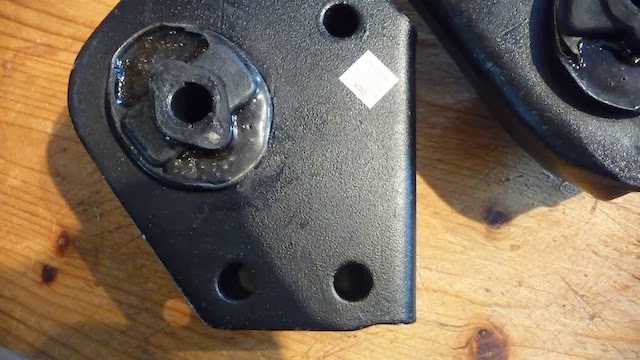
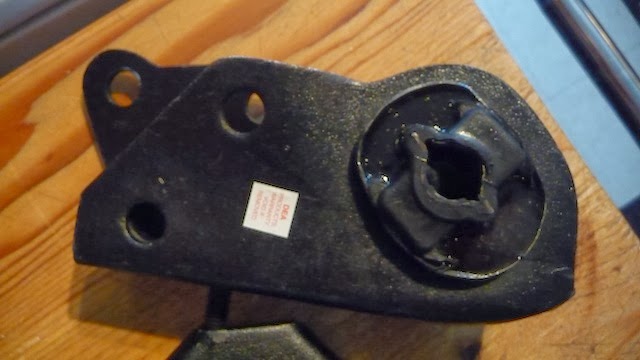
Getting the motor mounts was a serious hassle.
If you look up the Gen 1 3.9 4x4 mounts, they seem to all show the wrong part numbers.
For some reason, one of the aftermarket companies had the cross reference wrong and that seems to have propagated across all the aftermarket mount manufacturers.
The 1991 5.2 litre 4x4 engine mounts are the same as the 3.9L 4x4 engine mounts. Got them in stock locally and they were cheaper too.
Part numbers were 2983 and 2953.... those are from Anchor... like those that rock auto sells. Other brands use similar numbers.
In the end I got the correct mounts, but the quality, IMO, sucks.
They all appear to be made in the same plant in Asia under different names.
The rubber was badly done, and web posts about DEA brand mounts suggest they will only last 1 year.
I decided to get some 2 part urethane that matches the hardness of the mounts, and pour it into the empty spaces.
This will stiffen the mounts considerably, but I hope it's not too bad.
With my luck I guessed wrong and I'll have to swap the mounts out once the truck is on the road again. :P
Last edited by RobertMc; 01-29-2014 at 10:17 PM.

