
1996 Dodge Grand Caravan LE AC/Heater Blower, Relay and Resistor Block Problems 101
#1
 02-05-2006, 11:36 AM


Last updated 30-January-2006 (See Document Revision History)
Introduction... Although these procedures were originally written specifically for the 1996 Dodge Grand Caravan LE, they have been updated to apply to all 1996, 1997 and 1998 Dodge Caravan, Plymouth Voyager and Chrysler Town & Country Mini-vans.
Additional helpful notes for other model years are scattered throughout this document. You can print this document or link to it... but be advised, I will continue to update this post as necessary with corrections, new and/or additional helpful information and any special notes.
Before you get started, you should run your VIN through Dodge's Recall Check Procedure. The results of this check may (or may not) have some bearing on your current problem and your Dealer may have to fix it FREE by law. To find out if your vehicle has any current unperformed or incomplete recalls or customer satisfaction notifications, get the last 8 characters of your VIN and go here to make sure that your vehicle has had ALL of its recall work done:
http://www-5.dodge.com/webselfservice/dodg...rm%28%27R%27%29
As an aside, here is a compiled list of helpful information sources which can be found in forums of various web sites and user communities (including this one):
http://www.allpar.com/forums/index.php?showforum=16
http://www.autobanter.com/forumdisplay.php?f=23
http://www.automotiveforums.com/vbulletin/...splay.php?f=139
https://dodgeforum.com/forumid_30/tt.htm
And lastly, please read through this entire document to familiarize yourself with what it covers and what it does not cover. Your job will be a whole lot easier if you do... really.
Document Revision History... has been removed from the top and placed at the end of this document. If you find/found this document useful, please say so, even if you have to create a login ID to do so!... friends, that ALSO means that if you have information for model years or part numbers not mentioned in this document, please show your appreciation and post it so WE can make this document better than it already is! Check out the posts in this thread and the Revision History and you will see many names of thoughtful contributors... this document has become a collaborative effort!... thanks to YOU (and Chrysler engineering who made it necessary in the first place, of course") ).
).
So, THANK YOU EVERYONE, in advance, for SHARING! ... special thanks to ksflatfoot, clrbrown, Parky50, pwilliams517, John Wood, carolinaquestions, and most recently, Stevo2 for contributing pictures, source information and helpful comments regarding these procedures. Thanks to your thoughtful contributions, you have helped make this thread the hottest thread on the forum!
Good News for 1992-1995 and 1997-2005 Caravan, T&C and Voyager Owners... Complete success has also been achieved by owners of newer Caravans, T&Cs and Voyagers (1997-2005) and owners of earlier models (1992-1995) who have used the following information as a guide, instead of following step-by-step procedures. These owners resolved their AC/Heater Blower issues even though physical locations of certain components and their part numbers were different.
So, my fellow DIYers, take heart!... Woo-Hoo!
Also, these procedures are intended to cover only the most common AC/Heater Blower issues... electrical shorts, mis-wiring and other "extraordinary" issues are NOT covered in these procedures.
* * * * * * * * * * * * * * * * * * * * * * * * * * * * * * * * * *
There are 4 things that usually cause an AC/Heater Blower Motor to misbehave or stop working altogether...
1. A BLOWN 40Amp fuse,
2. A BURNED-out Resistor Block,
3. A BAD Blower Motor Relay, AND/OR
4. A WORN-out Blower Motor.
* * * * * * * * * * * * * * * * * * * * * * * * * * * * * * * * * *
Question #1 - Does your AC/Heater Blower Motor work in high-speed only or possibly some other speed as well, but NOT all speeds?
Probable Cause: Bad/Corroded RESISTOR BLOCK.
Solution: Replace Resistor Block.
* * * * * * * * * * * * * * * * * * * * * * * * * * * * * * * * * *
Question #2 - Does your AC/Heater Blower Motor NOT work AT ALL?
Probable Cause: Blown 40AMP FUSE, bad Resistor Block, bad Blower Motor RELAY and/or bad Blower MOTOR.
Solution: Inspect 40AMP fuse, replace if necessary. Inspect the Resistor Block and replace if necessary. If both 40 AMP fuse and Resistor Block are OK, replace the Blower Motor Relay FIRST. Then replace the Blower Motor, if necessary. Frankly though, I would replace BOTH Blower Motor Relay AND Blower Motor at the same time because a bad/marginal relay can cause a good motor to behave like a bad one and a good relay can also make a marginal motor temporarily appear better than it really is.
* * * * * * * * * * * * * * * * * * * * * * * * * * * * * * * * * *
Question #3 - Does your AC/Heater Blower Motor seem to "growl," run slow or stop altogether AFTER running for awhile, though sometimes it seems by turning it off and waiting awhile the problem resolves itself, but only temporarily?
Probable Cause: Blower Motor RELAY contacts are burned or pitted, Blower MOTOR brushes worn and/or bad bearing in Blower MOTOR.
Solution: Replace Blower Motor Relay, then Blower Motor, if necessary, preferably, both the Blower Motor Relay and Blower Motor at the SAME time.
* * * * * * * * * * * * * * * * * * * * * * * * * * * * * * * * * *
Question #4 - Does your AC/Heater Blower Motor continue to run after the engine is turned off and the key is removed from the ignition?
Probable Cause: Blower Motor RELAY contacts are "welded" in the closed position and refuse to cut power to the Blower Motor.
Solution: Replace Blower Motor Relay.
* * * * * * * * * * * * * * * * * * * * * * * * * * * * * * * * * *
PART NUMBERS, MANUFACTURERS & POINT of PURCHASE
40AMP Fuse:This is available at one of the stores I mention below and/or at your dealer. Chris of RockAuto.Com emailed and told me "We do not carry the fuses for your car. Those are something you will need to purchase locally or at a dealership." Stevo2 at AutomotiveForums.Com says "If the 40 amp fuse is a Maxi-fuse than it is available from these places also. NAPA-BK 7821079 Kragen, Checker, Shucks, Rockauto-MAX40 Mopar-6101641." I am guesstimating that they cost somewhere between $1-$3USD each.
Resistor Block:
OEM=by my Dodge dealer was $16USD which includes 6% CT state sales tax);
http://www.RockAuto.Com - Standard Motor Products Part=RU93 ($15.40 + $5.63 Shipping)
NOTE 1: OEM Part# for the 2001 Caravan is 4885583-AB RESISTOR 8035022 (Thank you Parky50!)
NOTE 2: OEM Part# for the 2005 Caravan is 4885583AC.
(Thank you pwilliams517 at http://www.dodgetalk.com/forums/showthread...ed=1#post865984 )
Blower Motor Relay:
OEM=4638094; GP Sorensen=MR76; AC Delco=15-8426; Hella=1410045; Niehoff Ignition=RL35301;Standard Motor Products=RY116 (prices I've seen vary between $8 and $13USD - the OEM price quoted by my Dodge dealer was $71USD [yeah, $71, that's NOT a typo] which includes 6% CT state sales tax)
NOTE: OEM Part# for the 2005 Caravan is 4727370AA.
(Thank you pwilliams517 at http://www.dodgetalk.com/forums/showthread...ed=1#post865984 )
Blower Motor:
OEM=(go to your dealer); AC Delco=15-80104; Siemens=PM3324X-12V-02345; FactoryAir=35283; Four Seasons=35283 (prices I've seen vary from $45 and $60USD, the full OEM unit is between $130-$175USD - the OEM price quoted by my Dodge dealer was $137USD which includes 6% CT state sales tax)
NOTE: OEM Part# for the 2005 Caravan is 4885475AC.
(Thank you pwilliams517 at http://www.dodgetalk.com/forums/showthread...ed=1#post865984 )
Stores/Places to Get Parts:
Advance Auto Parts; Auto Zone; CarQuest; Levine Automotive (in Connecticut USA); http://www.RockAuto.Com
* * * * * * * * * * * * * * * * * * * * * * * * * * * * * * * * * *
COST COMPARISON DATA: My Dealer Does the Work / I Do the Work
My Dealer's Estimate
Blower Motor Relay - $66 (this is an outrageous, friggin' RIP-OFF!)
Blower Motor (DOES include new fan/cage & motor housing, all assembled) - $129
Resistor Block - $14
CT State Sales Tax on Parts - $12.54
Labor (2 hours @ $85/hour) - $170
TOTAL Dealer Price - $391.54
My Actual Costs
Blower Motor Relay - $11
Blower Motor (does NOT include new fan/cage & motor housing, JUST motor) - $44
Resistor Block - $14
CT State Sales Tax on Parts - $4.14
Labor (3 hours @$0/hour) - $0
My TOTAL Actual Cost - $73.14
TOTAL Savings - $318.40 - I reduced my repair bill over 81%
* * * * * * * * * * * * * * * * * * * * * * * * * * * * * * * * * *
I apologize for the length of this "dissertation," but I hope it inspires others to include useful, detailed information in ALL of their messages posted on this board.
Step #1 - DISCONNECT the NEGATIVE Battery Cable from the battery. If you FAIL to do this, you risk shorting out a number of components that are EXPENSIVE to replace. You might also accidentally deploy either or both of your AIRBAGs which are HIDEOUSLY expensive to replace - not to mention extremely DANGEROUS with your head so close to these explosive devices!
Depending on the SYMPTOMS of your Caravan AC/Heater Blower Motor problem, you may wind up performing more than one problem resolution. Read through ALL of this BEFORE you decide what YOUR Step #2, #3 and so forth will be.
The first thing to remember is that their are at least FOUR main user-serviceable components in the the AC/Heater Blower system - 1.) 40 Amp Fuse, 2.) Resistor Block, 3.) Blower Motor Relay, and 4.) Blower Motor. Below are the procedures for checking and/or replacing these components. Good Luck, One and All!...
1.) 40AMP FUSE - located in the Power Distribution Center (PDC) under the hood on the driver-side fenderwell, according to my Haynes Manual #30011...
for the '96 Mini-Van is Fuse #3,
for the '97 Mini-Van is Fuse #3 or #7, and
for the '98 Mini-Van is Fuse #21.
The inside cover of the PDC for your Mini-Van will show you *exactly* where your Blower Motor Fuse is located. Carefully remove this fuse (pliers are OK if you are *careful*) and look at it - if it's bad, the little "loopy" conductor will be burned out - if so, replace the fuse. You are looking for a fuse that looks like this (contributed by Stevo2 at AutomotiveForums.Com):

NOTE: In a 1997 Grand Caravan, "Production date = 7/96 - title and owners manual (is a) 1997 (Grand Caravan). The PDC is under the hood with the relay at position 5, fuse at position 3... {this per the diagram in Chilton's}" - carolinaquestions/AutomotiveForums.Com
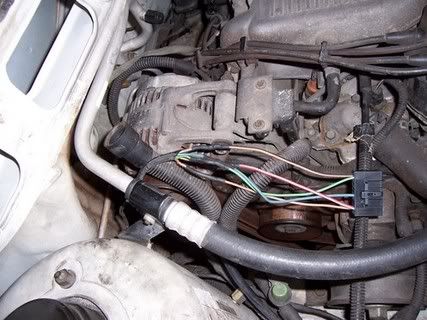
2.) RESISTOR BLOCK - located under the hood, on the firewall, passenger-side, above and slightly to the right of the shock tower.
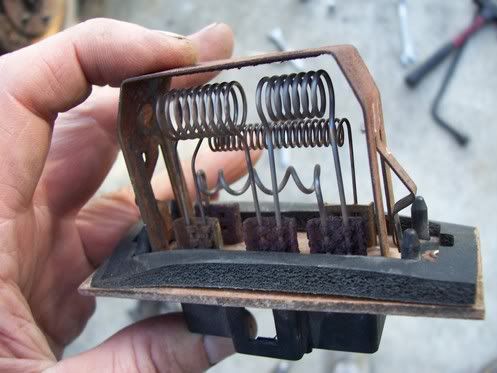
You do NOT have to pull this out of the firewall to inspect it. Remove the glovebox/door. Get a flashlight. You can see the Resistor Block poking through, high up, on the firewall by peering through the hole where the glovebox/door used to be. You will recognize the Resistor Block by several coiled wires (looks like a heater element) contained in a rectantagular arrangement about 3 inches wide and 1 inch high. If you see ANY rust on these coils, I suggest you REPLACE it. Removal is a PITA (pain in the as*), but accomplished with the hood up and pulling it out of the firewall.
The Resistor Block is held in place with attached clips, not screws so, in theory, tools are not required to remove it from the firewall. It may, however, require a screw driver to pry it loose. My Resistor Block was in so tight that I considered using a pry bar... @#$%&!
It doesn't matter if you unplug the wires first and then remove the Resistor Block or remove the Resistor Block and wires together... I found it impossible to remove the wires, so I CAREFULLY wiggled/tugged the wires together with the Resistor Block out of the firewall. It's tight, but possible to do because I did it. Installation, obviously, can ALSO be a PITA... I plugged the new Resistor Block into the firewall FIRST and then plugged the wires into it... Keep some BandAids handly. I gave blood; you might too.
@#$%&! Dodge Engineers!
NOTE: In a 2005 Caravan, "The resistor is behind the glove box attached to the HVAC case with two bolts & two wire harness connectors (one to the blower motor & one from the speed controls) - pwilliams517"
Here are a few great pictures and comments contributed by John Wood of Allpar.Com (Thank you John!)...
* * * Start... by John Wood/Allpar.com: Jan 7 2006, 09:33 PM (this is an actual installation!) * * *
Let me add a little: This is from a 96 G Voyager and should apply for 96 to 2000 year models. To get the resistor block out of the opening, insert a small acrewdriver blade under the edge and keep it sideways while pushing it to the center. This will compress the spring retainer and you can pull the block out with ease.
Here is a picture of the opening (Ed. note... it's the rectangular opening):

The resistor in this picture has no burnt coils, but the crimps for the coils are very badly corroded. This is typical.
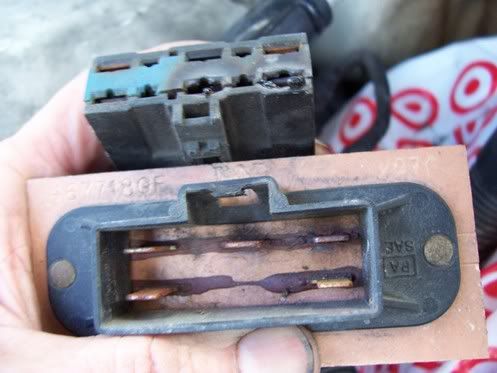
The resistor connector was badly corroded and burned and will have to be replaced in this picture. The resistor block blade connectors were rusted into the connector plug and literally had to be pulled apart with channel locks.
* * * End... by John Wood/Allpar.com: Jan 7 2006, 09:33 PM * * *
If you need to repair Resistor Block Wiring, here are a few MORE great pictures and comments contributed by John Wood (Thank you, again John!)...
* * * Start... by John Wood/Allpar.com: Jan 11 2006, 08:00 PM (this is an actual installation!) * * *
I got my resistor and connector pigtail in today to repair my corroded resistor and burnt wiring connector. I took some pictures of the repair process.
New parts:
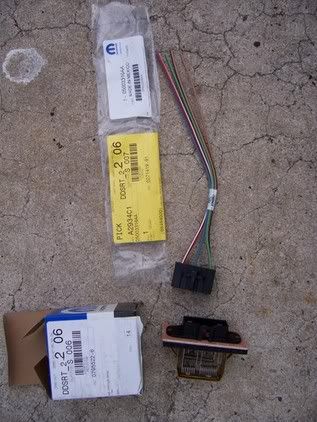
Soldering on new pigtail (they don't give you the heat shrink tubing but Home Depot has a nice supply of marine grade tubing).
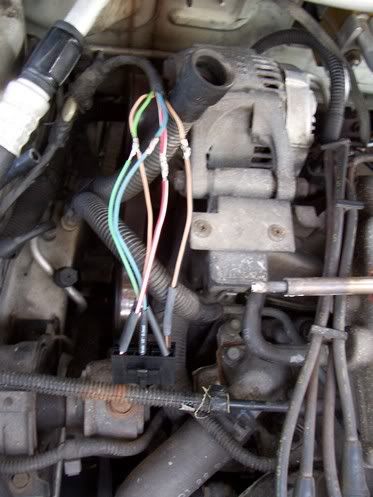
(Ed note... notice in this picture that the heat shrink tubing is now covering the soldered wires):
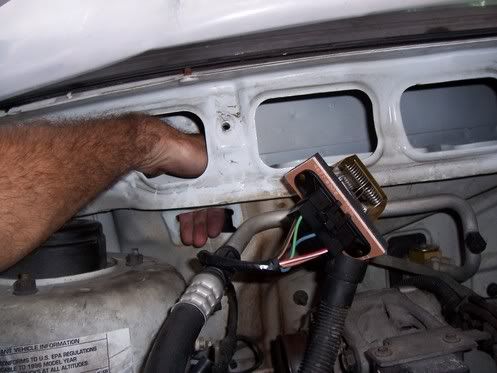
Here is where it goes (Ed. note... the Resistor Block goes INTO the rectangular hole where John's fingers are sticking out):
That was about $35 in parts but should finally resolve the missing blower speeds.
* * * End... by John Wood/Allpar.com: Jan 11 2006, 08:00 PM * * *
3.) BLOWER MOTOR RELAY - I have considered strangling the Dodge engineer who "designed" this device to reside in its installed location for the '96 Minivan. If your Minivan is a '97 or '98, location may vary. This is by far THE most difficult component to replace in a 1996 model, but it is also among the least expensive ($8-$13)... and doing so can resolve one or more of a number of problems. Get your tools out and allow between 1-2 hours for disassembly, replacement and reassembly. No kidding. You'll need a Phillips screwdriver, a 10mm socket and ratchet with a 6-to-8-inch extension, a flashlight and some electrical tape.
NOTE: In a 2005 Caravan, "The relay is in the main fuse/relay box under the hood between the battery & fender on driver's side. The box lid has the locations on the under side. - pwilliams517"
NOTE: In a 1997 Grand Caravan, "Production date = 7/96 - title and owners manual (is a) 1997 (Grand Caravan). The PDC is under the hood with the relay at position 5, fuse at position 3... {this per the diagram in Chilton's}" - carolinaquestions/AutomotiveForums.Com
a.) Remove the plastic facia below the steering column (4 or 5 Philips-head screws).
b.) Disconnect the parking brake cable from the facia (make a note about how the cable is attached - you have to lift the cable up and slide it sideways/outward to remove it from the facia).
c.) Remove the stamped-steel shroud beneath the steering column - it's (the one previously covered by the facia removed in Step b.) held on by about (12) 10mm hex-head screws - make a note of the screw types and their locations, there are 2 types of screws.
d.) Disconnect the hood release latch.
e.) Disconnect the computer diagnostics connector from the U-Channel crossmember.
f.) Uninstall the U-Channel crossmember - removing several 10mm hex-head screws get this job done. Trust me, you WILL need the extra clearance to get at the Blower Motor Relay later.
g.) Remove the Junction Box cover and unbolt the Junction Box (under the dash, driver's side, it contains relays and fuses, it also has the Body Control Module attached to its back) - there are three 10mm screws, each about 3 inches long that must be removed.
h.) GENTLY pull the Junction Box as far forward as possible. Behind the Junction Box, up high and attached to a clip on the firewall, is the Blower Motor Relay. (Now you know why I have considered strangling the "engineer" for this flash of brilliance). You will recognize the Blower Motor Relay as a "black box" with four wires (blue, green, orange/black and black). It's size is about 1"x1"x2".
i.) Carefully unclip/unfasten the Blower Motor Relay with wires attached from the firewall and GENTLY pull downward as far as possible. You will notice that a plastic depression clip holds the wired connector to the Blower Motor Relay... depress it and carefully pull the Blower Motor Relay out of its socket.
IMPORTANT NOTE: On the firewall, make SURE you push and flatten the clip that formerly held the Blower Motor Relay against the firewall so it does not contact the BCM/Junction Block when you reassemble your Caravan.
j.) You will notice that the OEM part has 4 prongs and your replacement part probably has 5; don't worry, the GP Sorensen, AC Delco and Hella parts work fine - I bought and tested ALL of them to make absolutely sure they would work. Plug your replacement part into the Blower Motor Relay socket with supreme confidence.
k.) Wrap a piece of electrical tape completely around the relay and its socket - this prevents dirt, dust and moisture from getting into and around the contact points and also makes it much less likely that the relay will somehow work its way out of the socket.
l.) Unless you are a certified masochist, do NOT attempt to reposition the Blower Motor Relay anywhere NEAR its original location. The special housing that came with the OEM relay is probably NOT part of the replacement part anyway (and do NOT attempt to reuse ANY piece of the old part). Keep the relay in view while you reassemble your Caravan and tuck/tape/bind it in any way you see fit after the reassembly is complete. That's what I did. Screw Dodge engineers. Anybody feel like storming Chrysler with torches and pitchforks by now?
But hey, pat yourself on the back - you're halfway home on this one. Get a beer. Or a glass of wine. Or whatever. But only ONE. You still need to remain focused.
m.) Starting with Step h., - reassembly is the reverse of disassembly.
NOTE: After you have reassembled the dash, your new Blower Motor Relay should be visible underneath and behind the Junction Box/BCM... make sure it is out of the way of your feet when you drive. If necessary, tuck, tape or strap this in any way you see fit so it will not move around under the dashboard. At any rate, it will NOW be a whole lot easier to replace this relay again, should you ever need to do so.
4.) BLOWER MOTOR - located under/behind the glovebox/door. If the symptoms of your AC/heater blower problem indicates a motor replacement, take heart in knowing this is not THE most difficult task to finish. Still, I write about this because I continue to be horrified by the prices of so-called replacement motor parts - between $130-$175USD from dealers. Gadzooks. Fact is, the motor, only, cost me $45USD (about 1/3 the cost of the OEM unit which also includes the motor housing and fan/cage). To pull off this procedure, however, a certain amount of "handyman savvy" is required.
a.) Remove the glovebox AND door... you may very well need the extra room.
b.) Remove the Blower Motor cover (four screws).
c.) Remove the Blower Motor ASSEMBLY (motor, fan/cage fan and fixture - three screws). You will probably need a flashlight to locate these screws. If you are NOT using the expensive OEM part and plan to reuse the motor housing and fan/cage, BE CAREFUL not to damage the fan/cage... it is "delicate."
If you bought a complete and expensive OEM replacement motor/fan, STOP HERE. All you need to do is reinstall it. However, if you did what I did and bought ONLY the motor for about 1/3 the cost (and did NOT break the fan/cage when removing the old motor!), proceed to Step d.
d.) FIRST, you must remove the old Blower Motor from its housing. There are 2 screws and 3 rubber bushings that center and hold the old motor in this housing. This is a little tricky, but it CAN be done.
e.) Remove the two screws from the bottom of the motor housing and, using a small flat-bladed screwdriver, carefully depress each of three rubber bushings to release the motor from its housing.
NOTE: Be EXTREMELY careful NOT to damage the fan/cage in ANY way... if you do, it's GAME OVER and you MUST buy the expensive replacement unit from your dealer!
f.) It IS possible to remove the fan/cage from the old motor for replacement on the new motor, but it requires VERY careful planning and execution. First, put the old Blower Motor tightly in a VISE, with the fan/cage upright (not tight enough to crush the housing, but tight enough to bang on it with a hammer [described below]).
g.) Lay a hacksaw blade flat on the top of the fan/cage, with teeth facing the motor spindle. Carefully saw sideways through the top of the plastic shaft on one side. Place the hacksaw blade on the other side (180 degrees) of the plastic shaft and saw through the plastic shaft to the metal motor spindle again. You should now have 2 notches on either side of the spindle (opposite sides), through the plastic shaft.
h.) Using a hammer and POINTED punch, score a dimple into the end of the metal motor spindle.
i.) Using a hub puller, place the blades of the puller into the scores of the plastic shaft you created in Step g. Use a C-clamp to push the grips into these scores (a fair amount, but not too much pressure).
j.) Rotate the hub puller clock-wise, centering the hub puller pin into the dimple you created in step h. Rotate the hub puller to gently lift the fan/cage about 1/2 inch UPWARD on the motor spindle.
k.) Remove the C-Clamp and hub puller. You should now be able to carefully and EVENLY lift from the bottom the fan/cage up and off the motor spindle. BE CAREFUL!
l.) The replacement motor I bought - I had to wrap this motor with a foam buffer strip (came with the motor) to properly fit in the stock OEM housing. You MAY have to modify the OEM motor housing in order to get the motor to seat FLUSH in housing - I had to carefully cut the center piece out of the end of the motor housing so I could get the motor to sit flush in the bottom of the housing. The two screws would NOT reach the new motor through the OEM motor housing otherwise. Make SURE the motor sits FLUSH in the bottom of the motor housing and the three rubber bushings are properly in place between the new motor and the OEM motor housing BEFORE attempting to screw in the two screws!
m.) Once done, carefully press the fan/cage back onto the new motor spindle. I did notice that the new motor spindle length was about 1/8" longer than the old OEM motor, so the new motor spindle protruded by that same amount beyond the fan/cage shaft. As a precaution, I mixed up a little epoxy and dabbed the end of the spindle so the fan/cage DEFINITELY would not slide on the spindle.
n.) Cut the wires (pigtail) off of the old motor as close to the old motor as possible (the black and blue wires with the grommet and plug... you will need to RE-USE this!) and strip the ends, leaving about 3/8 inch of exposed copper strands.
o.) Cut/shorten the wires from the new motor, leaving about 4 inches... and strip the ends of these wires, leaving about 3/8 inch of exposed copper strands.
p.) Using 10gauge/12gauge butts and proper crimping tool, attach the wires from the old pigtail to the wires on the new motor (black-to-black [ground-to-ground] FIRST, then the other wire, blue-to-whatever-the-other-color-is on the new motor). Make sure your crimps are TIGHT and wrap them well with electrical tape!
q.) Reinstallation is the reverse of installation, beginning with Step e. It is easy to break the fan/cage while reassembling as well... so please BE CAREFUL.
That's it...
I invite, urge and encourage anyone and EVERYONE to jump on this thread to add, correct, clarify, whatever on this subject... I think WE can do a better job than Chilton, Haynes and Chrysler!
Cheers!
DOCUMENT REVISION HISTORY
Updated 30-JAN-2006: Pic of 40amp fuse and source info added (Thank you Stevo2 at AutomotiveForums.Com!)
Updated 18-JAN-2006: New NOTEs added regarding actual Fuse and Blower Motor RELAY locations in a 1997 Grand Caravan (production date 7/96) which differ in some respects from Haynes manual specifications (Thank you carolinaquestions at AutomotiveForums.Com!)
Updated 12-JAN-2006: Truly EXCELLENT pictures and commentary regarding removal and installation of Blower Motor RELAY contributed by John Wood of Allpar.Com (Thank you John Wood at AllPar.Com!)
Updated 06-JAN-2006: OEM Part Numbers and locations for 2005 Caravan Resistor Block, Blower Motor and Blower Motor Relay added... thanks pwilliams517 at DodgeTalk.Com!
Updated 06-JAN-2006: OEM Part Number for 2001 Caravan Resistor Block added!... thanks Parky50 at AutomotiveForums.Com!
Updated 04-JAN-2006: Good News for 1992-1995 and 1999-2005 Caravan, T&C and Voyager Owners added
Updated 13-DEC-2005: 40AMP fuse replacement source
Updated 12-DEC-2005: Resistor Block Replacement price and source (Rockauto.com)... thanks, clrbrown at AutomotiveForums.Com!
Updated 15-FEB-2005: ADDED additional helpful detail to Resistor Block Replacement... thanks, ksflatfoot at AutomotiveForums.Com!)
[Updated 15-FEB-2005: Define "PITA" - Pain in the As*... to replace a Resistor Block]
[Updated 26-JAN-2005: Title change and description to reflect '96-'98 Chrysler Minivans]
[Reworked 16-JAN-2005: Steps l.) and m.) of Blower Motor Installation Procedure]
[Updated 16-JAN-2005: ADDED 40AMP PDC Fuse Locations for '97 & '98 Mini-Vans
[Updated 16-JAN-2005: ADDED a few Helpful Notes about Blower Motor Relay Installation]
[Updated 09-JAN-2005: A few, minor, corrections]
[Updated 06-JAN-2005: Old Blower Motor Pigtail Installation]
[Updated 06-JAN-2005: COST Comparison Data ]
[Updated 05-JAN-2005: Misc. NEW information ]
Introduction... Although these procedures were originally written specifically for the 1996 Dodge Grand Caravan LE, they have been updated to apply to all 1996, 1997 and 1998 Dodge Caravan, Plymouth Voyager and Chrysler Town & Country Mini-vans.
Additional helpful notes for other model years are scattered throughout this document. You can print this document or link to it... but be advised, I will continue to update this post as necessary with corrections, new and/or additional helpful information and any special notes.
Before you get started, you should run your VIN through Dodge's Recall Check Procedure. The results of this check may (or may not) have some bearing on your current problem and your Dealer may have to fix it FREE by law. To find out if your vehicle has any current unperformed or incomplete recalls or customer satisfaction notifications, get the last 8 characters of your VIN and go here to make sure that your vehicle has had ALL of its recall work done:
http://www-5.dodge.com/webselfservice/dodg...rm%28%27R%27%29
As an aside, here is a compiled list of helpful information sources which can be found in forums of various web sites and user communities (including this one):
http://www.allpar.com/forums/index.php?showforum=16
http://www.autobanter.com/forumdisplay.php?f=23
http://www.automotiveforums.com/vbulletin/...splay.php?f=139
https://dodgeforum.com/forumid_30/tt.htm
And lastly, please read through this entire document to familiarize yourself with what it covers and what it does not cover. Your job will be a whole lot easier if you do... really.
Document Revision History... has been removed from the top and placed at the end of this document. If you find/found this document useful, please say so, even if you have to create a login ID to do so!... friends, that ALSO means that if you have information for model years or part numbers not mentioned in this document, please show your appreciation and post it so WE can make this document better than it already is! Check out the posts in this thread and the Revision History and you will see many names of thoughtful contributors... this document has become a collaborative effort!... thanks to YOU (and Chrysler engineering who made it necessary in the first place, of course
). So, THANK YOU EVERYONE, in advance, for SHARING!
... special thanks to ksflatfoot, clrbrown, Parky50, pwilliams517, John Wood, carolinaquestions, and most recently, Stevo2 for contributing pictures, source information and helpful comments regarding these procedures. Thanks to your thoughtful contributions, you have helped make this thread the hottest thread on the forum!Good News for 1992-1995 and 1997-2005 Caravan, T&C and Voyager Owners... Complete success has also been achieved by owners of newer Caravans, T&Cs and Voyagers (1997-2005) and owners of earlier models (1992-1995) who have used the following information as a guide, instead of following step-by-step procedures. These owners resolved their AC/Heater Blower issues even though physical locations of certain components and their part numbers were different.
So, my fellow DIYers, take heart!... Woo-Hoo!
Also, these procedures are intended to cover only the most common AC/Heater Blower issues... electrical shorts, mis-wiring and other "extraordinary" issues are NOT covered in these procedures.
* * * * * * * * * * * * * * * * * * * * * * * * * * * * * * * * * *
There are 4 things that usually cause an AC/Heater Blower Motor to misbehave or stop working altogether...
1. A BLOWN 40Amp fuse,
2. A BURNED-out Resistor Block,
3. A BAD Blower Motor Relay, AND/OR
4. A WORN-out Blower Motor.
* * * * * * * * * * * * * * * * * * * * * * * * * * * * * * * * * *
Question #1 - Does your AC/Heater Blower Motor work in high-speed only or possibly some other speed as well, but NOT all speeds?
Probable Cause: Bad/Corroded RESISTOR BLOCK.
Solution: Replace Resistor Block.
* * * * * * * * * * * * * * * * * * * * * * * * * * * * * * * * * *
Question #2 - Does your AC/Heater Blower Motor NOT work AT ALL?
Probable Cause: Blown 40AMP FUSE, bad Resistor Block, bad Blower Motor RELAY and/or bad Blower MOTOR.
Solution: Inspect 40AMP fuse, replace if necessary. Inspect the Resistor Block and replace if necessary. If both 40 AMP fuse and Resistor Block are OK, replace the Blower Motor Relay FIRST. Then replace the Blower Motor, if necessary. Frankly though, I would replace BOTH Blower Motor Relay AND Blower Motor at the same time because a bad/marginal relay can cause a good motor to behave like a bad one and a good relay can also make a marginal motor temporarily appear better than it really is.
* * * * * * * * * * * * * * * * * * * * * * * * * * * * * * * * * *
Question #3 - Does your AC/Heater Blower Motor seem to "growl," run slow or stop altogether AFTER running for awhile, though sometimes it seems by turning it off and waiting awhile the problem resolves itself, but only temporarily?
Probable Cause: Blower Motor RELAY contacts are burned or pitted, Blower MOTOR brushes worn and/or bad bearing in Blower MOTOR.
Solution: Replace Blower Motor Relay, then Blower Motor, if necessary, preferably, both the Blower Motor Relay and Blower Motor at the SAME time.
* * * * * * * * * * * * * * * * * * * * * * * * * * * * * * * * * *
Question #4 - Does your AC/Heater Blower Motor continue to run after the engine is turned off and the key is removed from the ignition?
Probable Cause: Blower Motor RELAY contacts are "welded" in the closed position and refuse to cut power to the Blower Motor.
Solution: Replace Blower Motor Relay.
* * * * * * * * * * * * * * * * * * * * * * * * * * * * * * * * * *
PART NUMBERS, MANUFACTURERS & POINT of PURCHASE
40AMP Fuse:This is available at one of the stores I mention below and/or at your dealer. Chris of RockAuto.Com emailed and told me "We do not carry the fuses for your car. Those are something you will need to purchase locally or at a dealership." Stevo2 at AutomotiveForums.Com says "If the 40 amp fuse is a Maxi-fuse than it is available from these places also. NAPA-BK 7821079 Kragen, Checker, Shucks, Rockauto-MAX40 Mopar-6101641." I am guesstimating that they cost somewhere between $1-$3USD each.
Resistor Block:
OEM=by my Dodge dealer was $16USD which includes 6% CT state sales tax);
http://www.RockAuto.Com - Standard Motor Products Part=RU93 ($15.40 + $5.63 Shipping)
NOTE 1: OEM Part# for the 2001 Caravan is 4885583-AB RESISTOR 8035022 (Thank you Parky50!)
NOTE 2: OEM Part# for the 2005 Caravan is 4885583AC.
(Thank you pwilliams517 at http://www.dodgetalk.com/forums/showthread...ed=1#post865984 )
Blower Motor Relay:
OEM=4638094; GP Sorensen=MR76; AC Delco=15-8426; Hella=1410045; Niehoff Ignition=RL35301;Standard Motor Products=RY116 (prices I've seen vary between $8 and $13USD - the OEM price quoted by my Dodge dealer was $71USD [yeah, $71, that's NOT a typo] which includes 6% CT state sales tax)
NOTE: OEM Part# for the 2005 Caravan is 4727370AA.
(Thank you pwilliams517 at http://www.dodgetalk.com/forums/showthread...ed=1#post865984 )
Blower Motor:
OEM=(go to your dealer); AC Delco=15-80104; Siemens=PM3324X-12V-02345; FactoryAir=35283; Four Seasons=35283 (prices I've seen vary from $45 and $60USD, the full OEM unit is between $130-$175USD - the OEM price quoted by my Dodge dealer was $137USD which includes 6% CT state sales tax)
NOTE: OEM Part# for the 2005 Caravan is 4885475AC.
(Thank you pwilliams517 at http://www.dodgetalk.com/forums/showthread...ed=1#post865984 )
Stores/Places to Get Parts:
Advance Auto Parts; Auto Zone; CarQuest; Levine Automotive (in Connecticut USA); http://www.RockAuto.Com
* * * * * * * * * * * * * * * * * * * * * * * * * * * * * * * * * *
COST COMPARISON DATA: My Dealer Does the Work / I Do the Work
My Dealer's Estimate
Blower Motor Relay - $66 (this is an outrageous, friggin' RIP-OFF!)
Blower Motor (DOES include new fan/cage & motor housing, all assembled) - $129
Resistor Block - $14
CT State Sales Tax on Parts - $12.54
Labor (2 hours @ $85/hour) - $170
TOTAL Dealer Price - $391.54
My Actual Costs
Blower Motor Relay - $11
Blower Motor (does NOT include new fan/cage & motor housing, JUST motor) - $44
Resistor Block - $14
CT State Sales Tax on Parts - $4.14
Labor (3 hours @$0/hour) - $0
My TOTAL Actual Cost - $73.14
TOTAL Savings - $318.40 - I reduced my repair bill over 81%
* * * * * * * * * * * * * * * * * * * * * * * * * * * * * * * * * *
I apologize for the length of this "dissertation," but I hope it inspires others to include useful, detailed information in ALL of their messages posted on this board.
Step #1 - DISCONNECT the NEGATIVE Battery Cable from the battery. If you FAIL to do this, you risk shorting out a number of components that are EXPENSIVE to replace. You might also accidentally deploy either or both of your AIRBAGs which are HIDEOUSLY expensive to replace - not to mention extremely DANGEROUS with your head so close to these explosive devices!
Depending on the SYMPTOMS of your Caravan AC/Heater Blower Motor problem, you may wind up performing more than one problem resolution. Read through ALL of this BEFORE you decide what YOUR Step #2, #3 and so forth will be.
The first thing to remember is that their are at least FOUR main user-serviceable components in the the AC/Heater Blower system - 1.) 40 Amp Fuse, 2.) Resistor Block, 3.) Blower Motor Relay, and 4.) Blower Motor. Below are the procedures for checking and/or replacing these components. Good Luck, One and All!...
1.) 40AMP FUSE - located in the Power Distribution Center (PDC) under the hood on the driver-side fenderwell, according to my Haynes Manual #30011...
for the '96 Mini-Van is Fuse #3,
for the '97 Mini-Van is Fuse #3 or #7, and
for the '98 Mini-Van is Fuse #21.
The inside cover of the PDC for your Mini-Van will show you *exactly* where your Blower Motor Fuse is located. Carefully remove this fuse (pliers are OK if you are *careful*) and look at it - if it's bad, the little "loopy" conductor will be burned out - if so, replace the fuse. You are looking for a fuse that looks like this (contributed by Stevo2 at AutomotiveForums.Com):
NOTE: In a 1997 Grand Caravan, "Production date = 7/96 - title and owners manual (is a) 1997 (Grand Caravan). The PDC is under the hood with the relay at position 5, fuse at position 3... {this per the diagram in Chilton's}" - carolinaquestions/AutomotiveForums.Com
2.) RESISTOR BLOCK - located under the hood, on the firewall, passenger-side, above and slightly to the right of the shock tower.
You do NOT have to pull this out of the firewall to inspect it. Remove the glovebox/door. Get a flashlight. You can see the Resistor Block poking through, high up, on the firewall by peering through the hole where the glovebox/door used to be. You will recognize the Resistor Block by several coiled wires (looks like a heater element) contained in a rectantagular arrangement about 3 inches wide and 1 inch high. If you see ANY rust on these coils, I suggest you REPLACE it. Removal is a PITA (pain in the as*), but accomplished with the hood up and pulling it out of the firewall.
The Resistor Block is held in place with attached clips, not screws so, in theory, tools are not required to remove it from the firewall. It may, however, require a screw driver to pry it loose. My Resistor Block was in so tight that I considered using a pry bar... @#$%&!
It doesn't matter if you unplug the wires first and then remove the Resistor Block or remove the Resistor Block and wires together... I found it impossible to remove the wires, so I CAREFULLY wiggled/tugged the wires together with the Resistor Block out of the firewall. It's tight, but possible to do because I did it. Installation, obviously, can ALSO be a PITA... I plugged the new Resistor Block into the firewall FIRST and then plugged the wires into it... Keep some BandAids handly. I gave blood; you might too.
@#$%&! Dodge Engineers!
NOTE: In a 2005 Caravan, "The resistor is behind the glove box attached to the HVAC case with two bolts & two wire harness connectors (one to the blower motor & one from the speed controls) - pwilliams517"
Here are a few great pictures and comments contributed by John Wood of Allpar.Com (Thank you John!)...
* * * Start... by John Wood/Allpar.com: Jan 7 2006, 09:33 PM (this is an actual installation!) * * *
Let me add a little: This is from a 96 G Voyager and should apply for 96 to 2000 year models. To get the resistor block out of the opening, insert a small acrewdriver blade under the edge and keep it sideways while pushing it to the center. This will compress the spring retainer and you can pull the block out with ease.
Here is a picture of the opening (Ed. note... it's the rectangular opening):
The resistor in this picture has no burnt coils, but the crimps for the coils are very badly corroded. This is typical.
The resistor connector was badly corroded and burned and will have to be replaced in this picture. The resistor block blade connectors were rusted into the connector plug and literally had to be pulled apart with channel locks.
* * * End... by John Wood/Allpar.com: Jan 7 2006, 09:33 PM * * *
If you need to repair Resistor Block Wiring, here are a few MORE great pictures and comments contributed by John Wood (Thank you, again John!)...
* * * Start... by John Wood/Allpar.com: Jan 11 2006, 08:00 PM (this is an actual installation!) * * *
I got my resistor and connector pigtail in today to repair my corroded resistor and burnt wiring connector. I took some pictures of the repair process.
New parts:
Soldering on new pigtail (they don't give you the heat shrink tubing but Home Depot has a nice supply of marine grade tubing).
(Ed note... notice in this picture that the heat shrink tubing is now covering the soldered wires):
Here is where it goes (Ed. note... the Resistor Block goes INTO the rectangular hole where John's fingers are sticking out):
That was about $35 in parts but should finally resolve the missing blower speeds.
* * * End... by John Wood/Allpar.com: Jan 11 2006, 08:00 PM * * *
3.) BLOWER MOTOR RELAY - I have considered strangling the Dodge engineer who "designed" this device to reside in its installed location for the '96 Minivan. If your Minivan is a '97 or '98, location may vary. This is by far THE most difficult component to replace in a 1996 model, but it is also among the least expensive ($8-$13)... and doing so can resolve one or more of a number of problems. Get your tools out and allow between 1-2 hours for disassembly, replacement and reassembly. No kidding. You'll need a Phillips screwdriver, a 10mm socket and ratchet with a 6-to-8-inch extension, a flashlight and some electrical tape.
NOTE: In a 2005 Caravan, "The relay is in the main fuse/relay box under the hood between the battery & fender on driver's side. The box lid has the locations on the under side. - pwilliams517"
NOTE: In a 1997 Grand Caravan, "Production date = 7/96 - title and owners manual (is a) 1997 (Grand Caravan). The PDC is under the hood with the relay at position 5, fuse at position 3... {this per the diagram in Chilton's}" - carolinaquestions/AutomotiveForums.Com
a.) Remove the plastic facia below the steering column (4 or 5 Philips-head screws).
b.) Disconnect the parking brake cable from the facia (make a note about how the cable is attached - you have to lift the cable up and slide it sideways/outward to remove it from the facia).
c.) Remove the stamped-steel shroud beneath the steering column - it's (the one previously covered by the facia removed in Step b.) held on by about (12) 10mm hex-head screws - make a note of the screw types and their locations, there are 2 types of screws.
d.) Disconnect the hood release latch.
e.) Disconnect the computer diagnostics connector from the U-Channel crossmember.
f.) Uninstall the U-Channel crossmember - removing several 10mm hex-head screws get this job done. Trust me, you WILL need the extra clearance to get at the Blower Motor Relay later.
g.) Remove the Junction Box cover and unbolt the Junction Box (under the dash, driver's side, it contains relays and fuses, it also has the Body Control Module attached to its back) - there are three 10mm screws, each about 3 inches long that must be removed.
h.) GENTLY pull the Junction Box as far forward as possible. Behind the Junction Box, up high and attached to a clip on the firewall, is the Blower Motor Relay. (Now you know why I have considered strangling the "engineer" for this flash of brilliance). You will recognize the Blower Motor Relay as a "black box" with four wires (blue, green, orange/black and black). It's size is about 1"x1"x2".
i.) Carefully unclip/unfasten the Blower Motor Relay with wires attached from the firewall and GENTLY pull downward as far as possible. You will notice that a plastic depression clip holds the wired connector to the Blower Motor Relay... depress it and carefully pull the Blower Motor Relay out of its socket.
IMPORTANT NOTE: On the firewall, make SURE you push and flatten the clip that formerly held the Blower Motor Relay against the firewall so it does not contact the BCM/Junction Block when you reassemble your Caravan.
j.) You will notice that the OEM part has 4 prongs and your replacement part probably has 5; don't worry, the GP Sorensen, AC Delco and Hella parts work fine - I bought and tested ALL of them to make absolutely sure they would work. Plug your replacement part into the Blower Motor Relay socket with supreme confidence.
k.) Wrap a piece of electrical tape completely around the relay and its socket - this prevents dirt, dust and moisture from getting into and around the contact points and also makes it much less likely that the relay will somehow work its way out of the socket.
l.) Unless you are a certified masochist, do NOT attempt to reposition the Blower Motor Relay anywhere NEAR its original location. The special housing that came with the OEM relay is probably NOT part of the replacement part anyway (and do NOT attempt to reuse ANY piece of the old part). Keep the relay in view while you reassemble your Caravan and tuck/tape/bind it in any way you see fit after the reassembly is complete. That's what I did. Screw Dodge engineers. Anybody feel like storming Chrysler with torches and pitchforks by now?
But hey, pat yourself on the back - you're halfway home on this one. Get a beer. Or a glass of wine. Or whatever. But only ONE. You still need to remain focused.
m.) Starting with Step h., - reassembly is the reverse of disassembly.
NOTE: After you have reassembled the dash, your new Blower Motor Relay should be visible underneath and behind the Junction Box/BCM... make sure it is out of the way of your feet when you drive. If necessary, tuck, tape or strap this in any way you see fit so it will not move around under the dashboard. At any rate, it will NOW be a whole lot easier to replace this relay again, should you ever need to do so.
4.) BLOWER MOTOR - located under/behind the glovebox/door. If the symptoms of your AC/heater blower problem indicates a motor replacement, take heart in knowing this is not THE most difficult task to finish. Still, I write about this because I continue to be horrified by the prices of so-called replacement motor parts - between $130-$175USD from dealers. Gadzooks. Fact is, the motor, only, cost me $45USD (about 1/3 the cost of the OEM unit which also includes the motor housing and fan/cage). To pull off this procedure, however, a certain amount of "handyman savvy" is required.
a.) Remove the glovebox AND door... you may very well need the extra room.
b.) Remove the Blower Motor cover (four screws).
c.) Remove the Blower Motor ASSEMBLY (motor, fan/cage fan and fixture - three screws). You will probably need a flashlight to locate these screws. If you are NOT using the expensive OEM part and plan to reuse the motor housing and fan/cage, BE CAREFUL not to damage the fan/cage... it is "delicate."
If you bought a complete and expensive OEM replacement motor/fan, STOP HERE. All you need to do is reinstall it. However, if you did what I did and bought ONLY the motor for about 1/3 the cost (and did NOT break the fan/cage when removing the old motor!), proceed to Step d.
d.) FIRST, you must remove the old Blower Motor from its housing. There are 2 screws and 3 rubber bushings that center and hold the old motor in this housing. This is a little tricky, but it CAN be done.
e.) Remove the two screws from the bottom of the motor housing and, using a small flat-bladed screwdriver, carefully depress each of three rubber bushings to release the motor from its housing.
NOTE: Be EXTREMELY careful NOT to damage the fan/cage in ANY way... if you do, it's GAME OVER and you MUST buy the expensive replacement unit from your dealer!
f.) It IS possible to remove the fan/cage from the old motor for replacement on the new motor, but it requires VERY careful planning and execution. First, put the old Blower Motor tightly in a VISE, with the fan/cage upright (not tight enough to crush the housing, but tight enough to bang on it with a hammer [described below]).
g.) Lay a hacksaw blade flat on the top of the fan/cage, with teeth facing the motor spindle. Carefully saw sideways through the top of the plastic shaft on one side. Place the hacksaw blade on the other side (180 degrees) of the plastic shaft and saw through the plastic shaft to the metal motor spindle again. You should now have 2 notches on either side of the spindle (opposite sides), through the plastic shaft.
h.) Using a hammer and POINTED punch, score a dimple into the end of the metal motor spindle.
i.) Using a hub puller, place the blades of the puller into the scores of the plastic shaft you created in Step g. Use a C-clamp to push the grips into these scores (a fair amount, but not too much pressure).
j.) Rotate the hub puller clock-wise, centering the hub puller pin into the dimple you created in step h. Rotate the hub puller to gently lift the fan/cage about 1/2 inch UPWARD on the motor spindle.
k.) Remove the C-Clamp and hub puller. You should now be able to carefully and EVENLY lift from the bottom the fan/cage up and off the motor spindle. BE CAREFUL!
l.) The replacement motor I bought - I had to wrap this motor with a foam buffer strip (came with the motor) to properly fit in the stock OEM housing. You MAY have to modify the OEM motor housing in order to get the motor to seat FLUSH in housing - I had to carefully cut the center piece out of the end of the motor housing so I could get the motor to sit flush in the bottom of the housing. The two screws would NOT reach the new motor through the OEM motor housing otherwise. Make SURE the motor sits FLUSH in the bottom of the motor housing and the three rubber bushings are properly in place between the new motor and the OEM motor housing BEFORE attempting to screw in the two screws!
m.) Once done, carefully press the fan/cage back onto the new motor spindle. I did notice that the new motor spindle length was about 1/8" longer than the old OEM motor, so the new motor spindle protruded by that same amount beyond the fan/cage shaft. As a precaution, I mixed up a little epoxy and dabbed the end of the spindle so the fan/cage DEFINITELY would not slide on the spindle.
n.) Cut the wires (pigtail) off of the old motor as close to the old motor as possible (the black and blue wires with the grommet and plug... you will need to RE-USE this!) and strip the ends, leaving about 3/8 inch of exposed copper strands.
o.) Cut/shorten the wires from the new motor, leaving about 4 inches... and strip the ends of these wires, leaving about 3/8 inch of exposed copper strands.
p.) Using 10gauge/12gauge butts and proper crimping tool, attach the wires from the old pigtail to the wires on the new motor (black-to-black [ground-to-ground] FIRST, then the other wire, blue-to-whatever-the-other-color-is on the new motor). Make sure your crimps are TIGHT and wrap them well with electrical tape!
q.) Reinstallation is the reverse of installation, beginning with Step e. It is easy to break the fan/cage while reassembling as well... so please BE CAREFUL.
That's it...
I invite, urge and encourage anyone and EVERYONE to jump on this thread to add, correct, clarify, whatever on this subject... I think WE can do a better job than Chilton, Haynes and Chrysler!
Cheers!
DOCUMENT REVISION HISTORY
Updated 30-JAN-2006: Pic of 40amp fuse and source info added (Thank you Stevo2 at AutomotiveForums.Com!)
Updated 18-JAN-2006: New NOTEs added regarding actual Fuse and Blower Motor RELAY locations in a 1997 Grand Caravan (production date 7/96) which differ in some respects from Haynes manual specifications (Thank you carolinaquestions at AutomotiveForums.Com!)
Updated 12-JAN-2006: Truly EXCELLENT pictures and commentary regarding removal and installation of Blower Motor RELAY contributed by John Wood of Allpar.Com (Thank you John Wood at AllPar.Com!)
Updated 06-JAN-2006: OEM Part Numbers and locations for 2005 Caravan Resistor Block, Blower Motor and Blower Motor Relay added... thanks pwilliams517 at DodgeTalk.Com!
Updated 06-JAN-2006: OEM Part Number for 2001 Caravan Resistor Block added!... thanks Parky50 at AutomotiveForums.Com!
Updated 04-JAN-2006: Good News for 1992-1995 and 1999-2005 Caravan, T&C and Voyager Owners added
Updated 13-DEC-2005: 40AMP fuse replacement source
Updated 12-DEC-2005: Resistor Block Replacement price and source (Rockauto.com)... thanks, clrbrown at AutomotiveForums.Com!
Updated 15-FEB-2005: ADDED additional helpful detail to Resistor Block Replacement... thanks, ksflatfoot at AutomotiveForums.Com!)
[Updated 15-FEB-2005: Define "PITA" - Pain in the As*... to replace a Resistor Block]
[Updated 26-JAN-2005: Title change and description to reflect '96-'98 Chrysler Minivans]
[Reworked 16-JAN-2005: Steps l.) and m.) of Blower Motor Installation Procedure]
[Updated 16-JAN-2005: ADDED 40AMP PDC Fuse Locations for '97 & '98 Mini-Vans
[Updated 16-JAN-2005: ADDED a few Helpful Notes about Blower Motor Relay Installation]
[Updated 09-JAN-2005: A few, minor, corrections]
[Updated 06-JAN-2005: Old Blower Motor Pigtail Installation]
[Updated 06-JAN-2005: COST Comparison Data ]
[Updated 05-JAN-2005: Misc. NEW information ]
#2
02-11-2006, 02:04 PM
To bad this info wasn't posted anywhere when I needed it the most 6 months ago. 
I was able to replace the parts much cheaper and with better parts for the resistor and resistor connector plug. It seems that this is a VERY BAD DESIGN. I can say that since I'm an automotive engineer.
Who in their right mind would put an electrical component that isn't fully water-proof under the hood and at the far end of the hood seal???
On my 1996 Grand Caravan, that seal would slip off when the hood would open. I would simple slide it back on. However, the dumb seal wasn't long enough to cover the area over the resistor plug connection. So, when it rained or driving through puddles, the plug connection would get soaked! Thus, the resistor card and connector would corrode.
#3
02-11-2006, 10:56 PM
No question that this design could have been better. Still, somehow this design will miraculously last two or more years of constant blower/heater use. All we can do is be aware of the components and there liklihood of failure. My '96 GC LE is on its third Blower Motor, second Relay and second Resistor Block... I have 224,000 on my vehicle. Given some of the stories I've read, I consider myself fortunate.
#4
07-08-2007, 04:45 PM

Wonderful write-up! Saved me a lot of time tracking wires to find the resistor block (my last Ford was behind the dash in a duct). Easier than some, but still gawd-awful to get to with all the AC lines and such. And of course the connector was welded to the the block.
If you need a resistor block pigtail (and odds are you will), you will need to have the part number in handwhen you go to your Dodge dealer (yes, it's a dealer only part). My local Dodge dealer couldn't find the listing for the pigtail for a 2000 GC...What a wonderful parts systems....Anyway, here is what you need for the 96-00 Caravans/Grand Caravans.
Pigtail: MOPAR P/N 5003316AA
Resistor Block: MOPAR P/N 4677180AD
The pigtail will run you about $25 andthe resistor block about $14 from the Dodge parts dept. I soldered the pigtail in, but it was such a chore (short harness, tight space, etc), that I recommend using heat shrink butt splice connectors. They're pricey, but you will save a lot of time. You can pick them up at any auto parts store.
Now that I've got my front A/C working again, now it's time to fix the back...the rear blower quit a few days after getting the front working [:@] Know of any writeups for that one?
#5
07-22-2007, 10:03 AM

Excellent work posted here. Thank you!!!
I got the wiringharness disconnected from the resistor block very easily, then literally pulled the resistor block out of the firewall with a special set of vise-grips I have, all inabout15 mins.
When I get the new resistor pack tomorrow, I anticipate installation will be about 30 mins., including testing the blower motor.
Today, July 23, p/u the new resistor, had it back in and working in 15 mins.
Now I have to replace the muffler ARGGGGH!!!
Thanks again for taking the time to show everyone how to replace this unit. With time & patience, anyone can do it.
GT
Ajax, Ontario, Canada
#6
07-29-2007, 04:15 PM

I want to thank all of the previous contributors to this link! I have a 1996 caravan that demonstrated the symptoms listed in regards to the blower working sporatically then not at all. After reading the step by step instructions, I thought that I would give it a try.
1. Located and removed resistor block in firewall. Replaced unit from Dealer $16.00. Did not solve
problem.
2. Removed and replace blower motor, $151.00 Dealer price incl squirrel cage. Still did not solve
problem.
3. Removed all of the covers and crossmember, fuse box, etc... to get to the "conveniently" located relay! I can't believe where this relay is located! AH YES! Engineers for Chrysler! Can't get much more useless than that!
Replaced relay, $20.00 Dealer cost. SUCCESS!!!! The blower works great!
By the way, I relocated the relay to a more accessible location under the dash. So, if I need access inthe future, I can get to it.
I guess I probably should have tried to replace the relay first, but I generally try the easiest items first then work my way down to the more difficult tasks. At least all of the components are new now and it only cost about $188.00. Time to do all 3 tasks, probably about 4 hours all together but that included having to run to the dealer 3 times for parts and to cool off (Phoenix in July!!!) Hotter than you know what!
#7
08-10-2007, 01:06 PM

I pitty those who spent hours replacing the blower relay. While the location was stupid, it is possible to reach behind the bracket supporting the fuseblock and get a finger or two on it. It's the only relay there. I just moved it back and forth and worked it free of the firewall then dropped it through the opening in the bracket. In my case, I popped open the relay and the contact had stuck open. I freed it up and walla!!!!! I have blower motor function. Repair time was 3 minutes!!!
Of course I only broke even with the hours of troubleshooting I was doing without a schematic and without knowing the battery in my DVOM was bad. LOL. Anyway, try to reach through the bracket before dissassembling the driver's side of your van. Good Luck.
Of course I only broke even with the hours of troubleshooting I was doing without a schematic and without knowing the battery in my DVOM was bad. LOL. Anyway, try to reach through the bracket before dissassembling the driver's side of your van. Good Luck.
Trending Topics
#8
09-23-2007, 07:32 PM

To add to the list of symptoms for #3...when I turned off the AC/heater fan, the AC LED would remain on until I turned the car off. It turned out to be the blower motor which was replaced for about $60, but I can;t explain why the bad motor would keep the AC LED on.
#9
05-05-2008, 12:52 PM

Rookie
Join Date: Jun 2007
Location: Canton, GA
Posts: 96
Likes: 0
Received 0 Likes
on
0 Posts
#10
09-17-2008, 03:15 PM

I have been having problem 3 with this...and after reading this...we are ready to tackle it. I love this site and can always find the answer to my problems here. Being a female...people are amazed that I know what is wrong with my vehicle and how to fix it...although my husband usually does the work....after I research it. This site has saved us hundreds of dollars in repair cost. Thanks to everyones input!

