

DIY Write up How to replace Dodge Ram Ball Joints and Wheel Bearings
#1
 07-13-2011, 01:02 AM


Here is my write up of how to replace the ball joints on your second generation Dodge ram. Mine is a 2001 dodge ram 1500 but it should be the same for all 1994-2001 2nd generation dodge rams and also very simuliar for 2002 and up and 2500s and 3500s. I read a 3rd generation write up on a 2500 that really helped me. Below I will detail to the best of my memory my ball joints and wheel bearing replacement.
#3
07-13-2011, 02:09 AM
#4
07-13-2011, 02:21 AM
 Thats why we don't do it, sorry.
#5
07-13-2011, 02:23 AM
While I'm working on the pictures and all here is my list of tools needed to work on the project.
Wheel bearing and ball joints
1. a 1 inch 11/16 socket. After looking all over I found it at salvo for 10 or 12 bucks. Sears has it for 20. (needed for wheel bearing replacement to take the nut off that it in the center of the hub. You can pull the hub, axle spline out with this nut still on and get the hub off but i needed the nut to re use as the replacement wheel hub assembly didnt have it. I didnt no i could get out the spline and hub until after i bought the tools and took it off but either way i needed it and so will u.)
2. At least a half inch socket set. I broke 2 3/8s breaker bars. a 1/2 x 3/8 adapter, a 3/8 ratchet. Use at least a 1/2 socket set. I would also highly reccomend buy a 3/4 inch socket set from harbor frieight. It will really help u out and I bough a 20 some piece set with a 3/4 breaker bar and 3/4 ratchet and extensions for like 40 bucks. Harbor frieght always has 20% off coupons online on their web site.
3. Impact either compressor driven or battery powered. I used a 1/2 inch 18 volt dewalt. It has 300 lbs or torque and did the job. I use my battery power a ton and would reccomend one its just handy.
4. If you dont want to buy a 3/4 inch socket set have 2 heavy duty breaker bars and a cheater bar. For those who do not know what a cheater bar is, its a long piece of pipe used by placing it over the ratchet for extra leverage. It will really help u. (this is very helpful for the wheel bearing replacement. Not need for ball joints, but nice to have)
5. PB blaster. Its all I use and is great penetrating oil. Buy 2 cans.
6. Torque wrench that goes to like 250 ft lbs or if u want to save money be damn certain you put it on tight.
7. Ball joint press (can be rented from the auto parts store for about a $100 fully refundable deposit)
8. Deep sockets. I dont remember all the sizes but having them is handy on most things on the car. If you want to save money just buy a SAE set.
9. Floor jack at leat 2 1/4 ton. 2 jack stands. I also would say blocks of wood to sit the jacks on as I did mine down on the street and they sunk into the street.
the other sockets I remember off hand are 13 mm for the caliper bolts, I believe 7/8 for the brake pad holder ( the caliper goes over this) 3/4 for the lug nuts, 1 11/16 wheel bearing nut, 21 mm for I cant remember what. The ball joints I bought the upper from advanced auto and the lower from pep boys. The upper and lowers took different size sockets but I cant remembr what. They were SAE.
first thing you need to do is chock the wheels and loosen the lug nuts on the wheels. Then put a floor jack under it and jack it up. I'd recommend to place the floor jack under the front diff first jack the front end and place jack stand under driver side and sit down then move jack closer to passanger side jack up and place jack stand. Move from diff to passanger side as needed to get wanted height. Take the lug nuts off and remove the rites. You will now see the rotors and the brake hardware.
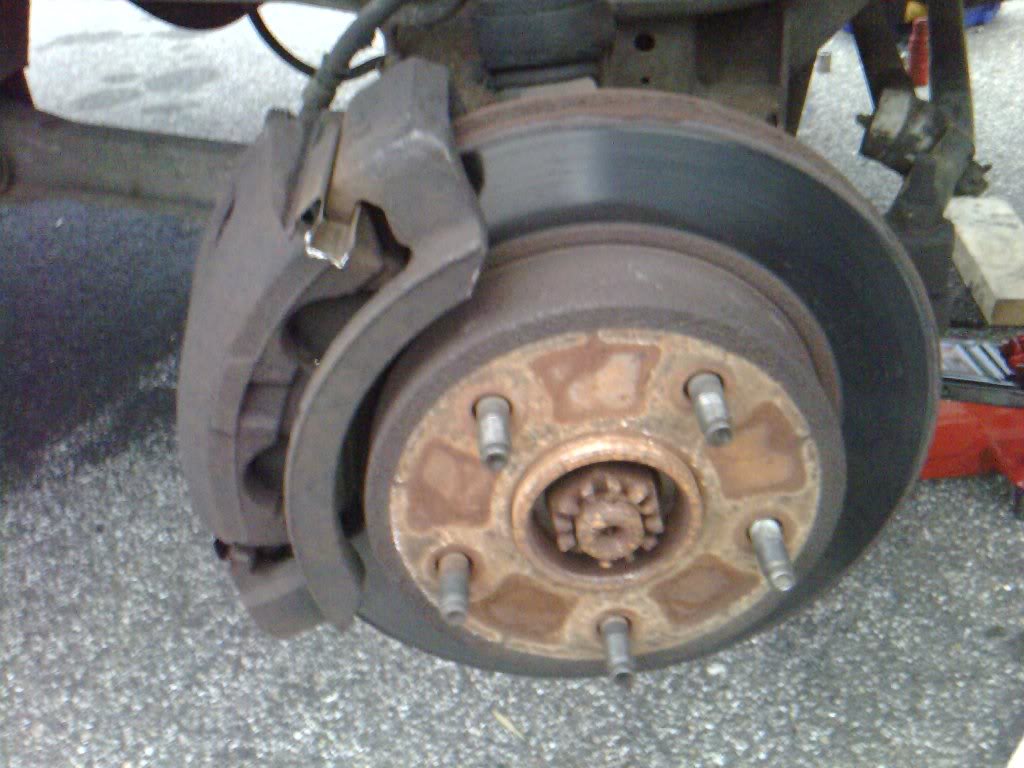
caliperrotorpadholderhubpic.jpg?t=1310539289
here is a picture of all the brake hardware. Caliper, rotor, brake pad holder that the caliper is attached to and the wheel bearing and the wheel bearing nut (the nut shown center in the picture).
next remove the brake caliper by removing the 2 bolts on the back side of the caliper.
then pull the caliper off. Sometimes if rusted you need to take a flat head screw driver and pry it off. then zip tie the caliper up out of the way. Do not let it dangle it can screw up the brake hose.
ziptiecaliperoutoftheway.jpg?t=1310539680
caliper removed and zip tied to coil spring and out of the way.
having a magnet tray would be very helpful also as i lost my caliper bolts. Still not sure how i did this one. I believe I found them or it was caliper bolts to something else. I have a few extra from going to the junk yard but they may of been jeep ones. Either way I got them in and they worked
now if you are replacing the wheel bearing take off that 1 11/16 nut as shown in the picture eariler and then go to the back side of the wheel bearing hub assembly and remove the 4 bolts that hold the wheel bearing to the axle shaft. Its the only 4 bolts on the back side of the wheel bearing. After u take out these bolts a mjaor time saving tip I found on here that I used is take the bolts you just removed and insert them back in by just placing them in. Do NOT screw them in at all, just place them in the holes or do not take them out once u loosen all the way. Tap the heads of the bolts with a hammer. Work you way around. A couple taps on each one or the ones you can get to. After a couple taps each the hub will pop off or be noticably farther out. If not off yet keep taking. You wont hurt anything and this will save major time. I tried beating on the hub and couldnt get it lose till i tried this and it took 20 seconds.
wheelhubbearingremoved.jpg?t=1310540392
above is the wheel bearing with the wheel hub removed. If you tap on the bolts that you placed in the hole this wheel bearing will come off with the hub. I was trying to figure it out so I pulled the hub off in one piece and then the wheel bearing in another piece. tab on the bolt heads and this will all pop rite off.
axleshaftafterwheelbearingremoved.jpg?t=1310540740
I had to get the above picture from a write up I used for a 3rd generation 2500 diesel since no one had one i could find for our truck. I will post his write up at the end. Glad I found his, just sorry I found it after 3 days invested. His write up helped me finish up in day 4. I spent so much time also with trial and error, realizing I needed more tools like the 1 11/16 socket. My floor jack broke, it sank into the asphalt and bent. I couldnt get the knuckle off, didnt no how to use the ball joint tool and couldnt find any pictures. My goal is hopefully this makes it alot easier for whoever uses this write up, then all the pissed off moments I had.
Now that you are at the point just grab the axle shaft and pull it straight out. You wont break anything so just grab it and try to pull it straight out. It should come freely.
For anyone just replacing the wheel bearing. You do not need to even pull the axle shaft out leave it in. Now put your new wheel bearing and hub assembly on. (All i found locally was the wheel bearing and hub assembly all in one, not just the wheel bearing so I replaced both it was about 120 bucks). Put the 4 bolts back in and then the wheel bearing hub axle nut and torque if you have a torque wrench.
you will now have a new shiny wheel hub assembly and new wheel bearing.
I forgot to take pictures here and there and at the time did it only in case I had problems putting the truck back together and then at the end thought to do a write up. Which is why I have pics of the brakes.
If you are doing the ball joints only or the ball joints and the wheel bearing you would disregard the above steps from when I said for anyone replacing the wheel bearing only! Posts 21, 22, and 23 you would disregard
so all the ball joint only or ball joint and wheel bearing replacement people you are still at the pic below
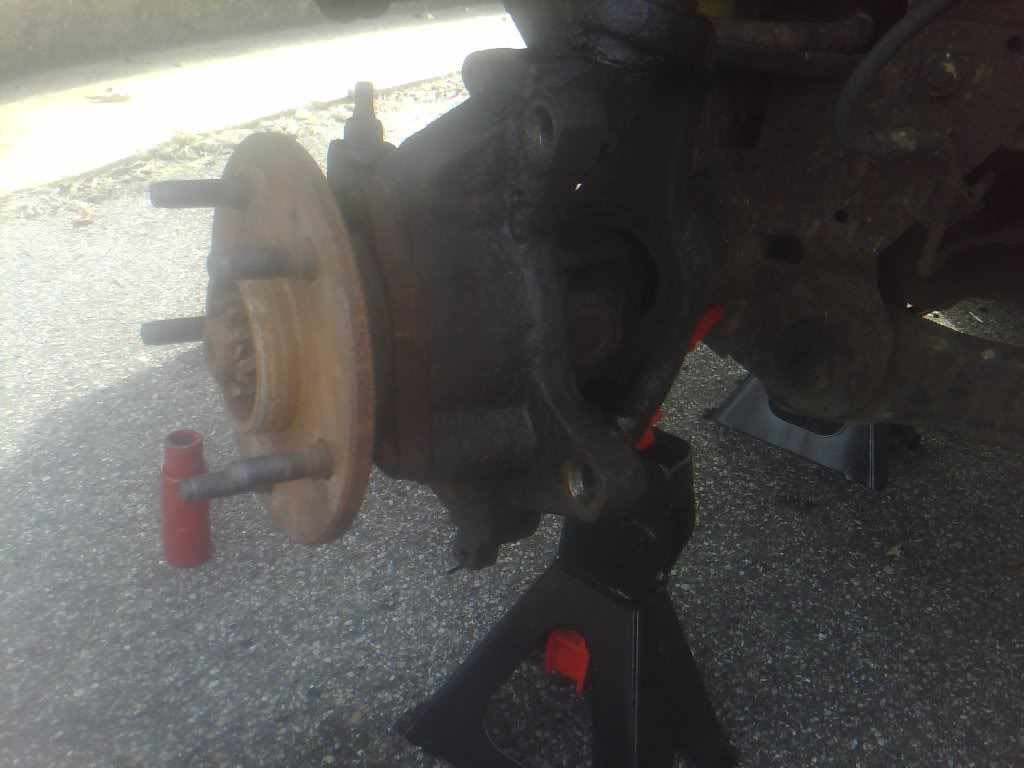
brakeknuckle.jpg?t=1310542043
you now want to remove the nuts located under the ball joints. There is a nut on each ball joint so 2 nuts all together per side. After that take an engineers hammer or as some people may know it a mini sludge hammer and wack the **** out of the knuckle until it pops off. My drivers side came off in 2 wacks. The passanger about a 1,000.
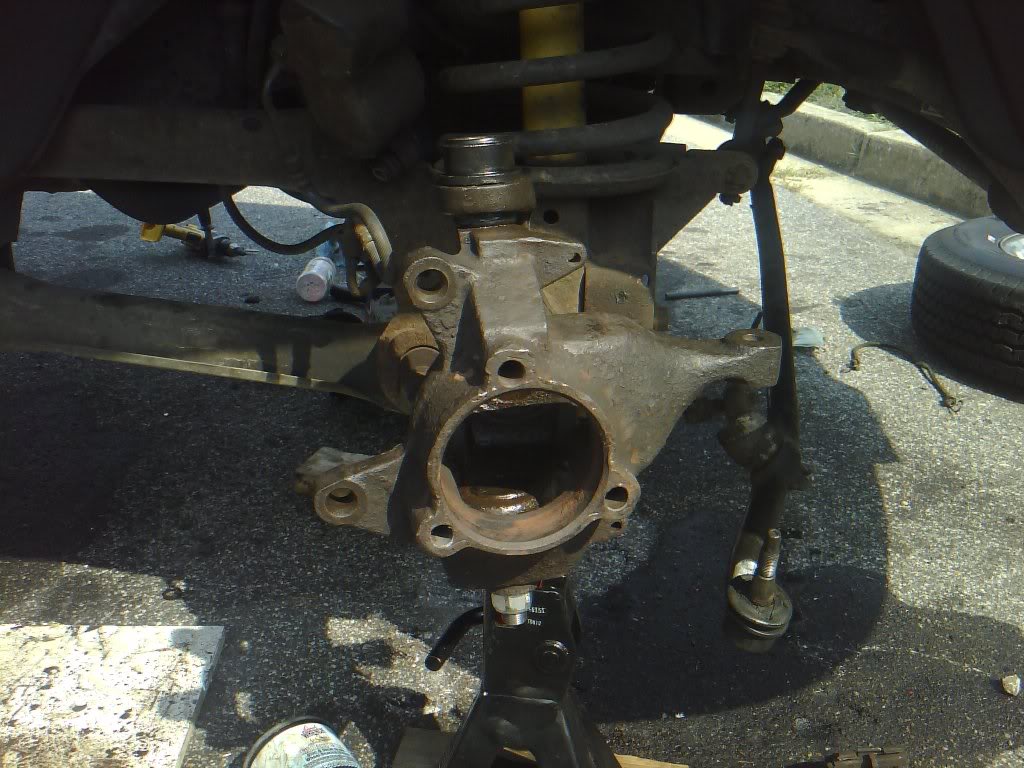
you will now look like this. brakeknuckleremovedAxleend.jpg?t=1310542347
I left out removing the track bar. You will also remove the track bar which was attached to the knuckle. The track bar is the bar hanging in the far right in the picture. All I did was remove the nut on top of the track bar joint, pund a pickle fork into it and bam it was done. Takes 30 seconds a side.
pickle fork tool.

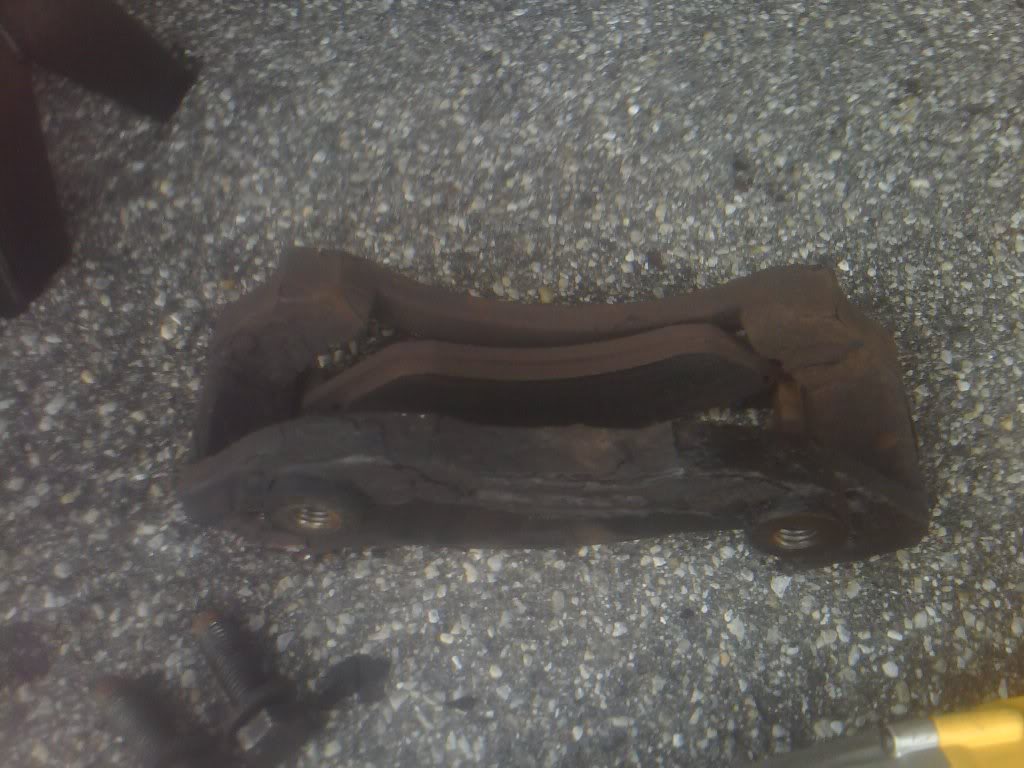
now you will press out your ball joints using the press tool
always press out lower ball joint first.
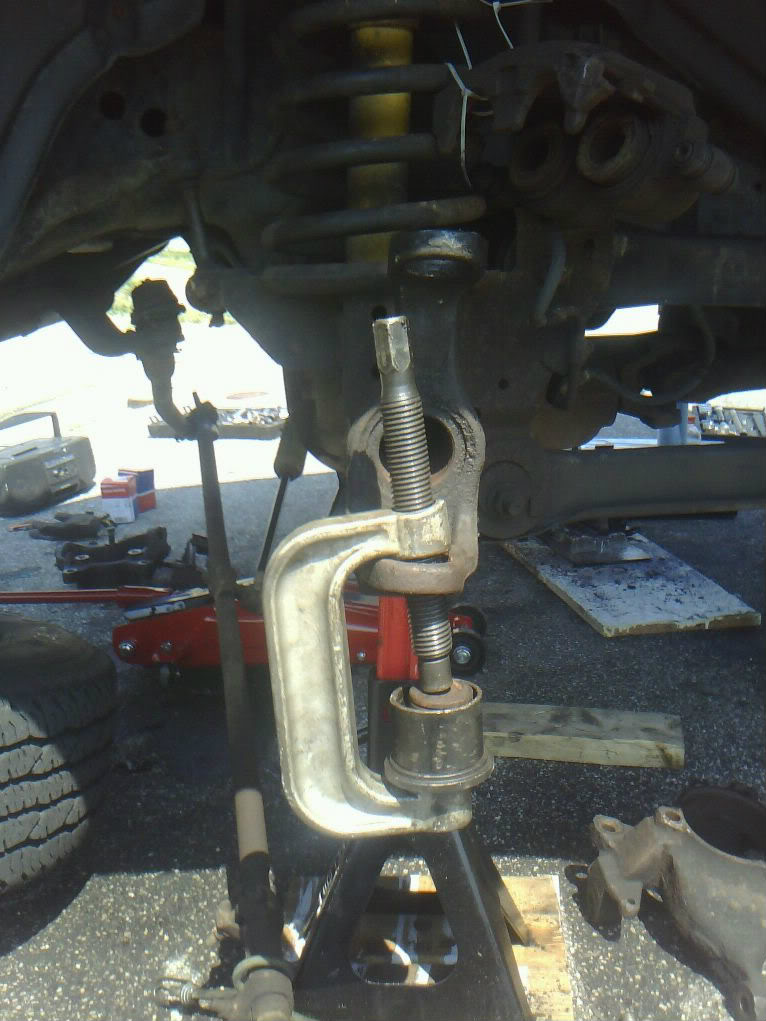
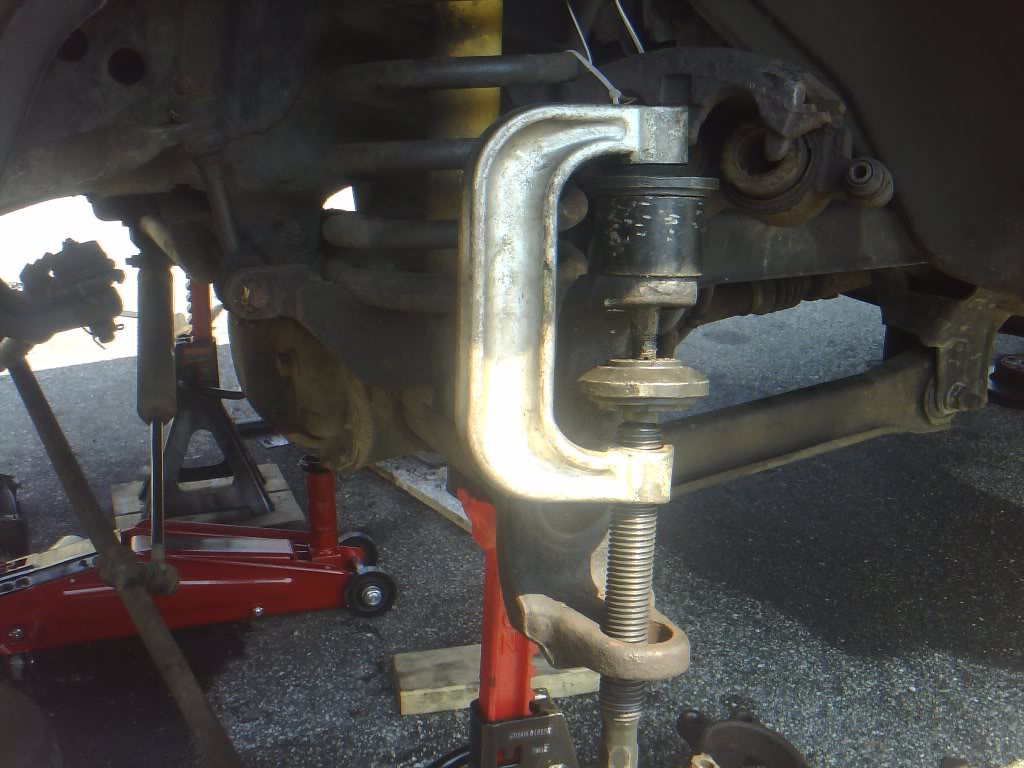
you have to press out the lower ball joint in order to press out the upper ball joint. The lower your going to press down. When you look at a press tool just look at my picture and it will make since. Place the round sapcer below the ball joint and place flat part of press tool on top of ball joint and tighten. Then place 7/8 socket on top of press too; and start tightening. You will need to hold press tool while doing this. or wedge it against something
Ball joint will make a loud pop sound and will look like picture above when it frees up
Now if you are just replacing bottom ball joint ONLY. Then press in simuliar to how u pressed out except you will have a round ring about a inch thick at the bottom instead of 3 inch hollow round piece. U will press by putting the new ball joint above the empty hole and pressing in. It will pop rite in.
If you are doing the top ball joint or both now press out the top ball joint as seen in the picture below. Place the long pressing tool rod into the empty lower ball joint hole and begin tightening down. You will have the empty 3 in round spacer at the top to press the ball joint into and the round flat spaced at the bottom and press up. See pic below.
Now put new ball joints in. Press them in
you will press in the top ball joint first. All you will do is look at my pic above and insted of using the round disc at the bottom in the pic u have another one with a bigger hole in the middle so the ball joint rod can go through it and place the ball joint tool on top of the ball joint with out a spacer.
this pic isnt mine but shows what to do. The kit I got from the auto parts store did not have the ring shown at the top so i just put the pressing tool directly on top of the ball joint.
for the bottom ball joint press the ball joint up from below and put the hollow 3 in deep cup on top the hole and press into it.
Wheel bearing and ball joints
1. a 1 inch 11/16 socket. After looking all over I found it at salvo for 10 or 12 bucks. Sears has it for 20. (needed for wheel bearing replacement to take the nut off that it in the center of the hub. You can pull the hub, axle spline out with this nut still on and get the hub off but i needed the nut to re use as the replacement wheel hub assembly didnt have it. I didnt no i could get out the spline and hub until after i bought the tools and took it off but either way i needed it and so will u.)
2. At least a half inch socket set. I broke 2 3/8s breaker bars. a 1/2 x 3/8 adapter, a 3/8 ratchet. Use at least a 1/2 socket set. I would also highly reccomend buy a 3/4 inch socket set from harbor frieight. It will really help u out and I bough a 20 some piece set with a 3/4 breaker bar and 3/4 ratchet and extensions for like 40 bucks. Harbor frieght always has 20% off coupons online on their web site.
3. Impact either compressor driven or battery powered. I used a 1/2 inch 18 volt dewalt. It has 300 lbs or torque and did the job. I use my battery power a ton and would reccomend one its just handy.
4. If you dont want to buy a 3/4 inch socket set have 2 heavy duty breaker bars and a cheater bar. For those who do not know what a cheater bar is, its a long piece of pipe used by placing it over the ratchet for extra leverage. It will really help u. (this is very helpful for the wheel bearing replacement. Not need for ball joints, but nice to have)
5. PB blaster. Its all I use and is great penetrating oil. Buy 2 cans.
6. Torque wrench that goes to like 250 ft lbs or if u want to save money be damn certain you put it on tight.
7. Ball joint press (can be rented from the auto parts store for about a $100 fully refundable deposit)
8. Deep sockets. I dont remember all the sizes but having them is handy on most things on the car. If you want to save money just buy a SAE set.
9. Floor jack at leat 2 1/4 ton. 2 jack stands. I also would say blocks of wood to sit the jacks on as I did mine down on the street and they sunk into the street.
the other sockets I remember off hand are 13 mm for the caliper bolts, I believe 7/8 for the brake pad holder ( the caliper goes over this) 3/4 for the lug nuts, 1 11/16 wheel bearing nut, 21 mm for I cant remember what. The ball joints I bought the upper from advanced auto and the lower from pep boys. The upper and lowers took different size sockets but I cant remembr what. They were SAE.
first thing you need to do is chock the wheels and loosen the lug nuts on the wheels. Then put a floor jack under it and jack it up. I'd recommend to place the floor jack under the front diff first jack the front end and place jack stand under driver side and sit down then move jack closer to passanger side jack up and place jack stand. Move from diff to passanger side as needed to get wanted height. Take the lug nuts off and remove the rites. You will now see the rotors and the brake hardware.
caliperrotorpadholderhubpic.jpg?t=1310539289
here is a picture of all the brake hardware. Caliper, rotor, brake pad holder that the caliper is attached to and the wheel bearing and the wheel bearing nut (the nut shown center in the picture).
next remove the brake caliper by removing the 2 bolts on the back side of the caliper.
then pull the caliper off. Sometimes if rusted you need to take a flat head screw driver and pry it off. then zip tie the caliper up out of the way. Do not let it dangle it can screw up the brake hose.
ziptiecaliperoutoftheway.jpg?t=1310539680
caliper removed and zip tied to coil spring and out of the way.
having a magnet tray would be very helpful also as i lost my caliper bolts. Still not sure how i did this one. I believe I found them or it was caliper bolts to something else. I have a few extra from going to the junk yard but they may of been jeep ones. Either way I got them in and they worked
now if you are replacing the wheel bearing take off that 1 11/16 nut as shown in the picture eariler and then go to the back side of the wheel bearing hub assembly and remove the 4 bolts that hold the wheel bearing to the axle shaft. Its the only 4 bolts on the back side of the wheel bearing. After u take out these bolts a mjaor time saving tip I found on here that I used is take the bolts you just removed and insert them back in by just placing them in. Do NOT screw them in at all, just place them in the holes or do not take them out once u loosen all the way. Tap the heads of the bolts with a hammer. Work you way around. A couple taps on each one or the ones you can get to. After a couple taps each the hub will pop off or be noticably farther out. If not off yet keep taking. You wont hurt anything and this will save major time. I tried beating on the hub and couldnt get it lose till i tried this and it took 20 seconds.
wheelhubbearingremoved.jpg?t=1310540392
above is the wheel bearing with the wheel hub removed. If you tap on the bolts that you placed in the hole this wheel bearing will come off with the hub. I was trying to figure it out so I pulled the hub off in one piece and then the wheel bearing in another piece. tab on the bolt heads and this will all pop rite off.
axleshaftafterwheelbearingremoved.jpg?t=1310540740
I had to get the above picture from a write up I used for a 3rd generation 2500 diesel since no one had one i could find for our truck. I will post his write up at the end. Glad I found his, just sorry I found it after 3 days invested. His write up helped me finish up in day 4. I spent so much time also with trial and error, realizing I needed more tools like the 1 11/16 socket. My floor jack broke, it sank into the asphalt and bent. I couldnt get the knuckle off, didnt no how to use the ball joint tool and couldnt find any pictures. My goal is hopefully this makes it alot easier for whoever uses this write up, then all the pissed off moments I had.
Now that you are at the point just grab the axle shaft and pull it straight out. You wont break anything so just grab it and try to pull it straight out. It should come freely.
For anyone just replacing the wheel bearing. You do not need to even pull the axle shaft out leave it in. Now put your new wheel bearing and hub assembly on. (All i found locally was the wheel bearing and hub assembly all in one, not just the wheel bearing so I replaced both it was about 120 bucks). Put the 4 bolts back in and then the wheel bearing hub axle nut and torque if you have a torque wrench.
you will now have a new shiny wheel hub assembly and new wheel bearing.
I forgot to take pictures here and there and at the time did it only in case I had problems putting the truck back together and then at the end thought to do a write up. Which is why I have pics of the brakes.
If you are doing the ball joints only or the ball joints and the wheel bearing you would disregard the above steps from when I said for anyone replacing the wheel bearing only! Posts 21, 22, and 23 you would disregard
so all the ball joint only or ball joint and wheel bearing replacement people you are still at the pic below
brakeknuckle.jpg?t=1310542043
you now want to remove the nuts located under the ball joints. There is a nut on each ball joint so 2 nuts all together per side. After that take an engineers hammer or as some people may know it a mini sludge hammer and wack the **** out of the knuckle until it pops off. My drivers side came off in 2 wacks. The passanger about a 1,000.
you will now look like this. brakeknuckleremovedAxleend.jpg?t=1310542347
I left out removing the track bar. You will also remove the track bar which was attached to the knuckle. The track bar is the bar hanging in the far right in the picture. All I did was remove the nut on top of the track bar joint, pund a pickle fork into it and bam it was done. Takes 30 seconds a side.
pickle fork tool.
now you will press out your ball joints using the press tool
always press out lower ball joint first.
you have to press out the lower ball joint in order to press out the upper ball joint. The lower your going to press down. When you look at a press tool just look at my picture and it will make since. Place the round sapcer below the ball joint and place flat part of press tool on top of ball joint and tighten. Then place 7/8 socket on top of press too; and start tightening. You will need to hold press tool while doing this. or wedge it against something
Ball joint will make a loud pop sound and will look like picture above when it frees up
Now if you are just replacing bottom ball joint ONLY. Then press in simuliar to how u pressed out except you will have a round ring about a inch thick at the bottom instead of 3 inch hollow round piece. U will press by putting the new ball joint above the empty hole and pressing in. It will pop rite in.
If you are doing the top ball joint or both now press out the top ball joint as seen in the picture below. Place the long pressing tool rod into the empty lower ball joint hole and begin tightening down. You will have the empty 3 in round spacer at the top to press the ball joint into and the round flat spaced at the bottom and press up. See pic below.
Now put new ball joints in. Press them in
you will press in the top ball joint first. All you will do is look at my pic above and insted of using the round disc at the bottom in the pic u have another one with a bigger hole in the middle so the ball joint rod can go through it and place the ball joint tool on top of the ball joint with out a spacer.
this pic isnt mine but shows what to do. The kit I got from the auto parts store did not have the ring shown at the top so i just put the pressing tool directly on top of the ball joint.
for the bottom ball joint press the ball joint up from below and put the hollow 3 in deep cup on top the hole and press into it.
Last edited by jasonw; 07-13-2011 at 11:03 PM. Reason: Merging DOZENS of in-a-row posts.
The following users liked this post:
chuck-norrises-truck (11-09-2020)
#6
07-13-2011, 03:58 AM
Now your ball joints are pressed in and look like this.
brakeknuckleremovedAxleend.jpg?t=1310542347
put your knuckle on and wack it back up with hammer and then tighten nuts. Torque nuts if you have a torque wrench.
brakeknuckle.jpg?t=1310542043
Now put the track bar back into the knuckle and tighten down.
Now insert the axle shaft back into the knuckle. Try to keep straight and it should just slide rite back in.
it will look like this now with the axle shaft inserted back in.
axleshaftafterwheelbearingremoved.jpg?t=1310540740
Now bolt your wheel bearing back on. If REPLACING the Wheel bearing bolt your new wheel bearing back on. Put the 4 bolts back in to tighten the wheel bearing. hub assembly down.
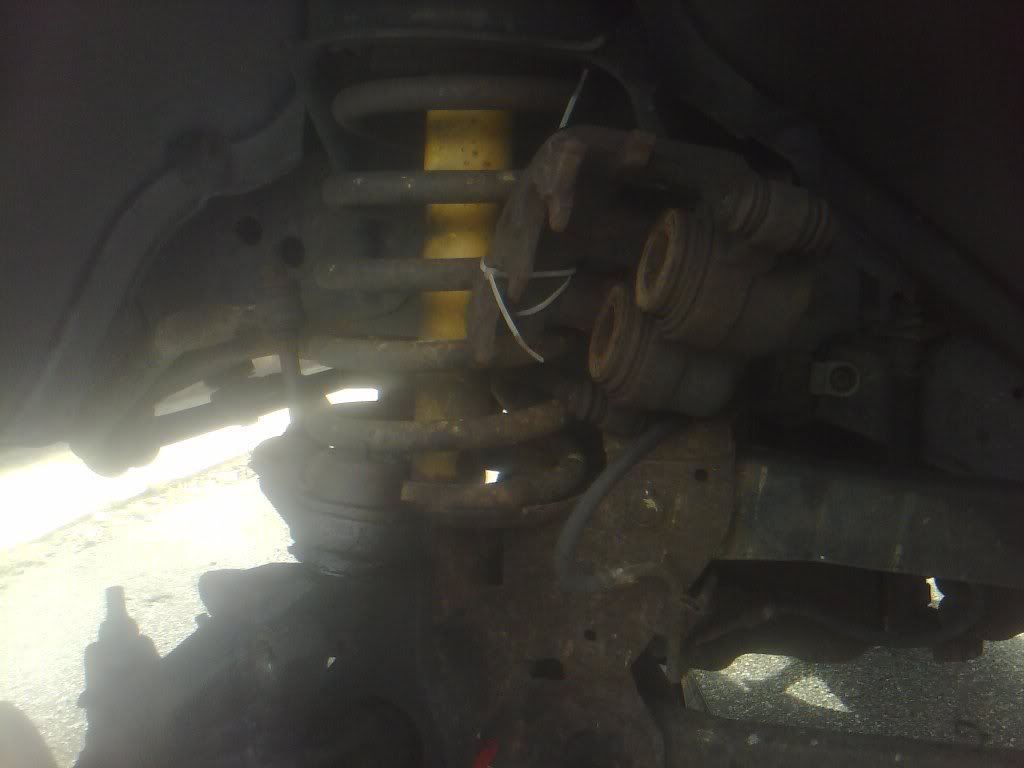
Now tighten the wheel bearing hub assembly nut down as shown center in the picture below and torque. I will post the torque settings later.
wheelhubbearing.jpg?t=1310538516
Now put the rotor back on and then bolt on the brake pad holder
brakepadholder.jpg?t=1310538385
Now that you have bolted on the brake pad holder after putting the rotor on you now can bolt the caliper to the brake pad holder.
you will now look like this. Except for the metal brake hardware sticking out in this picture. Obviously mine was messed up and I replaced that to.
caliperrotorpadholderhubpic.jpg?t=1310539289
Now bolt your tires back on and you have now replaced you ball joints and wheel hub bearing assembly. Any questions just ask. I will post a link to the write up I found and the torque settings. I'm tired as all hell and going to bed.
Special thanks to this write up https://dodgeforum.com/forum/dodge-c...placement.html
It helped me see how to press the ball joints out when I was lost.
brakeknuckleremovedAxleend.jpg?t=1310542347
put your knuckle on and wack it back up with hammer and then tighten nuts. Torque nuts if you have a torque wrench.
brakeknuckle.jpg?t=1310542043
Now put the track bar back into the knuckle and tighten down.
Now insert the axle shaft back into the knuckle. Try to keep straight and it should just slide rite back in.
it will look like this now with the axle shaft inserted back in.
axleshaftafterwheelbearingremoved.jpg?t=1310540740
Now bolt your wheel bearing back on. If REPLACING the Wheel bearing bolt your new wheel bearing back on. Put the 4 bolts back in to tighten the wheel bearing. hub assembly down.
Now tighten the wheel bearing hub assembly nut down as shown center in the picture below and torque. I will post the torque settings later.
wheelhubbearing.jpg?t=1310538516
Now put the rotor back on and then bolt on the brake pad holder
brakepadholder.jpg?t=1310538385
Now that you have bolted on the brake pad holder after putting the rotor on you now can bolt the caliper to the brake pad holder.
you will now look like this. Except for the metal brake hardware sticking out in this picture. Obviously mine was messed up and I replaced that to.
caliperrotorpadholderhubpic.jpg?t=1310539289
Now bolt your tires back on and you have now replaced you ball joints and wheel hub bearing assembly. Any questions just ask. I will post a link to the write up I found and the torque settings. I'm tired as all hell and going to bed.
Special thanks to this write up https://dodgeforum.com/forum/dodge-c...placement.html
It helped me see how to press the ball joints out when I was lost.
Last edited by jasonw; 07-13-2011 at 11:05 PM. Reason: Merging a DOZEN of in-a-row posts.
The following users liked this post:
chuck-norrises-truck (11-09-2020)
#7
11-12-2011, 02:11 PM
The following users liked this post:
chuck-norrises-truck (11-09-2020)