

power steering line replacement DIY(2001-2003 Durango)
#1
 08-02-2011, 03:34 PM

I am not responsible for any mishaps while you are wrenching, knuckle busting, throwing tools, kicking vehicles, stomping, whining, drinking, or possession of you or your rig by any entity....... Always consult a manual before attempting any wrenching and I advise you to stay within your skill set. If you’re expanding your skills, work on the easy stuff 1st to gain skills and the necessary scars on the hands to fall into the "working man/woman" category.
I suggest that you read ALL of this post before making any purchases or decisions on this repair, it will make sure you do it correctly
problem, power steering lines are leaking, you noticed this by either an 'oil spot' on the driveway, or a loss of power steering completely. If you noticed a lack of power steering while you were driving and decided to go straight home and investigate you will most likely not need to replace the pump, however if you drove it for a long while without any fluid in it the pump may or may not be bad, use your own best judgment on that, my pump was still fine so i just replaced the hoses.
on to the process
this process took me about 3 hours including removal of old hoses, installation of new hoses, clean up, finding tools, throwing tools, recovering tools, drinking beer, and diagnosis of issue, and it cost me $90 total for everything
step 1) gather your tools
1)18mm open end wrench (i didn't have one so i had to use an adjustable, i do NOT recommend this but if you must then be careful not to ruin the nuts.
2) 10mm box wrench
3) 8mm socket
4) (optional) case of your favorite beer
5) (only for the last couple steps)(optional) extra body, small child/gf/wife will work fine
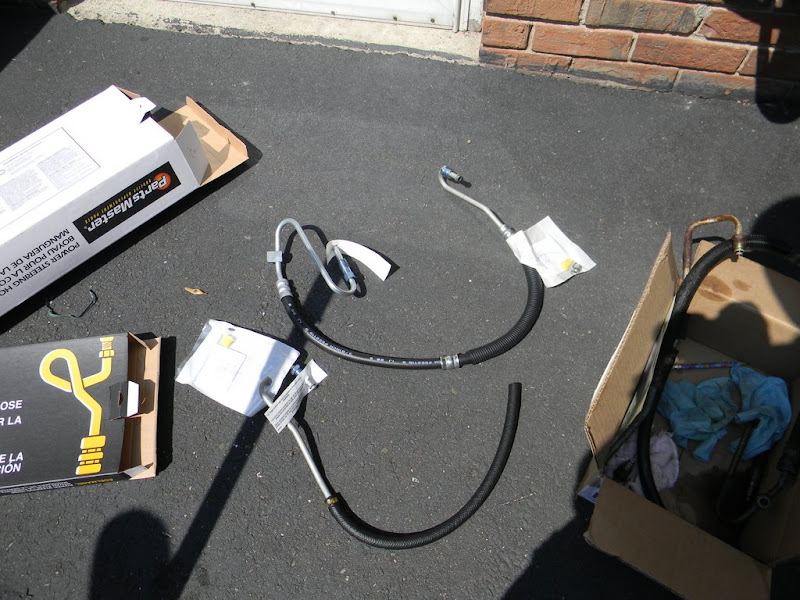
6) new pressure and return lines for your powersteering system (see your local auto store if you are unsure of which ones you need)
7) 1 quart of ATF +4 transmission fluid(i recommend getting 2 just in case you spill some, but i only used 3/4 of a quart through the entire process)
ok on to the actual problem
step 2) is to check that these lines are your issue and its not in fact something else.
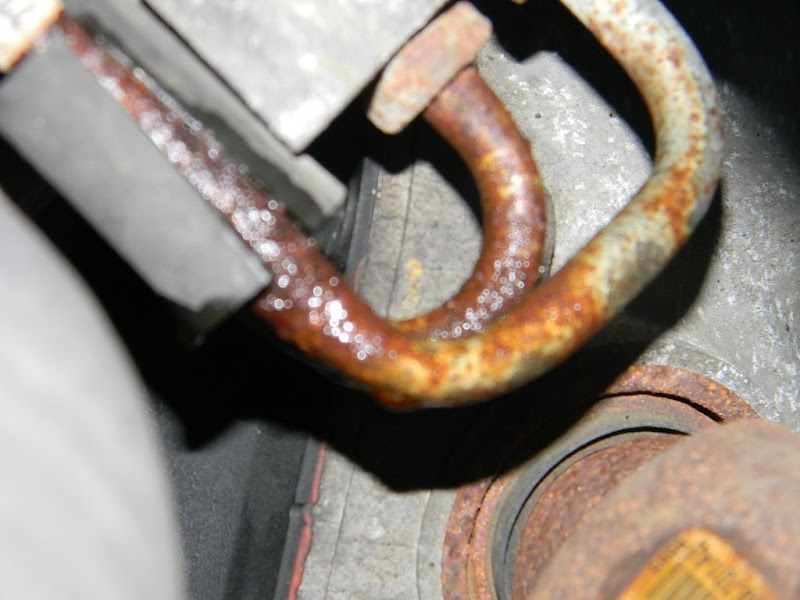
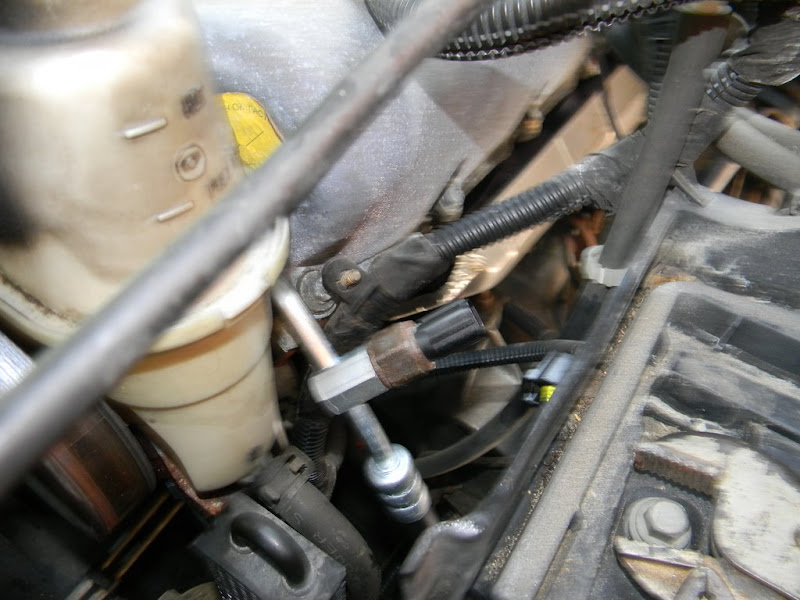
this is what the hard lines looked like at the steering gear on my truck
it was also damp with ATF while the rest of the lines were dry so i knew this was were it was leaking from.
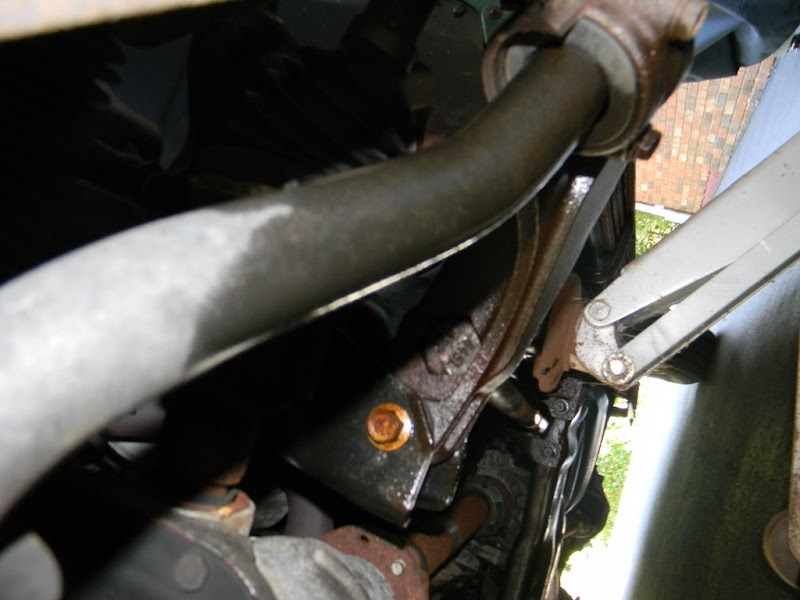 and the sway bar and lower A arm were also damp with fluid below where these lines connected.
step 3) lift front of vehicle and remove drivers side tire (if i need to explain this one to you just stop here and take your truck to a mechanic)
step 4) open hood and remove battery (this is another thing you should just know how to do, negative cable off first, then positive, unbolt the retaining bar and remove, if you cant figure that out take the truck to a mechanic)
step 5) siphon as much of the power steering fluid out of the reservoir as possible (i used an old turkey baster my dad and i stole from the kitchen a while back, this will never make its way back to the kitchen)
i used an old coffee can to put the fluid in as i took it out, use w/e you have handy, just remember this fluid cannot be re-used.


step 6) remove the hose clamp from the return line at either the cooler of the reservoir intake (i have the cooler in mine so that is where i removed it from)

(you can see it in this picture, although this picture is with the new hose in place)
step 7) remove the upper of the two lines from the steering gear, this is the return line(this one must come off first so you have room to swing a wrench (kind of) for the pressure line)

step 7 complete
step 8) remove the lower (only remaining at this point) line from the steering gear, this is the pressure line.

step 8 complete
step 9) unplug the pressure switch (this switch is only on the 4.7 according to the 2002 factory service manual, but check for it anyway and unplug it if it is there)

just push on the tab and pull the wire away from the switch.(make sure that you pull on the connector, and not on the wires)
step 10) i removed the oil filter access door for this, and pulled the far drivers side anchor out for the splash shield so i could fit my arm through there, do as much of as little of that as you need to to reach the power steering pump where the line attaches.
Then remove the power steering line from the pump (this is the pressure line and for me this was the tightest connection on the system)
step 11) remove pressure switch from pressure line and install in the new replacement hose.
( i did the two parts of this step separately since i had to order and wait for the new hoses to come in)

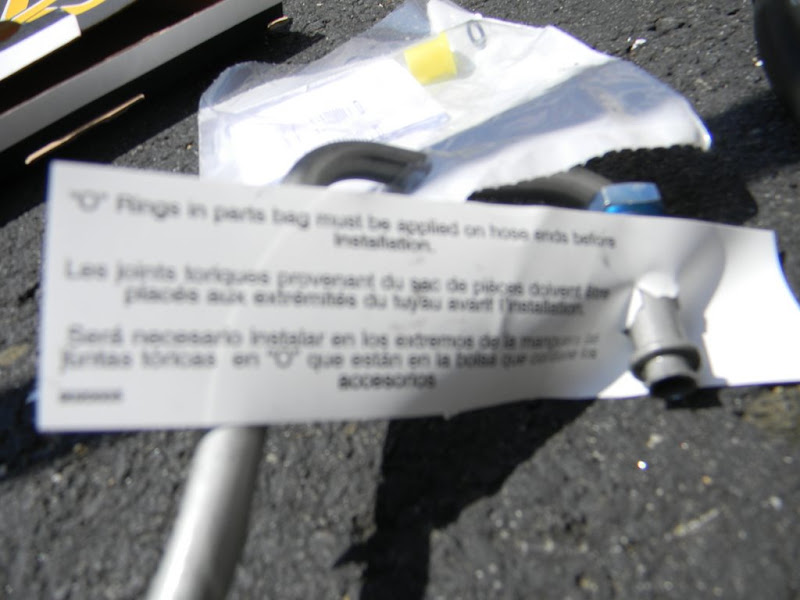
step 12) The new hoses should come with o rings that need to be installed, lubricate them (i used the old atf i pulled out of the system for this) and just push the o-rings onto both ends of the pressure hose and the gear end of the return hose.
step 13) now you are ready to install the new hoses, you install the pressure hose first since it is below the return line on the gear, i found it easiest to install the pump end of the line first, and then install the gear end, whichever order should work fine do whichever you prefer.

once both ends are attached and torqued properly to 25 ft. lbs (34NM) at both ends
step 14) plug the pressure switch back in
step 15) take the return hose and push the hose and onto the cooler (or the reservoir if you don't have a cooler) and make sure you get the hose clamp on there good, if you don't like the hose clamp they used at the factory you can buy a 3/4 in stainless clamp (the threaded ones) and use that instead, for me it was easier to reuse the factory one.
step 16) install the gear end of the return hose and tighten to 23 ft. lbs (31 NM)

now that the hard part is done, its time for the tedious part(but very necessary because air in the system will cause a lack of power assist), if you have one this is the time to get a partner/assistant.
step 17) make sure both front wheels are off the ground (the drivers side should be up already, so just make sure the passenger side is too)
step 18) fill the power steering reservoir with ATF +4 (i filled it to the full (hot) line, DO NOT OVERFILL PAST THIS POINT)
step 19) turn the steering wheel all the way to the left while the engine is off. (you need to have the key on to do this, and both front wheels off the ground)
step 20) check the power steering fluid level and top off if necessary
step 21) turn the steering wheel lock to lock (all the way to the right, and back to the left) slowly 40 times (20 if you do not have a cooler installed) and check the fluid after each time
so start with the wheel to the left, go all the way right, all the way left check fluid, repeat 39 more times, this is where the helper is nice, have them turn the wheel while you watch the fluid level and add as needed. don't keep the reservoir too full or the air bubbles that work their way out will cause fluid to splash out of the reservoir and ATF is NOT fun or easy to clean up.
step 22) install battery
step 23) start engine and let idle for 2 minutes to settle fluid level in reservoir and fill to full (cold) line on reservoir bottle
step 24) turn wheel lock to lock a couple of times with engine on (i did 5 times)
step 25) shut off engine and top off fluid to full (cold) line
step 26) put tires back on and lower vehicle back onto the ground
step 27) start engine and confirm power assist is present (if you can turn the wheel lock to lock with the tires on the ground the power steering is working)
step 28) Clean up all tools/old parts/rags, make sure to dispose of any old fluid correctly.
step 29) take truck for a drive (maybe leave this step out if you have drank alot of beer during the install)
step 30) relax and drink the rest of your beer!!!!
total cost for this project including hoses, fluid, beer ect was $90 i do NOT know what a shop would charge, but i'm certain that you saved yourself a bunch of money and time by doing it yourself.
if you have any questions or concerns please let me know and i will do my best to address them
-Bill
shrpshtr325
DF section Moderator
Durango section
I suggest that you read ALL of this post before making any purchases or decisions on this repair, it will make sure you do it correctly
problem, power steering lines are leaking, you noticed this by either an 'oil spot' on the driveway, or a loss of power steering completely. If you noticed a lack of power steering while you were driving and decided to go straight home and investigate you will most likely not need to replace the pump, however if you drove it for a long while without any fluid in it the pump may or may not be bad, use your own best judgment on that, my pump was still fine so i just replaced the hoses.
on to the process
this process took me about 3 hours including removal of old hoses, installation of new hoses, clean up, finding tools, throwing tools, recovering tools, drinking beer, and diagnosis of issue, and it cost me $90 total for everything
step 1) gather your tools
1)18mm open end wrench (i didn't have one so i had to use an adjustable, i do NOT recommend this but if you must then be careful not to ruin the nuts.
2) 10mm box wrench
3) 8mm socket
4) (optional) case of your favorite beer
5) (only for the last couple steps)(optional) extra body, small child/gf/wife will work fine
6) new pressure and return lines for your powersteering system (see your local auto store if you are unsure of which ones you need)
7) 1 quart of ATF +4 transmission fluid(i recommend getting 2 just in case you spill some, but i only used 3/4 of a quart through the entire process)
ok on to the actual problem
step 2) is to check that these lines are your issue and its not in fact something else.
this is what the hard lines looked like at the steering gear on my truck
it was also damp with ATF while the rest of the lines were dry so i knew this was were it was leaking from.
and the sway bar and lower A arm were also damp with fluid below where these lines connected.step 3) lift front of vehicle and remove drivers side tire (if i need to explain this one to you just stop here and take your truck to a mechanic)
step 4) open hood and remove battery (this is another thing you should just know how to do, negative cable off first, then positive, unbolt the retaining bar and remove, if you cant figure that out take the truck to a mechanic)
step 5) siphon as much of the power steering fluid out of the reservoir as possible (i used an old turkey baster my dad and i stole from the kitchen a while back, this will never make its way back to the kitchen)
i used an old coffee can to put the fluid in as i took it out, use w/e you have handy, just remember this fluid cannot be re-used.
step 6) remove the hose clamp from the return line at either the cooler of the reservoir intake (i have the cooler in mine so that is where i removed it from)
(you can see it in this picture, although this picture is with the new hose in place)
step 7) remove the upper of the two lines from the steering gear, this is the return line(this one must come off first so you have room to swing a wrench (kind of) for the pressure line)
step 7 complete
step 8) remove the lower (only remaining at this point) line from the steering gear, this is the pressure line.
step 8 complete
step 9) unplug the pressure switch (this switch is only on the 4.7 according to the 2002 factory service manual, but check for it anyway and unplug it if it is there)
just push on the tab and pull the wire away from the switch.(make sure that you pull on the connector, and not on the wires)
step 10) i removed the oil filter access door for this, and pulled the far drivers side anchor out for the splash shield so i could fit my arm through there, do as much of as little of that as you need to to reach the power steering pump where the line attaches.
Then remove the power steering line from the pump (this is the pressure line and for me this was the tightest connection on the system)
step 11) remove pressure switch from pressure line and install in the new replacement hose.
( i did the two parts of this step separately since i had to order and wait for the new hoses to come in)
step 12) The new hoses should come with o rings that need to be installed, lubricate them (i used the old atf i pulled out of the system for this) and just push the o-rings onto both ends of the pressure hose and the gear end of the return hose.
step 13) now you are ready to install the new hoses, you install the pressure hose first since it is below the return line on the gear, i found it easiest to install the pump end of the line first, and then install the gear end, whichever order should work fine do whichever you prefer.
once both ends are attached and torqued properly to 25 ft. lbs (34NM) at both ends
step 14) plug the pressure switch back in
step 15) take the return hose and push the hose and onto the cooler (or the reservoir if you don't have a cooler) and make sure you get the hose clamp on there good, if you don't like the hose clamp they used at the factory you can buy a 3/4 in stainless clamp (the threaded ones) and use that instead, for me it was easier to reuse the factory one.
step 16) install the gear end of the return hose and tighten to 23 ft. lbs (31 NM)
now that the hard part is done, its time for the tedious part(but very necessary because air in the system will cause a lack of power assist), if you have one this is the time to get a partner/assistant.
step 17) make sure both front wheels are off the ground (the drivers side should be up already, so just make sure the passenger side is too)
step 18) fill the power steering reservoir with ATF +4 (i filled it to the full (hot) line, DO NOT OVERFILL PAST THIS POINT)
step 19) turn the steering wheel all the way to the left while the engine is off. (you need to have the key on to do this, and both front wheels off the ground)
step 20) check the power steering fluid level and top off if necessary
step 21) turn the steering wheel lock to lock (all the way to the right, and back to the left) slowly 40 times (20 if you do not have a cooler installed) and check the fluid after each time
so start with the wheel to the left, go all the way right, all the way left check fluid, repeat 39 more times, this is where the helper is nice, have them turn the wheel while you watch the fluid level and add as needed. don't keep the reservoir too full or the air bubbles that work their way out will cause fluid to splash out of the reservoir and ATF is NOT fun or easy to clean up.
step 22) install battery
step 23) start engine and let idle for 2 minutes to settle fluid level in reservoir and fill to full (cold) line on reservoir bottle
step 24) turn wheel lock to lock a couple of times with engine on (i did 5 times)
step 25) shut off engine and top off fluid to full (cold) line
step 26) put tires back on and lower vehicle back onto the ground
step 27) start engine and confirm power assist is present (if you can turn the wheel lock to lock with the tires on the ground the power steering is working)
step 28) Clean up all tools/old parts/rags, make sure to dispose of any old fluid correctly.
step 29) take truck for a drive (maybe leave this step out if you have drank alot of beer during the install)
step 30) relax and drink the rest of your beer!!!!
total cost for this project including hoses, fluid, beer ect was $90 i do NOT know what a shop would charge, but i'm certain that you saved yourself a bunch of money and time by doing it yourself.
if you have any questions or concerns please let me know and i will do my best to address them
-Bill
shrpshtr325
DF section Moderator
Durango section
Last edited by shrpshtr325; 02-10-2012 at 11:41 AM. Reason: long missing proofread
The following users liked this post:
sporta (03-24-2022)
#2
08-02-2011, 08:10 PM

Captain
Join Date: Dec 2010
Location: Tempe,Az
Posts: 560
Likes: 0
Received 0 Likes
on
0 Posts
#3
08-02-2011, 09:08 PM
Record Breaker
#6
08-03-2011, 12:09 AM
Champion
Nice job. I am cross posting this now because I think it will indeed help someone. There is a guy with issues on his PS system right now at the DOC. Thanks and congrats on a good job.
2 questions:
1) so there is no "Bleeding", etc necessary to get the air out of the empty lines? I guess I never really thought about it being a circular system
2) WTH? That hose line looked terrible. You let it get that bad? Shame
IndyDurango
2 questions:
1) so there is no "Bleeding", etc necessary to get the air out of the empty lines? I guess I never really thought about it being a circular system
2) WTH? That hose line looked terrible. You let it get that bad? Shame
IndyDurango
#7
02-10-2012, 11:28 AM
Trending Topics
#8
02-10-2012, 01:20 PM

Veteran
Join Date: May 2011
Location: Denver
Posts: 462
Likes: 0
Received 0 Likes
on
0 Posts

