
A How-to; On your Heater-Core & Evaporator-Core,..PIC's FIXED
#11
 04-06-2007, 11:02 PM

Grand Champion
thats a good how to
I took my dash out completely when I did my heater core. one thing you forgot to mention is to check your new heater core for leaks.... I learned the hardway[:@] I have to do mine again. but I think its goin to the dealer this time. I dont have the time or the patience for it right now.
I took my dash out completely when I did my heater core. one thing you forgot to mention is to check your new heater core for leaks.... I learned the hardway[:@] I have to do mine again. but I think its goin to the dealer this time. I dont have the time or the patience for it right now.
#12
04-07-2007, 07:46 AM

Yeah, that's a good point. I think one of the secrets on keeping your new cores from leaking is DON"T - FLEX-THE - TUBES coming off of them. Also, always use distilled water with your cooling system.
Go get a friend now,.. YOU DO HAVE A FRIEND DON"T YOU??? LOL!!
One person on each side of the dash now. It's time to pull back on each side about 6 to 10 inches. Dead center up top by the windshield
is a plug that has to be disconnected. Pass-side again! Wiring harness on the extreme back top edge of the dash has two maybe three Phillip-head screws that have to come out. (Look in pic #6) and you'll see if you look carefully one of the holes for a screw. This will instantly give you more room to pull the dash back on the pass-side even further. Look for the two white wiring harness plugs to be also disconnected on the pass-side near the center middle.
Remember those two-12mm bolts you removed under the dash by the 4x4 shifter? There is a mounting-plate that the dash has to lifted up & over as you pull back for even more room. At this point, you should have about two feet on the pass-side and, at least a foot on the drivers-side. That's all you need. Blend-Door-rod now comes off.
Your 4-tube Vacume-hose plug get's unplugged. It's a soft clear-yellow rubber piece & it will pull off easy. The two-plug-line you can leave on the Air-Box. It will just come out from under the dash with it. (Pic#3 at the bottom of the Air-Box). There is a small black-plastic air-tube that also needs to come off You won't miss it. It comes out of the Air-Box & goes right thru the Firewall. It's right below the tubes coming out of your Heater-Core. (Pic#3 at the extreme-right you can see it). If it breaks, and it might because of how brittle it is, don't worry, another trip to the parts-store will fix it. Get SMALL diam-windshield washer hose (they sell it by the foot I think and it will fit nice and tight over the vac-line to fix it). (About two bucks).
Time to pull the entire AIR-BOX out from under the dash,.. A little antifreeze might come out from the Heater-Core when pulling back on the Air-Box but don't worry, there isn't much in there.
Now, I don't want to disappoint you but, I'm sure I've missed a few brackets and bolts & screws along the way that I just can't remember. But this will get you 95% of the way thru it.
Set your Air-Box on top of your work-bench and start to take off the top cover to access the Heater-Core & Evap-Core. (This is also where you can now get to the Blower-Motor if you want)...
Last edited by JBs DAK; 01-13-2011 at 07:12 PM.
#13
04-07-2007, 08:47 AM
If your using a Non-OEM Heater-Core & Evap-Core you want to re-use the foam-rubber wrap that goes around the Evap-Core.
Just peel it off carefully and apply some 3-M adhesive to put on your new unit in the same way. The Heater-Core should come with about two feet of one sided sticky foam rubber. Just cut it by copying the way the old Heater-Core was wrapped & apply.
Vacume out your Air-Box once you have top off & both cores are removed. Odds are there's quite a bit of happy-crap in there.
Clean and use Sil-Glide on the pivot points for your different blend-doors. Put a little on the ends of your actuator-rods too where they pivot. Inspect all your foam-rubber and replace with new stuff you can get at any hardware store in the A/C section. Odds are it will be fine though. Follow the instructions that comes with both cores. The compainies that make them know of the slight differances and will tell you exactly how to modify the Air-Box to make them fit. Inspect all the little green O-rings on the lines you took off. If they look bad in any way, replace 'em. You can get complete O-ring kits at the Auto-Parts store for under ten bucks.
Ok,.. Time for more beer & Tacos,.. Eat some more Tacos,... Your gonna need it!..
Time to put it all back together again! (Your on your own)!!
During the assembly, DON"T flex those tubes coming out of the Cores!! I can't stress this enough!! If you do,.. They're gonna leak!!!
Got it all back together now??
How many spare screws or bolts do you have? Under 3 is ok. The gods deem this to be just fine to have a few spare parts after a job this big. Any more than three, I'd start looking around for where they go.
Really, you have to be a person that LIKES to take stuff apart to tackle this job. It has many, many things to come off to get it done. It's unreal!
You now need a gaget that will pull all the moisture out of your system. It hooks up to your compressor and you hook it up to the low-side port. Your compressor needs to hold, or run at a steady 60 psi or higher with this Air-Dryer hooked up. It needs to run a solid 15 mins to remove any moist air out of the system. Don't worry, you can rent this magic box from Auto-Zone. Using it will make the difference of about 4 to 10 degrees when your air is on. (And that is a LOT in a vehicle)!
Next, start your truck & burp the air out of your system. (Remember, you opened up & changed your Heater-Hoses). Keep your truck running,Re-charge time,..
As for re charging the system; I used InterDynamics Auto Air-Conditioner Refrigerant-134a & Oil Charge with Leak-Sealer. Get two 18oz. bottles.They come with built in gauges attached to the can so your can monitor how much your putting in. You need another 4 oz. bottle to go with that also. 20 bucks a bottle for the 18oz. & 6 for a 6oz. bottle. You need two pounds total. You can buy cheaper 134a but, you don't get that nice built in gauge with them. Also, you might have to buy separate conditioner & sealer so, the cost is a wash.
Remember, Low-side to load your Freon.. My port is directly on top of the compressor. If yours is like mine, you want to feed your system slowly because your port is so close to the compressor. (it doesn't like to take the Freon fast). If your port is located on a hard-line away from the compressor, stick your can of freon in warm water before you charge the system. Also, hold the can up-side down when charging. But, you don't need to do all this if your port is on top of your compressor though.
Your done,.......... Check & make sure your Selector-Switch is functioning correctly.Check for leaks. Check the temp coming out of the vents for the A/C. 38 to 40 degrees is great for 134a.
Check your heat now. A great temp for heat is 148 to 156. But, 140 or higher will get you thru the winter also just fine. Heat temps seem to vary with these trucks.
Now, AGAIN, remember, this is what I remember from the job. I'm sure I've missed some stuff. Also, this is for a "99-318 4x4 SLT.
I'm sure it's gonna be a little different for different models and years. Hope this helps you if you deceide to tackle this job on your own!
Total cost for me to do it was about 275 dollars. (Not including the beer & tacos). Get it done at the dealer;.. Well over 1100 bucks. You choose! Good-Luck!!
Last edited by JBs DAK; 06-15-2010 at 04:35 AM.
#14
04-07-2007, 09:25 AM
Last three pics,.. One of the Orfice-Tubes,(New & old).
One of the Air-Box with the top cover off exposing the Heater-Core, Evap-Core.
And, one of the Hard A/C line with the direction that the Orfice-Tube goes in.
Thanks all!


One of the Air-Box with the top cover off exposing the Heater-Core, Evap-Core.
And, one of the Hard A/C line with the direction that the Orfice-Tube goes in.
Thanks all!
Last edited by Billiam; 06-17-2010 at 07:29 PM. Reason: Pic Insert
#15
05-12-2007, 09:22 PM
Here's a up-date on my cold air repair;..
If you read my write-up near the begining I state no need to replace your Receiver-Dryer,..
Boy, was I WRONG!! Here's why;..
If it's a few yrs old, replace the damm thing! I was getting less & less cold blowing out
the vents. Freon was all there. But cold air went from 38 degree to 48 in about five weeks
of time. Couldn't figure it out so, evacuated the system, removed the Orfice-Tube and low & behold,
it was clogged up! Not the Black-Death stuff everyone talks about that knows about air conditioners.
(Sign of the compressor going bye-bye). It was little Bee-Bee like thingy's completely blocking it!
I had no idea what this stuff was. So, I closed up the truck went inside and had dinner. Then,
I got to thinking, what's NOT been replaced on this stupid truck? Receiver-Dryer!!!
68 bucks later & purging the entire system with nitrogen & brake clean, I put the new dryer on,
Threw a vacume on for 30 mins, replaced the Orfice-Tube AGAIN and charged the system up again to
32 OZ. All is fine,.. 38degrees never felt so cold!!!
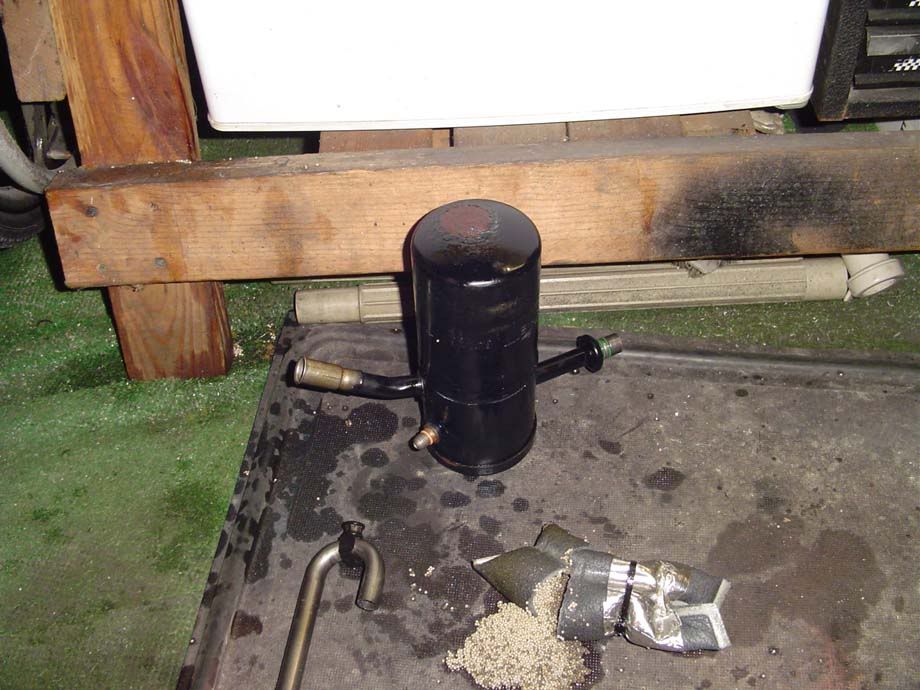
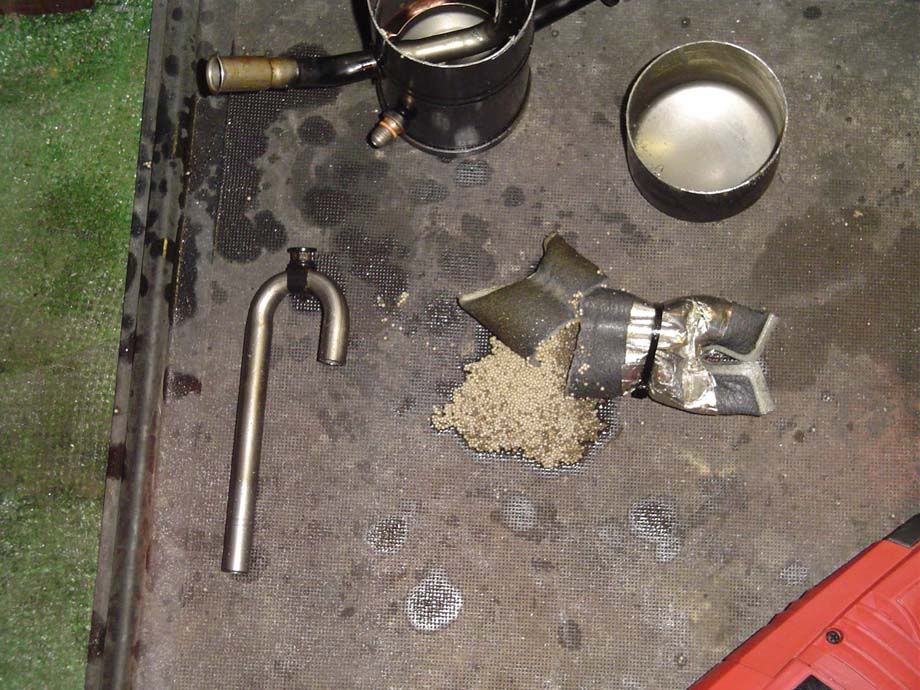
So,.. I wanted to see what's in this magic black tube thingy that got me hotter as the days wore on.
Here's what I found after cutting it open;..


If you read my write-up near the begining I state no need to replace your Receiver-Dryer,..
Boy, was I WRONG!! Here's why;..
If it's a few yrs old, replace the damm thing! I was getting less & less cold blowing out
the vents. Freon was all there. But cold air went from 38 degree to 48 in about five weeks
of time. Couldn't figure it out so, evacuated the system, removed the Orfice-Tube and low & behold,
it was clogged up! Not the Black-Death stuff everyone talks about that knows about air conditioners.
(Sign of the compressor going bye-bye). It was little Bee-Bee like thingy's completely blocking it!
I had no idea what this stuff was. So, I closed up the truck went inside and had dinner. Then,
I got to thinking, what's NOT been replaced on this stupid truck? Receiver-Dryer!!!
68 bucks later & purging the entire system with nitrogen & brake clean, I put the new dryer on,
Threw a vacume on for 30 mins, replaced the Orfice-Tube AGAIN and charged the system up again to
32 OZ. All is fine,.. 38degrees never felt so cold!!!
So,.. I wanted to see what's in this magic black tube thingy that got me hotter as the days wore on.
Here's what I found after cutting it open;..
Last edited by JBs DAK; 06-15-2010 at 04:38 AM.
#16
10-15-2007, 10:33 PM

So, I just tackeld this project this weekend because my heater core was leaking....
yes, everyone is correct..it is a PITA!
I wouldn't really rate it as "hard" but it is very very time consuming, and tedious and it does seem like you have to take everything apart except for the engine [:@]
Anyways, I would definetely say this job is worth doing on your own, and not paying the dealership $1000-1500.
My top suggestions would be to TAKE YOUR TIME....also keep a good accountability on all of your parts and tools- I would suggest using a shop tray- this will make the job a lot easier and a little faster.
If it wasn't for JB's very descriptive how-to...this would have taken another couple days. So THANK YOU JB!
Oh, and btw, I did do this by myself, not one other hand...so if you DON"T have a friend, it is very possible [8D]
Lastly, JB isn't joking when he says take the taco and beer breaks, you'll need them!
Feel free to contact me whenever if you need help with this project.
#17
10-16-2007, 01:00 AM
#18
11-04-2007, 01:39 AM

JBs Dakota:
Thanks bunches for the write-up.
I tackled this one last weekend. It took about 8 hours(mostly dark with a flashlight). 6 hours to dis-assemble, 1/2 hour to change core, and 1.5 hours to re-assemble.
It looks like I had the same aftermarket heater core you installed. I had to cut out part of another tab in the box(not in the instructions with the core) to make the core fit. I almost gave up getting it in there until I went back and looked at your pic of the core. It fits completely different than the stock one.
If anyone else would like to attempt this one, have the air conditioning line coupler tool handy before you start. It took me about an hour to make some 2-piece tools out of copper pipeand get them apart. The right tool would have taken an hour off my project time.
Mine had a slight antifreeze smell for 2 years, then let go one day on the way to work. It never dripped on the floor(drain hole is on the driver's side of the trans tunnel), but it steamed the whole truck up in about 10 seconds while driving when it let go.
BTW, the MUCH larger aftermarket core puts out TONS more heat than the stock core.
Since I'm in MN, and my air didn't work before, I re-connected it, but didn't get it re-filled.
Total cost: under $60.
Thanks again,
Mike
#19
09-07-2009, 01:01 PM

Its because of this writeup I decided to take this on myself.
I'm a little stuck at the part where you drop the steering column. I see four bolts that have an 8 point washer behind them. Do you remove just two of them, or all four of them to drop it? I also see two different kinds of bolt, but they appear to be blocked by metal supports.
I have a 98 so I know these instuctions won't match all the way, but I'm a little stumped at this point.
Any ideas?
#20
01-30-2010, 12:26 AM

Registered User
Join Date: Jan 2010
Location: SE Michigan
Posts: 1
Likes: 0
Received 0 Likes
on
0 Posts
Hi & Thank You Very Much for the Fix It Info. Now a Little of My Own.
DON'T TRY THIS IN JANUARY IN MICHIGAN, Like I Had Too. The Root Cause Was A Poor Solder Job on the OME Heater Core It Let Go at 129K Miles. Also Be REALLY Careful With the Rubber/Plastic Tubes They Like to Snap When Cold. I Got to Redesign the Vacuum Line Off the Power Brake Booster All the Way Back to the Inside on the Heater-A/C Box. Good Luck & Take Your Time. Also Bag Up Each Group of Nuts, Screws, and Nuts And Mark Them as To Where They Came From. That was the One Real Smart Thing I Did on This Project. I HAD ZERO Left Over Parts! Mine is a 2000 4.7L Quad Cab 4X4.
Dave V. - AKA THE MAD DUCK