

44RE Rebuild - DIY w/Pics
#1
 07-09-2013, 09:55 AM

Well Ladies and Gentlemen here it is, For all the 46RE rebuild threads there are on the web here is finally one for the 44RE.
As some of you may or may not know, i was having off and on again issue with my transmission for the last year. With almost 170,000 on the OEM transmission i decided i was tired of band aiding it. I was gonna bite the bullet and spring for a reman transmission and pay a shop to swap them out.
My first thought in doing this was to upgrade it to a 46RE so i purchase one and later discovered that it would be too much hassle for me to convert so i just put the project on hold for a bit. A few weeks later, i came across a friend of a good friend that had a 99 Dakota. It had a freshly installed 44RE with 30 miles on it. On the way home from the transmission shop he had a incident that pretty much left the truck unable to be driven without some major work so he bought a ram off CL for really cheap that needed a transmission and was planning to install the one out of the Dakota. Long story short, we traded transmissions so i would have the proper 44RE and he have the proper 46RE.
So, now i have the proper transmission just need to get it installed. Found a shop to install it and dropped it off... few days later i get a call.... Long story short, the installer can't finish the job, and my reman transmission was submerged it water for atleast 24 hours.
Now, that leads me to my only option as the D is our only car and i needed back months ago and the purpose of this thread. I decided to rebuild and install the transmission myself to get it back on the road and ill deal with the shop for compensation for the loss later.

So, here we go....
The first step was to do my research on how to rebuild it. I have rebuilt chevy transmissions in the past but never a dodge. This was going to be a exciting learning experiance for me that i am now sharing with all of you. I have many pics for this and as i get them uploaded to photobucket ill write a little bit and post them up till i been though the whole process.
The first purchase was the ATSG manual for the a500. I picked it up @ Northern auto parts supply for $24.99. If you have plans to rebuild your transmission yourself, I would highly recommend this manual. It's extremely easy to follow and has great illustrations.
Next i ordered a master rebuild kit from Oregon Performance Transmissions. The kit included a new front band so i also added a new rear band to my order. Total for everything came out to around $170.
Finally, i order a new torque converter from Torco, Inc. cost+shipping came to about $140.
Now i am ready for the tear down!
To be continued.....
As some of you may or may not know, i was having off and on again issue with my transmission for the last year. With almost 170,000 on the OEM transmission i decided i was tired of band aiding it. I was gonna bite the bullet and spring for a reman transmission and pay a shop to swap them out.
My first thought in doing this was to upgrade it to a 46RE so i purchase one and later discovered that it would be too much hassle for me to convert so i just put the project on hold for a bit. A few weeks later, i came across a friend of a good friend that had a 99 Dakota. It had a freshly installed 44RE with 30 miles on it. On the way home from the transmission shop he had a incident that pretty much left the truck unable to be driven without some major work so he bought a ram off CL for really cheap that needed a transmission and was planning to install the one out of the Dakota. Long story short, we traded transmissions so i would have the proper 44RE and he have the proper 46RE.
So, now i have the proper transmission just need to get it installed. Found a shop to install it and dropped it off... few days later i get a call.... Long story short, the installer can't finish the job, and my reman transmission was submerged it water for atleast 24 hours.
Now, that leads me to my only option as the D is our only car and i needed back months ago and the purpose of this thread. I decided to rebuild and install the transmission myself to get it back on the road and ill deal with the shop for compensation for the loss later.
So, here we go....
The first step was to do my research on how to rebuild it. I have rebuilt chevy transmissions in the past but never a dodge. This was going to be a exciting learning experiance for me that i am now sharing with all of you. I have many pics for this and as i get them uploaded to photobucket ill write a little bit and post them up till i been though the whole process.
The first purchase was the ATSG manual for the a500. I picked it up @ Northern auto parts supply for $24.99. If you have plans to rebuild your transmission yourself, I would highly recommend this manual. It's extremely easy to follow and has great illustrations.

Next i ordered a master rebuild kit from Oregon Performance Transmissions. The kit included a new front band so i also added a new rear band to my order. Total for everything came out to around $170.
Finally, i order a new torque converter from Torco, Inc. cost+shipping came to about $140.
Now i am ready for the tear down!
To be continued.....
#2
07-14-2013, 12:03 AM
Time to get started again!!
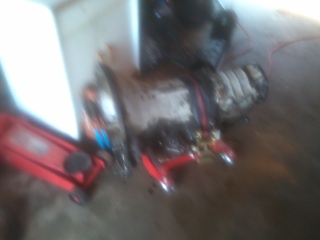
After i got it torn down i quickly discovered some of the reason for failure. I snapped a few pics of the damage.
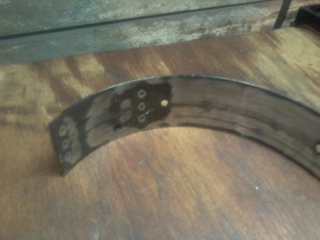
Front Band
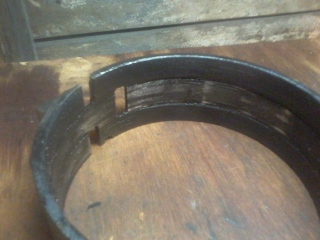
Rear Band
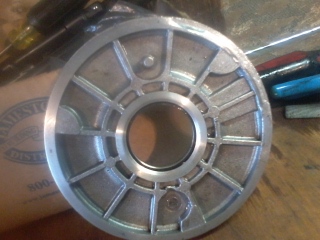
Overdrive Direct Clutch
Notice that the front band has no more material on it and the overdrive direct clutch has missing chunks out of it. The read band was not to bad, shocking as loss of reverse was one of my issues. The other issue was no overdrive, with the condition of the overdrive direct clutch that explains that...lol
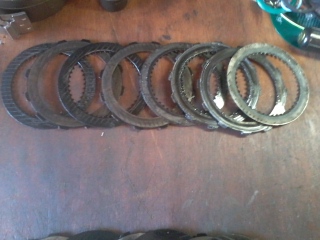
Forward Clutches
The forward clutches where not all that bad, they where wearing nicely with some material left on them.
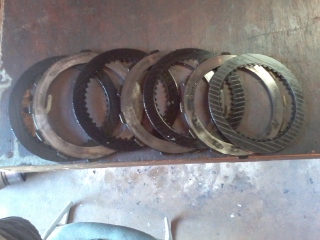
Reverse Clutches
The reverse clutches where the worst of the two. They where so far gone the clutches and plates where burnt together.. had to use a screwdriver and a hammer to break them apart. That explains why i lost reverse i guess...lol
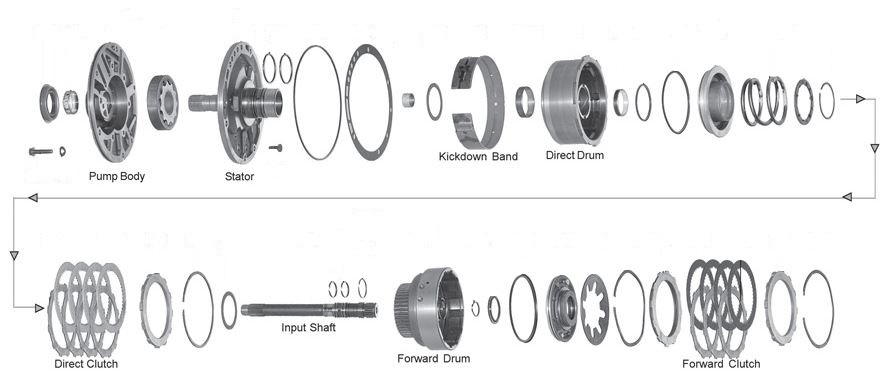
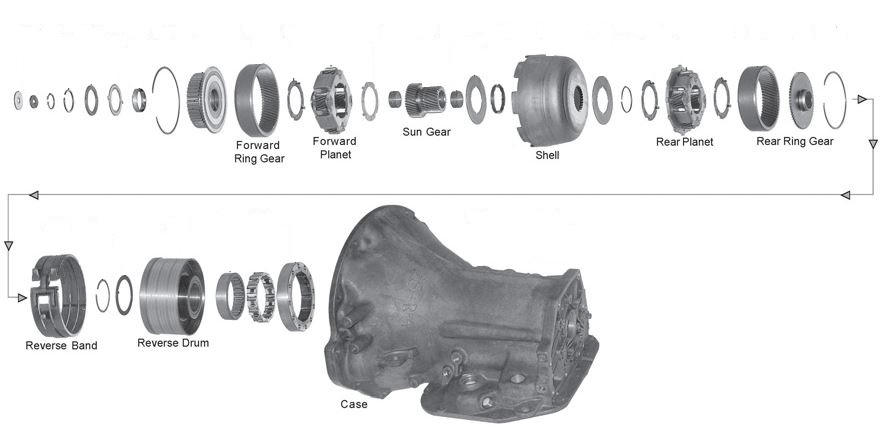
Here is a diagram of how the main case goes together. It is was i used to remember how everything went together. Later in the thread i will post one that shows how the overdrive unit is put together.
Here is a video i used as a reference... this video shows the tear down of a 48RE but, it is mostly the same as our 44RE. This video was very helpful to me that is why i thought i would include it here...

After i got it torn down i quickly discovered some of the reason for failure. I snapped a few pics of the damage.
Front Band

Rear Band

Overdrive Direct Clutch

Notice that the front band has no more material on it and the overdrive direct clutch has missing chunks out of it. The read band was not to bad, shocking as loss of reverse was one of my issues. The other issue was no overdrive, with the condition of the overdrive direct clutch that explains that...lol
Forward Clutches
The forward clutches where not all that bad, they where wearing nicely with some material left on them.

Reverse Clutches
The reverse clutches where the worst of the two. They where so far gone the clutches and plates where burnt together.. had to use a screwdriver and a hammer to break them apart. That explains why i lost reverse i guess...lol

Here is a diagram of how the main case goes together. It is was i used to remember how everything went together. Later in the thread i will post one that shows how the overdrive unit is put together.


Here is a video i used as a reference... this video shows the tear down of a 48RE but, it is mostly the same as our 44RE. This video was very helpful to me that is why i thought i would include it here...
#4
07-14-2013, 11:27 AM
Thanks, quite honestly as long as to take your time and pay attention to detail it's really not as hard as its made out to be. My only frustration is the fact that i want my truck back and i have to keep stopping to wait for the UPS man to deliver more parts!
#5
07-14-2013, 01:40 PM
#6
07-15-2013, 12:06 AM

Nice write up you have going Old_School. I just started prepping mine to be taken out. How did taking out your y-pipe go? Mine is being a pain and the cutting torch is coming out  . Also did you remove the t-case before or after the transmission was out? I'm gonna go with a performance rebuild kit I decided with a shift kit since I wanna do some motor mods eventually. Not to thread jack or nothing but I wonder what the difference is gonna be between factory. You should post a quick vid of how a proper 44re reacts and shifts, can't be to terribly different from a 46re. Sorry lots of questions but this is my first trans rebuild. I'm gonna go update my thread.
#7
07-15-2013, 08:02 AM
The only B-I-C-T-H of the whole project was getting the bolts for the cross member removed.. Took a few days of soaking them in PB Blaster and a air impact to break them free.
I'm gonna go with a performance rebuild kit I decided with a shift kit since I wanna do some motor mods eventually. Not to thread jack or nothing but I wonder what the difference is gonna be between factory. You should post a quick vid of how a proper 44re reacts and shifts, can't be to terribly different from a 46re.
That's okay. it's what we are here for to learn from each other... This is my first rebuild also. I am learning as i go and learning i have done. After this i am coming out with a complete understanding of how the "Magic Box" works!
Trending Topics
#8
07-16-2013, 10:33 PM
Thanks old_school. My dad is very good with a cutting torch and all those stubborn bolts are gonna go and I may as well take a saws-all after the O2 before the cat. I'm gonna go update my thread with where and what I'm getting for a rebuild kit. I am removing the drain-back valve as well so I feel that a shift kit is necessary for as you stated have the pump run in park. Tomorrow I have the day off so I'm gonna go at it for at least 5hrs. Having the flu and being in shop @90 degrees isn't fun.
#9
07-16-2013, 10:50 PM
Just thought I'd mention that when I had to take my transmission off to replace the freeze plugs on the back of the block, I didn't have to remove the y-pipe, I just unbolted it from the manifolds and moved it out of the way.
As for the O2 sensors, if you do need to use a torch to remove them, what you want to do is heat them up and then quench them with a wet rag a couple of times, then they should come out much easier.
As for the O2 sensors, if you do need to use a torch to remove them, what you want to do is heat them up and then quench them with a wet rag a couple of times, then they should come out much easier.
#10
07-16-2013, 11:54 PM

