

2011 R/T Upfit - Fire POV - Storm Chase Vehicle
#1
 08-15-2014, 10:52 PM

Join Date: Jun 2014
Posts: 9
Likes: 0
Received 0 Likes
on
0 Posts
Kicking off my membership here with my first post. Some may cringe, others may find this cool. An overview of upfitting my Durango with emergency response equipment, storm chasing equipment and my regular everyday gadgets and widgets.
To outline what I've equipped and continue to equip:
- Emergency lights (rear only, pending permit)
-- Amber lights can remain on, powered by secondary battery on extended scenes
- Secondary battery (can switch on/off via always hot switch in console for 'jump start')
- Primary battery IGN switched solenoid
-- My biggest pet-peeve with vehicle upfitting is one that isn't 'turn key'. When I go to a call or anything of the sort, I don't want to be flipping tons of switches for my equipment to turn on. I'm a big fan of the 100amp continuous duty solenoids for this purpose.
- Amateur Radio
- Front Bull-bar and LED light bar
- HID high-beams
- Interior LED's
- DRL mod
-- Using a standard 40 amp automotive relay, I enabled power to the low side of the front turn signals to be on whenever IGN is.
- Rear cargo light connected to secondary battery
- USB power supplies in front dash voids. Allows dedicated power for GPS, DVR, tablet/phone charging, etc.
Things to come:
- Ram laptop/tablet mount
- Federal Signal siren/light controller (license pending)
I'm sure many other little details here and there.
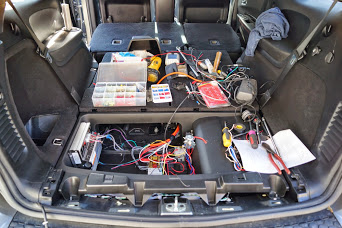
Let's get to it! For starters this first set of pictures is the initial day of installing. Includes the initial wiring, hence the mess.
First is my mounting location for the electrical distribution. You can see the two continuous duty solenoids, one is the IGN and one is for the secondary battery tie-in. The large box on left is a Federal Signal strobe power supply, will detail those further down. There are two smaller 40 amp relays - one for a stage of lighting do accompany the LED power draw and one will be used as an auxiliary power for camping and things of that nature. The small white box below the fuses is a 12V solar float charger, re-purposed to maintain the smaller secondary battery. Can't tie the main and secondary together unless they are the same size, can cause over-charge and boil over. Not pictured are my two 120V float chargers. The D sits during the week and it stays plugged in, best maintenance for your battery is a good charge.

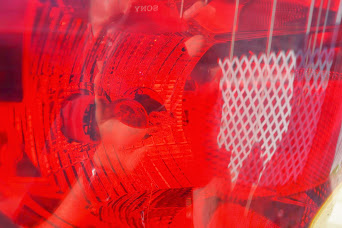
Quick view of the HAW strobe tubes. I have them configured for an 'X' pattern with emphasis on side warning.


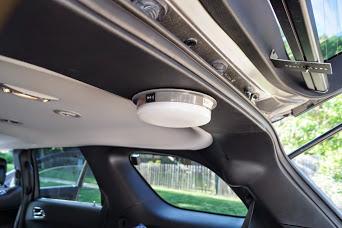
Here is a dual color dome light I installed in the rear. This light is exclusively powered off the secondary battery, allows me to leave a light on for extended scenes. Have the selection of red LED or white LED, very little power consumption.
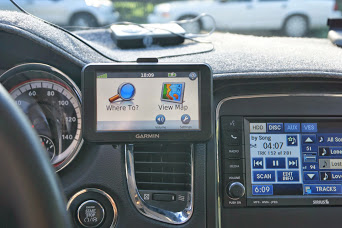
Quick shot of my Garmin Nuvi with a vent mount. Out of focus in the back is a Wilson Cellular amplifier prior to install. This gets use during chase season and allows me to tether my phone via Wifi in low coverage areas so I can provide streaming video back to my TV station.
Only have one radio thus far, a Kenwood D700A dual bander. Pictured first is the control head mounted and secondly the transceiver under front seat. I do have plans for a P25 800 in the future used for fire/rescue and emergency management during severe weather. All of my antennas are low-key, the 800 will be completely interior.


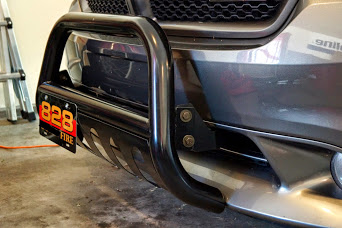
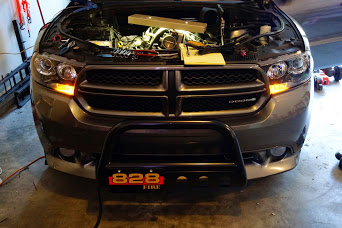
Here is the front bull bar, naked in the picture - will have a second plate for my second department and pictures of the LED bar in the coming days.
Pictured below are some various shots of the DRL mod, HID install and wiring for the LED bar. Something to note as I've taken flak for legality of an LED bar for light - it is switched off brights, isn't used for oncoming traffic. I make it a point not to mess with any low-beam lighting on any vehicle, we all know that a-hole who puts 55W HID's in a non-projector low-beam.
Loomed wire across to passenger side.

Two 40 amp relays. One for DRL and one for power to the LED bar.

5000k 35W Kensun HID's installed in brights. $40 on Amazon with a 2 year warranty - you CANNOT go wrong with the upgrade in light.
IGN tap for the DRL's.

Shot of the DRL's, again this is the parking lamp portion of the bulbs. Rather low amount of light but I still prefer to have a DRL of some kind.
Will have more shots in the coming days/weeks! I will also have a post detailing the part URL's I used if anybody is interested.
To outline what I've equipped and continue to equip:
- Emergency lights (rear only, pending permit)
-- Amber lights can remain on, powered by secondary battery on extended scenes
- Secondary battery (can switch on/off via always hot switch in console for 'jump start')
- Primary battery IGN switched solenoid
-- My biggest pet-peeve with vehicle upfitting is one that isn't 'turn key'. When I go to a call or anything of the sort, I don't want to be flipping tons of switches for my equipment to turn on. I'm a big fan of the 100amp continuous duty solenoids for this purpose.
- Amateur Radio
- Front Bull-bar and LED light bar
- HID high-beams
- Interior LED's
- DRL mod
-- Using a standard 40 amp automotive relay, I enabled power to the low side of the front turn signals to be on whenever IGN is.
- Rear cargo light connected to secondary battery
- USB power supplies in front dash voids. Allows dedicated power for GPS, DVR, tablet/phone charging, etc.
Things to come:
- Ram laptop/tablet mount
- Federal Signal siren/light controller (license pending)
I'm sure many other little details here and there.
Let's get to it! For starters this first set of pictures is the initial day of installing. Includes the initial wiring, hence the mess.
First is my mounting location for the electrical distribution. You can see the two continuous duty solenoids, one is the IGN and one is for the secondary battery tie-in. The large box on left is a Federal Signal strobe power supply, will detail those further down. There are two smaller 40 amp relays - one for a stage of lighting do accompany the LED power draw and one will be used as an auxiliary power for camping and things of that nature. The small white box below the fuses is a 12V solar float charger, re-purposed to maintain the smaller secondary battery. Can't tie the main and secondary together unless they are the same size, can cause over-charge and boil over. Not pictured are my two 120V float chargers. The D sits during the week and it stays plugged in, best maintenance for your battery is a good charge.
Quick view of the HAW strobe tubes. I have them configured for an 'X' pattern with emphasis on side warning.
Here is a dual color dome light I installed in the rear. This light is exclusively powered off the secondary battery, allows me to leave a light on for extended scenes. Have the selection of red LED or white LED, very little power consumption.
Quick shot of my Garmin Nuvi with a vent mount. Out of focus in the back is a Wilson Cellular amplifier prior to install. This gets use during chase season and allows me to tether my phone via Wifi in low coverage areas so I can provide streaming video back to my TV station.
Only have one radio thus far, a Kenwood D700A dual bander. Pictured first is the control head mounted and secondly the transceiver under front seat. I do have plans for a P25 800 in the future used for fire/rescue and emergency management during severe weather. All of my antennas are low-key, the 800 will be completely interior.
Here is the front bull bar, naked in the picture - will have a second plate for my second department and pictures of the LED bar in the coming days.
Pictured below are some various shots of the DRL mod, HID install and wiring for the LED bar. Something to note as I've taken flak for legality of an LED bar for light - it is switched off brights, isn't used for oncoming traffic. I make it a point not to mess with any low-beam lighting on any vehicle, we all know that a-hole who puts 55W HID's in a non-projector low-beam.
Loomed wire across to passenger side.
Two 40 amp relays. One for DRL and one for power to the LED bar.
5000k 35W Kensun HID's installed in brights. $40 on Amazon with a 2 year warranty - you CANNOT go wrong with the upgrade in light.
IGN tap for the DRL's.
Shot of the DRL's, again this is the parking lamp portion of the bulbs. Rather low amount of light but I still prefer to have a DRL of some kind.
Will have more shots in the coming days/weeks! I will also have a post detailing the part URL's I used if anybody is interested.
Last edited by ksoldani; 08-15-2014 at 11:04 PM.
#2
08-16-2014, 07:02 AM
Nice Job. You can find a battery isolator to tie the 2 batteries together and well as Yandina Combiner. I use these in the marine world to tie 2 batterers together and size doesn't matter. They will both reach the same voltage and charging will stop.
I work in LE and here is how we do another dodge vehicle.

I work in LE and here is how we do another dodge vehicle.
#3
08-16-2014, 02:55 PM
Join Date: Jun 2014
Posts: 9
Likes: 0
Received 0 Likes
on
0 Posts
Nice setup there. I'll have to do some checking into the isolator that would definitely be a good idea, hadn't gotten too giddy about ordering - tried to get as far as I could with minimal ordering.
The wiring area is approaching the cleanliness of that setup, though still have some additions to make.
The wiring area is approaching the cleanliness of that setup, though still have some additions to make.
#4
08-17-2014, 02:06 PM
Join Date: Jun 2014
Posts: 9
Likes: 0
Received 0 Likes
on
0 Posts
Here's some updated pictures from today.
Front with the bull bar and LED bar.


Shot of the rear, shoreline is seen hanging from the left of the tailgate - forgot to put this inside. Runs the float chargers for both batteries when garaged. May install an auto eject of some kind in the future.


Pictures of the LED interior lights. I'm still on the fence about these due to the warmer stock LED reading lights. I'll probably dig in further at some point in an attempt to swap those as well. For now the warmer reading light isn't quite as bright or harsh yet the cooler flood style LED's really help light up the dark interior at night.


Pictured below is the dual color Signal SoundOff dome light. Normally uses an incandescent style bulb for white, however I also swapped this to full LED. This is always hot and wired to the secondary battery.


I haven't dug into the antennas just yet and wanted to stray away from drilling holes in the roof. For now I'm sticking with on-glass style which work quite well. Pictured is a dual band 144/440 ham band on-glass.

Next up is the rear lighting compliment. Pictured is the long amber LED bar on bottom and two red/red and red/blue Federal Signal Viper LED heads.


Last but not least is the work in progress siren/light controller. Really wanted to keep the stock console for now, but may upgrade to a Havis public safety radio console down the road. For now the siren/light controller is stashed in the console. At the present only amber/white face front and no siren speaker is installed - for anybody who wants to throw the legality flag. An emergency vehicle permit is pending.

More to come.
Front with the bull bar and LED bar.
Shot of the rear, shoreline is seen hanging from the left of the tailgate - forgot to put this inside. Runs the float chargers for both batteries when garaged. May install an auto eject of some kind in the future.
Pictures of the LED interior lights. I'm still on the fence about these due to the warmer stock LED reading lights. I'll probably dig in further at some point in an attempt to swap those as well. For now the warmer reading light isn't quite as bright or harsh yet the cooler flood style LED's really help light up the dark interior at night.
Pictured below is the dual color Signal SoundOff dome light. Normally uses an incandescent style bulb for white, however I also swapped this to full LED. This is always hot and wired to the secondary battery.
I haven't dug into the antennas just yet and wanted to stray away from drilling holes in the roof. For now I'm sticking with on-glass style which work quite well. Pictured is a dual band 144/440 ham band on-glass.
Next up is the rear lighting compliment. Pictured is the long amber LED bar on bottom and two red/red and red/blue Federal Signal Viper LED heads.
Last but not least is the work in progress siren/light controller. Really wanted to keep the stock console for now, but may upgrade to a Havis public safety radio console down the road. For now the siren/light controller is stashed in the console. At the present only amber/white face front and no siren speaker is installed - for anybody who wants to throw the legality flag. An emergency vehicle permit is pending.
More to come.
#5
08-17-2014, 02:11 PM

#6
08-17-2014, 09:29 PM
Join Date: Jun 2014
Posts: 9
Likes: 0
Received 0 Likes
on
0 Posts
I'm thinking chevrons on the back?
#7
08-17-2014, 10:32 PM
Trending Topics
#8
08-20-2014, 02:13 PM
Join Date: Jun 2014
Posts: 9
Likes: 0
Received 0 Likes
on
0 Posts
All in all I'm pleased with the choice of R/T, it's a road truck used for trips, responding, perhaps some towing in the future and probably won't ever see rugged offroad trails.
#10
08-23-2014, 12:10 AM
Join Date: Jun 2014
Posts: 9
Likes: 0
Received 0 Likes
on
0 Posts
Sweeeet, looking forward to it. 
Update for 8/22.
I've installed amber LED's in my fogs since my DRL update technically put white lights in for my parking lamps. Right now the lighting looks messy since those DRL's are on however this weekend I'll be adding a relay that will turn DRL's off when headlights are on. Keeping only stock HID low beams, all parking lamps/side markers (minus the whites) and amber fogs on. Excuse the bugs, she's a bit dirty

Now for my next trick... Here's the HAVIS radio console I installed, previously taken out of my TrailBlazer prior to trading it in. Items pictured from top to bottom: Federal Signal Interceptor 400 siren/light controller, Yeasu FT-2500 VHF HAM and an Astro XTL control head (working on getting a mobile for fire/rescue here in the county). Fitment is simply mocked up at this point hence a few screws missing and the messiness to it. Also have a friend of mine that's going to make a new plate up top that will only have a cup-holder, may add the volt-meters later on but not initially. This entire 'mod' if you will was super easy, hard part was learning how to take this all apart for the first time. I removed the back portion of the stock console with arm rest and simply replaced it with this, I did leave the rear controls intact however couldn't really get the air duct back in 100% for the rear feet - my passengers will survive, as much as I have rear passengers anyway...


Quick little addition I made in the rear today was a cargo style net, just to keep things up for camping, gloves for calls, small things like that I didn't want down with my gear. This is about $12 on Amazon and made by Bell - pretty sturdy and definitely pleased with the result. The plan is for my fiance and I to camp out in the back of the Durango with an air mattress when we go on road trips, this will be handy to keep organized inside. Also ordered some mosquito netting, flat magnets and a small fan to move air inside (via the secondary battery) while keeping bugs out. More on camping later.


Will keep on going, hope to get some LED DRL's on this weekend (hopefully here soon) to enhance daytime brightness and clean up the rear electrical area so I can finally show that a bit more.
Update for 8/22.
I've installed amber LED's in my fogs since my DRL update technically put white lights in for my parking lamps. Right now the lighting looks messy since those DRL's are on however this weekend I'll be adding a relay that will turn DRL's off when headlights are on. Keeping only stock HID low beams, all parking lamps/side markers (minus the whites) and amber fogs on. Excuse the bugs, she's a bit dirty
Now for my next trick... Here's the HAVIS radio console I installed, previously taken out of my TrailBlazer prior to trading it in. Items pictured from top to bottom: Federal Signal Interceptor 400 siren/light controller, Yeasu FT-2500 VHF HAM and an Astro XTL control head (working on getting a mobile for fire/rescue here in the county). Fitment is simply mocked up at this point hence a few screws missing and the messiness to it. Also have a friend of mine that's going to make a new plate up top that will only have a cup-holder, may add the volt-meters later on but not initially. This entire 'mod' if you will was super easy, hard part was learning how to take this all apart for the first time. I removed the back portion of the stock console with arm rest and simply replaced it with this, I did leave the rear controls intact however couldn't really get the air duct back in 100% for the rear feet - my passengers will survive, as much as I have rear passengers anyway...
Quick little addition I made in the rear today was a cargo style net, just to keep things up for camping, gloves for calls, small things like that I didn't want down with my gear. This is about $12 on Amazon and made by Bell - pretty sturdy and definitely pleased with the result. The plan is for my fiance and I to camp out in the back of the Durango with an air mattress when we go on road trips, this will be handy to keep organized inside. Also ordered some mosquito netting, flat magnets and a small fan to move air inside (via the secondary battery) while keeping bugs out. More on camping later.
Will keep on going, hope to get some LED DRL's on this weekend (hopefully here soon) to enhance daytime brightness and clean up the rear electrical area so I can finally show that a bit more.
Last edited by ksoldani; 08-23-2014 at 12:12 AM.