
DIY 4x4 Transfer case linkage update (Pic Heavy)
#1
 02-27-2016, 02:10 AM

Original Post:
So I have followed this post for years and finally got around to building it. Let me say, it was incredibly simple and I only needed help finding two parts.
Since the OP contains all the info, here's building and the installed product, and I also have part numbers of all hardware used. I used all Grade 8 hardware, so the total price was around $23. Part numbers will be at the end.
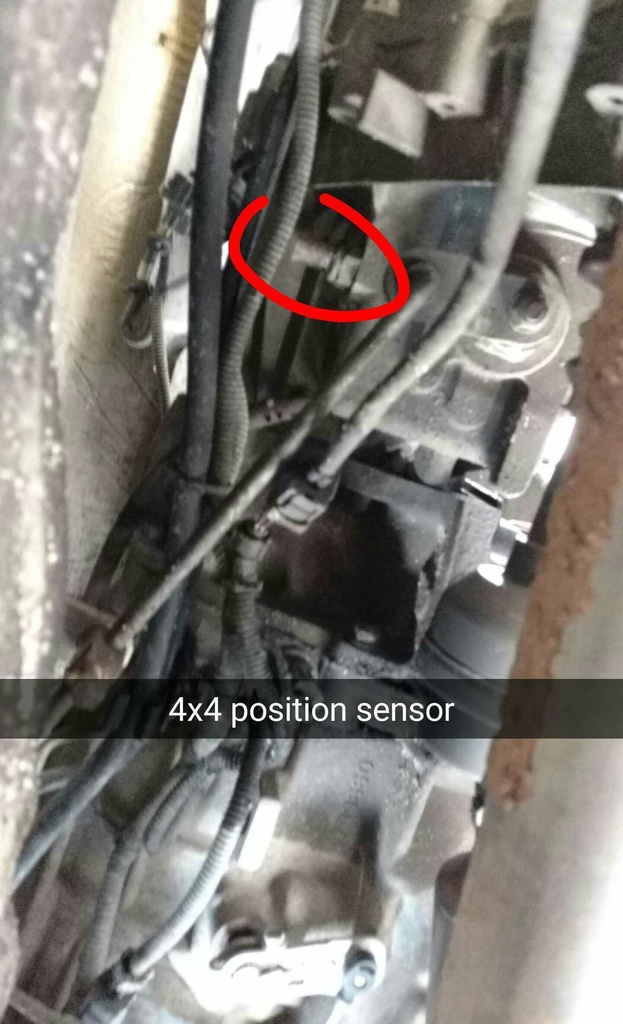
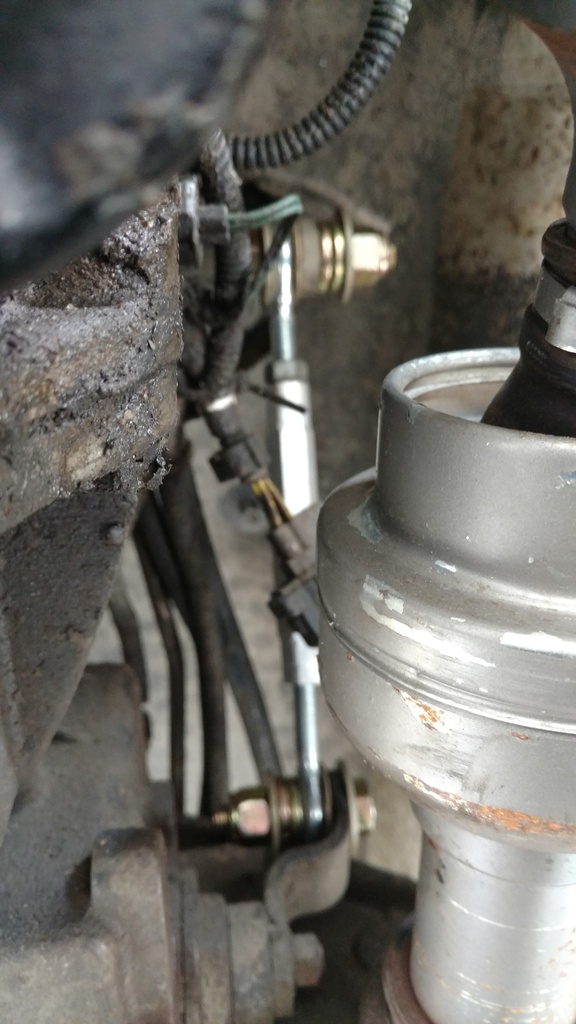
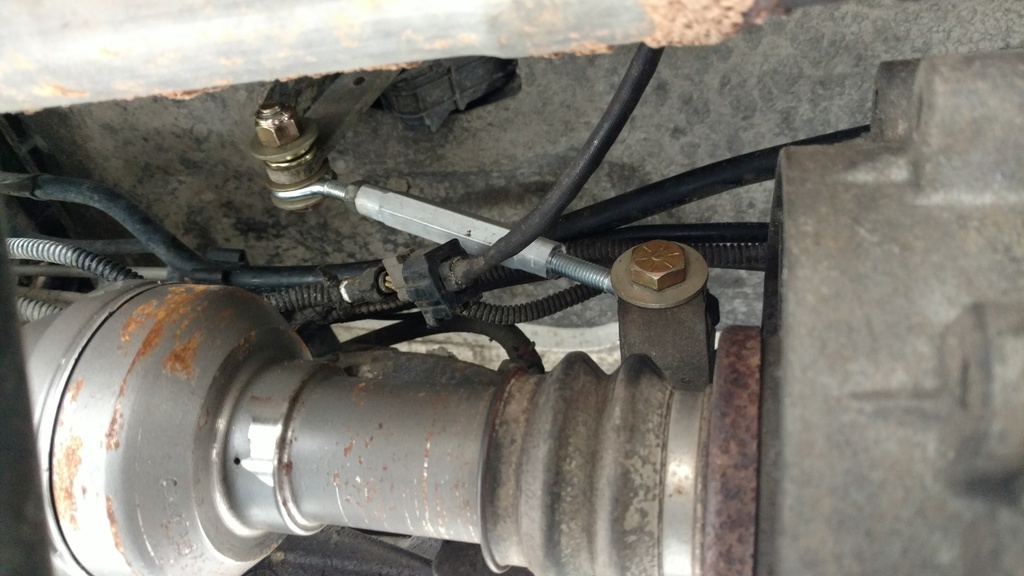
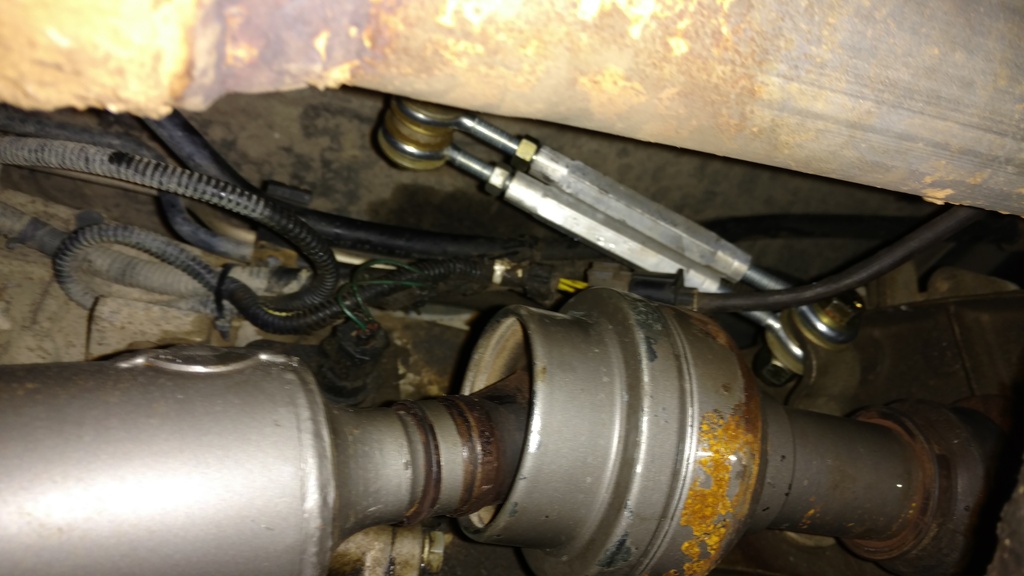
First off, let's get acquainted with the truck. This photo shows the 4x4 position sensor, but also the stock linkage:
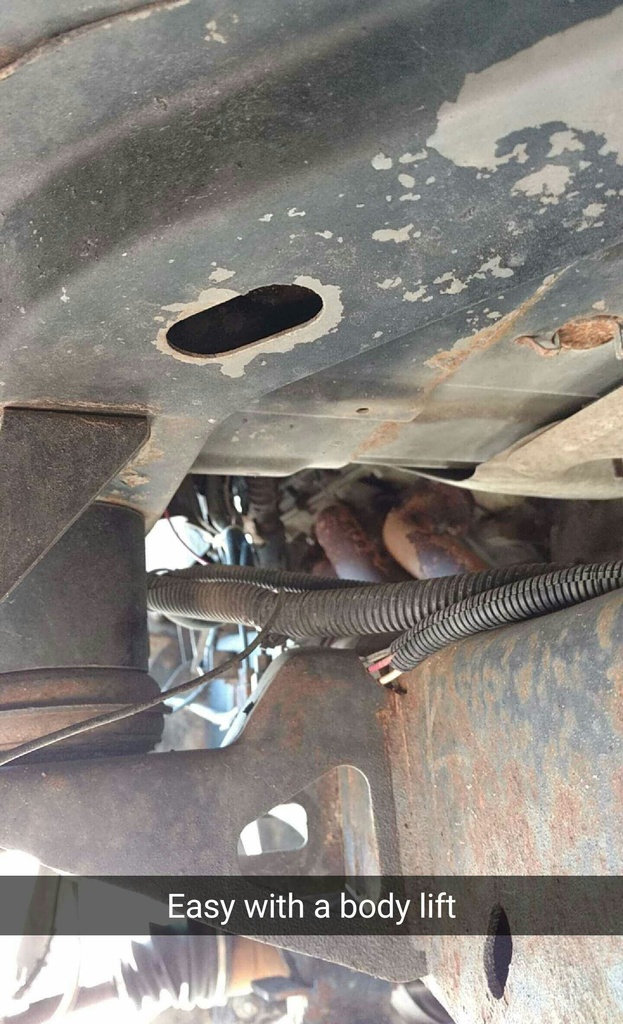
as stated, this will be easier with a bodylift.
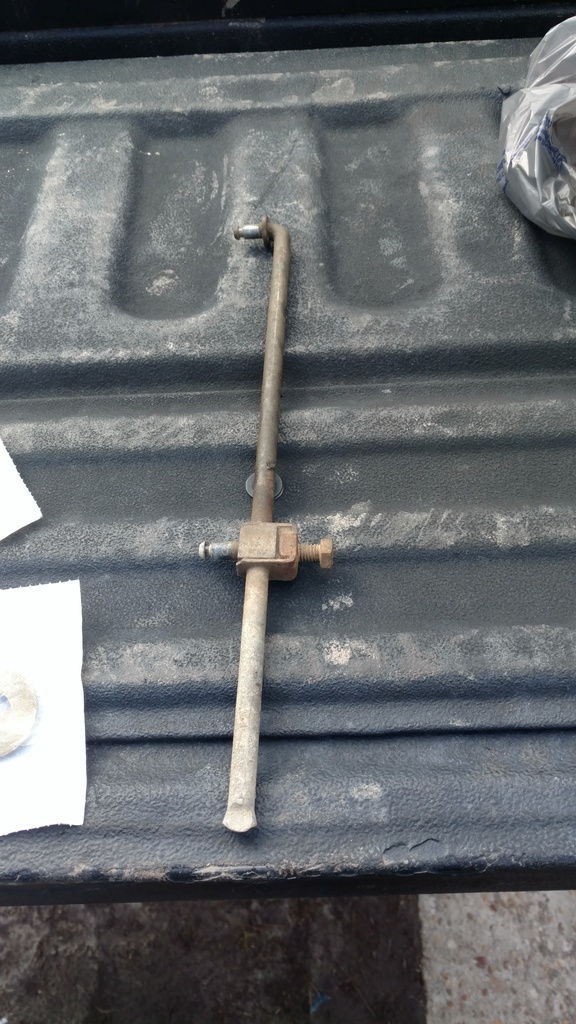
Here's your stock linkage, and the rubber grommets. You'll simply need a screwdriver or something to push the rubber grommets out.

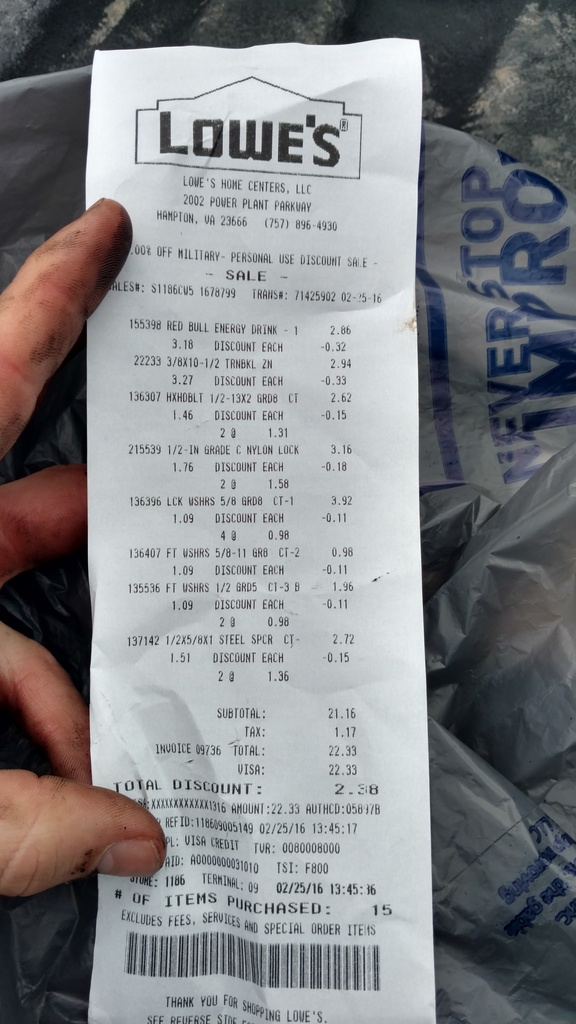
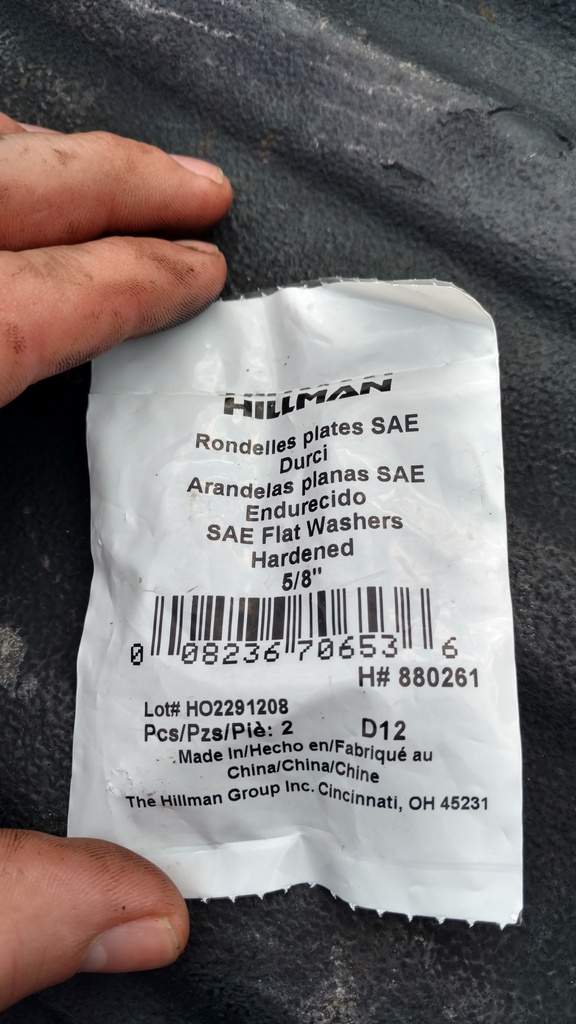
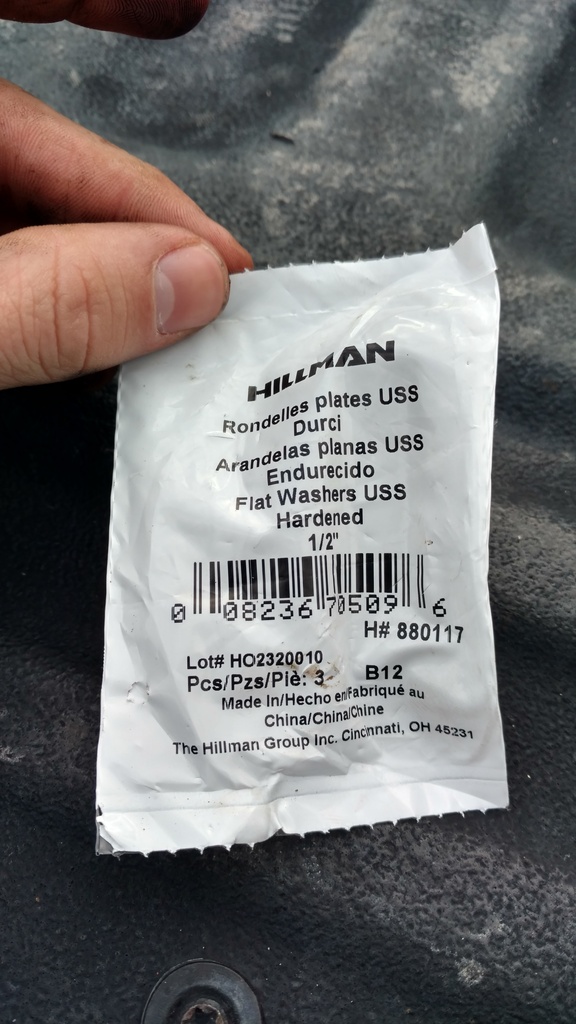
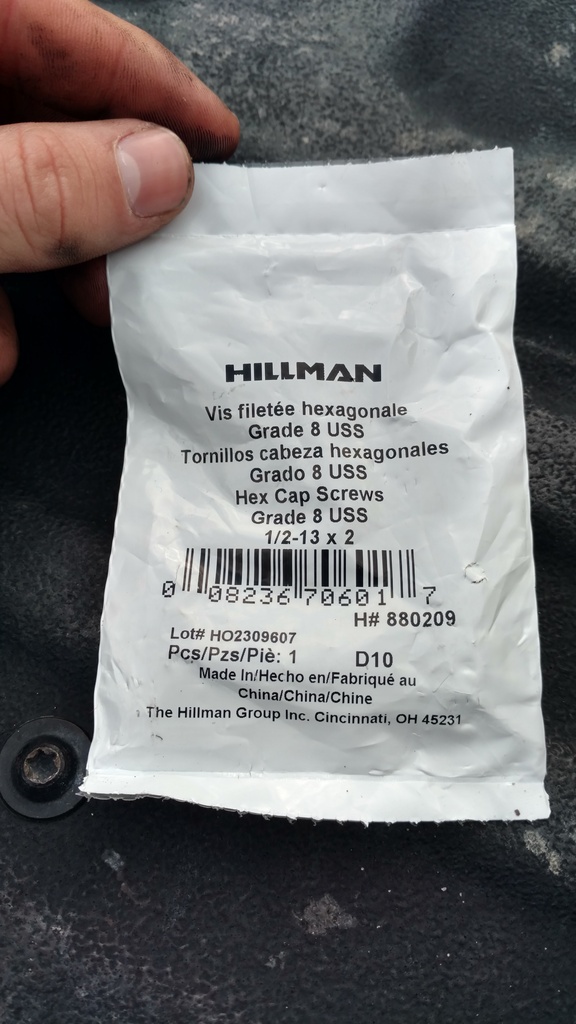
So you went to the hardware store? Great. You should be here:
Let's make sense of it:

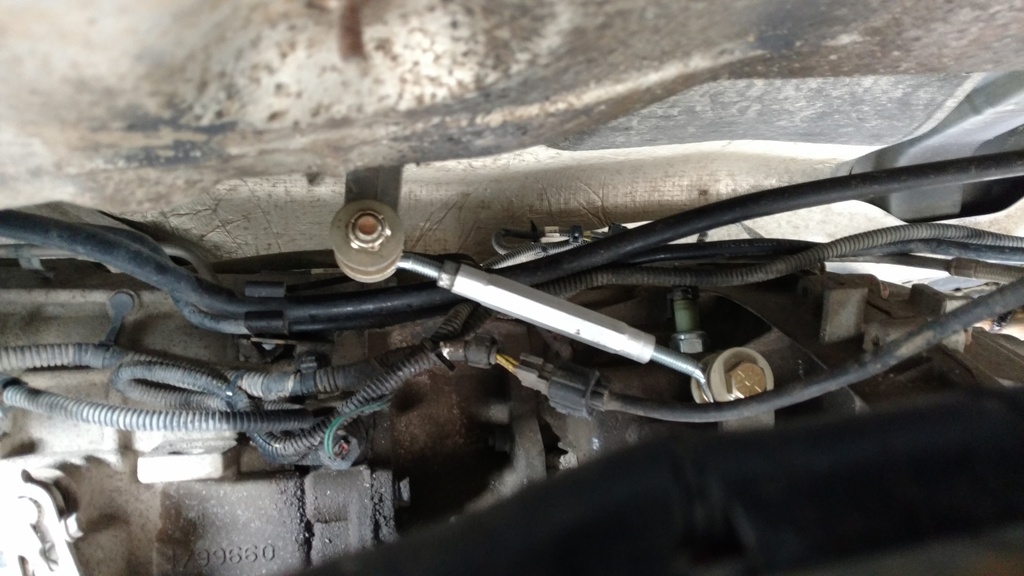
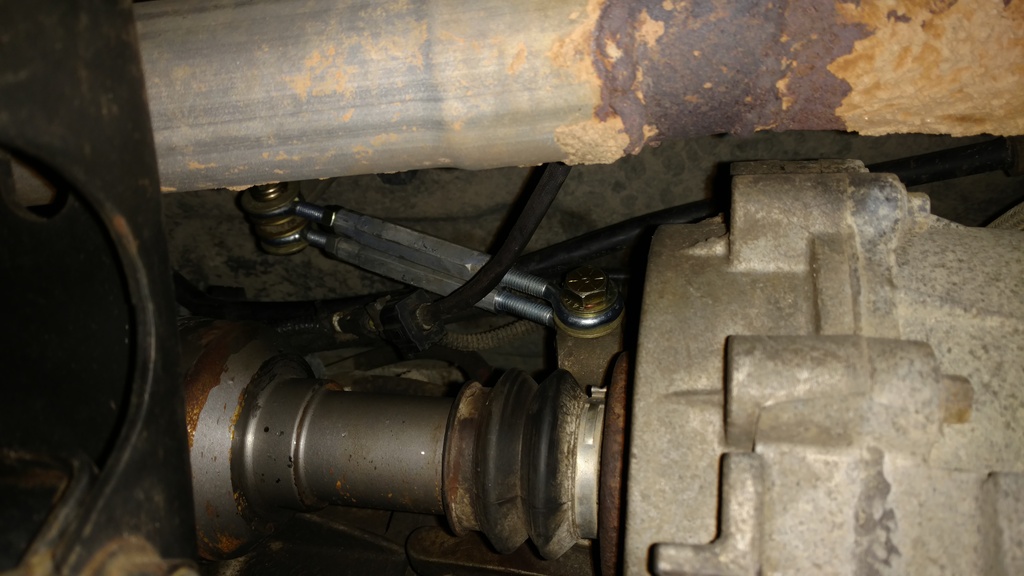
Now do this: (Photo courtesy of OP)
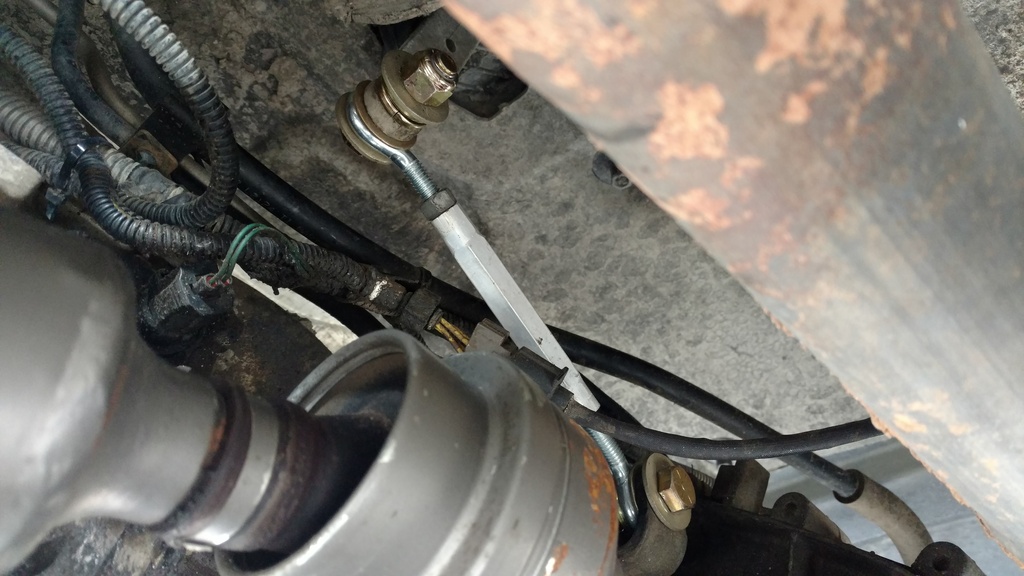
Mind you, mine is angled due to the body lift, yours will probably be straight.
Congratulations, you're done!
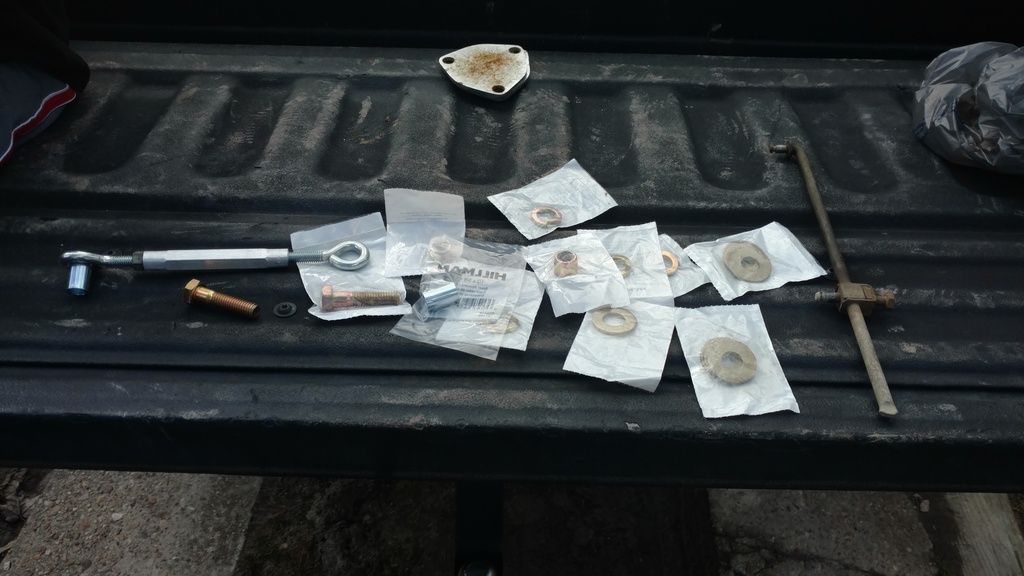
Here's the baggies of everything:
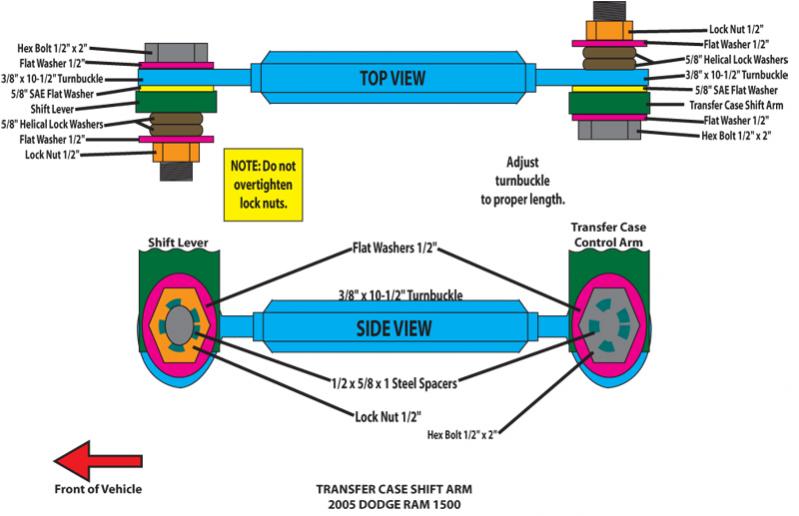
Back in November of 2011, while I was in the process of changing my oil, I discovered the shift linkage between the lever and my transfer case on my 2005 Dodge Ram 1500 4x4 had fallen off. Upon looking into it, I found the dealership fix would be $40 for parts and I can install them myself. Since the grommets wore out once, I am sure they would do so in the future. Not wanting to do this again, I began looking for a permanent fix. In searching the internet, I came to dodgeforums.com and found many threads with the same issue. I found a fix by one of the users on this site, but it involved shaping a piece of steel to fit, so it was put on the back burner until I found someone with the tools to shape the metal or found a different fix. Today, 01/14/2012, I found a way to fix it and with parts all from Lowes. I am including the part numbers I used, as well as a diagram of how they are arranged when installed and a picture of the completed instalation. The price listed for the parts are for the total. Total time to install might be around 30 minutes tops.
Tools needed:
A 3/4" box end wrench, a 3/4" socket, a ratchet, and a short extension for the ratchet.
Parts & Lowes Item number:
(2) Hex Bolts 1/2" x 2" (( 63329) These are loose in a tray. $1.08)
(4) Flat Washers 1/2" (( 63309) These are loose in a tray. $0.80)
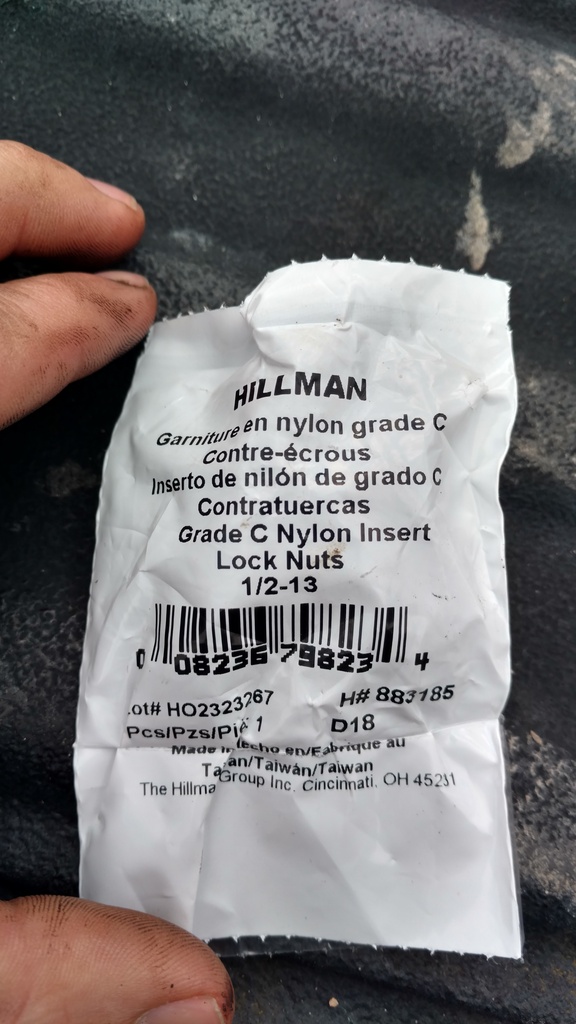
(2) Hillman 1/2 x 5/8 x 1 Steel Spacer - Zinc ((880419 or 137142) These are in one of the blue drawers at Lowes under specialty hardware. They come
1/bag. $3.02)
(1) HM 5/8" SAE Flat Washers (( 25602) These are in a little red bag and come 2/bag. $0.98)
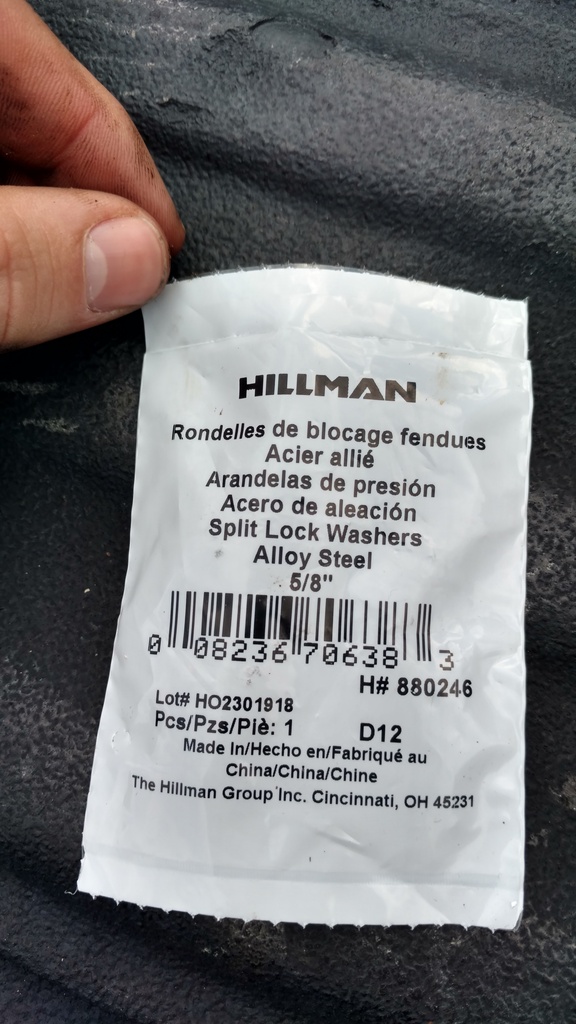
(4) HM 5/8" Helical Lock Washers (( 63412) These are loose in a tray. $1.12)
(2) Hex Lock Nuts 1/2" (( 63406) These are loose in a tray. $0.98)
(1) 3/8" x 10-1/2" Turnbuckle - Zinc (( 22233) These are loose in a box on the same aisle as the door ***** in the back half of the aisle on the right
from the front of the store. $3.27)
Parts Total: $11.25 (This value doesn't reflect the price with tax because I had to make a few trips inside to swap parts out before getting it right.)
Since the turnbuckle can be adjusted, I won't tell you what length to set it at. Just adjust it as needed. I put everything together before crawling under my truck. Then it was a simple matter of unscrewing the lock nut and then pulling washers off, threading the bolt & spacer through the hole in the transfer case connection, then putting the washers back on the bolt and hand tightening the lock nut. Then I repeated the same procedure on the shift lever, but flipped the direction the bolt is facing. This must be done so that you can shift into 4 low. Running the bolts facing the same direction results in clearance issues with the transfer case housing. After both ends were connected, I got in my truck and checked to make sure the linkage was working right & it was, so I crawled abck under my truck and tightened the nuts & bolts with hand tools and that was that. While talking with one of the people working the hardware department, he advised me that the steel might pull the threads from the aluminum turnbuckle. While that might be a possibility, I don't forsee a problem with this, but I will check and see how it is holding up in a month.
I do hope this works for you. If not, it is at least a starting point.
Tools needed:
A 3/4" box end wrench, a 3/4" socket, a ratchet, and a short extension for the ratchet.
Parts & Lowes Item number:
(2) Hex Bolts 1/2" x 2" (( 63329) These are loose in a tray. $1.08)
(4) Flat Washers 1/2" (( 63309) These are loose in a tray. $0.80)
(2) Hillman 1/2 x 5/8 x 1 Steel Spacer - Zinc ((880419 or 137142) These are in one of the blue drawers at Lowes under specialty hardware. They come
1/bag. $3.02)
(1) HM 5/8" SAE Flat Washers (( 25602) These are in a little red bag and come 2/bag. $0.98)
(4) HM 5/8" Helical Lock Washers (( 63412) These are loose in a tray. $1.12)
(2) Hex Lock Nuts 1/2" (( 63406) These are loose in a tray. $0.98)
(1) 3/8" x 10-1/2" Turnbuckle - Zinc (( 22233) These are loose in a box on the same aisle as the door ***** in the back half of the aisle on the right
from the front of the store. $3.27)
Parts Total: $11.25 (This value doesn't reflect the price with tax because I had to make a few trips inside to swap parts out before getting it right.)
Since the turnbuckle can be adjusted, I won't tell you what length to set it at. Just adjust it as needed. I put everything together before crawling under my truck. Then it was a simple matter of unscrewing the lock nut and then pulling washers off, threading the bolt & spacer through the hole in the transfer case connection, then putting the washers back on the bolt and hand tightening the lock nut. Then I repeated the same procedure on the shift lever, but flipped the direction the bolt is facing. This must be done so that you can shift into 4 low. Running the bolts facing the same direction results in clearance issues with the transfer case housing. After both ends were connected, I got in my truck and checked to make sure the linkage was working right & it was, so I crawled abck under my truck and tightened the nuts & bolts with hand tools and that was that. While talking with one of the people working the hardware department, he advised me that the steel might pull the threads from the aluminum turnbuckle. While that might be a possibility, I don't forsee a problem with this, but I will check and see how it is holding up in a month.
I do hope this works for you. If not, it is at least a starting point.
Since the OP contains all the info, here's building and the installed product, and I also have part numbers of all hardware used. I used all Grade 8 hardware, so the total price was around $23. Part numbers will be at the end.
First off, let's get acquainted with the truck. This photo shows the 4x4 position sensor, but also the stock linkage:
as stated, this will be easier with a bodylift.
Here's your stock linkage, and the rubber grommets. You'll simply need a screwdriver or something to push the rubber grommets out.
So you went to the hardware store? Great. You should be here:
Let's make sense of it:
Now do this: (Photo courtesy of OP)
Mind you, mine is angled due to the body lift, yours will probably be straight.
Congratulations, you're done!
Here's the baggies of everything:
#2
02-27-2016, 02:55 AM
3rd Gen Ram Moderator
Great write up. I recall reading that original post a while ago.
Funny, I've got the OEM linkage and bushings in the closet, but haven't gotten around to putting it back on after I found my shifter a bit, uhhhh.... flaccid, one day. Apparently the whole linkage fell off on the road somewhere (not surprising here with all the construction on Kamehameha). Had I given it much thought, I probably would have gone this route. On Amazon it all came out to be about the same, but I imagine your/OP fix would be more permanent.
Funny, I've got the OEM linkage and bushings in the closet, but haven't gotten around to putting it back on after I found my shifter a bit, uhhhh.... flaccid, one day. Apparently the whole linkage fell off on the road somewhere (not surprising here with all the construction on Kamehameha). Had I given it much thought, I probably would have gone this route. On Amazon it all came out to be about the same, but I imagine your/OP fix would be more permanent.
#3
02-27-2016, 03:09 AM
Thanks Chet! It's a great idea by OP and so simple, and a permanent solution! I may further modify it to have a second turn buckle (one on each side of linkage) but it depends how productive I am next time I'm off, and with the 10 here now, the Hemi won't get as much attention.
Reminder: Everyone change those 4x4 position sensors, they'll go bad and you'll no longer get that adorable little orange "4x4" in your cluster.
EDIT: So if any of you know my Hemi and I, we like to over do it. My fabricator friend brought up the fact that with it being on one side, it slightly bends, so I got a second one and made it fit.
To do this, you need the same hardware, with only minor changes. the 1/2 x 5/8 x 1" steel spacers are the perfect fit (They go through both turn buckles and the linkage, leaving just the 1/2" bolt for hardware. I tried 1/2 x 5/8 x 1.5" and it did not work, we'd need longer bolts.)
You will need 2 more 5/8" flat washers.
Instead of 2 5/8" lock washers, you'll need 2 1/2" lock washers. This is because the lock washers will no longer go over the spacer, they will be all on the bolt.
You'll also need one slightly smaller diameter 1/2" flat washer, it will be on the transfer case bolt head side. You need this to prevent it from scraping in (or to even get into) 4 wheel low.
The hardware should go as such: bolt, 1/2" washer, turnbuckle 1 (steel spacer is on the bolt), 5/8" washer, transfer case, 5/8" washer, turnbuckle 2, 1/2" washer, 2 1/2" lock washers, nut.
You can see it in the pictures below:
That's all that's necessary to run a dual turn buckle and indestructible shift linkage.
Last edited by KasperR34; 03-08-2016 at 02:00 AM.

