

Homemade bumpers & headache rack
#11
 10-05-2008, 10:45 PM


Record Breaker
Join Date: Oct 2007
Location: Kansas
Posts: 1,676
Likes: 0
Received 0 Likes
on
0 Posts
That bumper looks sick Chris. I see there where you put HEMI in the bottom part. How did you cut that out so smooth? Did you use a plasma cutter on that or what exactly? I've thought about replacing mine also with something heavy duty. But something that could be colored in chrome to match the rest of the truck unfortunately.
How hard was that to make, and how long did that take you to make?
How hard was that to make, and how long did that take you to make?
#12
10-05-2008, 11:33 PM

Champion
Hey I have a couple questions about the bumper. What thickness is it? And I know this might be a pain in the butt, but if you don't mind. What are the measurements of the sections. I know its a lot to ask. But my brother in law is in an auto collision class and needs a project and that would be sick as hell. Where are you located by the way. Thanks a bunch.
#13
10-06-2008, 02:11 AM

the Center Section is 1/4" the rest is 3/16" flat stock..
As for all the measurements I started with AutoCAD.. You have access to that ?
Then on the main section was done (The first Pic I posted) The rest I cut out
Cardboard templates, and cut two matching pieces (L & R) and used a Protractor
To ensure that each side matched up..
Oh yeah and its Mounted with 8"X8"X1/4" plates Drilled to the factory holes
with 2"X4"X1/4" rectangle tubing, conecting it to the bumper.
The Hemi Part I Cut out with a Plasma Cutter. Ive prolly got 60 hours or so into it.
But that includes all my template making and trial and error,
Its Welded Inside & Outside, the outside is ground smooth.
Location is in the NorthEast of Cali
Main reason it ws built was for deer protection, didnt want to smack a
deer and total my truck, and in case i hit something while offroading..
#14
10-06-2008, 07:50 PM

#16
10-06-2008, 11:23 PM
Record Breaker
Join Date: Oct 2007
Location: Kansas
Posts: 1,676
Likes: 0
Received 0 Likes
on
0 Posts
When I was looking around on the site today, where it shows at the top of the screen pictures from members galleries, I just so happened to see a picture of this truck: https://dodgeforum.com/forum/album.p...&pictureid=886
That one is a pretty sweet front bumper. He also has the headache rack and back bumper. Looks pretty sweet, and no doubt that it was purchased, but looks cool, and while I'd like to make one, I have access to less machines than it'd take to make a sweet one like Chris'.
That one is a pretty sweet front bumper. He also has the headache rack and back bumper. Looks pretty sweet, and no doubt that it was purchased, but looks cool, and while I'd like to make one, I have access to less machines than it'd take to make a sweet one like Chris'.
#17
10-07-2008, 08:51 AM
Champion

#18
10-07-2008, 03:36 PM
Actually I really didnt have alot of different machines.
I Used a Plasma cutter at the steel yard(friends work there), a basic lincoln 110 welder,
hand held grinder, $5 dollar plastic protractor, lots of cardboard and tape for templates.
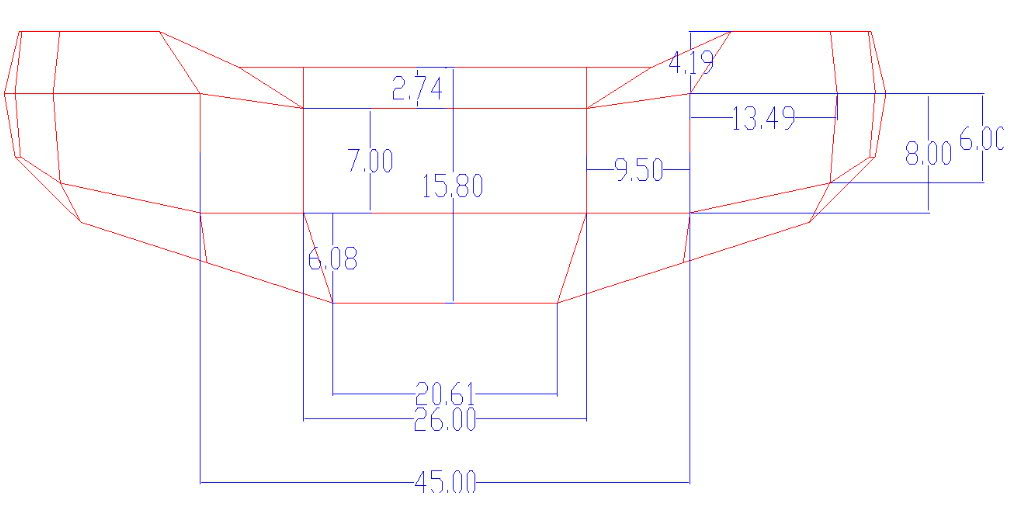
Heres the autocad drawing converted to jpeg.
if anyone uses this design, the widths will vary depending on the amount of angle,
you use coming off the center section.
and the sides i did with cardboard, just used the drawing as a reference as to how
i wanted it to look.
just make sure to use a protractor to get the angles the same from side to side.
I Used a Plasma cutter at the steel yard(friends work there), a basic lincoln 110 welder,
hand held grinder, $5 dollar plastic protractor, lots of cardboard and tape for templates.
Heres the autocad drawing converted to jpeg.
if anyone uses this design, the widths will vary depending on the amount of angle,
you use coming off the center section.
and the sides i did with cardboard, just used the drawing as a reference as to how
i wanted it to look.
just make sure to use a protractor to get the angles the same from side to side.
The following users liked this post:
John Wakely (01-11-2021)

#20
10-07-2008, 04:31 PM
Record Breaker
Join Date: Oct 2007
Location: Kansas
Posts: 1,676
Likes: 0
Received 0 Likes
on
0 Posts
The tools that I have access to are welders, grinder, cutting torch, cut-off saw. There is a metal shop not far from where I work, and I could get them to cut anything great out. The only thing I'd really have them do though is the lights.
If I can get the printer/scanner to work, I'll scan up my drawing. If not, then I'll just snap me a picture like you did.