

TransGo HD2 Shift Kit Installation Tutorial
#1
 02-09-2010, 07:22 PM

This is a tutorial on installing a Transgo 45/545RFE-HD2 Reprogram kit. This applies to any vehicle that uses a 45/545RFE transmission. All Hemi or 4.7 powered Rams, Dakotas, Durangos, etc...
First, take a look at the supplied instructions. Familiarize yourself with them well, I will elaborate on these. http://www.megaupload.com/?d=2NHXIDG7
Also take note, you DO NOT have to install the "Heavy Duty Underdrive Snap Ring" into the input clutch/drum or springs and valves into the transmission pump if you do not want to remove the transmission from your vehicle. However, I do recommend that you do, because this gives you beefed up parts designed to handle the increased line pressure this kit gives you.
The next document you should keep on hand is the 545RFE Transmission Manualhttp://www.megaupload.com/?d=DK0NSJYO This is a very handy manual to have around. It will tell you just about anything you need to know about this transmission.
Step One: Remove Transmission from your vehicle. (Or if you are skipping the pump and input clutch portion of the install, Skip to Step Fourteen) Refer to this tutorial here for detailed instructions on tranny removal https://dodgeforum.com/forum/3rd-gen...-tutorial.html
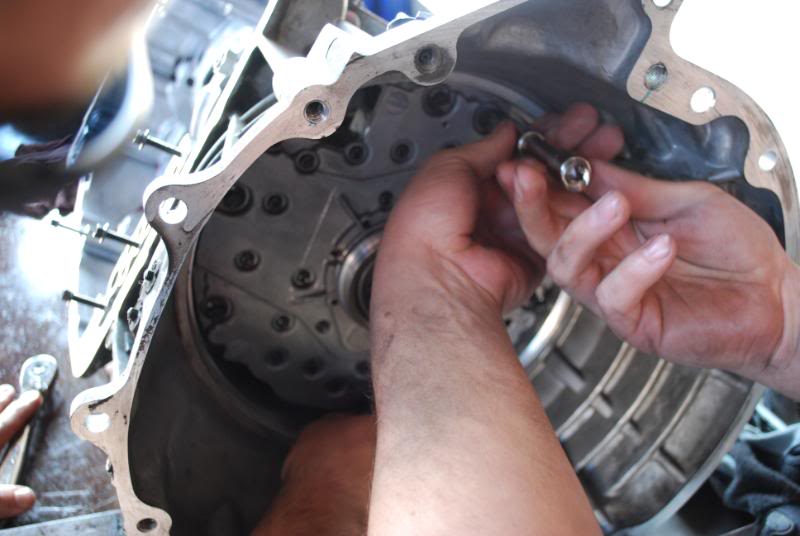
Step Two: Remove the torque converter. it just slides right off the input shaft. what you will be looking at behind the tq converter is the transmission front plate.
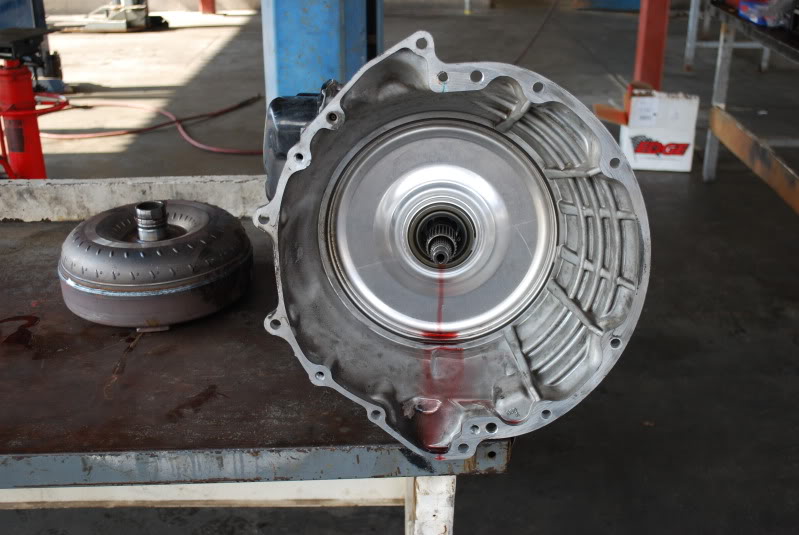
Step Three: Remove the front plate. It is held in place by two snap rings, one around the shaft, and one around the outer edge of the plate. I found that using a small flat head and a metal hook made it easy to work with. Once the snap rings are removed, I used a LONG flat head, and inserted it into a hole in the housing behind the plate, and gently tapped it out.
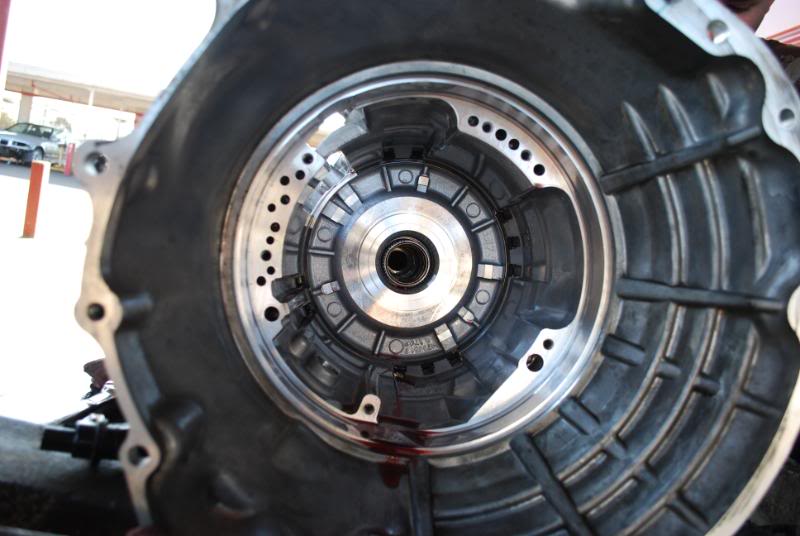
Step Four: Now we are left with the fluid pump, we need to remove this. It is held in place by six hex bolts. once those are taken off, it will slide off the shaft.
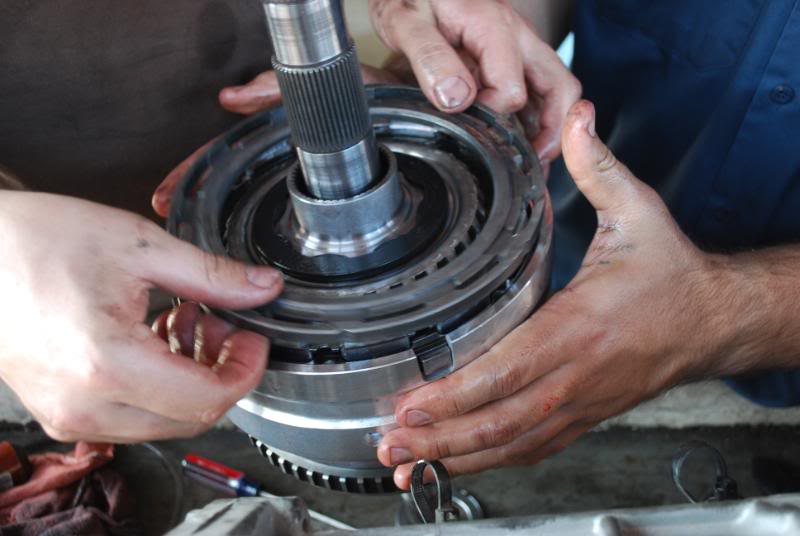
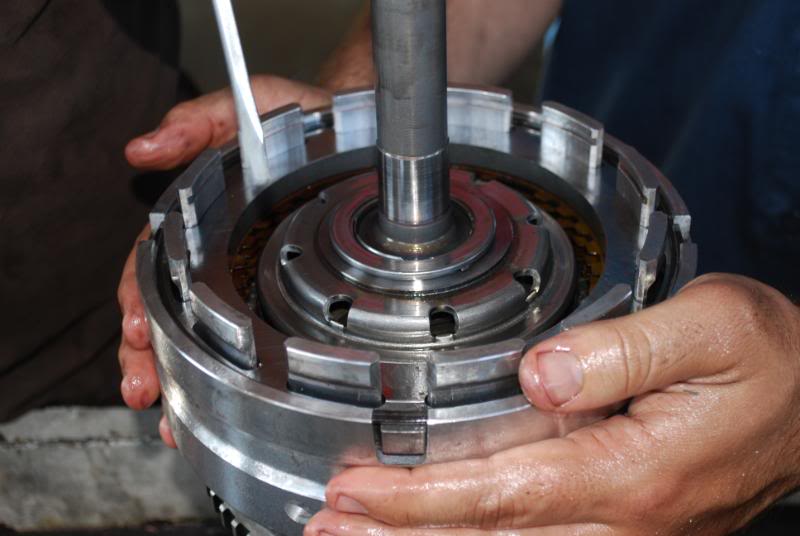
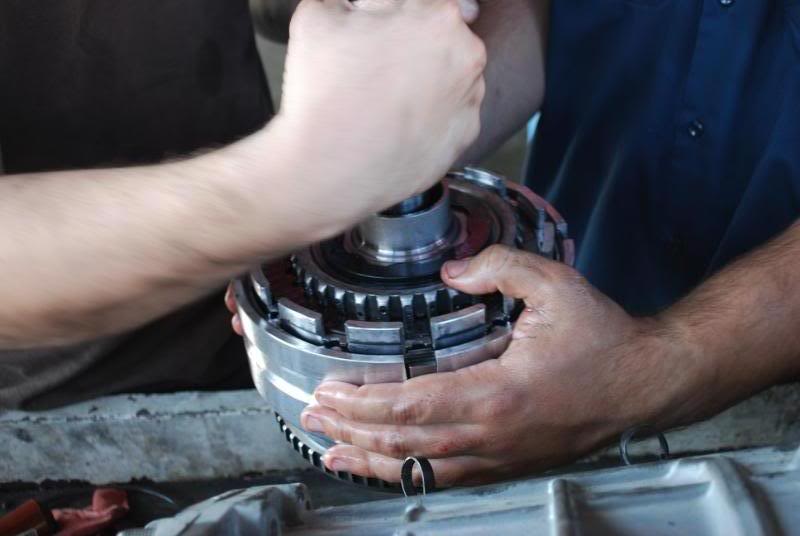
Step Five: Remove the input clutch assembly. it should slide right out. You are going to want to move this to a clean work bench. without a bunch of clutter. you will need to be organized to keep track of these parts.
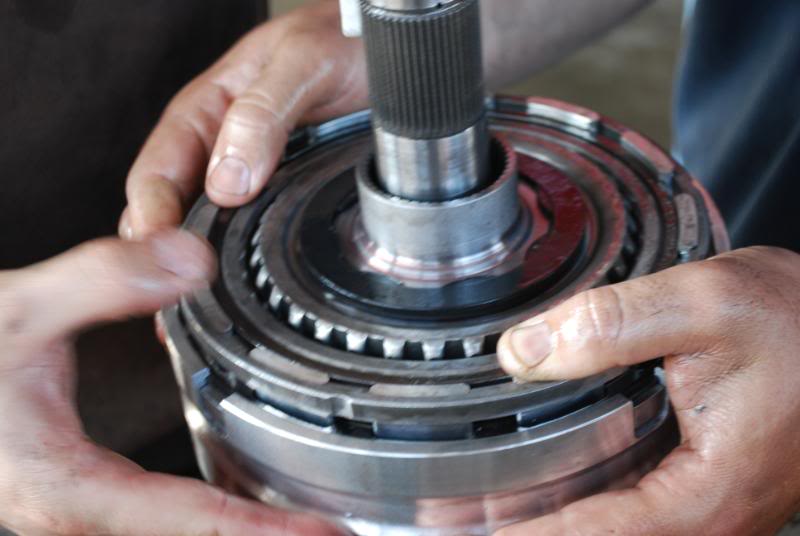
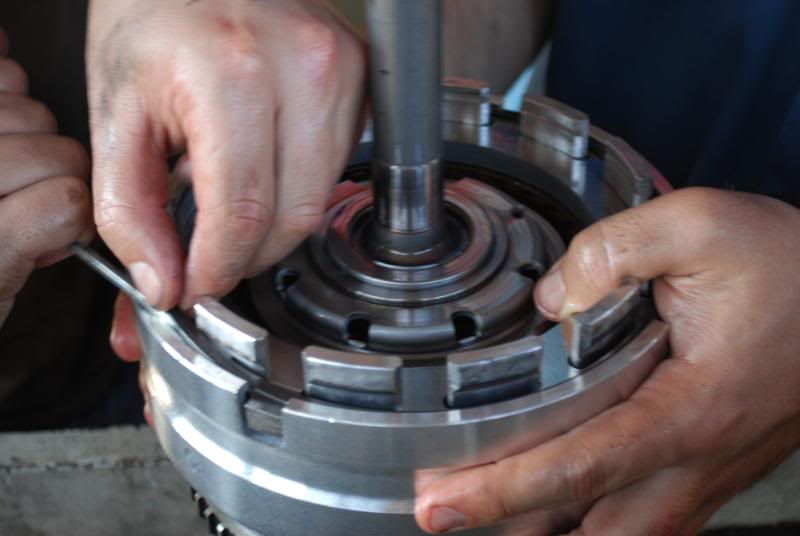
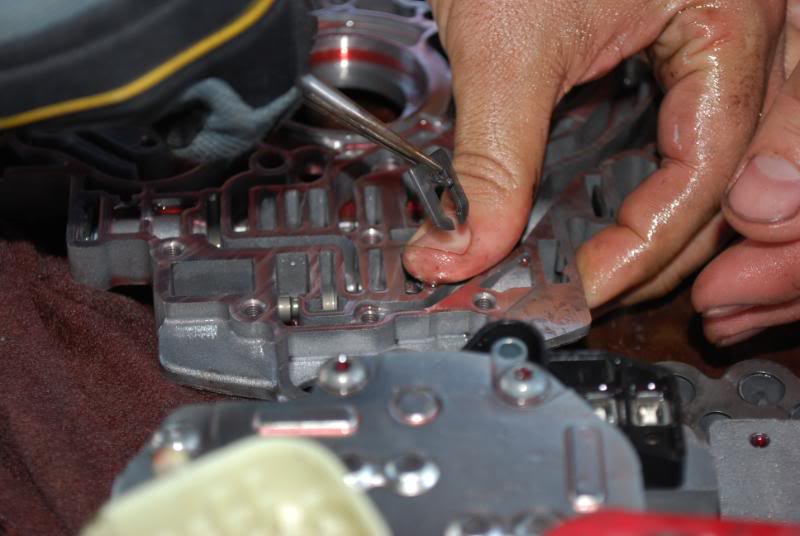
Step Six: Remove the first snap ring on the clutch retainer. It is the one right underneath the little lip on the protruding fins. Once the snap right is out of the way, remove the metal plate it was holding in place and the few discs that are under that. set those and the snap ring in a clean organized spot. (note, the snap ring we are replacing is located at the bottom lip of the before mentioned "fins" its a little ways down there)
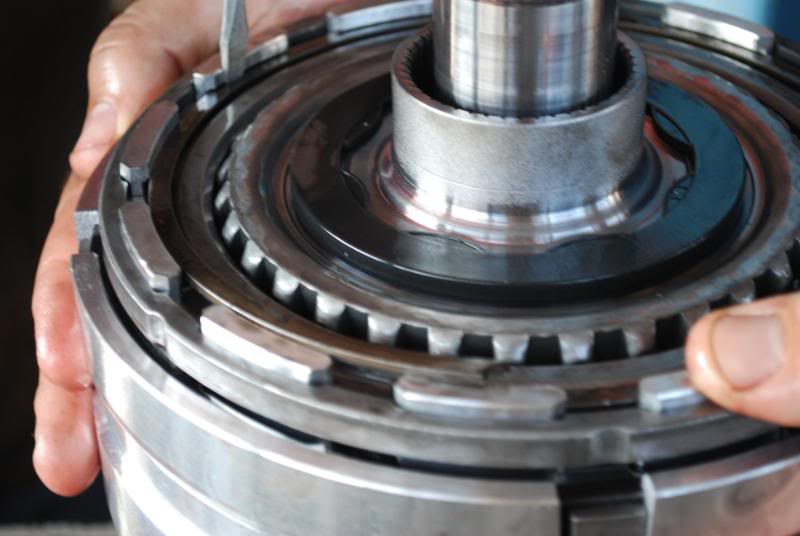
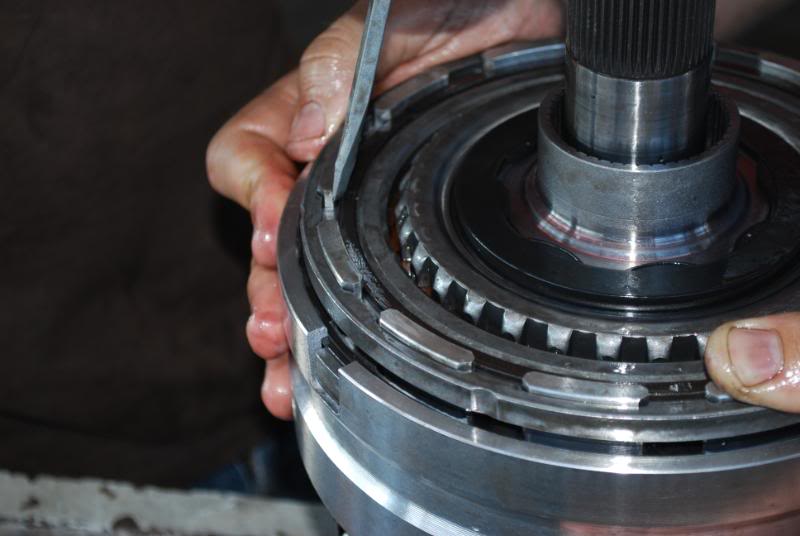
Step Seven: Remove the next snap ring, it is located on the outside of the fins, and is holding down another thick metal disk. once removed set those in your designated area, and keep track of the order these parts are coming out.
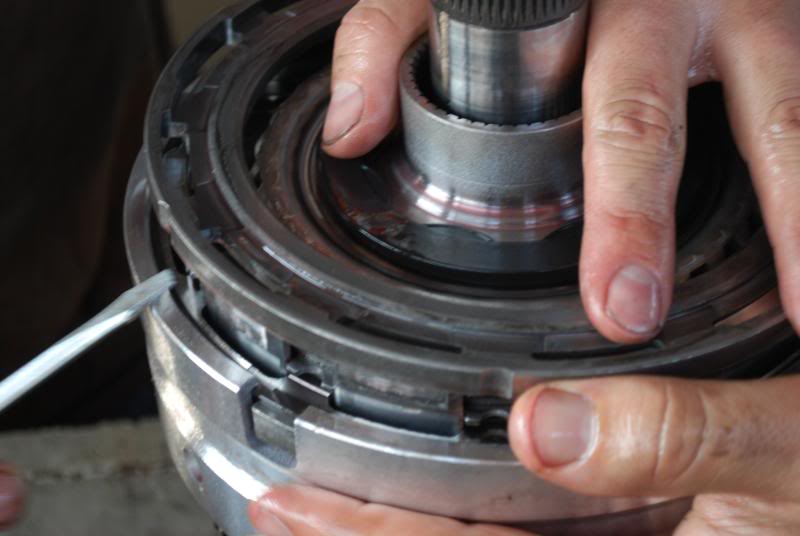
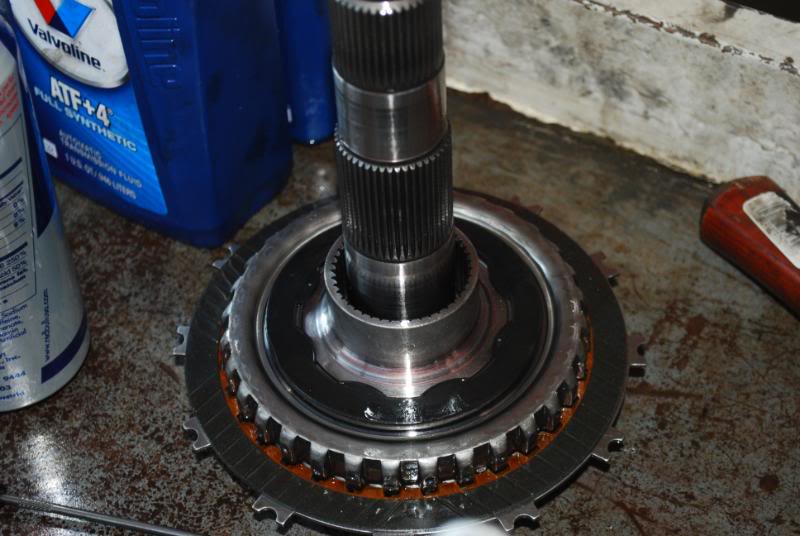
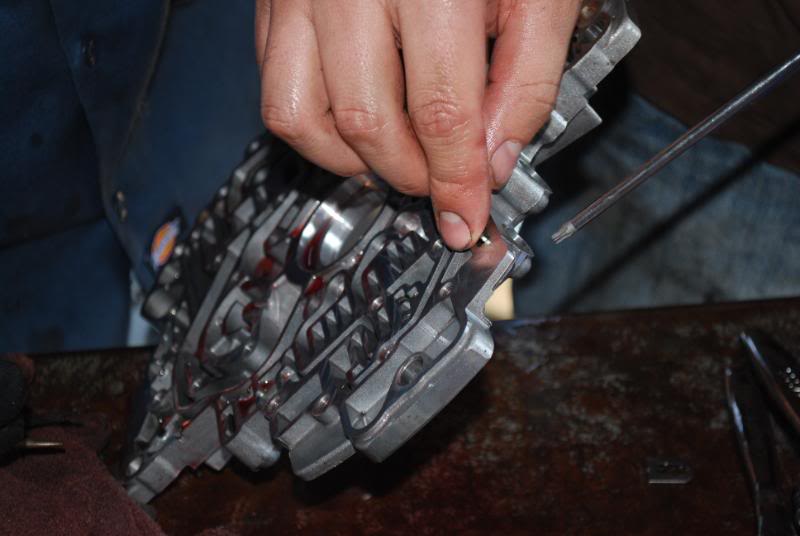
Step Eight: Remove the input shaft and the gear it is attached to. once again, set in clean area, in order.
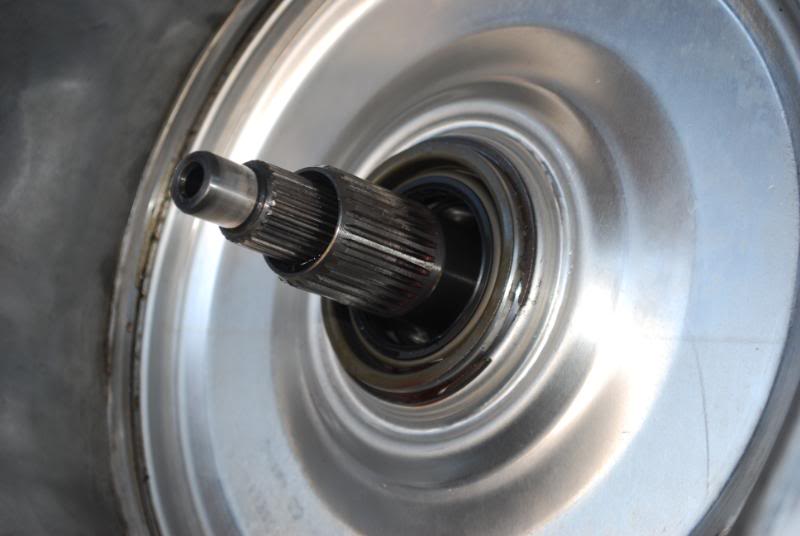
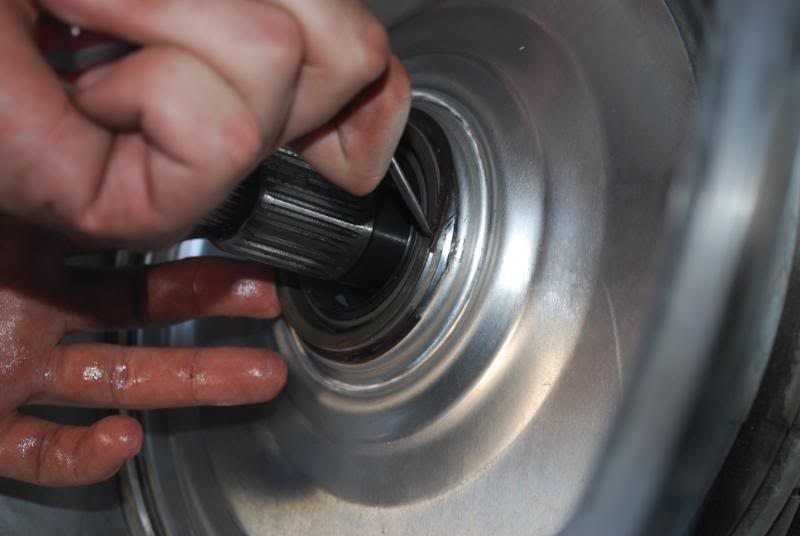
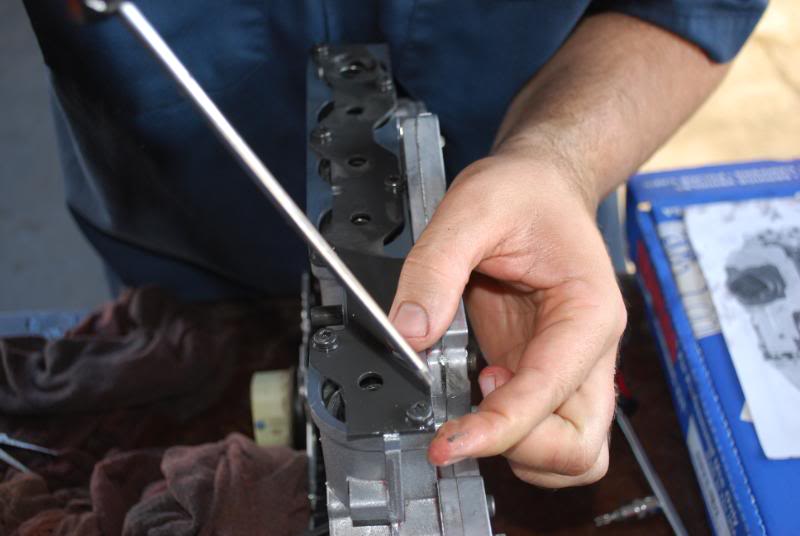
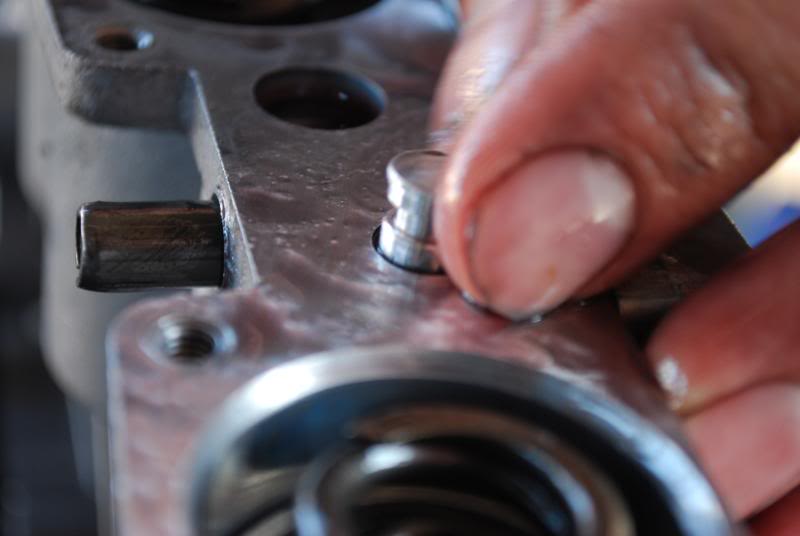
Step Nine: Now we are down to ring we are replacing. It is the ring located directly underneath the bottom lip of the "fins". you should have something that looks just like the first picture below, if you don't, you probably didn't remove enough parts and need to follow directions better. Remove this snap ring, and put in the new supplied one. It is a tight fit getting it in there. I used a flat head and mallet to tap it into place.
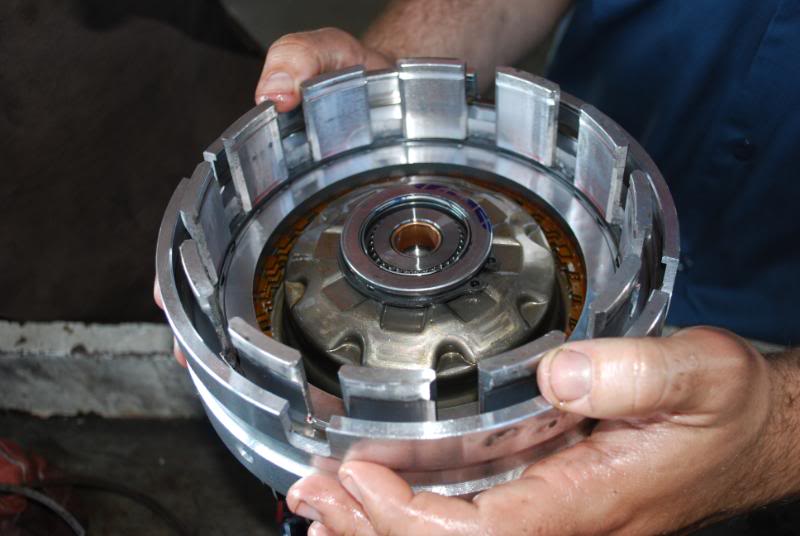
Step Ten: Reassemble the input clutch assembly in the reverse order you took it apart, then put it back into the transmission.
Step Eleven: Now we turn our focus to the fluid pump. You need to remove all torx bolts on the face of the pump, and the six around the pump shaft on the back. The bolts from the front of the pump are different from the bolts on the back, keep them separate. Now separate the front and rear of the pump.
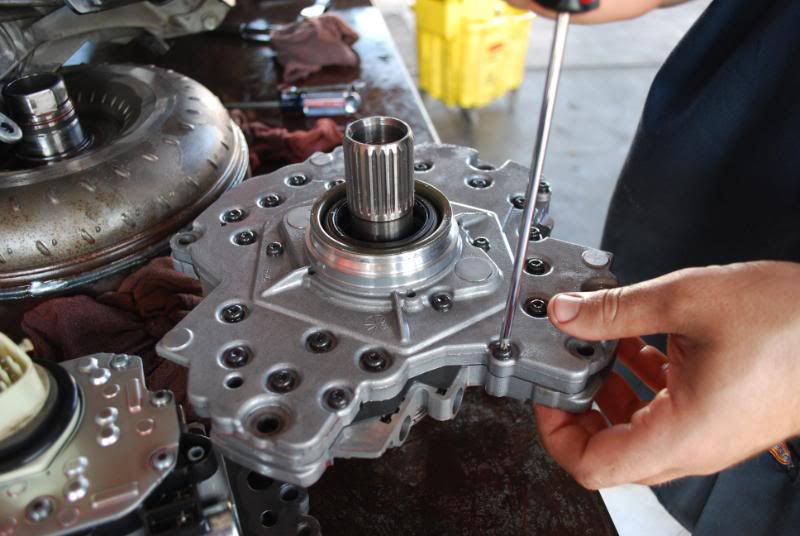

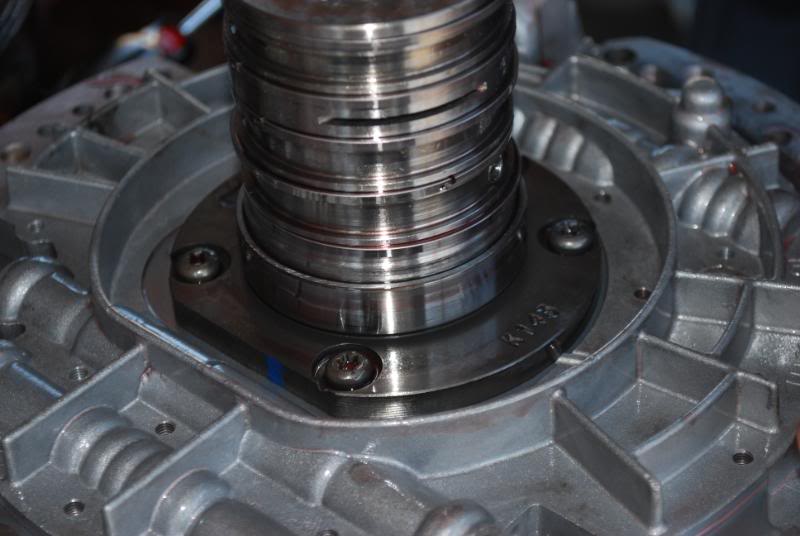
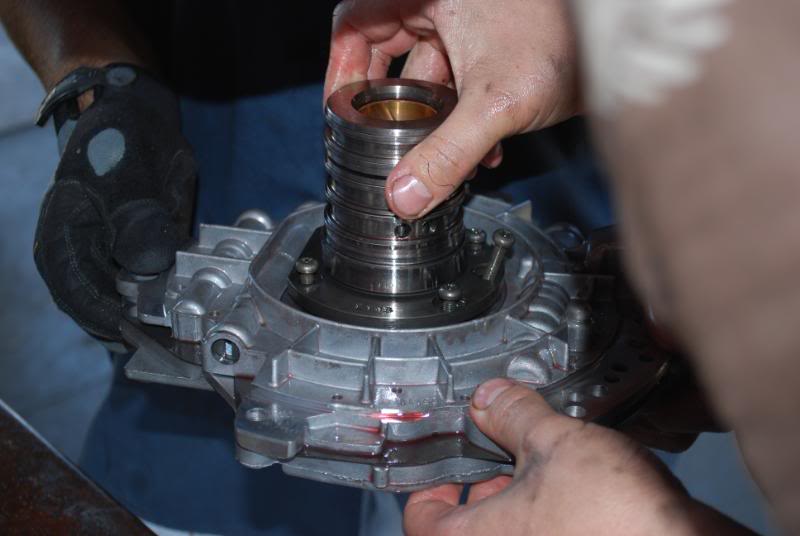
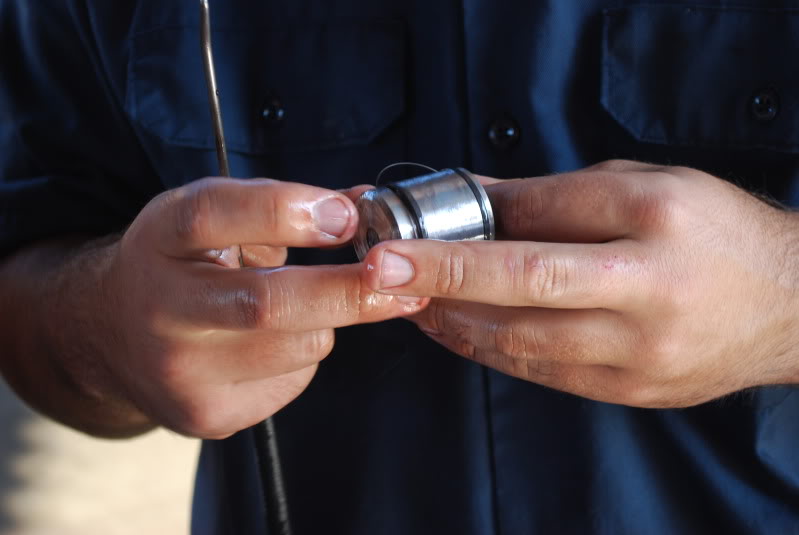
Step Twelve: Working on one valve at a time, remove the retainer clips, and replace parts with the supplied ones as per the instructions. note that the springs are not under much tension at all, and aren't going to go flying off when the retainer is removed. Be sure not to drop or lose any parts though, as they are very small.
Step Thirteen: Reassemble pump, and put it back into the transmission. Tighten up all 6 bolts holding it in. Then replace the front plate, and hold it in place with the 2 snap rings.
Step Fourteen: Drop the transmission pan and remove the flat filter (it is held in place by one torx bolt) and the spin on filter (it spins on and off just like a normal oil filter)
Step Fifteen: Disconnect the Transmission Solenoid/TRS Assembly. This is the huge plug on the driver side of the transmission.

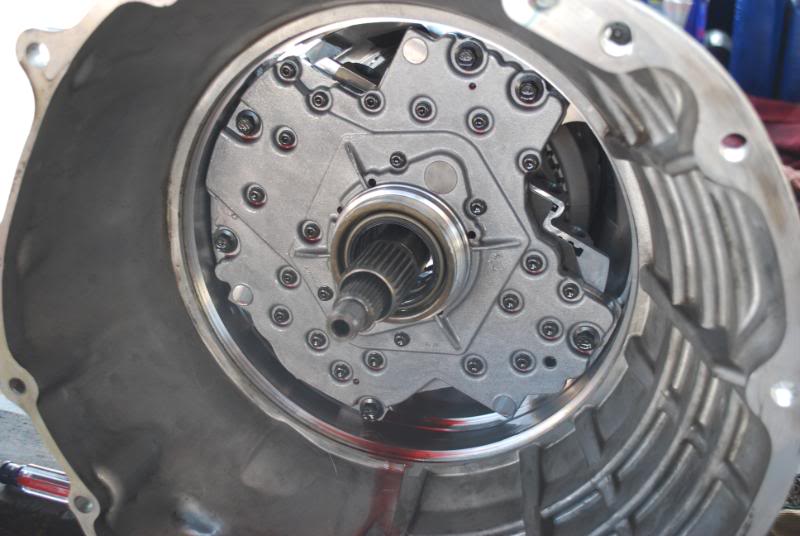
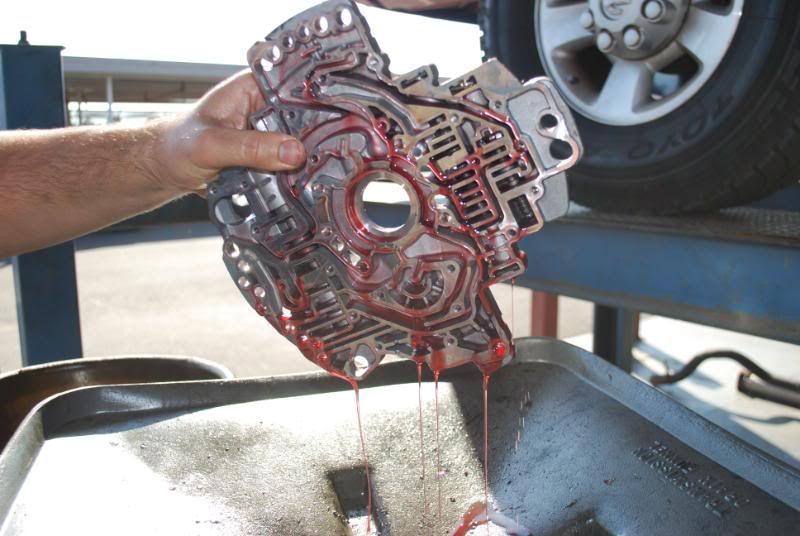
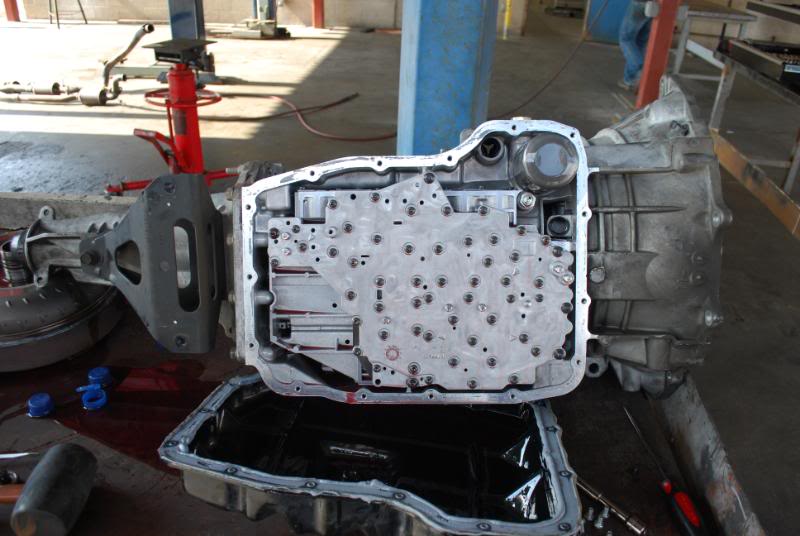
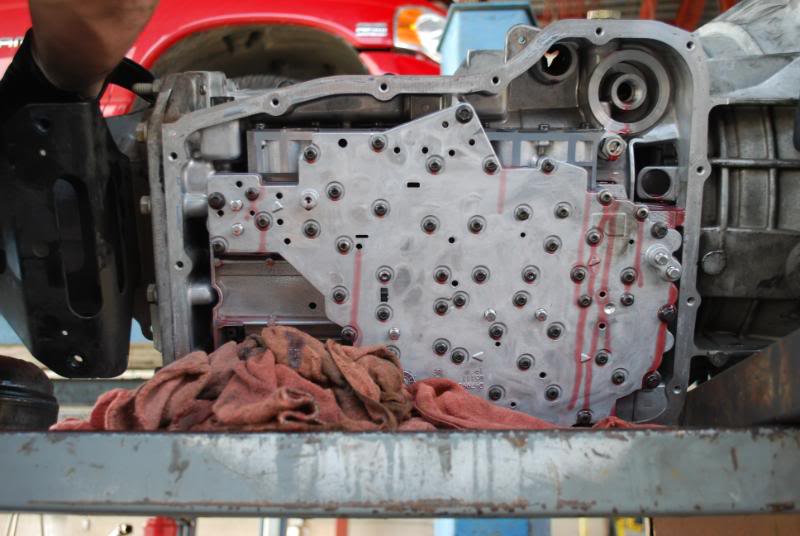
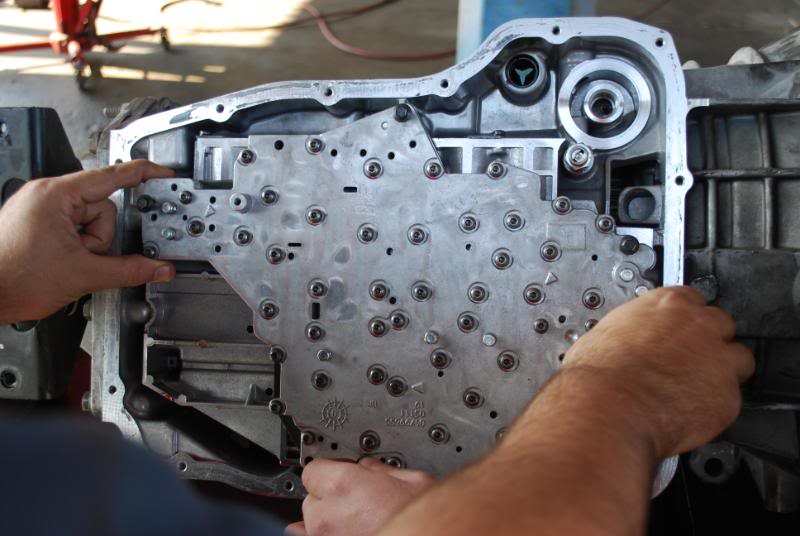
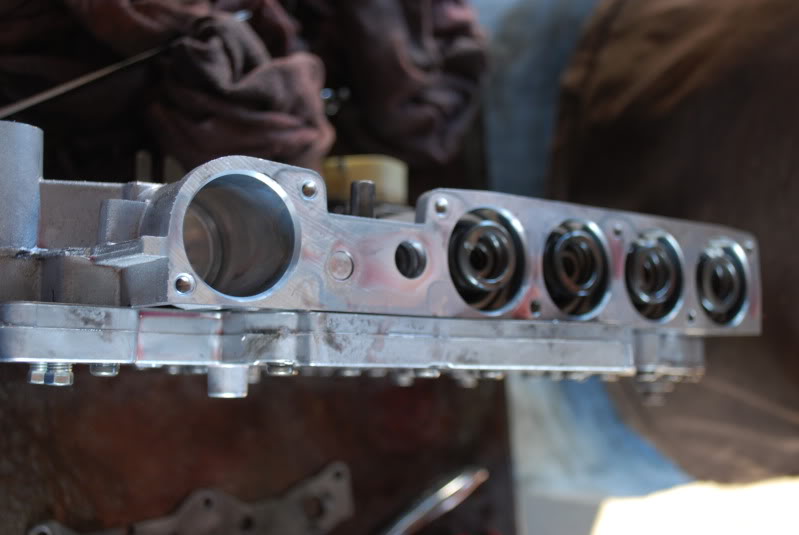
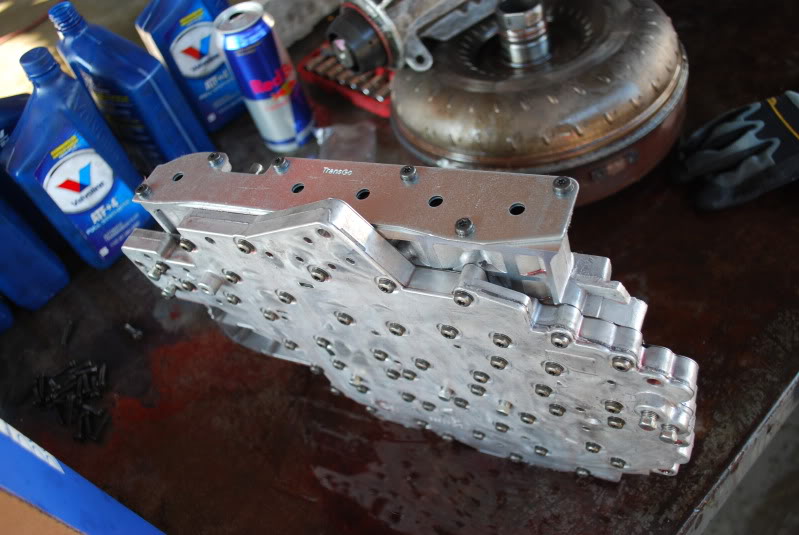
Step Sixteen: Remove the valve body. It is held in place by six hex bolts.
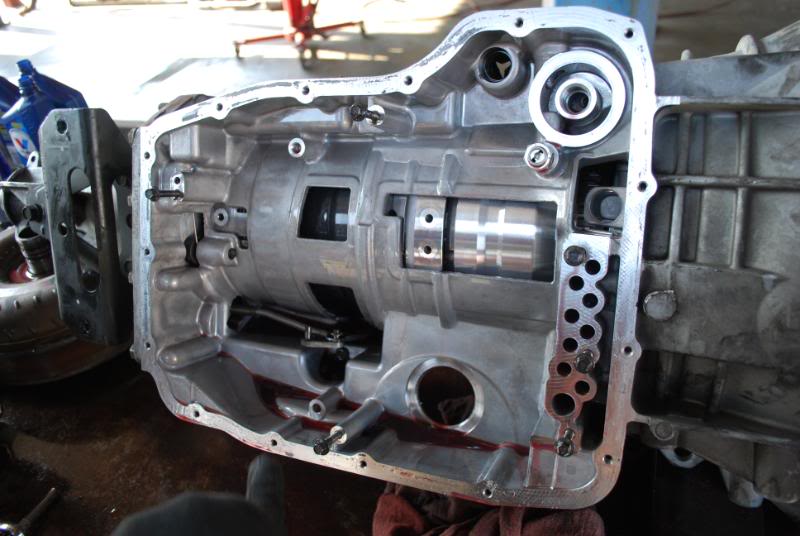
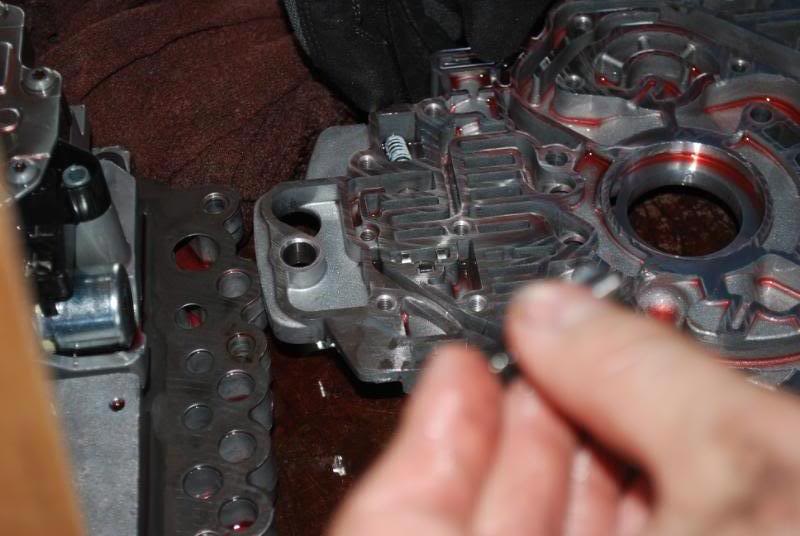
Step Seventeen: Remove the spring retention plate. Don't worry about springs shooting off all over the place when the cover is removed, there is no pressure on them at this point.
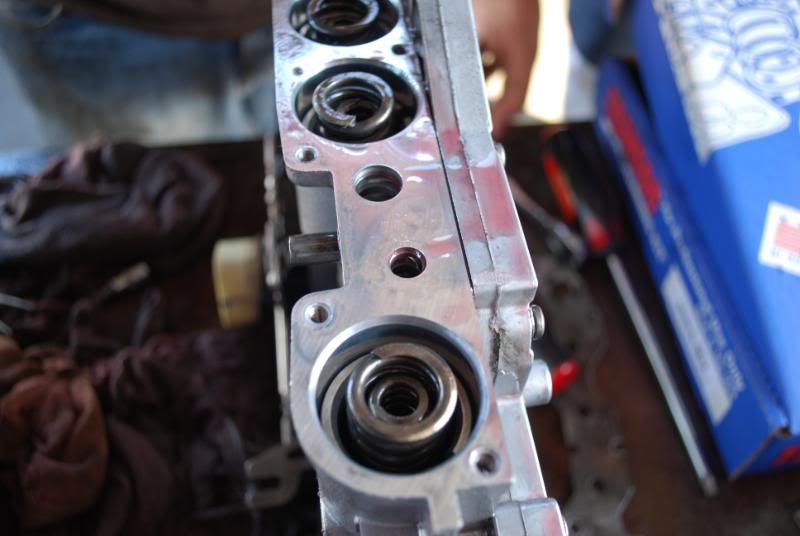
Step Eighteen: Remove the springs and pistons, place them in your clean organized area, and mark where each one goes. Replace the lower seal on each piston, and add the wire expander. Add the washer and the new large spring into the Over Drive Piston. Place the stock springs (large and small) back into the Under Drive piston. Put a new large spring, and stock small spring into the 4th piston. New large and small springs into the 2nd piston And both stock springs back into the Low/Reverse piston. (note, all new springs are the same size, so just put one in where it's called for)
Step Nineteen: Now comes the tricky part, removing the end plug and switch valve. They are in there pretty snug. To remove it, I turned the valve body upside down, and had a buddy hold it while I tapped the backside of the switch valve port with a screw driver handle. This took quite some time. I got it out just enough to fit a fingernail underneath the lip of the end plug so I could pull it out. I then had to repeat the process for the valve. Now install the new switch valve and end plug.
Step Twenty: Put the pistons and springs back into their respective places. Now put the new supplied spring retention plate on. Use blue loctite on each bolt, and torque it down to 40 inch/lbs. The loctite and torque specs are extremely important, do not overlook this step!
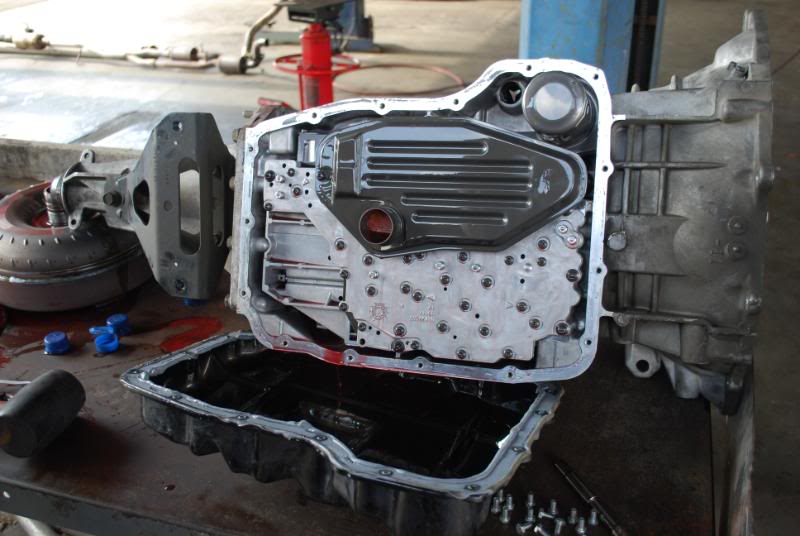
Step Twenty One: Put your valve body back into the transmission, put your filters on, put the TRS connection back on, use a factory gasket, RTV, or both to put the pan back on. Reinstall the transmission into the vehicle if you took it out. Fill with ATF+4.
Step Twenty Two: Warm up your fluid, top it off to the correct level, then enjoy the fruits of your labor with a much better shifting transmission.
First, take a look at the supplied instructions. Familiarize yourself with them well, I will elaborate on these. http://www.megaupload.com/?d=2NHXIDG7
Also take note, you DO NOT have to install the "Heavy Duty Underdrive Snap Ring" into the input clutch/drum or springs and valves into the transmission pump if you do not want to remove the transmission from your vehicle. However, I do recommend that you do, because this gives you beefed up parts designed to handle the increased line pressure this kit gives you.
The next document you should keep on hand is the 545RFE Transmission Manualhttp://www.megaupload.com/?d=DK0NSJYO This is a very handy manual to have around. It will tell you just about anything you need to know about this transmission.
Step One: Remove Transmission from your vehicle. (Or if you are skipping the pump and input clutch portion of the install, Skip to Step Fourteen) Refer to this tutorial here for detailed instructions on tranny removal https://dodgeforum.com/forum/3rd-gen...-tutorial.html
Step Two: Remove the torque converter. it just slides right off the input shaft. what you will be looking at behind the tq converter is the transmission front plate.
Step Three: Remove the front plate. It is held in place by two snap rings, one around the shaft, and one around the outer edge of the plate. I found that using a small flat head and a metal hook made it easy to work with. Once the snap rings are removed, I used a LONG flat head, and inserted it into a hole in the housing behind the plate, and gently tapped it out.
Step Four: Now we are left with the fluid pump, we need to remove this. It is held in place by six hex bolts. once those are taken off, it will slide off the shaft.
Step Five: Remove the input clutch assembly. it should slide right out. You are going to want to move this to a clean work bench. without a bunch of clutter. you will need to be organized to keep track of these parts.
Step Six: Remove the first snap ring on the clutch retainer. It is the one right underneath the little lip on the protruding fins. Once the snap right is out of the way, remove the metal plate it was holding in place and the few discs that are under that. set those and the snap ring in a clean organized spot. (note, the snap ring we are replacing is located at the bottom lip of the before mentioned "fins" its a little ways down there)
Step Seven: Remove the next snap ring, it is located on the outside of the fins, and is holding down another thick metal disk. once removed set those in your designated area, and keep track of the order these parts are coming out.
Step Eight: Remove the input shaft and the gear it is attached to. once again, set in clean area, in order.
Step Nine: Now we are down to ring we are replacing. It is the ring located directly underneath the bottom lip of the "fins". you should have something that looks just like the first picture below, if you don't, you probably didn't remove enough parts and need to follow directions better. Remove this snap ring, and put in the new supplied one. It is a tight fit getting it in there. I used a flat head and mallet to tap it into place.
Step Ten: Reassemble the input clutch assembly in the reverse order you took it apart, then put it back into the transmission.
Step Eleven: Now we turn our focus to the fluid pump. You need to remove all torx bolts on the face of the pump, and the six around the pump shaft on the back. The bolts from the front of the pump are different from the bolts on the back, keep them separate. Now separate the front and rear of the pump.
Step Twelve: Working on one valve at a time, remove the retainer clips, and replace parts with the supplied ones as per the instructions. note that the springs are not under much tension at all, and aren't going to go flying off when the retainer is removed. Be sure not to drop or lose any parts though, as they are very small.
Step Thirteen: Reassemble pump, and put it back into the transmission. Tighten up all 6 bolts holding it in. Then replace the front plate, and hold it in place with the 2 snap rings.
Step Fourteen: Drop the transmission pan and remove the flat filter (it is held in place by one torx bolt) and the spin on filter (it spins on and off just like a normal oil filter)
Step Fifteen: Disconnect the Transmission Solenoid/TRS Assembly. This is the huge plug on the driver side of the transmission.
Step Sixteen: Remove the valve body. It is held in place by six hex bolts.
Step Seventeen: Remove the spring retention plate. Don't worry about springs shooting off all over the place when the cover is removed, there is no pressure on them at this point.
Step Eighteen: Remove the springs and pistons, place them in your clean organized area, and mark where each one goes. Replace the lower seal on each piston, and add the wire expander. Add the washer and the new large spring into the Over Drive Piston. Place the stock springs (large and small) back into the Under Drive piston. Put a new large spring, and stock small spring into the 4th piston. New large and small springs into the 2nd piston And both stock springs back into the Low/Reverse piston. (note, all new springs are the same size, so just put one in where it's called for)
Step Nineteen: Now comes the tricky part, removing the end plug and switch valve. They are in there pretty snug. To remove it, I turned the valve body upside down, and had a buddy hold it while I tapped the backside of the switch valve port with a screw driver handle. This took quite some time. I got it out just enough to fit a fingernail underneath the lip of the end plug so I could pull it out. I then had to repeat the process for the valve. Now install the new switch valve and end plug.
Step Twenty: Put the pistons and springs back into their respective places. Now put the new supplied spring retention plate on. Use blue loctite on each bolt, and torque it down to 40 inch/lbs. The loctite and torque specs are extremely important, do not overlook this step!
Step Twenty One: Put your valve body back into the transmission, put your filters on, put the TRS connection back on, use a factory gasket, RTV, or both to put the pan back on. Reinstall the transmission into the vehicle if you took it out. Fill with ATF+4.
Step Twenty Two: Warm up your fluid, top it off to the correct level, then enjoy the fruits of your labor with a much better shifting transmission.
Last edited by OlDirtyJohn; 02-09-2010 at 07:29 PM.
#2
02-09-2010, 07:44 PM
Record Breaker
Join Date: Nov 2009
Location: Orlando, Fl
Posts: 1,886
Likes: 0
Received 0 Likes
on
0 Posts
#3
02-09-2010, 07:53 PM
#4
02-09-2010, 08:01 PM


#7
02-09-2010, 11:09 PM
weed, thanks man. and I honestly am surprised I made it through this without messing something up with those awesome instructions they supplied. I guess it just took a little time, common sense and ingenuity.
cheapbeater, also thanks. and it shifts very nicely now. its not such an awesome night and day difference that i would waste 17qts of fluid just to install it. but im surely glad I did it while I had the trans out anyway. i encourage anyone to pick one up, and next time you go to change the tranny fluid, just drop the valve body and do that portion. it was worth the money.
to everyone, please let me know any ways I can improve my write ups. I want them to get as good as possible. be it constructive criticism, or new ideas, just lemme know.
Trending Topics
#9
02-10-2010, 01:24 PM

Champion
#10
02-10-2010, 06:12 PM