


 08-05-2015, 07:45 PM
Last edit by: IB Advertising
See related guides and technical advice from our community experts:
Browse all: Exterior
- Dodge Ram 2nd Gen How to Replace Fuel Door
Step by step instructions for the do-it-yourself repairs.
Browse all: Exterior

Just replaced the infamous Recirculation Door in 30 minutes :-)
#1
05-29-2012, 03:47 PM

I don't know how the dealerships are still getting away with charging people $300-$600 dollars for this repair nor why they insist on removing the whole dash when you can do it from behind the glove box with a $50 Mopar part and a few simple tools.
Thank goodness for forums!
UPDATED: FYI if your truck sounds like it is blowing air hard but very little air seems to actually get through to the cab, chances are it is a broken recirculation door. Below is how to fix it yourself.
Thank goodness for forums!
UPDATED: FYI if your truck sounds like it is blowing air hard but very little air seems to actually get through to the cab, chances are it is a broken recirculation door. Below is how to fix it yourself.
Last edited by IamFrank; 05-29-2012 at 05:52 PM.

#4
05-29-2012, 05:00 PM
I suppose I could do that. Let me see... I'll have to "borrow" a few pictures found elsewhere but I'll add several of my own as well.
Recirculation Door Replacement for a 2006 Dodge Ram
1. Check to make sure it is actually your recirculation door. You can check that very easily by undoing the three bolts that attach the fan motor and then unplug it and pull it out. This is the circular looking deal just above the passenger floor board shown here:
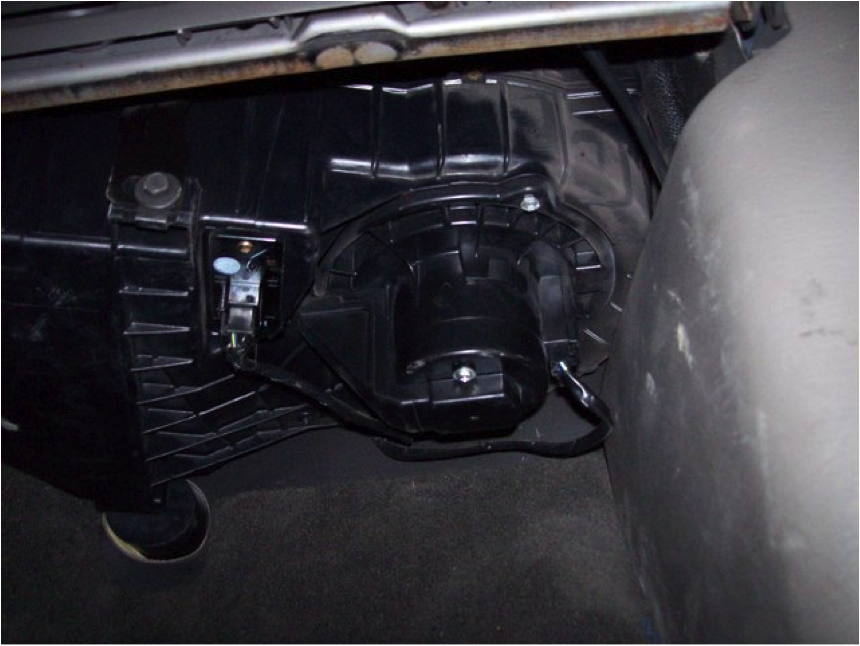
And the motor removed:

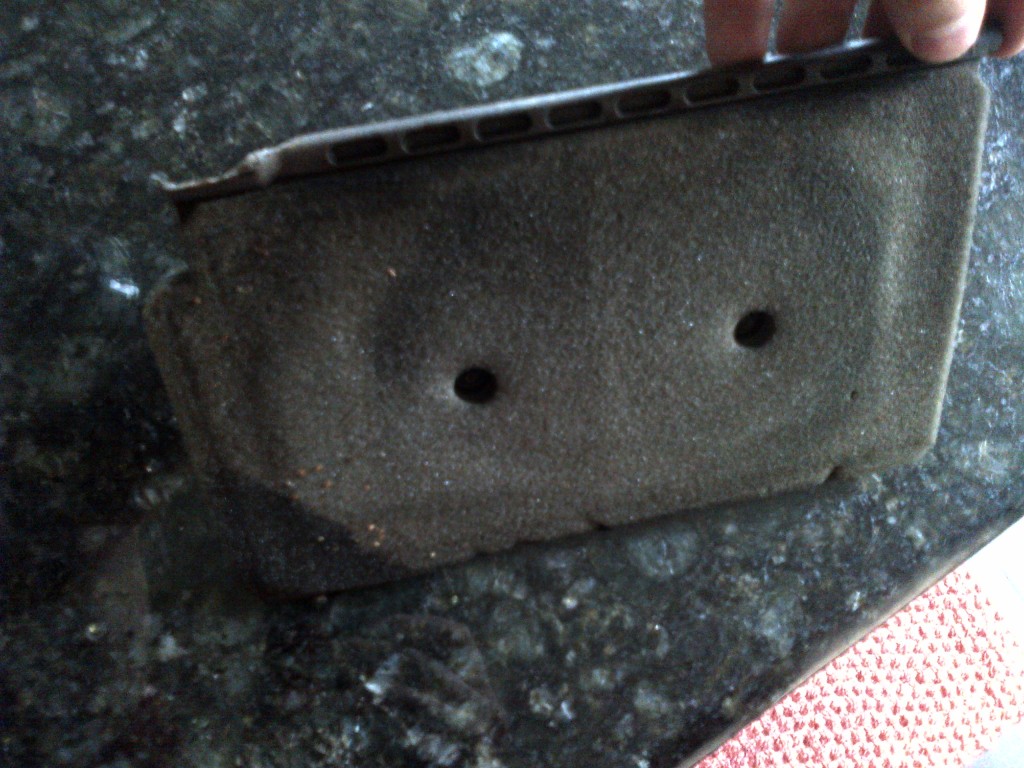
2. Once the motor is out, which takes maybe 3 minutes and a flat head screw driver, lay on your back on the passenger floor board and look up into where the blower motor was. If it is the recirculation door that is your culprit, it will be laying right there blocking the air duct. Reach up and pull it out (while you're there, make sure to remove any other pieces or debris that may be loose in there). If it is broken, it will not be connected to anything. Once it is out, you will have full blown air now, but without the door in place, you will not have any control over closing out the outside air (which if it was broken, you didn't have anyway). Below is what the broken recirculation door looks like:
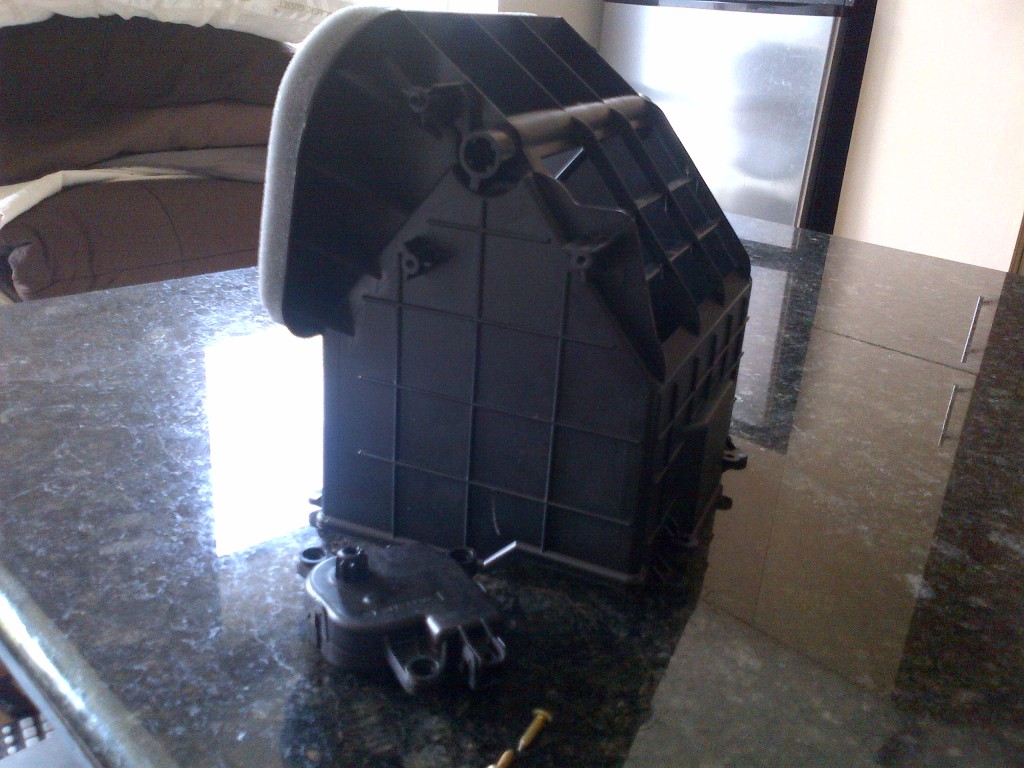
3. Now that you know it is the recirculation door, you'll need to pick up Mopar part number 68004226AB. This can be found online for about $35 but no matter how you spin it, it is around $50 shipped so I just picked mine up from the dealership for $50. They do not sell only the door anymore so the part that you receive will actually be the entire Air Inlet Housing shown here:
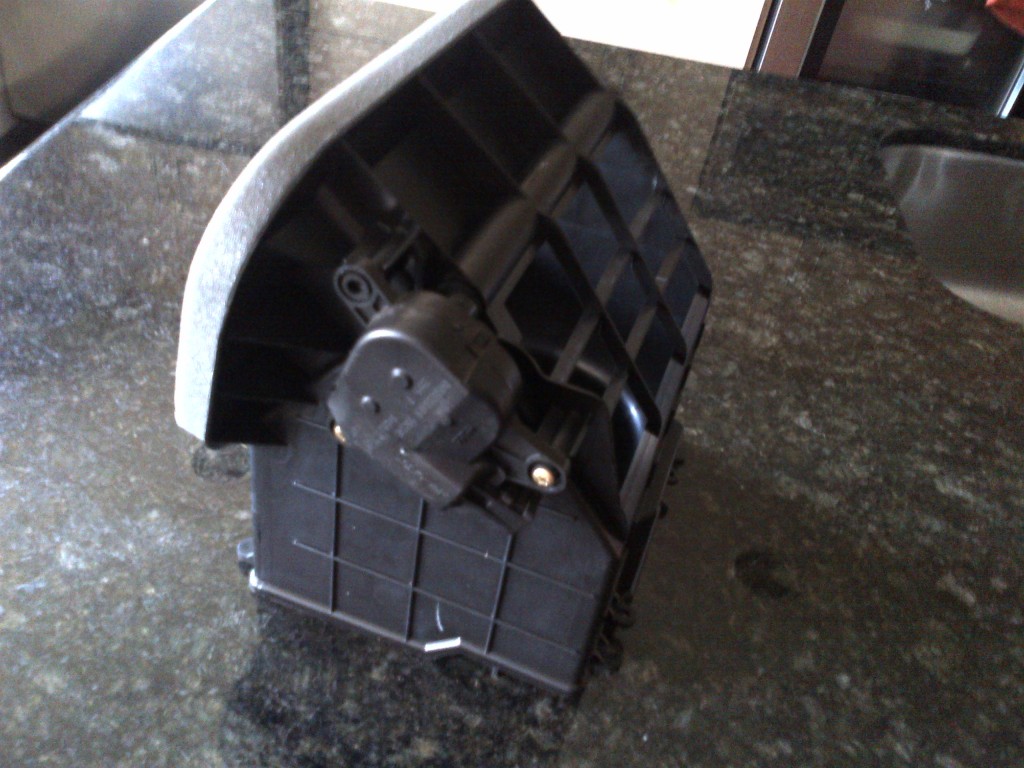
All you need however is the door motor, the axle pin, and the door itself. Removing these from the part you get will help you understand how it look and feels under your dash, where your vision is limited so take note. To retrieve the parts you need from the new part follow these steps:
-1. Unscrew the two phillips head screw located on the door motor.
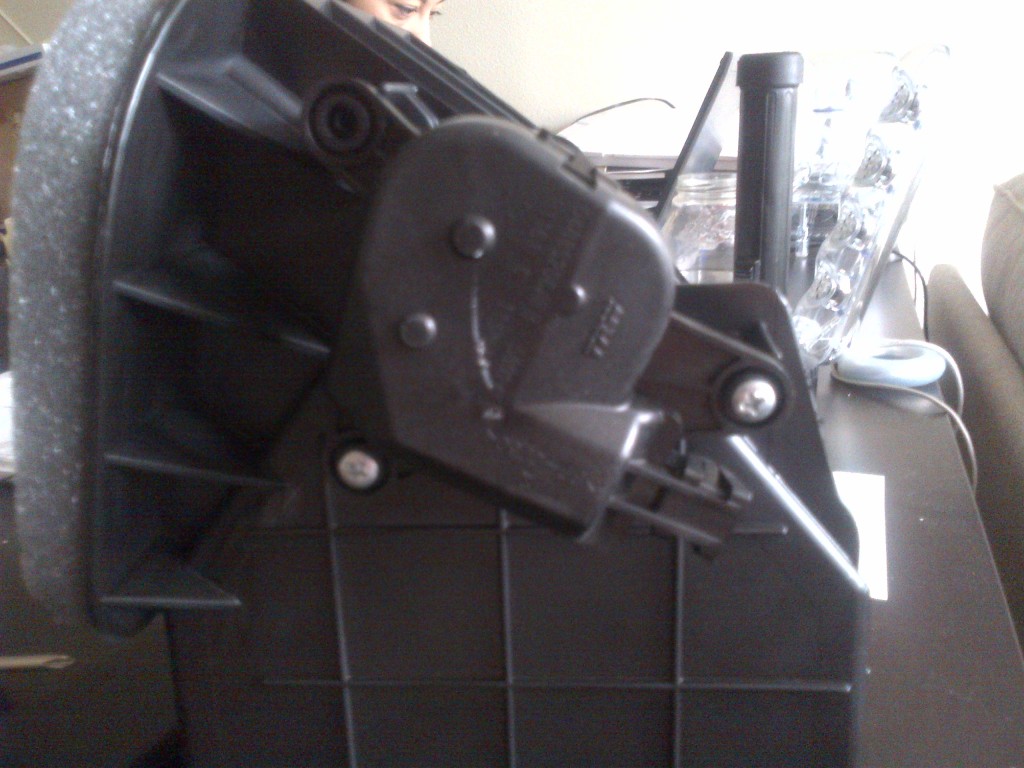
-2. The door motor is now free and will slide out and off.
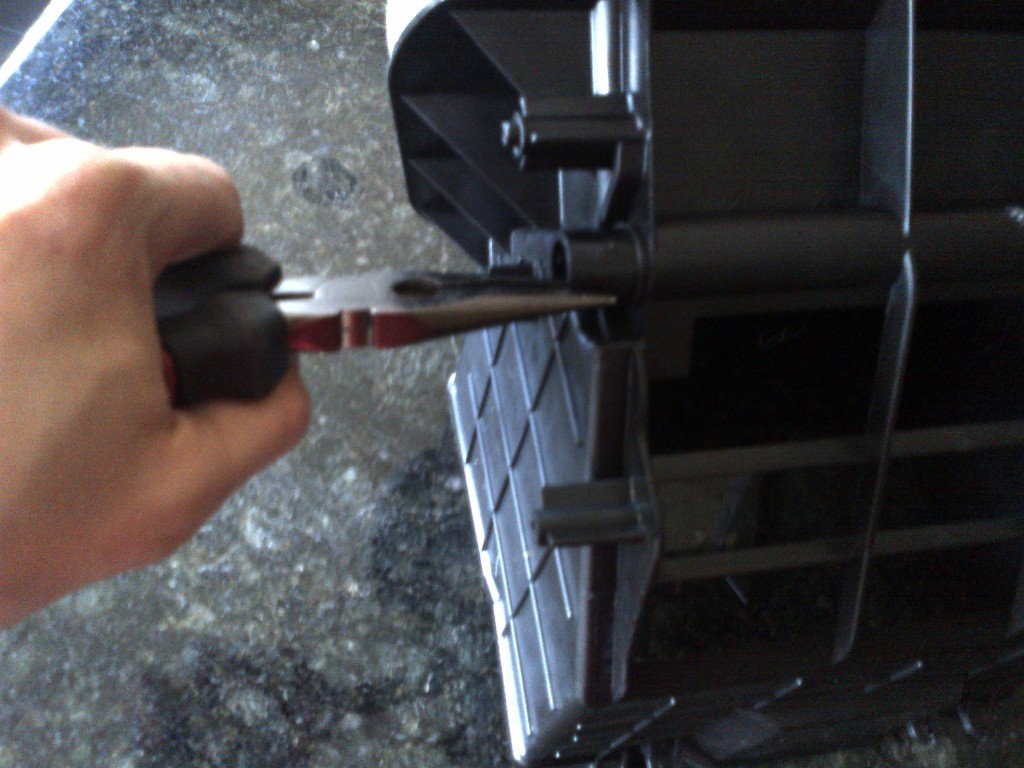
-3. Now with a pair of needle nose pliers, grab the axel pin and pull HARD in line with the axle away from the housing. This is the most difficult step for most but if you pull hard enough, it will give. It is only held on with contact points.
-4. The recirculation door is now free so remove it from the housing (Note: in this picture, I'd already removed the door and put it in my truck).
Now that you have the door, the door motor, and the axle pin, you are ready to move on to step 4.
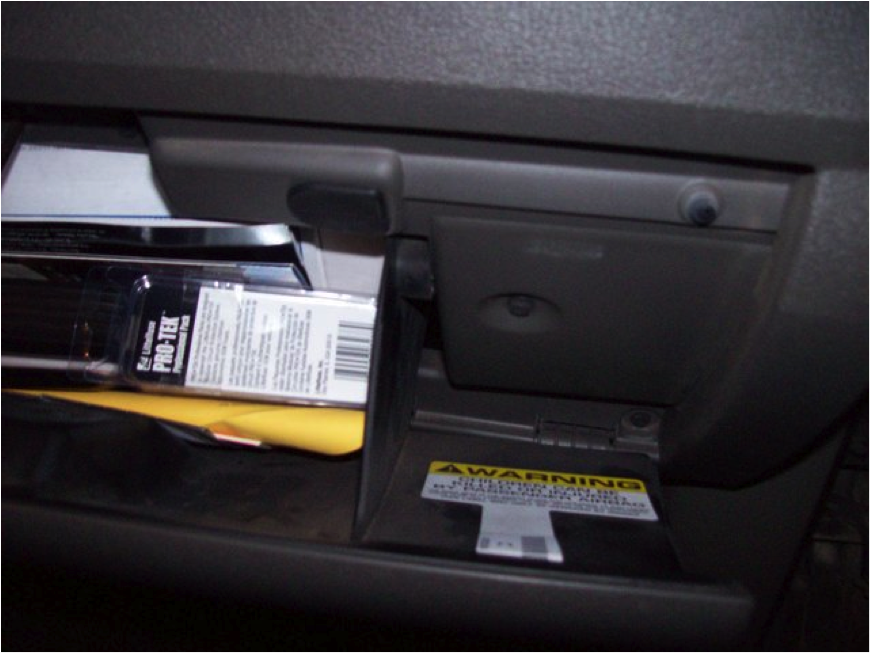
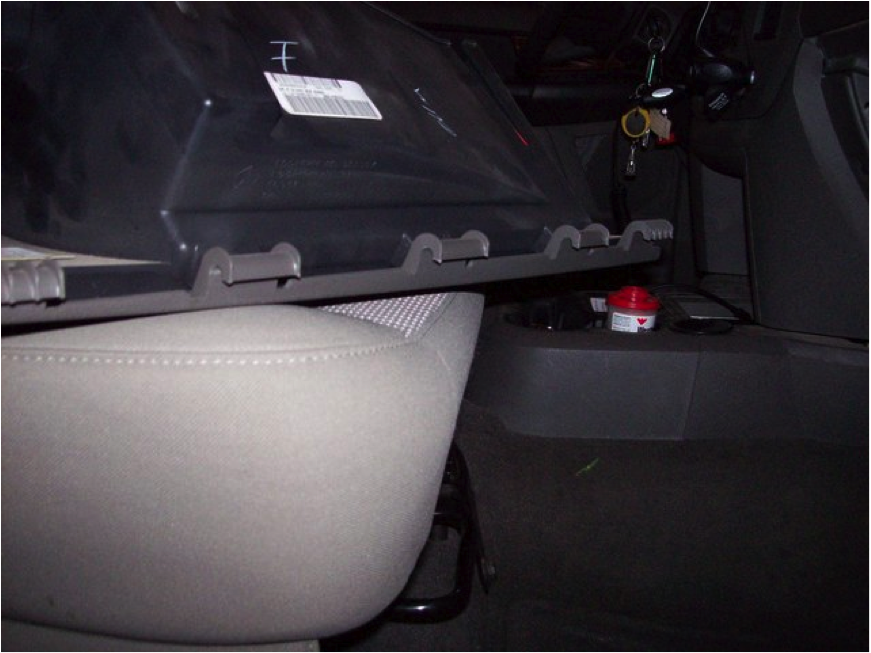
4. Remove the glove box. This can be achieved by depressing the upper parts until you see the rubber grommets as shown below: It falls right out.
5. With the glove box removed, you can look directly at the Air Inlet Housing (you should be familiar with what this looks like because you have a brand new housing to compare it to). It is on the upper right hand side view as you look into the glove box opening. There you will see the door motor and the screws that mount it seen here.

As you did with the new part, remove the two screws that mount the door motor. Note: I chose to replace the door motor also but it is not necessary so you can simply move on to step 6 now if you wish. If you wish to replace the door motor too, unplug it but don't replace it with the new one just yet.
6. Now for the fun part. After removing the door motor, you will see the old axle pin (usually white vs. the new black one you will replace it with as seen below).
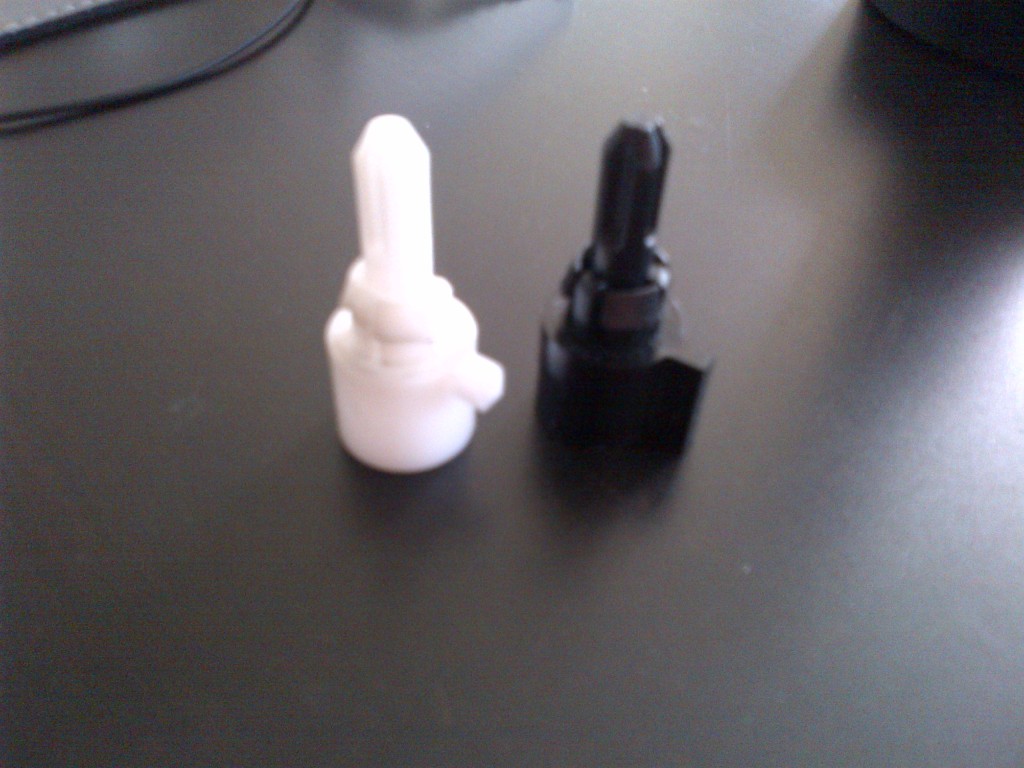
Get in there again, as you did with the new part, with a pair of needle nose pliers and grab the axle pin firmly. You actually have a bit of horizontal space in there so again, pull FIRMLY inline with the axle away from the air inlet housing and it will pop out. You're going to have to pull HARD.
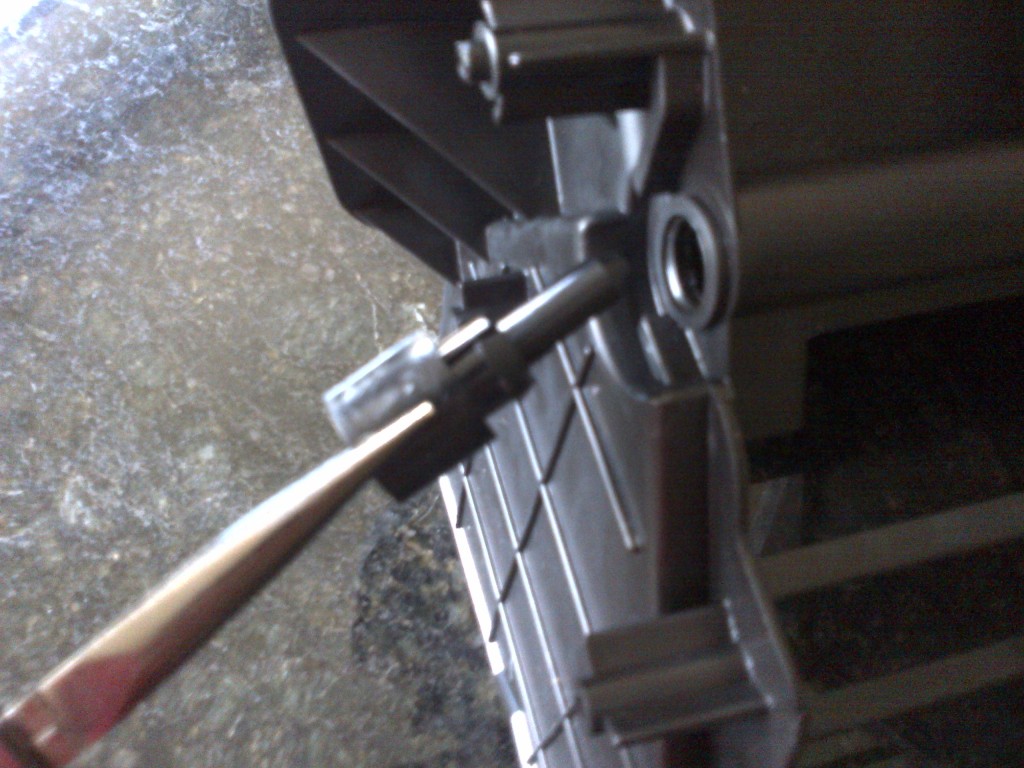
7. Once that's out it is time to replace the recirculation door. Go lay back down on your back on the passenger floor board and with one arm feed the new recirculation door through the HVAC tube back up to the top of the inlet housing where it belongs (as seen on the new part before you removed it). The wider side of the recirculation door's axle (the side that typically breaks on the older version doors as shown above on my broken door) should be on the driver's side where the axle pin goes. Feed the little end of the door axle into its socket and hold everything in line. With with the other arm, place the door axle pin in place and press the axle pin inward firmly until it snaps into place. NOTE: Make sure the recirculation door is closed (pressed against the side of the Air Inlet Housing that faces the rear of the truck) and the axle pin's rotation limiter (the black protrusion on the axle pin) is facing straight down toward the floor board. Once it snaps into place you can turn the axle pin back and forth assuring that everything is in place properly.
8. Now it is time to put everything back together. Put the new door motor back in by plugging it back in and replacing the two phillips head screws.
9. Put the glove box back by lining up the bottom mounting hooks, depressing the top where the rubber grommets are and putting it back in place.
10. Replace the blower motor by lining it back up according to the screws and plugging it back in.
Voila. A job the dealer would have charged you an arm and a leg for done within an hour for $50.
Recirculation Door Replacement for a 2006 Dodge Ram
1. Check to make sure it is actually your recirculation door. You can check that very easily by undoing the three bolts that attach the fan motor and then unplug it and pull it out. This is the circular looking deal just above the passenger floor board shown here:
And the motor removed:
2. Once the motor is out, which takes maybe 3 minutes and a flat head screw driver, lay on your back on the passenger floor board and look up into where the blower motor was. If it is the recirculation door that is your culprit, it will be laying right there blocking the air duct. Reach up and pull it out (while you're there, make sure to remove any other pieces or debris that may be loose in there). If it is broken, it will not be connected to anything. Once it is out, you will have full blown air now, but without the door in place, you will not have any control over closing out the outside air (which if it was broken, you didn't have anyway). Below is what the broken recirculation door looks like:
3. Now that you know it is the recirculation door, you'll need to pick up Mopar part number 68004226AB. This can be found online for about $35 but no matter how you spin it, it is around $50 shipped so I just picked mine up from the dealership for $50. They do not sell only the door anymore so the part that you receive will actually be the entire Air Inlet Housing shown here:
All you need however is the door motor, the axle pin, and the door itself. Removing these from the part you get will help you understand how it look and feels under your dash, where your vision is limited so take note. To retrieve the parts you need from the new part follow these steps:
-1. Unscrew the two phillips head screw located on the door motor.
-2. The door motor is now free and will slide out and off.
-3. Now with a pair of needle nose pliers, grab the axel pin and pull HARD in line with the axle away from the housing. This is the most difficult step for most but if you pull hard enough, it will give. It is only held on with contact points.
-4. The recirculation door is now free so remove it from the housing (Note: in this picture, I'd already removed the door and put it in my truck).
Now that you have the door, the door motor, and the axle pin, you are ready to move on to step 4.
4. Remove the glove box. This can be achieved by depressing the upper parts until you see the rubber grommets as shown below: It falls right out.
5. With the glove box removed, you can look directly at the Air Inlet Housing (you should be familiar with what this looks like because you have a brand new housing to compare it to). It is on the upper right hand side view as you look into the glove box opening. There you will see the door motor and the screws that mount it seen here.
As you did with the new part, remove the two screws that mount the door motor. Note: I chose to replace the door motor also but it is not necessary so you can simply move on to step 6 now if you wish. If you wish to replace the door motor too, unplug it but don't replace it with the new one just yet.
6. Now for the fun part. After removing the door motor, you will see the old axle pin (usually white vs. the new black one you will replace it with as seen below).
Get in there again, as you did with the new part, with a pair of needle nose pliers and grab the axle pin firmly. You actually have a bit of horizontal space in there so again, pull FIRMLY inline with the axle away from the air inlet housing and it will pop out. You're going to have to pull HARD.
7. Once that's out it is time to replace the recirculation door. Go lay back down on your back on the passenger floor board and with one arm feed the new recirculation door through the HVAC tube back up to the top of the inlet housing where it belongs (as seen on the new part before you removed it). The wider side of the recirculation door's axle (the side that typically breaks on the older version doors as shown above on my broken door) should be on the driver's side where the axle pin goes. Feed the little end of the door axle into its socket and hold everything in line. With with the other arm, place the door axle pin in place and press the axle pin inward firmly until it snaps into place. NOTE: Make sure the recirculation door is closed (pressed against the side of the Air Inlet Housing that faces the rear of the truck) and the axle pin's rotation limiter (the black protrusion on the axle pin) is facing straight down toward the floor board. Once it snaps into place you can turn the axle pin back and forth assuring that everything is in place properly.
8. Now it is time to put everything back together. Put the new door motor back in by plugging it back in and replacing the two phillips head screws.
9. Put the glove box back by lining up the bottom mounting hooks, depressing the top where the rubber grommets are and putting it back in place.
10. Replace the blower motor by lining it back up according to the screws and plugging it back in.
Voila. A job the dealer would have charged you an arm and a leg for done within an hour for $50.
Last edited by IamFrank; 05-29-2012 at 06:21 PM.
The following users liked this post:
Hazes Coleman (10-29-2019)
#5
05-29-2012, 05:43 PM

The following 2 users liked this post by PRADO:
Hazes Coleman (10-29-2019),
nibroc (07-14-2022)
#7
05-29-2012, 05:50 PM
The following users liked this post:
Hazes Coleman (10-29-2019)
Trending Topics
#8
05-30-2012, 10:31 AM
Professional
#9
06-01-2012, 10:13 PM

Just did this job today. A word to those who have the Infinity sound system, this is not an easy job. Those who have the standard sound system don't have to contend with the amplifier that is mounted next to the recirc motor.
What a pain in the a... I gave up last week, and decided this morning to try again. My plan of attack was to remove the entire dash, and replace the whole recirc box. After reading many tutorials on how to remove the dash, I attempted to do so. Not so easy. I had every nut and bolt out of the thing, and still it seemed attached to the defrost vents. Couldn't get it to budge. Not to mention the passenger airbag that wasn't addressed in the write ups that I read.
Finally gave up with the entire dash removal, and decided to concentrate on getting that damn amplifier out of the way. After fighting for an hour to reach an unreachable bolt (there are three that hold it in place), and just to remove the wires took considerable effort, plus bleeding knuckles, finally got it out of the way. Barely. After 6 hours, most of which was going in the wrong direction, I finally got my recirc door installed. It was much missed and I am so glad it's working again!!! However, when I switch to floor, all the air goes to the dash vents. So I guess I have another bad door.
The following users liked this post:
Cooptrac (10-26-2019)
#10
06-01-2012, 11:52 PM

Check this website out:
http://heatertreater.net/Ram%2002-08%20Listing.html
They also have step by step videos to replace ALL the doors that can and often do break in your HVAC system. All the methods to get at them are much easier then taking your whold dash out too. And best of all, the replacement doors are metal and can never break ever again. So you will fix the problem once and be done with it for the life of the truck. My recirc door is broken now for the second time. I will be doing the Heeter Treeter package this fall.
