


 08-05-2015, 09:03 PM
Last edit by: IB Advertising
See related guides and technical advice from our community experts:
Browse all: Interior Guides
- Dodge Ram Quad Cab 2002-2008: How to Repair Rear Door Wire Harness
Step by step instructions for the do-it-yourself repairs
Browse all: Interior Guides

QC Rear Door Wire Harness Fix - Tutorial!
#1
01-15-2013, 05:08 PM


Join Date: Aug 2012
Posts: 88
Likes: 0
Received 0 Likes
on
0 Posts
Rear door auto locks not working? what about power windows? Dome light?
this tutorial might help.
this is by no means a professional job. more of a poor mans quick-fix. i recommend getting a factory harness from your dealer, but this will work in the mean time.
this will be a very thorough tutorial and there will be a few tips at the end about what i would have done differently so read the whole thing before starting a project.
Estimated time: 1 hour.
II.... Battery
III... Removing door panel
IV... Removing speaker
V.... Removing grommet - pillar
VI... Removing grommet - door
VII.. Prepping wires
VIII. Twisting wires
IX... Access to male end harness
X.... Reattaching grommet - pillar
XI... Reattaching grommet - door
XII.. Reattaching pillar covers
XIII. Reattaching door panel
XIV. Final notes and things i would have done differently
I. Tools recommended...

1. metal clothes hanger
2. wire snips
3. adjustable wrench
4. stranded wire (i used radioshack hookup wire, 18 gauge. $10)
5. nail clippers
6. Phillips Head
7 & 8. 2 flatheads
9. 10mm socket
10. socket extension
11. socket wrench
12. electric tape
13. something to mark wires with, i used white paint marker.
14. a ziptie
15. pen and paper
II. battery
1. disconnect negative battery terminal. Always do this when working with electronics.
III. removing door panel.

1. start by removing the screw(1)
2. then slightly lift door handle to get to the 10mm bolt(2) and remove it along with the door handle.
3. push up on entire panel and pull top away just enough to get to the power window switch.
4. disconnect switch by pressing the tab on the top of the connector.
5. remove panel completely
IV. removing speaker.
1. remove the 3 screws holding speaker
2. disconnect wires, same as window.
V. removing grommet - pillar

1. use flat head to pop the clip holding the harness. repeat on the other side
2. disconnect harness via tab
3. pull rubber away from plastic connector. the rubber is wrapped around it.
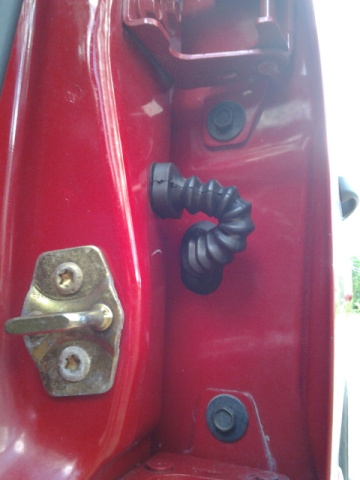
VI. removing grommet - door
This was probably the most difficult part of the project
1. use one flat head to push down on the top of the grommet
2. slide the other flat head upwards between the grommet and the door frame.
3. use the door frame as a fulcrum to pry out the top bit of the grommet
4. you should be able to pull the rest of the grommet out by hand once you get it started.
Now that you've got each end of the grommet out, you should be able to give a pull on each wire to see which ones are torn. I had 6 broken wires on mine

VII. prepping wires
1. strip each wire about a half an inch
2. cut and strip as many lengths of wire #4 as you need. i used about 5" lengths, but i would say go with 10"
3. use something to mark both ends of the wires so you dont cross them.
4. once you've got your wires ready put the ends of them together and tape them off

5. cut a straight piece of the clothes hanger, about 6"
7. compress the grommet and feed the clothes hanger through
8. bend the ends of the hanger so that it keeps the grommet compressed.
9. feed your wires through. ziptie the end so the wires dont pull back out
VIII. twisting wires
1. twist your wires together, writing down which color wire goes with which wire you marked.
2. use electrical tape and tape each connection, then tape all the wires together into a bundle, making sure no wires are kinked. use a lot of tape to prevent the wires from bending too much and tearing again.
3. untape and remove the ziptie from the other end and repeat the process using your notes to know which color goes to which marked wire.
4. at this point, if you've got all the wires taped correctly, you can reconnect the battery and the wire harness* to test it out. check your locks with switch AND FOB (if equipped), speakers, dome light, window from rear switch AND driver switch. NOTE!: window will not work if door panel switch is not re-connected first!
5. if all is working correctly, remove hanger from grommet by unbending and pulling it out, making sure not to catch any wires.
*if you cannot reconnect harness, continue to IX.
IX. access to male end harness
1. on the pillar, use a flat head to pop the two covers on the handle.
2. use the 10mm socket to remove the two bolts and pull the handle off.
3. at the top of the rear door seal, use a flat head to pull back the upper plastic pillar cover, careful not to damage rubber door seal. this is to gain access to the lower pillar cover.
4. pry flat head under the rear doorjam(?) and pop it up
5. use flat head to pry lower pillar cover from the rear part of the pillar just enough to get your hand into the pillar to be able to reach the male end harness.
X. reattaching grommet - pillar
1. wrap grommet around the end of the female end wire harness.
2. reach into pillar and grab male end harness.
3. connect the harness, you should hear the tabs click and the rubber grommet should be flush with the pillar, with no plastic showing. you can now test the connections if you weren't able to before.
XI. reattaching grommet - door
1. being sure the grommet is oriented the correct way, place the lower end into the door well.
2. muscle the rest of that baby in there. you should be able to do it with your hands.
3. test everything again, making sure nothing came loose. make sure door is unlocked and close it. open drivers door and check that grommet is not twisted. should look like this
XII. reattaching pillar covers.
1. replace lower pillar cover with the lip correctly in the groove of the door seal.
2. repeat with upper pillar cover. pop handle back into its holes. (it'll only fit one way) then replace bolts and caps.
3. press door jam down until it clicks back into place.
XIII. reattaching door panel.
make sure speaker is replaced correctly first

1. pop lock bezel by pressing inward on the two clips(above) and lock door.
2. place lower two hooks into door well first.
3. reconnect window switch.
4. lift the panel slightly then push it all the way against the door well. make sure all hooks are seated properly by running hand along lip of panel. there shouldn't be any gap
5.push down on the panel until the screw hole lines up
6. replace screw and door handle.
7.press lock bezel back int place
8. again, make sure everything works correctly and is back in place.
XIV. Final notes and things i would have done differently:
The only reason i kept the harness is because i had enough wire left to be able to strip and twist. if your wire tore closer to the harness and you cant work with it, but you dont want to go to the dealer, i would 1. open the pillar covers and snip the wires at the male end of the harness, same with female end. 2. use a rotary tool to drill out the inside of both, so they clip together leaving a hole in the middle. 3. connect long wires (about 2' maybe?) and run them from inside the pillar through the harness, through the grommet and then connect them same as above. then just use the harness to hold the grommet to the pillar.
might have used a heavier gauge wire, 18 seemed the same as factory. might be harder to fit through grommet though
soldering instead of twisting
heat shrink instead of tape. still tape the bundle though, makes the grommet much more firm (see below)
Before

After
if this helps one person, Im happy!
took a while to write, so please leave some feedback
Also, ill leave you guys up north with something from sunny Florida!

this tutorial might help.
this is by no means a professional job. more of a poor mans quick-fix. i recommend getting a factory harness from your dealer, but this will work in the mean time.
this will be a very thorough tutorial and there will be a few tips at the end about what i would have done differently so read the whole thing before starting a project.
Estimated time: 1 hour.
Table of Contents
I..... ToolsII.... Battery
III... Removing door panel
IV... Removing speaker
V.... Removing grommet - pillar
VI... Removing grommet - door
VII.. Prepping wires
VIII. Twisting wires
IX... Access to male end harness
X.... Reattaching grommet - pillar
XI... Reattaching grommet - door
XII.. Reattaching pillar covers
XIII. Reattaching door panel
XIV. Final notes and things i would have done differently
I. Tools recommended...
1. metal clothes hanger
2. wire snips
3. adjustable wrench
4. stranded wire (i used radioshack hookup wire, 18 gauge. $10)
5. nail clippers
6. Phillips Head
7 & 8. 2 flatheads
9. 10mm socket
10. socket extension
11. socket wrench
12. electric tape
13. something to mark wires with, i used white paint marker.
14. a ziptie
15. pen and paper
II. battery
1. disconnect negative battery terminal. Always do this when working with electronics.
III. removing door panel.
1. start by removing the screw(1)
2. then slightly lift door handle to get to the 10mm bolt(2) and remove it along with the door handle.
3. push up on entire panel and pull top away just enough to get to the power window switch.
4. disconnect switch by pressing the tab on the top of the connector.
5. remove panel completely
IV. removing speaker.
1. remove the 3 screws holding speaker
2. disconnect wires, same as window.
V. removing grommet - pillar
1. use flat head to pop the clip holding the harness. repeat on the other side
2. disconnect harness via tab
3. pull rubber away from plastic connector. the rubber is wrapped around it.
VI. removing grommet - door
This was probably the most difficult part of the project
1. use one flat head to push down on the top of the grommet
2. slide the other flat head upwards between the grommet and the door frame.
3. use the door frame as a fulcrum to pry out the top bit of the grommet
4. you should be able to pull the rest of the grommet out by hand once you get it started.
Now that you've got each end of the grommet out, you should be able to give a pull on each wire to see which ones are torn. I had 6 broken wires on mine
VII. prepping wires
1. strip each wire about a half an inch
2. cut and strip as many lengths of wire #4 as you need. i used about 5" lengths, but i would say go with 10"
3. use something to mark both ends of the wires so you dont cross them.
4. once you've got your wires ready put the ends of them together and tape them off
5. cut a straight piece of the clothes hanger, about 6"
7. compress the grommet and feed the clothes hanger through
8. bend the ends of the hanger so that it keeps the grommet compressed.
9. feed your wires through. ziptie the end so the wires dont pull back out
VIII. twisting wires
1. twist your wires together, writing down which color wire goes with which wire you marked.
2. use electrical tape and tape each connection, then tape all the wires together into a bundle, making sure no wires are kinked. use a lot of tape to prevent the wires from bending too much and tearing again.
3. untape and remove the ziptie from the other end and repeat the process using your notes to know which color goes to which marked wire.
4. at this point, if you've got all the wires taped correctly, you can reconnect the battery and the wire harness* to test it out. check your locks with switch AND FOB (if equipped), speakers, dome light, window from rear switch AND driver switch. NOTE!: window will not work if door panel switch is not re-connected first!
5. if all is working correctly, remove hanger from grommet by unbending and pulling it out, making sure not to catch any wires.
*if you cannot reconnect harness, continue to IX.
IX. access to male end harness
1. on the pillar, use a flat head to pop the two covers on the handle.
2. use the 10mm socket to remove the two bolts and pull the handle off.
3. at the top of the rear door seal, use a flat head to pull back the upper plastic pillar cover, careful not to damage rubber door seal. this is to gain access to the lower pillar cover.
4. pry flat head under the rear doorjam(?) and pop it up
5. use flat head to pry lower pillar cover from the rear part of the pillar just enough to get your hand into the pillar to be able to reach the male end harness.
X. reattaching grommet - pillar
1. wrap grommet around the end of the female end wire harness.
2. reach into pillar and grab male end harness.
3. connect the harness, you should hear the tabs click and the rubber grommet should be flush with the pillar, with no plastic showing. you can now test the connections if you weren't able to before.
XI. reattaching grommet - door
1. being sure the grommet is oriented the correct way, place the lower end into the door well.
2. muscle the rest of that baby in there. you should be able to do it with your hands.
3. test everything again, making sure nothing came loose. make sure door is unlocked and close it. open drivers door and check that grommet is not twisted. should look like this
XII. reattaching pillar covers.
1. replace lower pillar cover with the lip correctly in the groove of the door seal.
2. repeat with upper pillar cover. pop handle back into its holes. (it'll only fit one way) then replace bolts and caps.
3. press door jam down until it clicks back into place.
XIII. reattaching door panel.
make sure speaker is replaced correctly first
1. pop lock bezel by pressing inward on the two clips(above) and lock door.
2. place lower two hooks into door well first.
3. reconnect window switch.
4. lift the panel slightly then push it all the way against the door well. make sure all hooks are seated properly by running hand along lip of panel. there shouldn't be any gap
5.push down on the panel until the screw hole lines up
6. replace screw and door handle.
7.press lock bezel back int place
8. again, make sure everything works correctly and is back in place.
XIV. Final notes and things i would have done differently:
The only reason i kept the harness is because i had enough wire left to be able to strip and twist. if your wire tore closer to the harness and you cant work with it, but you dont want to go to the dealer, i would 1. open the pillar covers and snip the wires at the male end of the harness, same with female end. 2. use a rotary tool to drill out the inside of both, so they clip together leaving a hole in the middle. 3. connect long wires (about 2' maybe?) and run them from inside the pillar through the harness, through the grommet and then connect them same as above. then just use the harness to hold the grommet to the pillar.
might have used a heavier gauge wire, 18 seemed the same as factory. might be harder to fit through grommet though
soldering instead of twisting
heat shrink instead of tape. still tape the bundle though, makes the grommet much more firm (see below)
Before
After
if this helps one person, Im happy!
took a while to write, so please leave some feedback
Also, ill leave you guys up north with something from sunny Florida!
#3
01-15-2013, 05:30 PM
Join Date: Aug 2012
Posts: 88
Likes: 0
Received 0 Likes
on
0 Posts
#5
01-27-2013, 04:34 PM

Registered User
Join Date: Oct 2011
Location: Colorado
Posts: 7
Likes: 0
Received 0 Likes
on
0 Posts
#6
01-27-2013, 09:44 PM
Join Date: Aug 2012
Posts: 88
Likes: 0
Received 0 Likes
on
0 Posts
Thanks for this info. I've done jobs like this before, just not on this model. I'm going to tackle it now. Chuckled at the 79F temp. This up north (Wyoming) running -10F night time to 30F daytime. I'll wait for warmer temp to tackle this. Let you know. Thanks again.
#7
12-26-2013, 10:37 AM
Registered User
Join Date: Dec 2013
Location: Texas
Posts: 1
Likes: 0
Received 0 Likes
on
0 Posts
Trending Topics
#8
06-05-2014, 02:53 AM

I had this problem happen today I have a 2003 quad cab yesterday day i ran the speaker wires for the rear doors to rear of cab so I had door panels, speakers and center pillars all apart so I could do necessary wiring all said and done simple enough job about an hour start finish put everything back together and was cruising fine later that night no problems.. today I had problems with the door lock on one rear door and then noticed the window didn't work but speaker and ajar censor did took everything apart to check my work and it all looked good... I have had problems hear and there with my rear door locks not working with alarm key but not enough to investigate it till today! Also I have experienced delayed window function and static in rear door speaker I couldn't pin point so looking at everything and using my noodle I came to the conclusion I have a short!!! Automotive nightmare right!!! thinking im screwed I start Googling and came across this thread within five minutes!! You are a life saver and I appreciate your time invested in this article it took me another two minutes to find my problem considering I still had everything apart, pulled back grommet and peeled back tape and seen a broken brown wire in the same exact crease as in your photo!! I have called it a night but tomorrow my repair will consist of me just cutting the entire wire harness were the wires are being folded and opened causing the breakage I plan on soldering them back together and heat shrinking with a whole lot of electrical tap so the harness can't bend and crease again I figure it should hold up another 100k lol thanks for the help and time you took to post your knowledge about this stubborn truck!! "TREAT IT LIKE A BABY, DRIVE IT LIKE A BEAST"
#9
08-26-2014, 09:34 AM

#10
09-13-2014, 01:54 AM

Thanks Chase, great tutorial. It just helped me fix my 2005 RAM 1500 QC. Instructions were perfect. I was able to do it without taking off the pillar cover. I found that there is a certain point that you can push open the B pillar far enough to push 1/2 my hand into the back of the pillar to hold the connector plug in place. I couldn’t have done it without your helpful hints. Dome light still doesn’t activate when I open the door, but at least the key fob, lock, & speaker work again.
I went to the dealership after reading your post but before doing the fix. I told them about the key fob and master switch locking not working on the back door. The immediately try to sell me a lock actuator for $150 and $130+ in labor. I told him I had read on the internet that sometimes the wires break in the boot. He tells me that only happens on the Jeep Cherokees. I knew then I was dealing with a moron. I told him to check out the internet before spewing wrong info. I simple googol search brought me to this page.
Thanks again….