
So what's up with your van
#21
 10-22-2013, 01:12 PM


And now:
This van was fairly neglected when I bought it not too long ago, but that's going to change.
Last edited by Tommy555; 10-22-2013 at 01:35 PM.
#22
10-22-2013, 05:01 PM


#24
11-07-2013, 02:05 AM

If the noise occurs over bumps, its probably shock absorber bushings or possibly control arm bushings.
If the noises are only occurring when backing up or during tight parking lot maneuvers its most likely the strut rod bushings. They wear from the inside out so they may look ok but if you can rotate them by hand, they are worn out. Don't use poly bushings for this application! Search the forum and you'll find most people had trouble with those poly strut bushings.
The correct kit is advance part # DW-K7090, it may come labeled as Moog K7090. These are black rubber over plastic core. I installed mine about a month ago and am very happy. These do not squeak, clunk or groan and my van is quiet again. Recommend retaining your steel heavy duty OEM washers (unless yours are damaged) as they are thicker than the ones in the aftermarket kit. Unbolt the sway bar ends, jack up one side, install strut bushing to factory torque spec, lower and repeat on the other side. Just torque the two connecting bolts to 100 lbs and the 1 1/8 end nut to to 60 ft lbs and you should be good to go.
Last edited by blackvan; 11-07-2013 at 02:14 AM.
#25
11-07-2013, 10:24 AM


You can get a hammer/punch type crimper, or a mechanical crimper, or a hydraulic crimper for large lugs/terminals, but flattening out the wires in the flattened lugs not only yields poor electrical connections, but will also fail abruptly, possibly causing a fire starting short circuit.
Electrical tape always unravels. Use heat shrink.
#26
11-07-2013, 10:44 AM
I've still got to drop the transmission pan and replace the fluid and filter. Then I need to replace the serpentine belt. I also want to route a cigarette lighter outlet towards the middle of the van somewhere. Then of course it's almost time for an oil change again. I've got enough to do for a while.

The ends are glued to avoid that issue.
Last edited by Tommy555; 11-07-2013 at 04:01 PM.
#27
11-07-2013, 09:52 PM
There are always a lot of unexpected repairs and amateur half assed repairs that have to be redone whenever you pick up a used vehicle.
Not to jump on your case here but, I strongly recommend soldering all connectors and lugs, and either avoid or solder all crimp-on spade lugs too. Just use a propane torch on large lugs over 10 gauge and feed solder into them until they overflow, its very easy and they don't fall apart six months down the road.
Don't bother with electrical tape, ever. I wont even use for speaker wires anymore. Its an emergency tool, kinda like radiator stop leak. it always fails and leaves a huge sticky mess that will have to be cleaned up before you can even proceed to repair the connection properly.
Heat shrink tubing is very cheap, faster to use and available in packs of assorted sizes.
If you replace the belt, I'd recommend replacing the belt tensioner mechanism, tensioner pulley and the idler pulley at the same time. They are cheap plastic and don't expect they live longer than 100k miles..
#28
11-07-2013, 10:22 PM
Yep, it was all that I had on-hand and so I just went with it. I should have just went to the store and bought the tubing instead.

Last edited by Tommy555; 11-07-2013 at 10:31 PM.
#29
11-07-2013, 11:51 PM
Soldering big wires and big lugs takes some skill. Most will end up burning lots of insulation till they get the hang of it. Most will not bother getting the hang of it and call good enough on a cold weak solder joint.
Better than just smashing flat those ring terminal lugs though.
Proper crimps won't fail, but making a proper crimp takes the right tool as well as skill too.
In my local 99 cent store, they sell a self fusing electrical tape. Super stretchy and makes air tight and water tight connections.
This stuff can't unravel once fused.
If you have no experience with the above product, I highly recommend it. Sometimes you can't get the right size heat shrink. and no matter what, even glued, regular electrical tape is temporary, and leaves a sticky ugly mess when it does unravel. Even the best quality UL listed Electrical tapes. Most tapes sold are far below the UL listing.
Liquid electrical tape can be great, if one has the time and meticulousness to fully apply three + thin coats an hour apart, depending on humidity and thickness applied. But if one leaves the cap loose, or off for too long during application, then it gets too thick or not usable at all.
I 've been crimping with a hydraulic crimper or soldering, layering the liquid electrical tape, letting it dry, then covering with heat shrink for full overkill.
If soldering using a torch rather than an iron, use some aluminum foil to attempt to protect insulation from torch heat, and don't forget liberal application of soldering flux. After solder cools, use rubbing alcohol and a q tip to remove flux detrius before heat shrink/tape from solder and insulation.
Often heatshrink will be forgotten before soldering, or the wiring gets so hot the heat shrink gets stuck where not needed and one is force to insulate the connection with other methods.
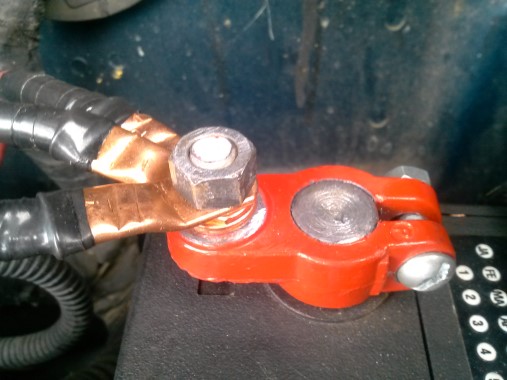
Your flattened battery ring terminals lugs *Will* give you issues at some point. It is but a matter of time. I bet they are getting hot as they are now when having to pass a bunch of current for any extended period.
If your van was a boat and being inspected, it would fail alone on those battery connections. if an airplane and you tried to pass that off to an FAA inspector, you'd be fined or in jail for gross negligence.
Better than just smashing flat those ring terminal lugs though.
Proper crimps won't fail, but making a proper crimp takes the right tool as well as skill too.
In my local 99 cent store, they sell a self fusing electrical tape. Super stretchy and makes air tight and water tight connections.
This stuff can't unravel once fused.
If you have no experience with the above product, I highly recommend it. Sometimes you can't get the right size heat shrink. and no matter what, even glued, regular electrical tape is temporary, and leaves a sticky ugly mess when it does unravel. Even the best quality UL listed Electrical tapes. Most tapes sold are far below the UL listing.
Liquid electrical tape can be great, if one has the time and meticulousness to fully apply three + thin coats an hour apart, depending on humidity and thickness applied. But if one leaves the cap loose, or off for too long during application, then it gets too thick or not usable at all.
I 've been crimping with a hydraulic crimper or soldering, layering the liquid electrical tape, letting it dry, then covering with heat shrink for full overkill.
If soldering using a torch rather than an iron, use some aluminum foil to attempt to protect insulation from torch heat, and don't forget liberal application of soldering flux. After solder cools, use rubbing alcohol and a q tip to remove flux detrius before heat shrink/tape from solder and insulation.
Often heatshrink will be forgotten before soldering, or the wiring gets so hot the heat shrink gets stuck where not needed and one is force to insulate the connection with other methods.
Your flattened battery ring terminals lugs *Will* give you issues at some point. It is but a matter of time. I bet they are getting hot as they are now when having to pass a bunch of current for any extended period.
If your van was a boat and being inspected, it would fail alone on those battery connections. if an airplane and you tried to pass that off to an FAA inspector, you'd be fined or in jail for gross negligence.
#30
11-08-2013, 12:12 AM
Thanks for the advice guys. I don't pretend to know everything about everything, so it's good to get some feedback on this stuff.
What ended up happening with the original rusted battery terminals was that the van wouldn't start at times, and I'd have to go to the cables and give them a twist in one direction or another and then try to start the van again. The van would then start most times after that. Ever since I've installed the new terminals (even though not as good as they could be), the starting issue has completely gone away. Like you guys have said, though, it is fine (for now), but I will have to redo the job again. This time, I'll make it more permanent.
What ended up happening with the original rusted battery terminals was that the van wouldn't start at times, and I'd have to go to the cables and give them a twist in one direction or another and then try to start the van again. The van would then start most times after that. Ever since I've installed the new terminals (even though not as good as they could be), the starting issue has completely gone away. Like you guys have said, though, it is fine (for now), but I will have to redo the job again. This time, I'll make it more permanent.
Last edited by Tommy555; 11-08-2013 at 12:16 AM.