Dodge Ram 1994-2001: How to Replace Oxygen (O2) Sensors
Is your truck running too rich, leaving you with poor fuel economy? Sounds like your oxygen sensors have failed, and here is how to replace them.
This article applies to the Dodge Ram 2nd Generation (1994-2001).
Your Dodge Ram uses two types of O2 sensors: a primary and secondary. Primary O2 sensors read the fuel and air mixture from an engine, then send signals to the computer telling it how much fuel to inject into the motor. Secondary O2 sensors are responsible for keeping tabs on the truck's catalytic converter. Along with the two different types of O2 sensors, their layouts vary according to which state the Dodge Ram was built. Models for California based trucks have to deal with four O2 sensors, while the rest only use two. Still, they follow the same function, as the primaries are used for fuel regulation and secondaries for emissions. If the primary, or upstream sensors fail, the truck will experience poor fuel economy, engine stutters, or even stalling issues. This article covers the replacement of any O2 sensor on your truck, with the only difference being their respective locations.

Materials Needed
- 7/8" combination wrench
- Anti-seize compound
Step 1 – Open the hood and start the engine
In most cases, the oxygen sensor(s) will be fairly difficult to break loose from the exhaust pipe. Start the engine to warm up the exhaust and expand the metal, but just for a minute or so. You want the pipes to be a bit warm, but workable, and not "why are my hands burning" level of hot.

Step 2 – Locate and unplug the O2 sensor
If you haven't already, locate the O2 sensor(s). The primary will be mounted in front of the catalytic convertor and the secondary will be mounted behind it. One you find them, carefully reach up and disconnect the wire plug.

Figure 2. Locate the O2 sensor. 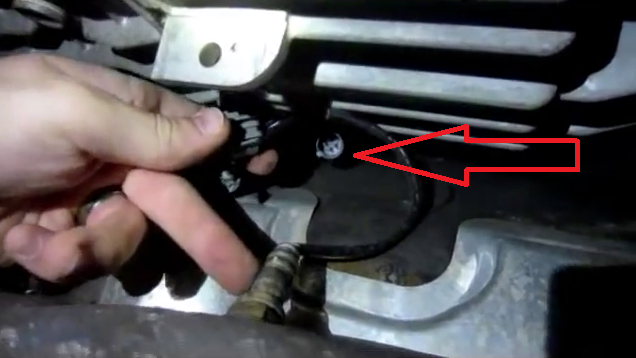
Figure 3. Unplug the wire from the engine harness.
Step 3 – Break loose the oxygen sensor(s)
Grab the 7/8" wrench and slide it on top of the sensor. If you need more leverage, slide a pipe on top. Break loose the oxygen sensor(s), and then remove it by hand.

Step 4 – Prepare the new sensor
Take the new sensor(s) and apply anti-seize onto the threads. Do not let the anti-seize compound touch the actual sensor(s), as it will cause damage.

Step 5 – Install the new oxygen sensor
- Thread the new oxygen sensor in by hand.
- Reconnect the plug to the engine's wire harness.
- Use the 7/8" wrench to quickly torque it down.
- Reset the check engine light and you are finished!

Featured Video: How to Change O2 Sensor
Related Discussions
- Oxygen Sensor Questions - DodgeForum.com
- How Many O2 Sensors Am I Supposed to Have? -DodgeForum.com
- How to Replace O2 Sensor on Ram 1500 - DodgeForum.com