Dodge Ram 1994-2001: How to Replace Serpentine Belt
The serpentine belt in your Dodge Ram is responsible for driving the necessary accessories for proper vehicle operation. While a serpentine belt setup is simple and easily maintained, an overlooked belt can leave you stranded if it breaks. Take a few moments to replace your old belt as it is one of the easiest maintenance items on your truck.
This article applies to the 2nd generation Dodge Ram 1500 (1994-2001).
In years past, vehicles used multiple accessory drive belts driven off of the engine's crankshaft to operate components such as the water pump, alternator, air conditioning compressor, and power steering pump. The development of the serpentine belt (sometimes referred to as a multi-rib or poly-v belt) has allowed engineers to not only reduce the amount of space necessary to drive the accessories, but to increase belt life. A serpentine belt setup as used on the second generation Dodge Ram utilizes a tensioner to maintain proper belt tension and reduce the chances of belt slip on the accessory pulleys. Accompanied with low ratio pulleys, a serpentine belt setup improves fuel economy and reduces the load on the engine compared to a multi-belt setup. Despite all of its advantages, the only negative aspect of a single serpentine belt is that it will render all accessories inoperative if it fails. This mean loss of water circulation through the engine and the loss of power assisted steering, to name a few. Fortunately, serpentine belts are quite robust and are one of the easiest maintenance items on your truck. So if your serpentine belt is looking a bit shagged, or you cannot remember ever replacing your serpentine belt, this DIY will walk you through the steps to quickly replace your belt.

Materials Needed
- 15mm combination wrench, or ratchet/breaker bar with a shallow 15mm socket
- New serpentine belt
Step 1 – Familiarize yourself with belt routing
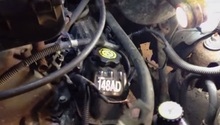
The serpentine belt snakes its way around the accessory pulleys, tensioner, and idler. The belt must be properly routed around these components to ensure proper operation of all accessories. Before removing the belt, familiarize yourself with how the belt is routed by referencing the belt routing diagram, or studying the orientation of the belt on the engine. All trucks came from the factory with a belt routing diagram located in the engine bay.
Figure 1. Typical belt routing diagram location. 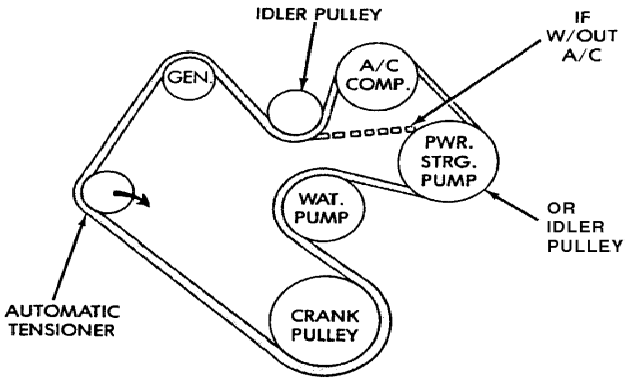
Figure 2. Close-up of routing diagram for 3.9L, 5.2L, and 5.9L engines.
Step 2 – Release tension and remove belt
- On the passenger's side of the engine, place your 15mm wrench or ratchet/breaker bar with a 15mm socket on the belt tensioner bolt. Turn the tensioner clockwise as if tightening the bolt to release tension on the belt.
- While holding the tensioner away from the belt with one hand, slide the loosened belt off of the tensioner pulley.
- Release the tensioner and remove the belt from the remaining pulleys.
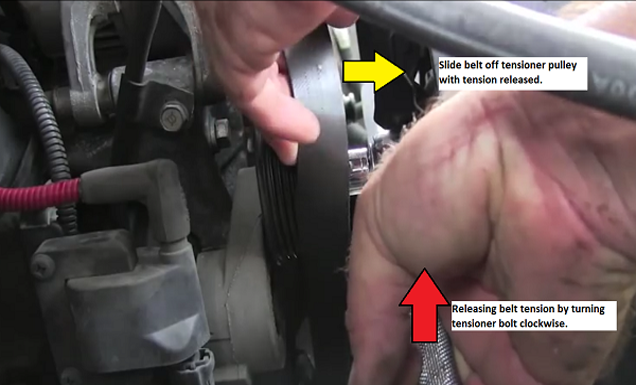
Figure 3. Releasing belt tension. 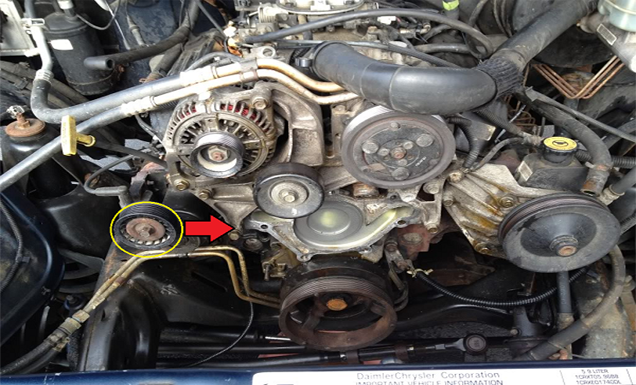
Figure 4. Frontal view of belt tensioner and engine.
Pro Tip
With the belt removed from the engine, it is a good idea to inspect the condition of the tensioner as well as the pulleys, and replace any if necessary.
Step 3 – Install new belt
- Using your belt diagram as a guide, route the new belt around all of the accessory pulleys as they were before, leaving the tensioner pulley for last. Make sure the belt is properly in the groove of each pulley.
- Again, using your 15mm wrench or socket, rotate the tensioner clockwise and slide the belt over the tensioner pulley. With the belt in place, release the tensioner.

Step 4 – Start the truck and check belt operation
With the belt properly in place, start the truck to make sure the belt is running true and is properly centered on each accessory pulley.

Featured Video: Serpentine Belt Replacement
Related Discussions
- Replacing Serpentine Belt - DodgeForum.com
- Serpentine Belt, Belt Tensioner, Idler Pulley - DodgeForum.com
- Serpentine Belt Question - DodgeForum.com