Dodge Ram 1994-2001: How to Replace Water Pump
Don't put off replacing your water pump when it's time. Replacing a water pump is not an easy task, but it can be done on your own.
This article applies to the Dodge Ram 2nd Generation (1994-2001).
The water pump in your truck is one of the most important components of your vehicle. When the water pump goes out, there is no way around replacing it. If you try to drive without a functioning water pump, you won't get very far. The engine will overheat and you'll be looking at one massive repair, if it is even possible to be repaired at this point. Some of the telltale signs of a water pump going bad is what start out as a faint whine, which progressively gets louder. It is easy to mistake the origination of the noise, so a stethoscope is a great tool to help figure it out. There should be very little to no play at all when you try to wiggle the water pump and pulley. If either of these symptoms are present, it's really time to replace the water pump before it leaves you stranded on the side of the road. This is definitely not a cheap repair when you take it to a professional; however, you can save a bundle by tackling this job yourself. While it is not a walk in the park by any stretch of the imagination, if you have a lot of patience, some room, and a decent tool supply, then you can change it out yourself.

Materials Needed
- Radiator drain/flush kit
- Ratchet with various sockets and extensions
- Open-end wrenches
- Plastic putty knife or scraper
- Replacement radiator fluid and distilled water
- Container with lid
Step 1 – Disconnect battery and drain coolant
Disconnect the battery terminals from the battery.
Then, attach a hose to the radiator drain plug and place the other end in a bucket. Drain the fluid completely. This is a good time to flush your radiator prior to putting the new water pump on. This will help ensure that you aren't contaminating the new pump with old nasty sludge.

Figure 1. Disconnect your battery before starting this job. 
Figure 2. Flush the coolant into a container with lid.
Warning
Make sure to wipe up any spills because coolant is slick and deadly to animals.
Step 2 – Remove accessory belt
Use a 15mm socket and wrench on the accessory belt tensioner to create enough slack in the belt to pull it off of all the pulleys. You will be able to pull the belt off without navigating over the fan. You will need to remove the fan shroud and assembly (Step 3), so it's up to you whether or not you do that before or after this step.

Step 3 – Remove the fan shroud and fan assembly
Use a Crescent wrench on the nut of the fan clutch. The threads may be reversed, but check your manual. You will need to hold the old water pump while you wrench on the clutch nut. A strap wrench works well for this task. Before you pull off the fan, remove the bolts from the shroud and the entire assembly can come off at the same time, making this job a little easier.

Step 4 – Remove the alternator
Remove the alternator. Use a 10mm socket to remove the bolt that holds the electrical wire in place. Replace the bolts back into the bracket to keep them organized.
Step 5 – Remove radiator hoses
Remove both the upper and the lower radiator hoses. If you did not flush the radiator in the previous steps, you can remove the entire radiator at this point to give it a good flushing. This is probably a better way of doing it, but it is not necessary.

Step 6 – Remove air conditioning compressor
Remove the four bolts that hold the A/C compressor to the bracket, and then remove the accessory bracket that mounts to the intake manifold. This entire assembly needs to come out. Take care when pulling the bolts. This is a pretty heavy piece of equipment that is coming off. Don't let it drop.

Featured Video: How to Remove A/C Compressor
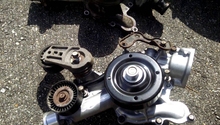
Step 7 – Remove and replace water pump
Once the A/C compressor and accessory bracket come off, you'll have a clean view of the water pump. Remove the return line on the right side of the pump. Remove the five bolts from the front-right of the water pump housing and two from the front-left. Make sure that you keep the bolts in the correct places on the new water pump. Once you remove one bolt from the old pump, place it into the corresponding location on the new pump. Once the pump is pulled, clean the old gasket residue off the mounting plates as clean as possible. You need a good seal with the new pump to ensure you don't have any leaks. Install the new gaskets as well as the new water pump and bolt back on according to manufacturer's torque specifications.

Step 8 – Reassembly
As they always say, installation is the reverse of the removal. With the water pump secured, it's time to put the front end of the car back together.
- Re-install the A/C compressor.
- Re-install the radiator and reconnect the hoses.
- Refit the alternator.
- Re-install the cooling fans and shrouds.
- Install new serpentine belt (why not, you already removed the old one).
- Connect the battery.
- Finally, fill the radiator with coolant and bleed any air from the system by letting the truck run as well as idle with the radiator cap removed.
Featured Video: How to Replace Water Pump
Related Discussions and Video
- DIY Water Pump Replacement - DodgeForum.com
- Water Pump Replacement Dodge 5.9L - YouTube.com
- Replace Water Pump - DodgeForum.com
- Water Pump Going Out - DodgeForum.com
- Water Pump Questions - DodgeForum.com