Dodge Ram 1994-2008: How to Install LED Dash Lights
Are your dash lights to dim for your liking? Then maybe it's time for an upgrade. Here is how to install LED lights into your dashboard.
This article applies to the Dodge Ram 2nd and 3rd Generation (1994-2008).
One of the most charming traits in a new vehicle is the LED dashboard lights. LED bulbs are brighter than incandescent bulbs, but do not get as hot and still retain sharper look. An LED light is also generally more efficient, while still being powerful. So how do you install LED lights into your truck? There is not much work to it. Since LED bulbs use less energy than the standard incandescent ones found in your truck, the stock wires provide more than enough current to sustain the bulbs. Use the following steps to safely upgrade your dashboard bulbs.

Materials Needed
- Trim removal tool
- Needle nose pliers
- Flat head screwdriver
- Philips screwdriver
- Pick or small prying tool
- Razor or hacksaw
- Drill and drill bits
- Wire strippers
- Tape and aluminum foil
- WLED-B5 LED wide angle bulbs (7)
- T1.5-B LED bulb (3)
- 5mm NEO5-B LED bulbs (4)
Step 1 – Remove the bezel and lower dash trim
- Use a trim removal tool to gently and carefully pry out the dashboard bezel around the gauge cluster.

Figure 1. Pry off the dashboard bezel.
- Remove three Phillips screws at the bottom of the driver's side lower dash trim.
- Carefully tug on the trim and remove it.

Step 2 – Disconnect the gear shift cable
- The shift cable is located to the left of the steering column. Twist the cable and pull it down to unhook as well as remove it.
- Flip the ignition switch, but to not crank the engine.
- Place the gear selector into first and engage the parking brake.

Step 3 – Remove the stock gauge cluster lights
- Loosen and remove the four Philips screws on each corner of the gauge cluster.
- Wiggle the gauge cluster and carefully pull it free from the dash, but just enough to access the two wire harness connectors.
- Remove the gauge cluster and face it down to access the factory bulbs.
- There are seven orange bulb sockets and one gray bulb socket on the back side of the gauge cluster. Twist the sockets counterclockwise and pull them out.
Figure 4. Remove the gauge cluster mounting screws. 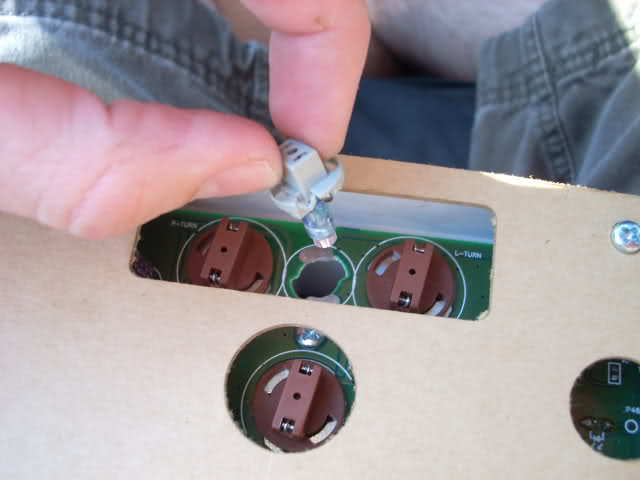
Figure 5. Twist the socket counterclockwise to unlock it.
Step 4 – Install the gauge cluster LED lights
- Pull out the stock light bulb from the gray socket.
- Bend the prongs of a new T1.5-B LED bulb upwards, but just enough for them to make contact with the metal brackets inside of the gray socket.
- Then snap the LED bulb into the socket, and install it to the gauge cluster.
Replacing the other seven bulbs follows a different procedure.
- Use a pick or small prying tool to push the prongs of the stock bulb on the back of the orange socket.
- Then pull the bulb out. If it's difficult to remove, use needle nose pliers to pull out the two metal tabs on each side of the socket. Set the tabs aside and be careful not to lose them.
- Insert the prongs of a new WLED-B5 LED wide angle bulb into the socket until you see the prongs exit the opposite end of the socket.
- Use the pick or small prying tool to bend the prongs inward, facing down into the socket.

Figure 6. Straighten the LED bulb contacts. 
Figure 7. LED bulb plugged into the socket. 
Figure 8. Push contacts of the stock bulb.
- Slide the two metal tabs back into the socket.
- Follow this procedure with the other six lights.
- Once all the LED bulbs are installed, reattach the two wire harness connectors to the gauge cluster. The new LED lights should turn on.
- If all the LED lights are working, secure the gauge cluster to the dash with the four Phillips screws.
- Re-install the gear shift cable.

Figure 9. Remove the metal locking tabs if necessary. 
Figure 10. Install the new LED bulb. 
Figure 11. Bend the LED bulb contacts.
Step 5 – Install the headlight switch LED lights
- Use the Philips screwdriver to remove three screws around the headlight switch housing.
- Use a flat head screwdriver to push down on the tabs of the wire harness connector, and then unplug it.
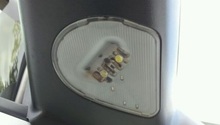
- Connected to a gray socket on the back side of the switch housing is a pair of black and white wires. Use a flat head screwdriver to twist the socket to the left and then pull it out.
- Pull out the stock bulb from the socket.
- Use a razor or hacksaw to shorten the socket to about half its normal length.
- Then, drill into the socket to widen it and make room for the new LED bulb.
- Cut and splice the two wires connected to a new 5mm NEO5-B LED bulb.
- Re-install the wire plugs.
- Then mount the headlight switch back to its location.

Figure 12. Remove the headlight switch housing. 
Figure 13. Headlight switch LED bulb installed.
Step 6 – Install the climate control LED lights
- Use the Philips screwdriver to remove four mounting screws holding the climate control unit in place, and then pull it out.
- Twist and remove two gray sockets from behind the unit.
- Install a new T1.5-B LED bulb to each socket, and re-install them to the unit.
- Cautiously remove the unit's front cover panel using the pry tool. Be careful not to lose the springs holding the climate control buttons in place.
- For extra lighting, splice two more 5mm NEO5-B LED bulb into the climate control wiring.
- Tape aluminum foil to the inside panel of the unit, and then re-install the cover.
- Mount the climate control unit into the car, and tighten the four mounting screws.

Figure 14. Remove the two twist-lock bulb sockets. 
Figure 15. Remove the climate control face panel. 
Figure 16. Cover inside of climate control unit with foil, and wire the extra LED bulbs.
Step 7 – Install the storage hole LED light (optional)
The previous steps cover all 2nd generation Dodge Ram models, but some Ram trucks have a pre-installed cubby located to the right of the stereo head unit. Installing an LED light into the cubby is optional.
- Loosen as well as remove the three Philips mounting screws around the cubby, and then remove it.
- Drill a hole in the center rear face of the cubby. Make sure it is tight enough to mount the new LED bulb.
- Splice a new 5mm NEO5-B LED bulb into one of the dashboard's light power supply wires.
- Glue the bulb's housing into the drilled hole.
- Re-install the cubby to the dashboard and tighten its three Phillips mounting screws.
- Lastly, snap on the bezel and trim panel.

Figure 17. Mount LED bulb to the cubby. 
Figure 18. Blue LED dashboard lights installed.
Related Discussion
- Ladies and Gentlemen! The LED Dash DIY Instructions! - DodgeForum.com