

P0455 P0442 evap evaporative emissions leak fix
#1
 09-18-2010, 10:09 PM

so my check engine light has been on for a long time. it started as a P0442 small leak, then changed to a P0455 large leak.
i replaced the gas cap, no help.
i cut the ends off two dried out/split hoses at the purge solenoid. no help.
felt around the top of the canister. can't really see anything. felt ok.
replaced the purge solenoid. no help.
tried ignoring it for several months. no help.
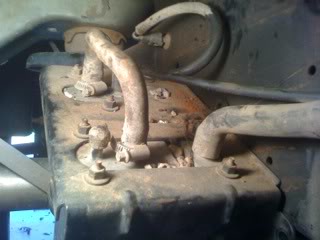
so today i tilted the canister down so i could see it. the smaller 5/16" hose on top was split on both ends. i replaced it and that should fix it.
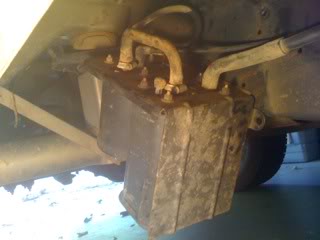
the canister bracket had 2 bolts on the rear side, 1 on the front, and 1 on the top that you cannot see, but have to feel for it.
remove the bolt on the top and throw it away.
remove 1 of the rear bolts and loosen the other.
remove the front bolt.
tilt the canister down in the front.
the 5/16 hose connects the canister to the hard line from the tank and its about 8-10 inches long.
canister bracket tilted down in the front.
hoses in place.
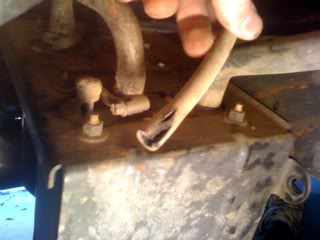
a-ha. i think i see the problem.
edit 01/10/12. that was one problem, here's 2 more.
edit 03/09/12. CEL has been off for 2 months. I'm calling this done.
finally got around to replacing all the rest of the hoses.
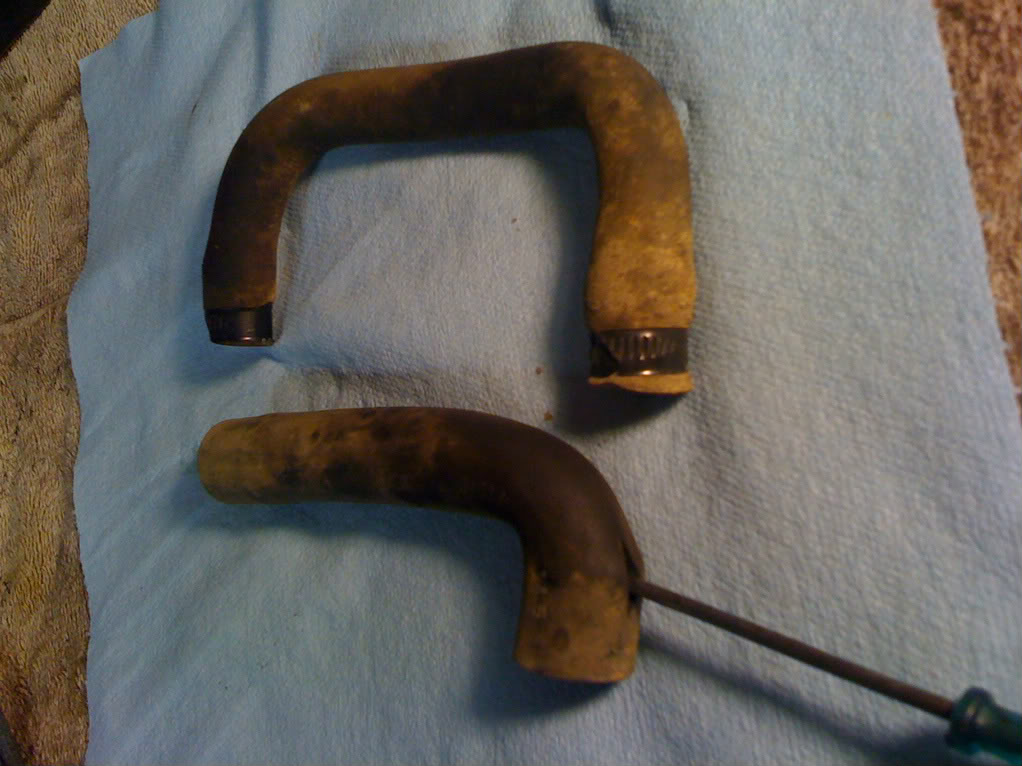
1 of the 2 big hoses on the canister was split in the curve. i didn't see it before. and another of the little ones was split at the purge valve.
big hose at evap with split.
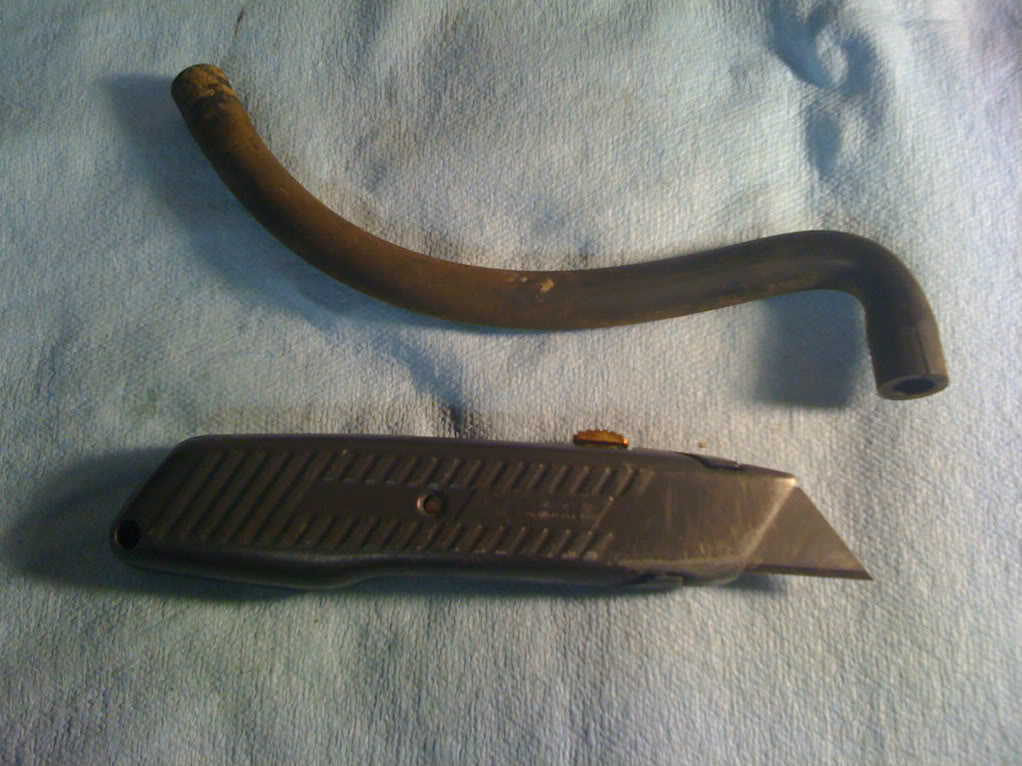
when removing old hoses, rather than fight them and risk breaking the tee's, use a utility knife to slice them lengthways and peel them off like a banana peel. careful - these damn things are sharp and will cut the tee, or your finger, or both.
i replaced the gas cap, no help.
i cut the ends off two dried out/split hoses at the purge solenoid. no help.
felt around the top of the canister. can't really see anything. felt ok.
replaced the purge solenoid. no help.
tried ignoring it for several months. no help.
so today i tilted the canister down so i could see it. the smaller 5/16" hose on top was split on both ends. i replaced it and that should fix it.
the canister bracket had 2 bolts on the rear side, 1 on the front, and 1 on the top that you cannot see, but have to feel for it.
remove the bolt on the top and throw it away.
remove 1 of the rear bolts and loosen the other.
remove the front bolt.
tilt the canister down in the front.
the 5/16 hose connects the canister to the hard line from the tank and its about 8-10 inches long.
canister bracket tilted down in the front.
hoses in place.
a-ha. i think i see the problem.
edit 01/10/12. that was one problem, here's 2 more.
edit 03/09/12. CEL has been off for 2 months. I'm calling this done.
finally got around to replacing all the rest of the hoses.
1 of the 2 big hoses on the canister was split in the curve. i didn't see it before. and another of the little ones was split at the purge valve.
big hose at evap with split.
when removing old hoses, rather than fight them and risk breaking the tee's, use a utility knife to slice them lengthways and peel them off like a banana peel. careful - these damn things are sharp and will cut the tee, or your finger, or both.
Last edited by dhvaughan; 03-09-2012 at 10:48 PM.
The following users liked this post:
Mags PH (01-07-2024)

#3
09-19-2010, 08:49 PM

Amateur
Join Date: Apr 2010
Location: Mass.
Posts: 44
Likes: 0
Received 0 Likes
on
0 Posts
On a ext cab, they will be bellow the passenger rear door mounted to the frame.
I will also suggest, as I will be doing this once I replace my canisters because theyre junk, if you do any sort of wheeling, make a protective skid plate. I ruined mine by hitting them while wheeling once. I will post pictures off how I will be doing mine.
I will also suggest, as I will be doing this once I replace my canisters because theyre junk, if you do any sort of wheeling, make a protective skid plate. I ruined mine by hitting them while wheeling once. I will post pictures off how I will be doing mine.
#4
09-24-2010, 09:38 PM
#5
09-25-2010, 01:29 AM
Professional
Join Date: Aug 2010
Location: Rhode Island
Posts: 136
Likes: 0
Received 0 Likes
on
0 Posts
#7
09-25-2010, 08:56 AM
Trending Topics
#8
09-25-2010, 09:10 AM
from the 01 service manual. damn what a complicated setup.
LEAK DETECTION PUMP MONITOR (IF EQUIPPED)
The leak detection assembly incorporates two primary
functions: it must detect a leak in the evaporative
system and seal the evaporative system so the
leak detection test can be run.
The primary components within the assembly are:
A three port solenoid that activates both of the functions
listed above; a pump which contains a switch,
two check valves and a spring/diaphragm, a canister
vent valve (CVV) seal which contains a spring loaded
vent seal valve.
Immediately after a cold start, between predetermined
temperature thresholds limits, the three port
solenoid is briefly energized. This initializes the
pump by drawing air into the pump cavity and also
closes the vent seal. During non test conditions the
vent seal is held open by the pump diaphragm
assembly which pushes it open at the full travel position.
The vent seal will remain closed while the
pump is cycling due to the reed switch triggering of
the three port solenoid that prevents the diaphragm
assembly from reaching full travel. After the brief
initialization period, the solenoid is de-energized
allowing atmospheric pressure to enter the pump
cavity, thus permitting the spring to drive the diaphragm
which forces air out of the pump cavity and
into the vent system. When the solenoid is energized
and de energized, the cycle is repeated creating flow
in typical diaphragm pump fashion. The pump is controlled
in 2 modes:
Pump Mode: The pump is cycled at a fixed rate to
achieve a rapid pressure build in order to shorten the
overall test length.
Test Mode: The solenoid is energized with a fixed
duration pulse. Subsequent fixed pulses occur when
the diaphragm reaches the Switch closure point.
The spring in the pump is set so that the system
will achieve an equalized pressure of about 7.5� H20.
The cycle rate of pump strokes is quite rapid as the
system begins to pump up to this pressure. As the
pressure increases, the cycle rate starts to drop off. If
there is no leak in the system, the pump would eventually
stop pumping at the equalized pressure. If
there is a leak, it will continue to pump at a rate representative
of the flow characteristic of the size of the
leak. From this information we can determine if the
leak is larger than the required detection limit (currently
set at .040� orifice by CARB). If a leak is
revealed during the leak test portion of the test, the
test is terminated at the end of the test mode and no
further system checks will be performed.
After passing the leak detection phase of the test,
system pressure is maintained by turning on the
LDP�s solenoid until the purge system is activated.
Purge activation in effect creates a leak. The cycle
rate is again interrogated and when it increases due
to the flow through the purge system, the leak check
portion of the diagnostic is complete.
The canister vent valve will unseal the system
after completion of the test sequence as the pump
diaphragm assembly moves to the full travel position.
Evaporative system functionality will be verified by
using the stricter evap purge flow monitor. At an
appropriate warm idle the LDP will be energized to
seal the canister vent. The purge flow will be clocked
up from some small value in an attempt to see a
shift in the 02 control system. If fuel vapor, indicated
by a shift in the 02 control, is present the test is
passed. If not, it is assumed that the purge system is
not functioning in some respect. The LDP is again
turned off and the test is ended.
#9
09-25-2010, 09:33 AM
from another site. a little more in english.
Evaporative Leak Detection Pump
Part Description
The Evaporative Leak Detection Pump is a bellows like pump that is
used to build vacuum in the Evaporative Control (EVAP) System each
time the self-diagnostic leak check is performed by the Power Train
Module or PCM.
System Overview
The Evaporative Control (EVAP) System captures any raw fuel evaporating
from the fuel storage system (e.g. the fuel tank, the filler neck, and fuel cap).
Under precise operating conditions dictated by engine temperature, speed, and load,
the EVAP system stores and purges these captured fuel vapors back into the combustion
process.
How Parts Functions In The System
The Evaporative Control System is designed to not only capture, store and purge any
raw fuel vapors that leak from any areas of the Fuel Storage System but also to run
a series of self-tests that confirm or deny the Operational and Vapor Holding ability
of the System.
The Evaporative Leak Detection Pump or LDP uses engine vacuum to operate a bellows like
pump to build vacuum in the EVAP System after the Canister Vent Valve has been closed to
seal the system from any outside air during a leak test. The LDP uses a diaphragm that
changes shape as the vacuum builds. When the desired amount of vacuum has been reached,
the diaphragm opens a set of electrical contacts that disables the the LDP and prevents
the vacuum from building any further. Then the PCM starts a timer and monitors the time
that it takes for the vacuum to decay to the point where the electrical contacts close
again. If the electrical contacts close too soon, the PCM knows that there is a problem
with the performance of the EVAP System that could trigger a fault code and illuminate the
Check Engine Light.
There are many ways for vehicles to 'leak test' the Evaporative System, but most perform
the leak test either when the vehicle is sitting, say over night, or shortly after initial
start up after the vehicle has been sitting over night. The Evaporative Systems operational
performance is also tracked by the Power Train Computer by reading the change in the Oxygen
Sensor voltages and Short Term Fuel Trim when ever the stored Vapors are released or 'purged'
back into the combustion process. These values should indicate that fuel is being added to
the system and that the over all mixture is getting richer. The purging process occurs when
the vehicle is under acceleration, which is when most vehicles require additional fuel.
#10
09-25-2010, 09:42 AM
more copy/paste from other places.
Common misconception: The EVAP system is a useless addition and is only for "Smog" reasons...FALSE. The EVAP system actually saves the fuel that you spent your hard earned money on. It captures all the vapors and stores them in the EVAP canister to be introduced into the combustion chamber (via the intake). So...does it waste money...nope (and it also keeps the hydrocarbons out of our air).
After you have done a repair on the EVAP system and reset/cleared the codes, it can take up to 1700 - 4200 minutes for the EVAP monitors to run (Engine OFF/Key OFF). They start after the first 10 minutes of turning the vehicle off and can take up to 60 minutes to start running. First, the small leak detection monitor will run...if it passes - done deal. If not, the medium leak and then the large leak monitors will run. However...during this time, driving the vehicle will turn the monitors OFF - they won't run while you're driving and you'll have to wait again until they turn on. Park the vehicle for at least a day or two, after you've done your repair and driven the vehicle a little bit, in order to let it run the LDP (or NVLD) test and then the monitors.
The purge monitors are a different story, they will only run at specific running conditions and if you reset the PCM at anytime during this process...you're back to square one. The conditions vary from vehicle to vehicle so there's no 100% correct answer without looking at the actual monitor pre-test conditions on the DRB and making sure that it's within those parameters. Also, when you think you're "just clearing the codes"...you're also clearing the monitor data which puts you right back to square one. Now, if you clear the monitors...you may have to wait even longer as some monitors (O2 and Fuel) need to run sooner in some cases and can cause the EVAP monitors to be delayed (that's where the 4200 minutes comes into play). Be careful what you do.
Check ALL of the vacuum hoses for leaks. If you see ANY cracks in the lines, replace them as the system will detect up to a .010-.020" leak (that's small). The best test is to watch the LDP (or NVLD) switch from closed to open with a vacuum pump (1" H20 is all that's required to change the switch). DON'T run the vacuum test from the fuel tank cap either - it's not a proper test to find a leak. You'll need to know which system is on your truck though - LDP is standard on up to most early 2000 models with NVLD on most all newer vehicles.
A gas cap will NOT cause this problem. That would be detected with a P0456 code (Small Leak) and sometimes with a Medium Leak...unless you left the cap completely off. P0440 is a General EVAP Performance Failure and a P0441 is a EVAP Purge Performance issue. It's also NOT going to be the EVAP Filter as it's on the opposite side of the system that's actually failing (P0440). From experience with these hard to diagnose issues - it'll either be a cracked line(s), the LDP/NVLD, Purge Solenoid, or the actual EVAP can that has been fuel soaked from "topping off" the tank. You'll have to do the leg work and proper tests to verify it.
Hope that helps get the myths out of the P0440 code (it's NOT a gas cap) and i've seen the code come back after several months myself by people who thought it was a gas cap.
A trained technician can test and repair the system rather easily...the first time. I've seen too many "parts changers" that don't and all the customer gets is a large bill and more "Check Engine" lights. Even if they show you an EELD Machine...while it is a nice piece of equipment and does work in most cases...a simple Mighty-Vac Pump and a cup of water will work to test the NVLD/LPD system and vacuum lines. If they don't know how to use those simple tools to test the system...go somewhere else and save your money and Tylenol.
BTW:
LDP = Leak Detection Pump
NVLD = Natural Vacuum Leak Detection Pump
1" H2O does not equal 1" HG

