
Anyone replaced the NV2500 with NV3500
#1
 05-27-2017, 07:51 PM


Im in the middle of doing this swap and have run into an unexpected snag.
There is a part called the Pinion nose adapter (part no. 04728698)
This part bolts to the engine block with 2 bolts, The front differential with 2 bolts, and then the transmission with 2 bolt.
My problem is the bolt pattern on the transmission is different.
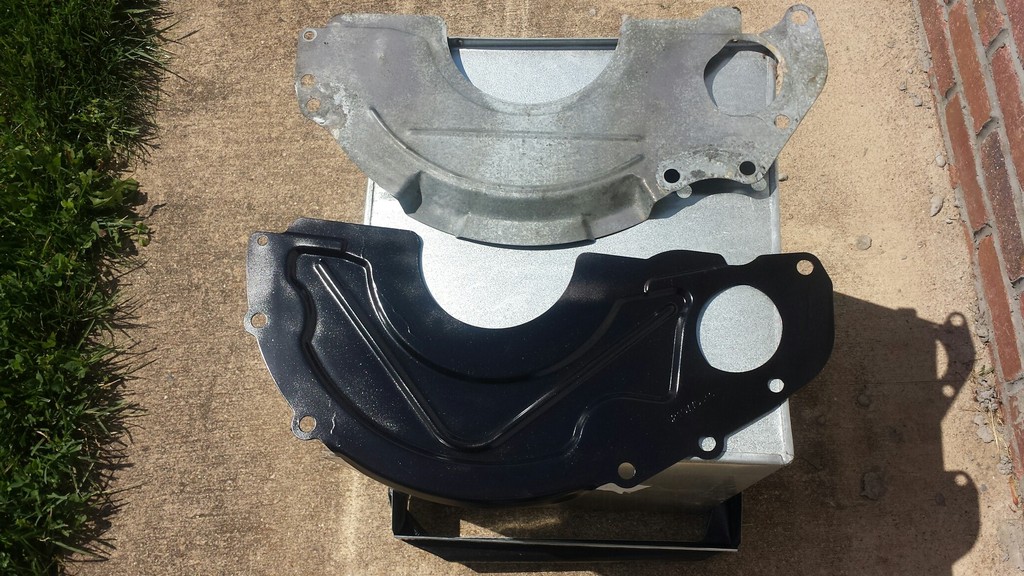
Below is a picture of the two bellhousing covers and directly below the starter you can see where the adapter was mounted
The black cover (NV3500) has a different bolt pattern.
Has anyone else ran into this?
I believe this is a unique problem that would only apply to the NV2500 and 4wd.
Any suggestions are appreciated
Hopefully Ragged89 will see this!!
The part is no. 7 below
http://www.factorychryslerparts.com/...rimLevel=20741
There is a part called the Pinion nose adapter (part no. 04728698)
This part bolts to the engine block with 2 bolts, The front differential with 2 bolts, and then the transmission with 2 bolt.
My problem is the bolt pattern on the transmission is different.
Below is a picture of the two bellhousing covers and directly below the starter you can see where the adapter was mounted
The black cover (NV3500) has a different bolt pattern.
Has anyone else ran into this?
I believe this is a unique problem that would only apply to the NV2500 and 4wd.
Any suggestions are appreciated
Hopefully Ragged89 will see this!!

The part is no. 7 below
http://www.factorychryslerparts.com/...rimLevel=20741
#2
05-27-2017, 09:21 PM

#3
05-28-2017, 06:28 AM
The transmission came out of a 2002-2003 (cant remember which) 4.7 quad cab.
I did not get the cover for the clutch, so I ordered this one on line.
http://www.ebay.com/itm/322262778600...%3AMEBIDX%3AIT
I thought all NV3500 (dakota) were the same, but something is wrong.
Ragged89, Im glad you answered, you are the only one I can think of that has replaced a nv2500 4wd with the nv3500.
Ill do some research and then look at it again this afternoon.
Hopefully one bolt (top) will align, and then I could cut a tab for the bottom and weld it up.
Thanks again.
#4
05-28-2017, 04:44 PM
As far your NV3500's bellhousing, are the mounting holes in the same place, other than maybe the engine/trans/axle bracket holes? From what I've read, the mounting holes should be the same, except for the top center hole.
If you need pics or something let me know. I think I'd do as you suggested and see if the one bracket hole will line up, then modify for the other one.
If you need pics or something let me know. I think I'd do as you suggested and see if the one bracket hole will line up, then modify for the other one.
Last edited by ragged89; 05-28-2017 at 09:15 PM.
#5
06-01-2017, 07:51 AM
As far your NV3500's bellhousing, are the mounting holes in the same place, other than maybe the engine/trans/axle bracket holes? From what I've read, the mounting holes should be the same, except for the top center hole.
If you need pics or something let me know. I think I'd do as you suggested and see if the one bracket hole will line up, then modify for the other one.
If you need pics or something let me know. I think I'd do as you suggested and see if the one bracket hole will line up, then modify for the other one.
Hey Ragged89,
Sorry for the delayed response. The actual engine mounts are in the same place and the transmission is bolted in.
Below are pictures showing the mount and what I ended up doing.
This is how it aligned

I welded a tab on the mount and with a die grinder opened the one hole

Here is the mount fininshed. I tried to fill in the orig. holes and then painted it. As you can see, my welding skills are somewhat lacking!!

Hopefully will get a chance to put it on in the next few days.
#6
06-02-2017, 01:35 AM
I don't see a thing wrong with that job, looks like you've got the first adapter bracket to mate a 4.7 4x4 NV to a Magnum!
Did you wind up with two mounting holes hanging out passed the rear edge of the trans mount, like I did? I still need to do something about that on mine, I've currently got only two of the four mounting holes bolted up (the front two).
Did you wind up with two mounting holes hanging out passed the rear edge of the trans mount, like I did? I still need to do something about that on mine, I've currently got only two of the four mounting holes bolted up (the front two).
#7
06-02-2017, 06:30 AM
I don't see a thing wrong with that job, looks like you've got the first adapter bracket to mate a 4.7 4x4 NV to a Magnum!
Did you wind up with two mounting holes hanging out passed the rear edge of the trans mount, like I did? I still need to do something about that on mine, I've currently got only two of the four mounting holes bolted up (the front two).
Did you wind up with two mounting holes hanging out passed the rear edge of the trans mount, like I did? I still need to do something about that on mine, I've currently got only two of the four mounting holes bolted up (the front two).
Here is the mount I made for the rear of the transmission. The orig. is 3/8 thick, and I did not have any 3/8 metal. I made it out of 1/4 and will probably replace it when I do the 5.9 magnum, in time
What I did was cut a piece of metal about 5 x 14 and then laid the orig. 4 bolt mount that came with the NV3500 on it. Marked and drilled holes. Bolted that to transmission, lowered on crossmember and marked the holes for the rubber mounts. Those are larger then 1/2 which is as large of a drill bit that I have. So after drilling it with the 1/2 I used a die grinder to finish the hole. Used a chop saw and a circular saw with a fiber blade to shape. Not hard, just time consuming.

Here it is installed

Last edited by 93 ragtop; 06-02-2017 at 06:35 AM.