Dodge Ram 1999-2001: How to Replace Headlamp Relay
One can never have too much light on a dark night. Learn how to replace the headlamp relays here.
This article applies to the Dodge Ram (1999-2001).
Manufacturers equip vehicles with all sorts of lighting. The important ones are the headlights – both low-beam and hi-beam. Some vehicles even come with "fog" lights which are a separate, additional lighting feature on many vehicles usually mounted on the lower edge of the bumpers. The stock halogen lighting on many vehicles today usually has satisfactory light output. One could certainly benefit from "brighter" light output especially if they drive at night a lot. Relays are great for this purpose because they can direct the power to fuses and wiring to the lights from the battery instead of coming from the minimal power the standard "light switch" provides.

Materials Needed
- Wire crimping tool
- Two 30A relays
- Two single fuse holders
- Two 9004/9007 head light harnesses
- Two 15A fuses
- 12, 14 & 16 gauge wire
- Wire cutters
- Wire connectors
- Solder
- Electrical tape
Step 1 – Determine relay location and prep
You'll want to determine where you want to place both relays. Commonly used is the frame rail near headlight housing and battery.
- Place relays on frame rails and loosely bolt in.
- Disconnect low beam bulbs from harnesses.
- Original head light harnesses can be disconnected and set aside at this time.

Pro Tip
You can wire tie the old headlight harness off to the side and out of view. After setting up the relays, they will no longer be used.
Step 2 – Wire low beams to first relay
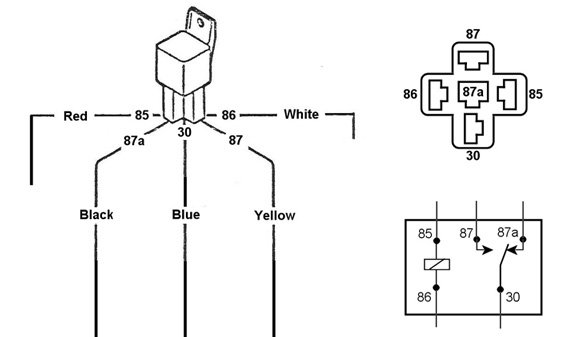
Now that the first relay is in its general mounting location, it can be wired up to the low beams. There are four terminals on the bottom of the relays to consider: 30, 85, 86, and 87.
- Cut center wire on old harness and use 16 gauge wire to connect it to post #86.
- Cut black wire on new harness and use 14 gauge wire to ground to a place on the frame rail (to ground harness).
- Cut purple wire on old harness and connect to post #85 (to ground first relay).
- Connect 12 gauge wire to battery's positive terminal.
- Splice in two lengths of 14 gauge wire (one for each relay).
- Connect a fuse holder to one end of 14 gauge wire and connect to post #30.
- Run 14 gauge wire from post #87.
- Connect center wire on new harness and connect to wire running from post #87.
- Insert bulbs into harness and connect to the housings.
- Insert 15A fuse into fuse holder.
- Repeat above steps for other low beam.
Step 3 – Wire second relay for high beams
Now that the low-beams are wired up with new harnesses, fuses and the relay, the hi-beams can be addressed.
- Using the remaining wire on the new harnesses (right wire should be purple), connect them together.
- Connect the other 14 gauge wire coming off the previously created battery splice to a fuse holder.
- Connect other end of fuse holder wire to post #30 on the second relay.
- Insert 15A fuse in fuse holder.
- Insert bulb into harness and connect back into housing.
Pro Tip
Make certain that every "connection" made was made with solder and then covered with a connector as well as electrical tape.
Step 4 – Test
Let there be light!
- Turn the headlight switch on.
Pro Tip
You may hear the relays make a "click" sound.
Related Discussion
- DIY: Headlight Relay Wiring - Dodgeforum.com