

DIY Rust Proofing with POR-15

Thread Starter
|
Record Breaker
Joined: Feb 2008
Posts: 1,058
Likes: 7
From: Chicago, IL
This thread will be specific to my engine, however, the process is the same for mostly anything you paint with POR-15, but your topcoat can change depending on application.
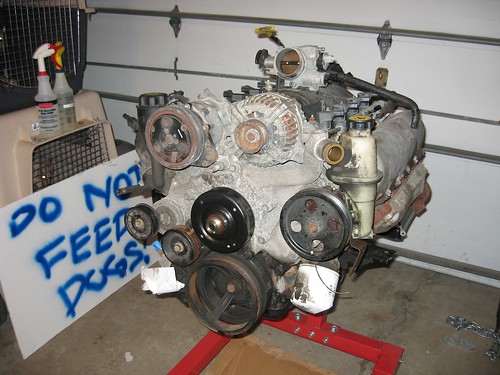
Before...
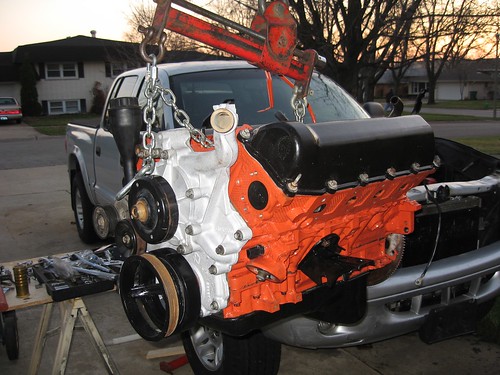
After...
I wanted to try out the POR-15 engine enamel on my 4.7L PowerTech engine, so I will try to outline what I did to prep my engine and paint it. First, the supplies you will need to get are as follows: POR-15 engine enamel (your choice of color), POR-15 paint (different colors cover differently), Metal Ready (by POR-15), and a degreaser such as Marine Clean (also by POr-15) or I used brake cleaner on some parts, paint brushes, paint stirrer, rubber gloves would be a good idea, a drop cloth, wire brushes and scrapers to do your prep, and some mason jars if you plan on saving your left over paint.

Here is the type of paintbrush I used, a cheap one for $1.29 from Sears.
First, start of by degreasing the part or engine enough to be able to scrape the loose metal and flaking rust off. POR-15 claims to not need a lot of prep work to cover, but if anything is flaking off or if there is a lot of pitting, the paint will not be able to level off over these areas and the pitting texture will show through. I used a combination of wire brushes by hand, wire wheels on my angle grinder, and my favorite was a 1” thin wire brush for my electric drill. Spend enough time to get down to a good metal surface, this surface doesn’t have to be rust free metal, just solid metal that is not going to flake off and an even enough surface for the POR-15 to level over if you are worried about looks.
Next, you are going to want to degrease as well as get the excess dust off from your wire brushing. I used brake cleaner on my engine on the really greasy parts, and then I used the Marine Clean by POR-15 after. Mix the Marine Clean as stated on the directions with the bottle.
After the degreasing you can move onto the Metal Prep. It also needs to be diluted down per the directions on the bottle. I used the spray bottle provided by POR-15 to mix it in and apply it. I wet down my entire engine block and let it sit for 20 minutes, spraying it 3 more times within those 20 minutes to keep it wet. After 20 minutes, I took a spray bottle full of plain tap water and sprayed the block down to rinse off the excess Metal Ready. I kept spraying until the drops of water falling from the block were clean and no longer cloudy. As the water dried off of the block the treated metal formed a whitish colored haze over it. Let the block or part dry completely. After dry, get some tape, newspaper, plastic, or whatever, and cover up or tape off any parts of the block or part you don’t want to get paint on. Keep in mind this is not normal paint, it is much harder to be removed, so unless you are planning on cleaning out every threaded hole on your block, or scraping it off of every gasket sealing surface, tape it off. This paint is no joke, and in some instances I ended up resorting to an angle grinder with a scouring pad on it or wire wheel to remove the POR-15. The razor blades didn’t even want to take everything off.
Now for the fun messy part. I put a drop cloth down on the garage floor and put on my gloves. Open the can of POR-15, in this case I am using black, and stir. There are warnings all over not to shake their paint, so I stirred it for a good 2 minutes with a paint stirrer to make sure I got it good and mixed. Using a cheapo paint brush from the local Sears I started painting. Coverage is good with the POR-15 in my opinion, so just paint it on even and be careful to avoid going to heavy and getting drips. I waited for the POR-15 to dry enough to the point where I could drag my finger over it and not get paint on it, but the paint was just slightly resistant to me pulling my finger over it then I did my second coat. Between waiting for coats I covered the can back up and threw away the paint brush, using a new one for the second coat. Second coat was the same as the first. After it dried to the point of just having a slight finger drag when I touched it, I should have started with the engine enamel, unfortunately I had been working all day and it was about 2 a.m. and I fell asleep. So waking up the next morning the POR-15 had dried completely and had a smooth glass like finish to it. I took a Scotch-Brite pad and rubbed down the entire block, scouring the surface of the POR-15. A little hint here is to pay extra attention to the sharp edges or corners when you are roughing up the POR-15 surface as these were the areas I had the hardest time getting coverage on.
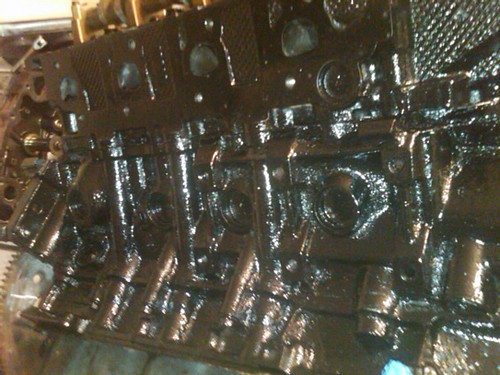
Above is the block with the 2 coats of POR-15. Covered very well. Durable stuff.
Painting with the actual engine enamel wasn’t as easy as I had hoped. I did 3 coats to get the coverage I was happy with. This was probably because I didn’t start with the POR-15 being tacky I’m guessing. If I had to do it again I would make sure I started the enamel at the time where the POR-15 had a slight finger drag. I chose hemi-orange for the color as you can tell. All threaded hole and grounding wire locations will be cleaned of paint before installation. The photo shown below is after the first coat. You can see the holes in the coverage. Plan on putting on a few coats, waiting approximately 24 hours between coats.
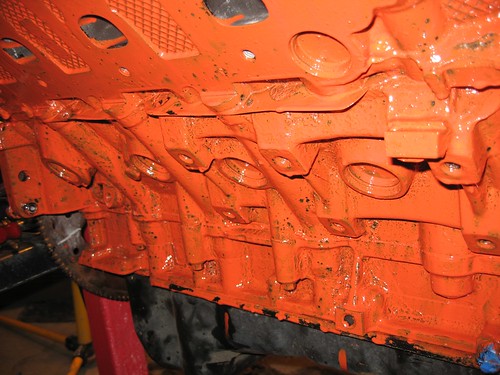
This is after one coat of engine enamel. You can see the black still showing through.
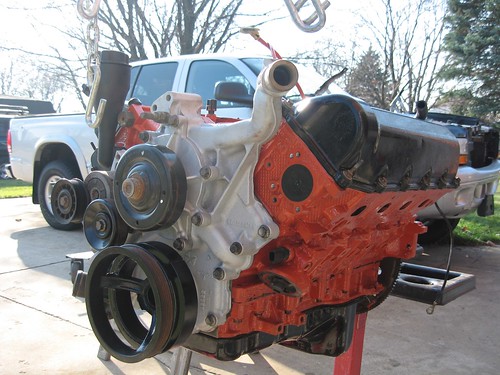
Below is a photo of the coverage after all the coats, cleaning, and accessories being put back on. The oil pan and valve covers are POR-15 top coated with black engine enamel. The aluminum was cleaned, primes with engine primer or Rust-O-Leum red primer and top coated with rattle can “cast aluminum” paint. I painted the dampener/main pulley with engine primer then black rattle can engine enamel.
If you would like more information, the POR-15 website has directions for every product they make posted at the following link: http://www.por15.com/quickindex.asp. Overall, I loved the stuff, and I am happier with the finish the POR-15 engine enamel gave the engine and parts than what I got with primer and rattle cans on my 318 Magnum. Long term, I think the POR-15 is also a better choice. When you cover something with it, it really bonds to the metal. The prep time and prep work were also a lot less with the POR-15.
Before...
After...
I wanted to try out the POR-15 engine enamel on my 4.7L PowerTech engine, so I will try to outline what I did to prep my engine and paint it. First, the supplies you will need to get are as follows: POR-15 engine enamel (your choice of color), POR-15 paint (different colors cover differently), Metal Ready (by POR-15), and a degreaser such as Marine Clean (also by POr-15) or I used brake cleaner on some parts, paint brushes, paint stirrer, rubber gloves would be a good idea, a drop cloth, wire brushes and scrapers to do your prep, and some mason jars if you plan on saving your left over paint.
Here is the type of paintbrush I used, a cheap one for $1.29 from Sears.
First, start of by degreasing the part or engine enough to be able to scrape the loose metal and flaking rust off. POR-15 claims to not need a lot of prep work to cover, but if anything is flaking off or if there is a lot of pitting, the paint will not be able to level off over these areas and the pitting texture will show through. I used a combination of wire brushes by hand, wire wheels on my angle grinder, and my favorite was a 1” thin wire brush for my electric drill. Spend enough time to get down to a good metal surface, this surface doesn’t have to be rust free metal, just solid metal that is not going to flake off and an even enough surface for the POR-15 to level over if you are worried about looks.
Next, you are going to want to degrease as well as get the excess dust off from your wire brushing. I used brake cleaner on my engine on the really greasy parts, and then I used the Marine Clean by POR-15 after. Mix the Marine Clean as stated on the directions with the bottle.
After the degreasing you can move onto the Metal Prep. It also needs to be diluted down per the directions on the bottle. I used the spray bottle provided by POR-15 to mix it in and apply it. I wet down my entire engine block and let it sit for 20 minutes, spraying it 3 more times within those 20 minutes to keep it wet. After 20 minutes, I took a spray bottle full of plain tap water and sprayed the block down to rinse off the excess Metal Ready. I kept spraying until the drops of water falling from the block were clean and no longer cloudy. As the water dried off of the block the treated metal formed a whitish colored haze over it. Let the block or part dry completely. After dry, get some tape, newspaper, plastic, or whatever, and cover up or tape off any parts of the block or part you don’t want to get paint on. Keep in mind this is not normal paint, it is much harder to be removed, so unless you are planning on cleaning out every threaded hole on your block, or scraping it off of every gasket sealing surface, tape it off. This paint is no joke, and in some instances I ended up resorting to an angle grinder with a scouring pad on it or wire wheel to remove the POR-15. The razor blades didn’t even want to take everything off.
Now for the fun messy part. I put a drop cloth down on the garage floor and put on my gloves. Open the can of POR-15, in this case I am using black, and stir. There are warnings all over not to shake their paint, so I stirred it for a good 2 minutes with a paint stirrer to make sure I got it good and mixed. Using a cheapo paint brush from the local Sears I started painting. Coverage is good with the POR-15 in my opinion, so just paint it on even and be careful to avoid going to heavy and getting drips. I waited for the POR-15 to dry enough to the point where I could drag my finger over it and not get paint on it, but the paint was just slightly resistant to me pulling my finger over it then I did my second coat. Between waiting for coats I covered the can back up and threw away the paint brush, using a new one for the second coat. Second coat was the same as the first. After it dried to the point of just having a slight finger drag when I touched it, I should have started with the engine enamel, unfortunately I had been working all day and it was about 2 a.m. and I fell asleep. So waking up the next morning the POR-15 had dried completely and had a smooth glass like finish to it. I took a Scotch-Brite pad and rubbed down the entire block, scouring the surface of the POR-15. A little hint here is to pay extra attention to the sharp edges or corners when you are roughing up the POR-15 surface as these were the areas I had the hardest time getting coverage on.
Above is the block with the 2 coats of POR-15. Covered very well. Durable stuff.
Painting with the actual engine enamel wasn’t as easy as I had hoped. I did 3 coats to get the coverage I was happy with. This was probably because I didn’t start with the POR-15 being tacky I’m guessing. If I had to do it again I would make sure I started the enamel at the time where the POR-15 had a slight finger drag. I chose hemi-orange for the color as you can tell. All threaded hole and grounding wire locations will be cleaned of paint before installation. The photo shown below is after the first coat. You can see the holes in the coverage. Plan on putting on a few coats, waiting approximately 24 hours between coats.
This is after one coat of engine enamel. You can see the black still showing through.
Below is a photo of the coverage after all the coats, cleaning, and accessories being put back on. The oil pan and valve covers are POR-15 top coated with black engine enamel. The aluminum was cleaned, primes with engine primer or Rust-O-Leum red primer and top coated with rattle can “cast aluminum” paint. I painted the dampener/main pulley with engine primer then black rattle can engine enamel.
If you would like more information, the POR-15 website has directions for every product they make posted at the following link: http://www.por15.com/quickindex.asp. Overall, I loved the stuff, and I am happier with the finish the POR-15 engine enamel gave the engine and parts than what I got with primer and rattle cans on my 318 Magnum. Long term, I think the POR-15 is also a better choice. When you cover something with it, it really bonds to the metal. The prep time and prep work were also a lot less with the POR-15.
Last edited by dbilik; Dec 7, 2009 at 01:22 PM.
Captain
Joined: Aug 2009
Posts: 509
Likes: 1
From: SoCal
wow that looks awesome!!! Fortunately for me I live in Southern California and down here we have almost no rust and unless you live an the beach it's a non-issue.
But that is awesome in look and functionality.
But that is awesome in look and functionality.