

Ram 1st Gen Do It Yourself information

Registered User
Joined: Nov 2010
Posts: 19
Likes: 1
From: Gresham, OR
For my 82 i got a factory service manual for $28 off ebay new. Way better than a haynes or chilton. Has the vin decoder on the first page.
Here is the vin decode for 82' PU.
The 1st column is the Position in the VIN. 2nd column is the option. Sorry its a little big.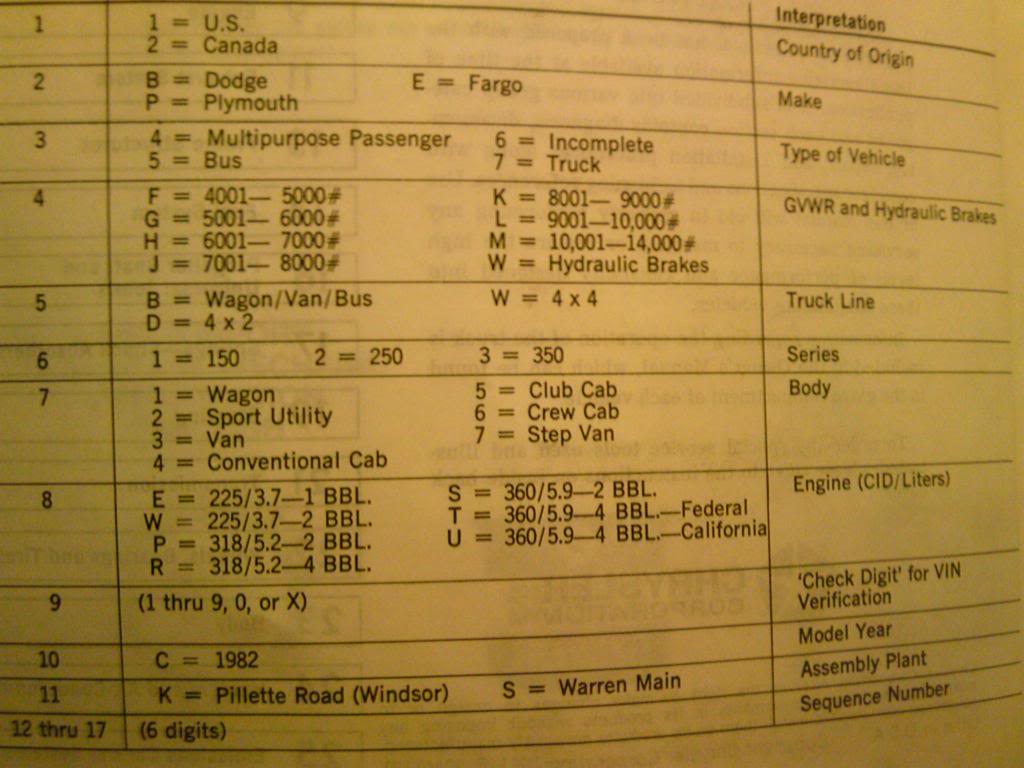
Hope this helps any of you guys. I know i was frutserated when i couldnt find a good vin decoder to tell me all the stuff i wanted to know.
Here is the vin decode for 82' PU.
The 1st column is the Position in the VIN. 2nd column is the option. Sorry its a little big.
Hope this helps any of you guys. I know i was frutserated when i couldnt find a good vin decoder to tell me all the stuff i wanted to know.


Champion
Joined: Mar 2009
Posts: 2,639
Likes: 4
From: Bent Mountain Va
Champion
Joined: Mar 2009
Posts: 2,639
Likes: 4
From: Bent Mountain Va
If you want to lower your 2 wheel drive trucks front end. This was found by crazzywolfie and I thought it belonged in the do it yourself thread since this question is often asked. To use this link you must copy it into your browser and then remove the space between dodge and talk.
http://www.dodge talk.com/forums/sho...d.php?t=328611
http://www.dodge talk.com/forums/sho...d.php?t=328611
Legend


Joined: Jun 2009
Posts: 8,025
Likes: 72
From: orangeville ontario
thanks for trying SEAL
how to lower the front of a dodge. this link should take you straight to the diy on dodge talk.
http://bit.ly/iHFVjg
thanks for also posting it over here Kevin
how to lower the front of a dodge. this link should take you straight to the diy on dodge talk.
http://bit.ly/iHFVjg
thanks for also posting it over here Kevin
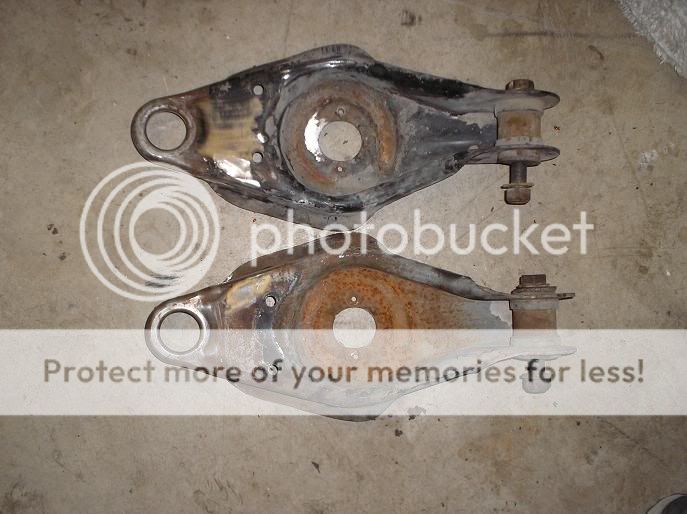
I forgot I was a member here. Here is a how-to I wrote up for the van lower control arms and the rear axle flip.
Nobody makes much in the way of aftermarket parts for 1972-1993 Dodge trucks. Parts for lowering your Dodge pickup are not offered by the major aftermarket companies like Belltech or Eibach. There is one small manufacturer that makes some very expensive lower control arms, but I've had no luck getting in contact with them. What can you do if you want to lower your pickup? You can go the cheap route by cutting your coil springs. This may cause your spring rates to change or cause camber problems. You could go the expensive route by modifying a pair of lowering spindles made for a 1st generation Dakota. I've heard this works, but there are a few issues with this and it takes a lot of trouble to get them to work.
There is another option that is very simple, engineered by the factory, and is cost effective. Go to the junkyard and find a 1972-1993 Dodge B-series van and unbolt the lower control arms. Just swapping the van's lower control arms onto your 1972-1993 Dodge half ton truck lowers it roughly 3" due to the fact that the van lower control arms have a spring pocket that allows the coil springs to sit lower than they do in the truck's stock lower control arms. No shock or spring change is needed. It doesn't matter if it is a 1/2 ton, 3/4 ton, or 1 ton van. The van lower control arms are the same. I purchased a pair from a mid 80's B350 for $40 plus tax at my local Pull-A-Part.
I had trouble separating the steering knuckle from the lower control arm at the ball joint. In fact, I gave up and left the junkyard. I asked around and found out that the steering knuckle is a two-piece design. There are two 15/16 bolts/nuts that you will have to unbolt in order to separate the top piece from the bottom piece. You will have to take the brake caliper and rotor off to gain access to the bolts. Remove those steering knuckle bolts, take out the shock absorber, unbolt the control arm pivot bolt, remove the strut rod from the lower control arms, and separate the steering tie rod from the lower steering knuckle piece and you're done. The only parts you will need are the lower control arms and the control arm pivot bolts/nuts. Once you get the lower control arms home, take a large hammer and remove the lower steering knuckle piece from the ball joint and then knock the ball joint out. You cannot reuse the ball joints from the one ton van because they are larger in diameter than the ones on your truck. I do not know if the 1/2 ton or 3/4 ton ball joints are the same or not. New ball joints are $30 at NAPA, so you might as well replace them anyway.
There are a couple modifications you will need to make to the lower control arms and your truck. First, completely remove the steering stops. They are not needed and the arms will look cleaner without them. Next, you will need to drill two 1/2" holes in each arm for the strut rods. I pulled a stringline from the center of the ball joint to the center of the pivot bushing and found the holes in the truck arms are equal distance from the centerline of the arm. Measure the distance from the ball joint to the strut rod holes on the truck arms. Now, you can transfer this information onto the van arms, mark your holes, and drill. There is one modification you will need to make to the lower control arm pivot holes on your truck's frame. The truck's factory lower control arm bolts are 5/8" in diameter. The van's are 3/4" in diameter. You will need to drill these holes larger for the van's bolts to fit the truck. I was thinking that maybe I would be able to slide the sleeve from the truck arms into the sleeve on the van arms so I wouldn't have to drill the pivot holes. The truck sleeve is too large in diameter to fit inside the van's sleeve,so that will not work. From this point, you may be able to just bolt the van arms on your truck. I had a little problem with mine. I tried to install my driver's side arm and the holes wouldn't begin to line up. I found that the metal around the pivot bushing on the arm was up against the pivot bracket on the truck. Before you paint your lower control arms, you may want to grind a little off the arms around the pivot bushing.
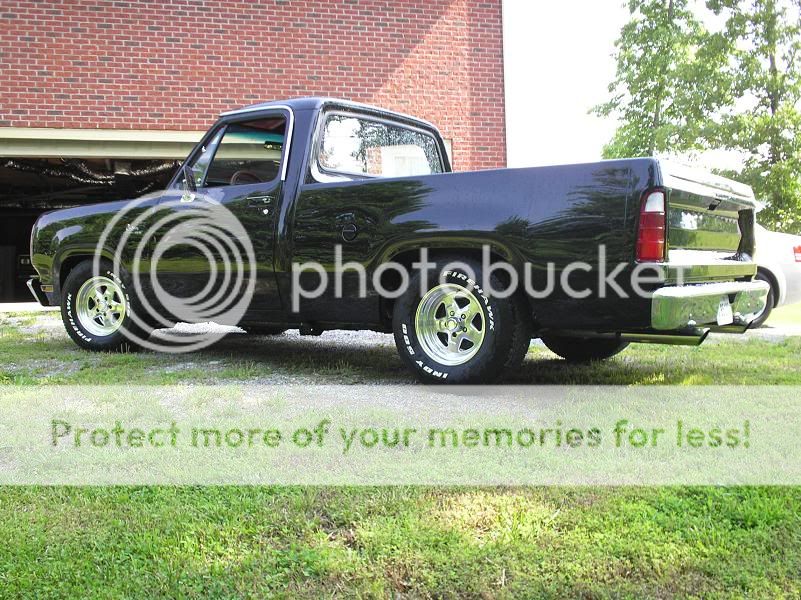
When I put the wheels back on and dropped the truck onto the ground, I measured 1/2" between the bottom of the fender and top of the tire. Before the drop, I measured 3.5". I'm very pleased with that. To my surprise, the camber wasn't off too bad, however, the wheels were pointed in different directions. I also had to cut the bump stop brackets off because they were hitting the lower control arms. Another thing, any time you perform work like this to your vehicle, a front end alignment is necessary.

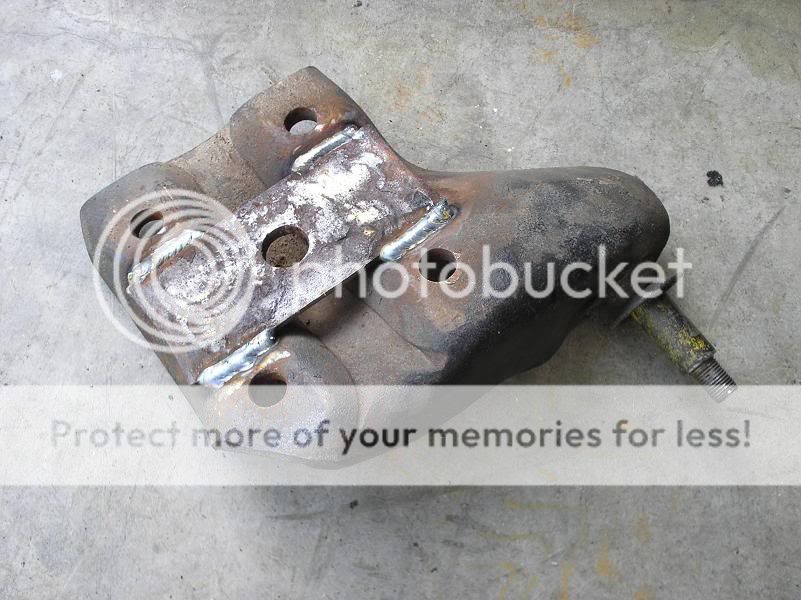
The steering knuckle is a two piece design on the truck and van. You will need a 15/16" socket for these.

Van arms with van lower steering knuckle
Van arms with bump stops and ball joint removed

Side by side comparison of the truck arm and van arm. Blue arrows point to the strut rod bolt holes that you need to drill.

Truck pivot bolt (5/8") on top and van pivot bolt (3/4") on bottom

Drilling the truck's pivot bolt bracket from 5/8" to 3/4"

Grind in the unpainted area shown by the arrows. The holes in the lower control arms would not line up with the ones on the truck's pivot bracket due to this area touching the pivot bracket.

Finished product

Before

After
Rear axle flip:
I found a pair of leaf spring perches on an old rearend I had. I unbolted the axle and dropped it to the floor. I removed the shocks and dropped the driveshaft to make it easier to move the axle around. You may not have to do either. Then, I clamped the leaf springs together with a C-clamp before I removed the leaf centering pin to flip it over. You will have to remove each leaf spring from their hangers and put them under the axle. Sit the spring perches on top of each leaf spring and sit the axle on top of the spring perches. The new spring perches should be on the exact opposite side of the axle from the original spring perches to keep pinion angle. Clamp everything down using your original lower shock mount plates (modified in the picture below) and new U-bolts. Weld the rear axle to the spring perches.

Completed pictures.


Nobody makes much in the way of aftermarket parts for 1972-1993 Dodge trucks. Parts for lowering your Dodge pickup are not offered by the major aftermarket companies like Belltech or Eibach. There is one small manufacturer that makes some very expensive lower control arms, but I've had no luck getting in contact with them. What can you do if you want to lower your pickup? You can go the cheap route by cutting your coil springs. This may cause your spring rates to change or cause camber problems. You could go the expensive route by modifying a pair of lowering spindles made for a 1st generation Dakota. I've heard this works, but there are a few issues with this and it takes a lot of trouble to get them to work.
There is another option that is very simple, engineered by the factory, and is cost effective. Go to the junkyard and find a 1972-1993 Dodge B-series van and unbolt the lower control arms. Just swapping the van's lower control arms onto your 1972-1993 Dodge half ton truck lowers it roughly 3" due to the fact that the van lower control arms have a spring pocket that allows the coil springs to sit lower than they do in the truck's stock lower control arms. No shock or spring change is needed. It doesn't matter if it is a 1/2 ton, 3/4 ton, or 1 ton van. The van lower control arms are the same. I purchased a pair from a mid 80's B350 for $40 plus tax at my local Pull-A-Part.
I had trouble separating the steering knuckle from the lower control arm at the ball joint. In fact, I gave up and left the junkyard. I asked around and found out that the steering knuckle is a two-piece design. There are two 15/16 bolts/nuts that you will have to unbolt in order to separate the top piece from the bottom piece. You will have to take the brake caliper and rotor off to gain access to the bolts. Remove those steering knuckle bolts, take out the shock absorber, unbolt the control arm pivot bolt, remove the strut rod from the lower control arms, and separate the steering tie rod from the lower steering knuckle piece and you're done. The only parts you will need are the lower control arms and the control arm pivot bolts/nuts. Once you get the lower control arms home, take a large hammer and remove the lower steering knuckle piece from the ball joint and then knock the ball joint out. You cannot reuse the ball joints from the one ton van because they are larger in diameter than the ones on your truck. I do not know if the 1/2 ton or 3/4 ton ball joints are the same or not. New ball joints are $30 at NAPA, so you might as well replace them anyway.
There are a couple modifications you will need to make to the lower control arms and your truck. First, completely remove the steering stops. They are not needed and the arms will look cleaner without them. Next, you will need to drill two 1/2" holes in each arm for the strut rods. I pulled a stringline from the center of the ball joint to the center of the pivot bushing and found the holes in the truck arms are equal distance from the centerline of the arm. Measure the distance from the ball joint to the strut rod holes on the truck arms. Now, you can transfer this information onto the van arms, mark your holes, and drill. There is one modification you will need to make to the lower control arm pivot holes on your truck's frame. The truck's factory lower control arm bolts are 5/8" in diameter. The van's are 3/4" in diameter. You will need to drill these holes larger for the van's bolts to fit the truck. I was thinking that maybe I would be able to slide the sleeve from the truck arms into the sleeve on the van arms so I wouldn't have to drill the pivot holes. The truck sleeve is too large in diameter to fit inside the van's sleeve,so that will not work. From this point, you may be able to just bolt the van arms on your truck. I had a little problem with mine. I tried to install my driver's side arm and the holes wouldn't begin to line up. I found that the metal around the pivot bushing on the arm was up against the pivot bracket on the truck. Before you paint your lower control arms, you may want to grind a little off the arms around the pivot bushing.
When I put the wheels back on and dropped the truck onto the ground, I measured 1/2" between the bottom of the fender and top of the tire. Before the drop, I measured 3.5". I'm very pleased with that. To my surprise, the camber wasn't off too bad, however, the wheels were pointed in different directions. I also had to cut the bump stop brackets off because they were hitting the lower control arms. Another thing, any time you perform work like this to your vehicle, a front end alignment is necessary.
The steering knuckle is a two piece design on the truck and van. You will need a 15/16" socket for these.
Van arms with van lower steering knuckle
Van arms with bump stops and ball joint removed
Side by side comparison of the truck arm and van arm. Blue arrows point to the strut rod bolt holes that you need to drill.
Truck pivot bolt (5/8") on top and van pivot bolt (3/4") on bottom
Drilling the truck's pivot bolt bracket from 5/8" to 3/4"
Grind in the unpainted area shown by the arrows. The holes in the lower control arms would not line up with the ones on the truck's pivot bracket due to this area touching the pivot bracket.
Finished product
Before
After
Rear axle flip:
I found a pair of leaf spring perches on an old rearend I had. I unbolted the axle and dropped it to the floor. I removed the shocks and dropped the driveshaft to make it easier to move the axle around. You may not have to do either. Then, I clamped the leaf springs together with a C-clamp before I removed the leaf centering pin to flip it over. You will have to remove each leaf spring from their hangers and put them under the axle. Sit the spring perches on top of each leaf spring and sit the axle on top of the spring perches. The new spring perches should be on the exact opposite side of the axle from the original spring perches to keep pinion angle. Clamp everything down using your original lower shock mount plates (modified in the picture below) and new U-bolts. Weld the rear axle to the spring perches.
Completed pictures.

Registered User
Joined: May 2011
Posts: 4
Likes: 1
From: NJ
I have a 1987 Dodge 4x4 318 auto Power Ram LE 150. My first 4x4. I'm a diy. I would like to know the specs for tune-up, how to check front differential and what fluids to use. I want to do general tune-up, maintenence and lube. Any help would be appreciated. Thanks.
Record Breaker
Joined: Mar 2010
Posts: 1,017
Likes: 3
From: Pittsburgh, PA
Here is some info for all your "I have an 78 d100, a 92 w350, an 84 d250, and an 85 w100 and want to put them all together into one truck" type questions.
This was taken from the user MYSTERYMAN on Turbo Diesel Register forums.
"The frames from 72 threw 93 are basically the same at a glance but quite different if you look closely..
The 8" (some were 7.5") frame was used on all the cab/chassis models. It was also used on all the 1 ton pickups and select 3/4 ton trucks..
Most of the 3/4 ton and all of the half ton's used the smaller 6" center frame.
The 1st gen diesels 89,90,91.0 250, 3/4 ton used used the 6" frame but it was a bit heavier than the earlier gas version. You could order the 8" frame
if desired but most were called single wheel 350's rather than 250's
89,90,91.0 350, 1 tons used the taller 7.5 " to 8" frame. The 8" was a bit heavier than the earlier gas version..
In 91.5 the 8" frame was updated and is heavier than all the rest that came before it... This is hard to see with the naked eye. But quite obvious on the blueprints. It was updated and the 6" frame was discontinued due to breakage problems... in conclusion.....
All 91.5, 92 and 93's 250's and 350 diesels used the SAME frame ...
The exceptions.....2wd verses 4wd....The frames are the same except for the front cross member's and spring hangers....
Converting a 2wd frame to a 4wd frame is rather easy assuming that you have the 4wd engine cross member and 4 spring hangers...
Converting a 4wd frame to a 2wd frame is a whole lot of work !!!!! You have
to change the front cross member and the engine cross member.. Weld in the motor mounts. Mount the upper control arm brackets.... None of the holes will be pre drilled for you. You will have to drill them all yourself.. The tolerance for these holes is .125 (1/8") on center .. If you miss the mark you may never get it to take a front end alignment or track properly...
I would not recommend doing a 4wd to 2wd frame conversion to a novice
or back yard mechanic..
One last note..... If you need to replace an 89,90 or 91.0 6" 250 diesel frame. And if you can not locate a diesel frame.. You can use an early 7.5" 300 gas frame.. All the holes will line up for the most part...
Be sure to measure the wheelbase of the doner frame you buy...
Trucks that were sold as "cab/chassis" have longer frames than Pickuptrucks.
And dually rear axles out of "cab/chassis" trucks are NARROWER than the dually rears out of pickup trucks..
Dually rears out of "cab/chassis" CAN be used in most cases in single wheel pickup trucks.. You may need to change the gears to get highway speeds with the diesel.. 3.55 to 1 ratio is the best choice for all around use when using stock size tires.
I hope this answers all the frame questions"

Registered User
Joined: Dec 2011
Posts: 3
Likes: 0
hey, i have a 1986 w100 dodge custom i have a lift nice paint and all my cosmetics are done. i need to know what i can do to the engine to make it a monster and i need ideas and help. i want to stroke it out but i dont know if that is the best route
Champion
Joined: Mar 2009
Posts: 2,639
Likes: 4
From: Bent Mountain Va
How to rebuild your 727 automatic transmission. There is a series of videos here so watch them on you tube to make it simple. This was originally posted by xjarhead69.
http://www.youtube.com/watch?v=xzJhCBZ1wMY
http://www.youtube.com/watch?v=xzJhCBZ1wMY

Registered User
Joined: Mar 2010
Posts: 7
Likes: 0
basicallly took an 88 318/4sp auto and an 89 360,3sp auto and made 1 badass truck. the 88 was from georgia and the body was impeccable the 89 was was from here in mass and was a rust box but ran great. hit her with some nice orange paint and now i have a pretty nice head turner for about $2500 total investment. She lights up the tires and sounds great but with these fuel prices i'm thinking of building up a "Leaning Tower of Power" healthy slant 6 with a fabricated turbo off a saab or volvo or even an early 90's daytona. 