

DIY - Color Matching your Grille

Ok, since many on here are asking about how to color match your grill, I thought I would make this DIY on it.
First of all, there are three main concepts when painting: 1. Surface Preparation, 2. Surface Preparation, and lastly 3. Surface Preparation.
All of the painting, primering, and application of the adhesion promoter, were all in aerosol form.
Now, when I first set out to do this, I had a crack in the chrome foil on the grill itself. So, lets begin....
1. Examine your grill, Look for any kind of cracking, or bubbling of the foil on both the front and back sides. If you see bubbles in the foiling, you have two options, 1. You can try to peel off all of the foil, or 2. you can order a replacement. I don't really recommend you even attempt to remove all of the chrome foil. It is a complete pain, and in the end you will have about half of it stripped off and shredded finger tips as proof. I will warn you though that if your ram's grill is still a factory piece, you are almost guaranteed that the frame of the grill will be cracked, and many times the foil is what is holding it all together.
(I will post links at the bottom of this DIY to give you a start on where to look for a replacement grill.
2. After deciding if you are going to use the old grill, or order new, and if you have your replacement grill, you are ready to remove the old one.
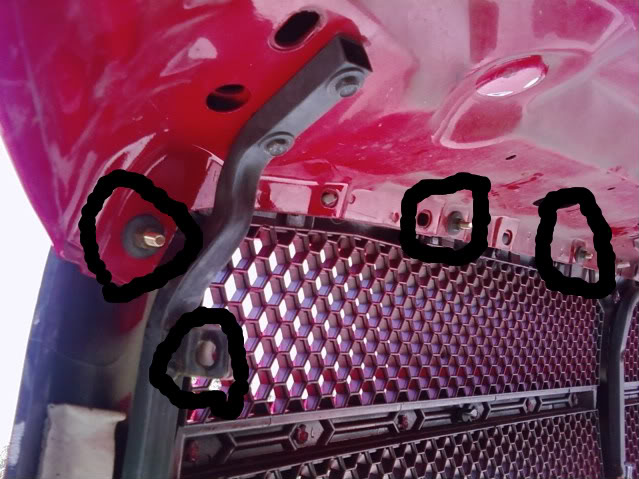
There are a set of 11/16 nuts across the top of the grill from the under side, and four bolts on each corner of the grill. Also, there should be one clip and bolt in the middle of the grill right above the hood latch.
Below is a picture of the back side of the grill with the nuts and bolts, circled in black.
3. If you ordered a new grill, please note that more often than not, it will not come with an emblem. If your old grill's emblem is still in good shape it is cheapest to just re use it. To remove it, all you need to do to remove it is apply slight pressure along the edge with either a screwdriver, or pocket knife. (You might be a little surprised at how easy it will pop out.)
For the next step, I will split it into two sections, 4A, and 4B. 4A will be for those of you that decide to reuse the old grill, and 4B will be for those of you that bought a replacement.
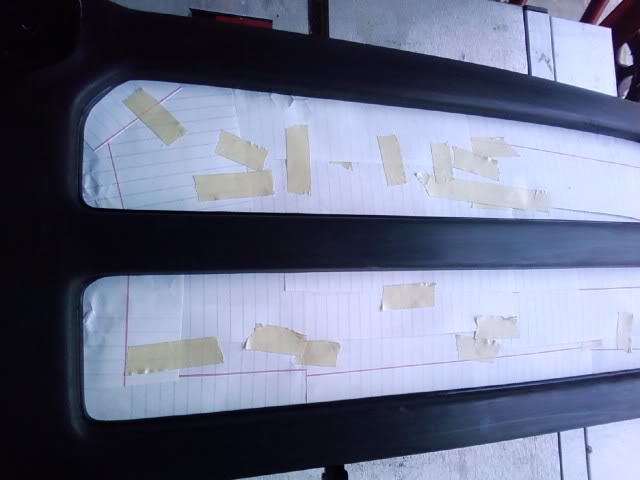
4A. If your chrome grill is still in good condition, you need to remove the glossy finish on the surface. For this I recommend that you use a coarse grit paper like 320, or 600. Basically, all your trying to do is buff away the smooth finish on the foil to allow the paint to have something to grip to.
4B. If you ordered a replacement grill, it should already come primered, usually the primer will be black. More often than not, this primer will have its own gloss finish, and that needs to be removed. To remove the finish, I recommend a 1000 grit paper.
Below is before sanding and after sanding to give you an example of what to expect.
Before
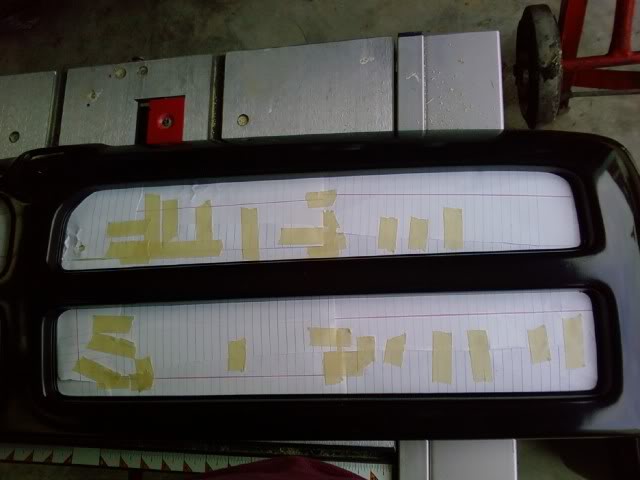
After
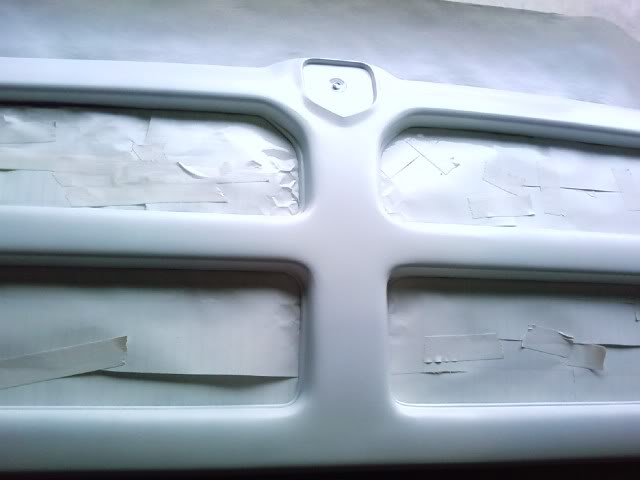
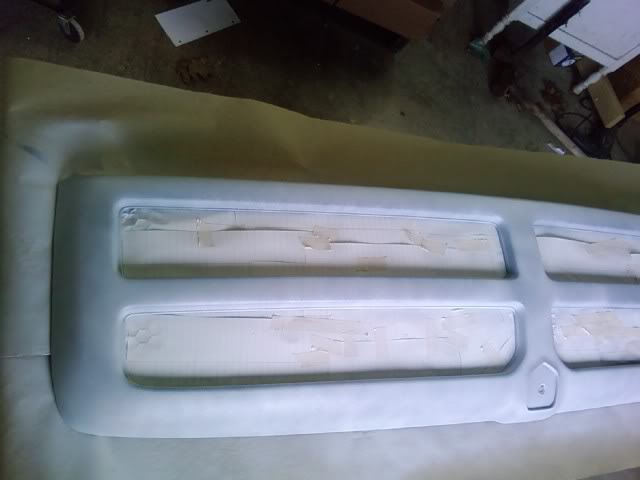
5. Once you have a nice flat finish on your grill, you can start the rest of your surface prep. If you plan on keeping the inserts black, or have plans on a different color, now is the time to paper off the inserts. (Some replacement grills will not give you the option to remove the inserts. For the most part, they are welded in, and non removable.) You can forgo papering off the inserts if you want them to match the grill color.
Below is a papered off example (You can use regular notebook paper, or you can purchase a roll of thinner masking paper from your parts store)
Where I live, the weather is grossly unpredictable, and there are a lot of places like it. Most people will only spray color and primer if the outside temperature is 50 degrees F or higher, with a Humidity level of 60% or less. (Spraying in weather conditions that do not fall into the bracket will affect your over all outcome)
6. Now that you have all of your sanding done, and papering done, you are ready to start spraying. Before spraying any thing down, make sure you wipe every surface of the grill down with a "Tac" Cloth. It is a glue impregnated cloth that will pick up all of your primer dust and other contaminants off of your surface. For the first coat, I used an adhesion promoter to help the primer and color stick better. (Most parts stores will have this with their painting supplies) Keep the can up right, and spray in an even pace, and distance. Most tend to like to keep the spray about 12" (Inches) away from the surface. Lightly coat the surface, and wait at least 5 minutes between each coat! ( I do warn you that you need to be careful of fumes at this point. More specifically with the adhesion promoter, it can be very nasty to the nose)
7. Once you have the promoter down, wait about 15 minutes before attempting to lay down the primer.
If your paint color is a light color, (White, Yellow, Orange, Red) I prefer using a white primer. Age affects paint, and after a few years of sun damage the paint will begin to fade. Using a white primer, will help lighten up the over all color, to help aid in a better match to the rest of your truck.
The same goes for a dark color truck (Black, Dark Blue, Purpl, Maroon) I recommend you use a black primer, this will help darken the color to match your truck. When you begin to apply the primer, do not worry about covering every surface in your first coat. It is more important to make sure that you acheive an even spray over time, rather than a splotchy cover. As with the promoter, wait at least 5 minutes between each coat.
Below is a picture of the grill with the primer completed. (for best results, you need to have at least 3 coats of primer)
8. Once you have your surface coated in primer, you are ready for color. Make sure to shake your color paint for at least 3 minutes to be fully positive that all the paint is mixed up.
Keeping the can about 12" away from your surface, begin spraying in a smooth moving straight line. Always start the spray away from the grill to prevent droplets of paint from falling on your grill. Again, do not try to cover every part of the surface in one coat, just lightly spray it down. It should look speckled for the first few coats. This is a good sign, that you are not rushing things. (For best results, I recommend at least 5 coats of color. Currently, I have 7 on the one I am using now.)
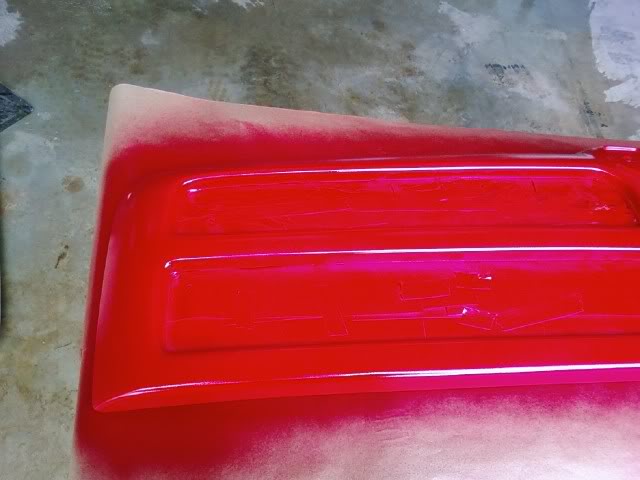
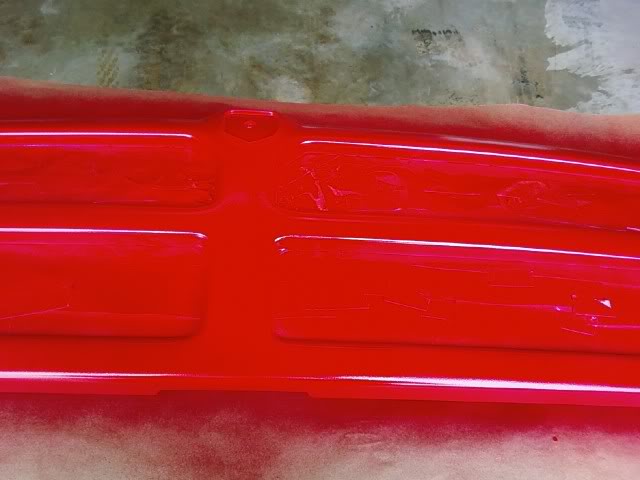
Below is a pic of the color applied.
9. If you have papered the inserts off, the best time to remove the paper is right after your final coat. This way the paint wont fully dry on the portions where grill and paper are touching, and thus making it easier to remove. After you are done applying your color, you should wait at least 24 hours for the top coat of paint to dry before trying to move the grill.
If you let your grill set over night, and you get up and look at it the next day and think," Man I missed a spot, or it doesn't look quite right". Make sure you fully wipe down the entire grill with your tac cloth to remove any dirt or dust that might have accumulated over night.
10. Now that the grill is mainly dry on the surface, you can reattach your "RAM" emblem to your grill. For this I used a plastic formulated super glue. Don't be afraid of putting too much on the emblem, just make sure that you fully coat the back side of it to ensure you get a good stick. Now, you are ready to reattach your grill to your truck, just follow the first few steps of the DIY to finish this. If you have a tape on bug shield, it is best to wait at least 30 days after painting before you reapply it.
Some tips to think about before you start this project.
1. If you are going to be doing this in your garage, take a wet mop and every now ant then wet the floor down during spray. This will keep dust from flying up while you are walking around spraying.
2. Always turn the paint can up side down and spray until color quits coming out to clear the nozzle. while you wait in between coats. This will help eliminate spray droplets from landing on your work.
3. When you are buying your paint, make sure that you buy it all in one place!!! Most companies that produce this paint have a few different plants making the same color. The difference in the locations will have a slight affect on the over all tint of the paint. Keep in mind that more often than not, Red, White, and Black paint colors are the hardest to match up. Those three colors seem to vary quite a bit among different parts of the country.
4. Take your time! Do not rush while doing this. Going slow will almost always produce a better finish.
5. Remember that the most important part of painting is surface prep. If you don't have a good foundation, the rest is going to look like crap.
6. I mentioned waiting at least 30 days before reattaching your bug shield. In the same token, you need to wait the same amount of time before you wash your vehicle. The outer most layer of paint might feel dry, and it usually is, but the underlying coats will take a lot longer to fully dry out. By waiting 30 days, you are almost guaranteed to not mess up your paint job.
7. You have a few different options when choosing where to get your paint. The two I prefer would be Duplicolor/ Dupont, or get a color matched paint from your local Dealership. As you can imagine buying your paint from duplicolor, or dupont is going to be much much cheaper in the long haul.
8. When you are tightening the nuts and bolts down, they don't have to be really tight, just snug. If you tighten them too much you will break the plastic tabs on the sides, and over time the whole grill will begin to crack.
9. Unless you don't about over spray, it is a good idea to lay down some kind of paper, or cardboard beneath your grill to protect your work surface.
Here is where I ordered my replacement grill: http://pershing-auto-body-parts.amaz...ord=B0012BUFO2
Very fast shipping, and at a good price too.
All of this cost me around $60.00 minus the gas burnt to pick some items up.
Enjoy, and if you do this procedure, make sure you post up pics of your completed job for the rest of the world to see.
If you have something to add, don't be shy chime up, I am sure there is something I have failed to mention that might help our fellow DIYers out.
First of all, there are three main concepts when painting: 1. Surface Preparation, 2. Surface Preparation, and lastly 3. Surface Preparation.
All of the painting, primering, and application of the adhesion promoter, were all in aerosol form.
Now, when I first set out to do this, I had a crack in the chrome foil on the grill itself. So, lets begin....
1. Examine your grill, Look for any kind of cracking, or bubbling of the foil on both the front and back sides. If you see bubbles in the foiling, you have two options, 1. You can try to peel off all of the foil, or 2. you can order a replacement. I don't really recommend you even attempt to remove all of the chrome foil. It is a complete pain, and in the end you will have about half of it stripped off and shredded finger tips as proof.
I will warn you though that if your ram's grill is still a factory piece, you are almost guaranteed that the frame of the grill will be cracked, and many times the foil is what is holding it all together.(I will post links at the bottom of this DIY to give you a start on where to look for a replacement grill.
2. After deciding if you are going to use the old grill, or order new, and if you have your replacement grill, you are ready to remove the old one.
There are a set of 11/16 nuts across the top of the grill from the under side, and four bolts on each corner of the grill. Also, there should be one clip and bolt in the middle of the grill right above the hood latch.
Below is a picture of the back side of the grill with the nuts and bolts, circled in black.
3. If you ordered a new grill, please note that more often than not, it will not come with an emblem. If your old grill's emblem is still in good shape it is cheapest to just re use it. To remove it, all you need to do to remove it is apply slight pressure along the edge with either a screwdriver, or pocket knife. (You might be a little surprised at how easy it will pop out.)
For the next step, I will split it into two sections, 4A, and 4B. 4A will be for those of you that decide to reuse the old grill, and 4B will be for those of you that bought a replacement.
4A. If your chrome grill is still in good condition, you need to remove the glossy finish on the surface. For this I recommend that you use a coarse grit paper like 320, or 600. Basically, all your trying to do is buff away the smooth finish on the foil to allow the paint to have something to grip to.
4B. If you ordered a replacement grill, it should already come primered, usually the primer will be black. More often than not, this primer will have its own gloss finish, and that needs to be removed. To remove the finish, I recommend a 1000 grit paper.
Below is before sanding and after sanding to give you an example of what to expect.
Before
After
5. Once you have a nice flat finish on your grill, you can start the rest of your surface prep. If you plan on keeping the inserts black, or have plans on a different color, now is the time to paper off the inserts. (Some replacement grills will not give you the option to remove the inserts. For the most part, they are welded in, and non removable.) You can forgo papering off the inserts if you want them to match the grill color.
Below is a papered off example (You can use regular notebook paper, or you can purchase a roll of thinner masking paper from your parts store)
Where I live, the weather is grossly unpredictable, and there are a lot of places like it. Most people will only spray color and primer if the outside temperature is 50 degrees F or higher, with a Humidity level of 60% or less. (Spraying in weather conditions that do not fall into the bracket will affect your over all outcome)
6. Now that you have all of your sanding done, and papering done, you are ready to start spraying. Before spraying any thing down, make sure you wipe every surface of the grill down with a "Tac" Cloth. It is a glue impregnated cloth that will pick up all of your primer dust and other contaminants off of your surface. For the first coat, I used an adhesion promoter to help the primer and color stick better. (Most parts stores will have this with their painting supplies) Keep the can up right, and spray in an even pace, and distance. Most tend to like to keep the spray about 12" (Inches) away from the surface. Lightly coat the surface, and wait at least 5 minutes between each coat! ( I do warn you that you need to be careful of fumes at this point. More specifically with the adhesion promoter, it can be very nasty to the nose
)7. Once you have the promoter down, wait about 15 minutes before attempting to lay down the primer.
If your paint color is a light color, (White, Yellow, Orange, Red) I prefer using a white primer. Age affects paint, and after a few years of sun damage the paint will begin to fade. Using a white primer, will help lighten up the over all color, to help aid in a better match to the rest of your truck.
The same goes for a dark color truck (Black, Dark Blue, Purpl, Maroon) I recommend you use a black primer, this will help darken the color to match your truck. When you begin to apply the primer, do not worry about covering every surface in your first coat. It is more important to make sure that you acheive an even spray over time, rather than a splotchy cover. As with the promoter, wait at least 5 minutes between each coat.
Below is a picture of the grill with the primer completed. (for best results, you need to have at least 3 coats of primer)
8. Once you have your surface coated in primer, you are ready for color. Make sure to shake your color paint for at least 3 minutes to be fully positive that all the paint is mixed up.
Keeping the can about 12" away from your surface, begin spraying in a smooth moving straight line. Always start the spray away from the grill to prevent droplets of paint from falling on your grill. Again, do not try to cover every part of the surface in one coat, just lightly spray it down. It should look speckled for the first few coats. This is a good sign, that you are not rushing things. (For best results, I recommend at least 5 coats of color. Currently, I have 7 on the one I am using now.)
Below is a pic of the color applied.
9. If you have papered the inserts off, the best time to remove the paper is right after your final coat. This way the paint wont fully dry on the portions where grill and paper are touching, and thus making it easier to remove. After you are done applying your color, you should wait at least 24 hours for the top coat of paint to dry before trying to move the grill.
If you let your grill set over night, and you get up and look at it the next day and think," Man I missed a spot, or it doesn't look quite right". Make sure you fully wipe down the entire grill with your tac cloth to remove any dirt or dust that might have accumulated over night.
10. Now that the grill is mainly dry on the surface, you can reattach your "RAM" emblem to your grill. For this I used a plastic formulated super glue. Don't be afraid of putting too much on the emblem, just make sure that you fully coat the back side of it to ensure you get a good stick. Now, you are ready to reattach your grill to your truck, just follow the first few steps of the DIY to finish this. If you have a tape on bug shield, it is best to wait at least 30 days after painting before you reapply it.
Some tips to think about before you start this project.
1. If you are going to be doing this in your garage, take a wet mop and every now ant then wet the floor down during spray. This will keep dust from flying up while you are walking around spraying.
2. Always turn the paint can up side down and spray until color quits coming out to clear the nozzle. while you wait in between coats. This will help eliminate spray droplets from landing on your work.
3. When you are buying your paint, make sure that you buy it all in one place!!! Most companies that produce this paint have a few different plants making the same color. The difference in the locations will have a slight affect on the over all tint of the paint. Keep in mind that more often than not, Red, White, and Black paint colors are the hardest to match up. Those three colors seem to vary quite a bit among different parts of the country.
4. Take your time! Do not rush while doing this. Going slow will almost always produce a better finish.
5. Remember that the most important part of painting is surface prep. If you don't have a good foundation, the rest is going to look like crap.
6. I mentioned waiting at least 30 days before reattaching your bug shield. In the same token, you need to wait the same amount of time before you wash your vehicle. The outer most layer of paint might feel dry, and it usually is, but the underlying coats will take a lot longer to fully dry out. By waiting 30 days, you are almost guaranteed to not mess up your paint job.
7. You have a few different options when choosing where to get your paint. The two I prefer would be Duplicolor/ Dupont, or get a color matched paint from your local Dealership. As you can imagine buying your paint from duplicolor, or dupont is going to be much much cheaper in the long haul.
8. When you are tightening the nuts and bolts down, they don't have to be really tight, just snug. If you tighten them too much you will break the plastic tabs on the sides, and over time the whole grill will begin to crack.
9. Unless you don't about over spray, it is a good idea to lay down some kind of paper, or cardboard beneath your grill to protect your work surface.
Here is where I ordered my replacement grill: http://pershing-auto-body-parts.amaz...ord=B0012BUFO2
Very fast shipping, and at a good price too.
All of this cost me around $60.00 minus the gas burnt to pick some items up.
Enjoy, and if you do this procedure, make sure you post up pics of your completed job for the rest of the world to see.
If you have something to add, don't be shy chime up, I am sure there is something I have failed to mention that might help our fellow DIYers out.