

Swapping the Dana 44 front axle for a Dana 60.

Thread Starter
|
Site Moderator
Joined: Jan 2008
Posts: 8,374
Likes: 28
From: Sioux Falls, SD
Complete credit for the below goes to SpcD1500.
--------------------------------------------------------
The title says it all this is a DIY for you guys that want to know how to put a Dana 60 front axle in your 1500's. Ill make another one for the Rear or add it to this post later depending on how detailed i get with each.
Quick history of my truck and while i decided to do this swap. I have a 1997 Ram 1500 with a Fabtech 5.5" lift. I was running 35x12.5x15 tires and my rims had to much backspacing so it caused my Dana 44 to start caving in on itself and giving me positive camber and causing my tires to wear.
Heres a picture to show the size difference in the "c's" of the two axles

dana 44

dana 60
Ok, you guys will notice that there are some extra brackets on my axle and that my control arms are different. So before someone asks, no you do not have to have this lift kit or any lift kit to do this swap. This is a simple unbolt old bolt in new swap but im doing this so you can get a better idea. So let the swapping begin.......
Tools needed:
basic assortment of hand tools including wrenches, hammers, sockets etc.....
at least 2 sets of jack-stands (i used three sets so i could have both axles off the ground while i was transfering parts)
2 jacks
grinder with cutting wheel and or torches
Bungee cords
black electrical tape
Knowledge on how to use above tools
Step one: I unbolted everything that i could without jacking the truck up, such as:
drive shaft, i left it contected to the transfer case and hung it out of the way. Make sure you tape the u joint caps so they don't fall off and get lost or screw up your needle bearings.

CAD vaccum lines, plug, and breather

sway bar: again i left it connected to the frame at first but when i put the new axle in i had to take it off completely anyway cause i wouldnt clear the steering linkage to fit back up in it's mounts.

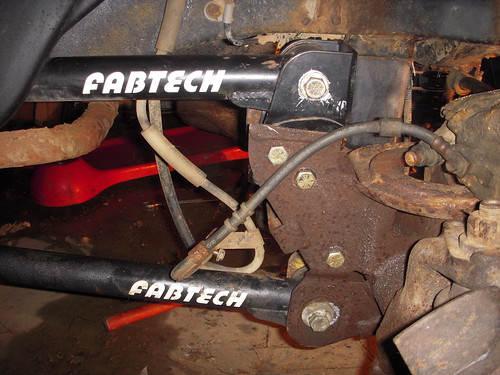
Steering Linkage and Trac Bar: the linkage i unbolted from the pittman arm and left on the axle, the trac bar i unbolted from the axle end and tied up to my frame cause i had a drop bracket on the frame end that makes it a real pain to get the castle nut off, you can see it in the above pic on the far right, if your really interested. (some of you will notice in the one pic that it is the dana 60 under my truck, this is because i diddnt get a pic of the dana 44 before i took it out but the pic still gives you the same idea)

trac bar tied to frame

Step 2: Lift truck and place on jackstands , i had 2 sets of jackstands for this step. I put one set under the frame and one set under my axle. This way when i needed to i could move lower the axle as far as i needed and also there was no weight or stress on the coil springs or shocks. Then remove tires and begin unbolting everything else
Shocks and coil springs: Sorry but i dont not have a pic for this step (yet) but i will do my best to describe it until i can get one. There are 2 shock towers in the engine bayon either side of the frame. Remove the nut that is on top of them. Next go under your truck and rite under your coil springs there will be a bolt head remove that bolt (mine and ears on the nut so i diddn't have to hold it with a wrench) and your shocks are unbolted. Next i put 2 jacks under each end of the axle and removed that set of jackstands. I then lowered the axle until my springs pretty much fell out and removed them and the shocks. If you cant get your axle to drop far enough for this step you may need to go pick up a set of spring compressors.
Control Arms: Next step is to unbolt the control arms on the axle side. If you are working on a northeren truck, as both of mine our, be ready for some hard times cause these bolts love to rust to the bushing sleeve. The upper control arm bolts weren't to bad to get out on mine but i did have to hit them a couple times with a hammer, make sure you place the nut on end of the bolt to protect the threads if you plan on reusing them. The lower control arm bolts are a different story though. These bolts are special too, because they are a cam style bolt and this is the way you control your caster. They are also a dealer only item, i bought a set from napa but they are to small but they work for now. I have taken these bolts out of 2 different axles now and both times they have snapped on me and i have had to cut them out which is where the grinder or torchs come into play. But realize if you are reusing your control arms (i wasnt) that you are still going to have to get that piece out of your bushing or replace the bushing.
control arms
cam bolts

what happens when they are removed

Brakes: For the brakes i simple unbolted the calipers from the knuckles and placed them on a bucket, this way i would have all my brake fluid dripping out on to the floor.

Step 3: drop axle on jacks and drag out from under your truck.
Installation is pretty much the same steps just in reverse. Some things that i transferred over from my 44 were: Drag-link end, lift brackets, and CAD vacuum unit. I did this cause mine were either new and better condition or the parts just weren't there on the 60.
Brakes: The brakes on the 2500's are bigger so i don't think the 1500's will fit (1500 , i didn't even try to put mine on cause the 60's were like brand new anyway. But my brake lines bolted up perfectly to them just make sure you take the little copper crush washer and put it between the line and caliper or you will have a steady leak of brake fluid.
just some pics to show the size difference the caliper on the top is the one off the 44.


Thats pretty much all i can think of that is different from the removal. All you got to do now is torque to spec following your Haynes Manual or lift company's specs, make sure to recheck after about 50 miles, then built on your new 8 lug rims, bolt pattern 8x165 i believe (please correct me if im wrong,) and then your ready to head to the alignment shop or break out your tape string and level and align it yourself (that's is a different DIY for someone else if there isnt one already.)
--------------------------------------------------------
The title says it all this is a DIY for you guys that want to know how to put a Dana 60 front axle in your 1500's. Ill make another one for the Rear or add it to this post later depending on how detailed i get with each.
Quick history of my truck and while i decided to do this swap. I have a 1997 Ram 1500 with a Fabtech 5.5" lift. I was running 35x12.5x15 tires and my rims had to much backspacing so it caused my Dana 44 to start caving in on itself and giving me positive camber and causing my tires to wear.
Heres a picture to show the size difference in the "c's" of the two axles
dana 44
dana 60
Ok, you guys will notice that there are some extra brackets on my axle and that my control arms are different. So before someone asks, no you do not have to have this lift kit or any lift kit to do this swap. This is a simple unbolt old bolt in new swap but im doing this so you can get a better idea. So let the swapping begin.......
Tools needed:
basic assortment of hand tools including wrenches, hammers, sockets etc.....
at least 2 sets of jack-stands (i used three sets so i could have both axles off the ground while i was transfering parts)
2 jacks
grinder with cutting wheel and or torches
Bungee cords
black electrical tape
Knowledge on how to use above tools
Step one: I unbolted everything that i could without jacking the truck up, such as:
drive shaft, i left it contected to the transfer case and hung it out of the way. Make sure you tape the u joint caps so they don't fall off and get lost or screw up your needle bearings.
CAD vaccum lines, plug, and breather
sway bar: again i left it connected to the frame at first but when i put the new axle in i had to take it off completely anyway cause i wouldnt clear the steering linkage to fit back up in it's mounts.
Steering Linkage and Trac Bar: the linkage i unbolted from the pittman arm and left on the axle, the trac bar i unbolted from the axle end and tied up to my frame cause i had a drop bracket on the frame end that makes it a real pain to get the castle nut off, you can see it in the above pic on the far right, if your really interested. (some of you will notice in the one pic that it is the dana 60 under my truck, this is because i diddnt get a pic of the dana 44 before i took it out but the pic still gives you the same idea)
trac bar tied to frame
Step 2: Lift truck and place on jackstands , i had 2 sets of jackstands for this step. I put one set under the frame and one set under my axle. This way when i needed to i could move lower the axle as far as i needed and also there was no weight or stress on the coil springs or shocks. Then remove tires and begin unbolting everything else
Shocks and coil springs: Sorry but i dont not have a pic for this step (yet) but i will do my best to describe it until i can get one. There are 2 shock towers in the engine bayon either side of the frame. Remove the nut that is on top of them. Next go under your truck and rite under your coil springs there will be a bolt head remove that bolt (mine and ears on the nut so i diddn't have to hold it with a wrench) and your shocks are unbolted. Next i put 2 jacks under each end of the axle and removed that set of jackstands. I then lowered the axle until my springs pretty much fell out and removed them and the shocks. If you cant get your axle to drop far enough for this step you may need to go pick up a set of spring compressors.
Control Arms: Next step is to unbolt the control arms on the axle side. If you are working on a northeren truck, as both of mine our, be ready for some hard times cause these bolts love to rust to the bushing sleeve. The upper control arm bolts weren't to bad to get out on mine but i did have to hit them a couple times with a hammer, make sure you place the nut on end of the bolt to protect the threads if you plan on reusing them. The lower control arm bolts are a different story though. These bolts are special too, because they are a cam style bolt and this is the way you control your caster. They are also a dealer only item, i bought a set from napa but they are to small but they work for now. I have taken these bolts out of 2 different axles now and both times they have snapped on me and i have had to cut them out which is where the grinder or torchs come into play. But realize if you are reusing your control arms (i wasnt) that you are still going to have to get that piece out of your bushing or replace the bushing.
control arms
cam bolts
what happens when they are removed
Brakes: For the brakes i simple unbolted the calipers from the knuckles and placed them on a bucket, this way i would have all my brake fluid dripping out on to the floor.
Step 3: drop axle on jacks and drag out from under your truck.
Installation is pretty much the same steps just in reverse. Some things that i transferred over from my 44 were: Drag-link end, lift brackets, and CAD vacuum unit. I did this cause mine were either new and better condition or the parts just weren't there on the 60.
Brakes: The brakes on the 2500's are bigger so i don't think the 1500's will fit (1500 , i didn't even try to put mine on cause the 60's were like brand new anyway. But my brake lines bolted up perfectly to them just make sure you take the little copper crush washer and put it between the line and caliper or you will have a steady leak of brake fluid.
just some pics to show the size difference the caliper on the top is the one off the 44.
Thats pretty much all i can think of that is different from the removal. All you got to do now is torque to spec following your Haynes Manual or lift company's specs, make sure to recheck after about 50 miles, then built on your new 8 lug rims, bolt pattern 8x165 i believe (please correct me if im wrong,) and then your ready to head to the alignment shop or break out your tape string and level and align it yourself (that's is a different DIY for someone else if there isnt one already.)
Last edited by jasonw; Jul 15, 2010 at 07:31 PM.