


anyone have some painting knowledge?

Professional
Joined: May 2011
Posts: 103
Likes: 0
From: GA
* Some stuff I forgot in the previous post is auto motive masking tape, a tack cloth or two, paint sticks, dust mask and goggles. You don't want to breath the fiberglass filler dust or get it into your eyes.
Here is a short video of the Raptor product being installed. Notice at about 13 seconds into it the have a stud welder displayed. If you can borrow or rent one they can save you a lot of time. Though you can do it with out one.
http://www.youtube.com/watch?v=pKDpY...eature=related
Please post some picture of the dents so I can tell how to go about pulling / hammering them out. Here's some generalized information on dents.
http://www.youtube.com/watch?v=cVtCakrSigU&NR=1
http://www.youtube.com/watch?v=LwIVc...eature=related
Note they use 24 grit to grind the paint off which is perfectly fine. I normally use 40 grit.
http://www.youtube.com/watch?v=shc4A...eature=related
In the subsequent video(s) they are talking about mixing body filler and hardener. The Bondo Hair body filler or similar other brands mixes the same way. Also know this about the hardeners and fillers. Depending on the amount of filler, the temperature, humidity, time of day, weather, region etc. can effect the amount of harder you need to add to the filler. Too much hardener will cause the fillers to dry to quickly or do some crazy stuff. Too little hardener and the filler will take a LONG time to dry which could also cause problems down the road. Some of these videos, for example, use way to much hardener for where I live. How ever you may need to use that much. This will be something you'll have to figure out on your own.
Further more when mixing the hardener with the filler don't stir it... pull it to you with the applicator as they do in the videos. Stiring it will create air pockets in it.
http://www.youtube.com/watch?v=zwbQn...eature=related
I believe he mentioned a "cheese grader." The cheese grader he's talking about is not the same thing you have in the kitchen. They work the same but that's it. BTW I don't for see you needing one. You can use 40 grit instead of it if needed. Other wise use 80 grit to get it worked down then 180 grit to finish it up.
This guy explains it in detail.
http://www.youtube.com/watch?v=eygKD...feature=relmfu
http://www.youtube.com/watch?v=_9MhX...eature=related
Notice in this one how they sand the panels in a "X" type pattern going in a relatively 45* angle with the sanding block / file? This is the preferred method to use.
This guy explains it well but does a lousy job of demonstrating it.
http://www.youtube.com/watch?v=cUj_j...eature=related
Again he uses different grits than what I suggested. However you'll notice that it's still the same principle. You can use those grades but don't skip more than a hundred between grits of sand paper.
Continued....
Thread Starter
|
Registered User
Joined: Jun 2011
Posts: 40
Likes: 0
From: Houston, Tx
finally got the pictures, sorry its taken so long..been out of town and things have been hectic. Gonna upload the pictures and post them now. also thanks for all the videos, very helpful information!
Thread Starter
|
Registered User
Joined: Jun 2011
Posts: 40
Likes: 0
From: Houston, Tx
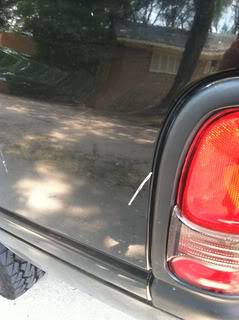
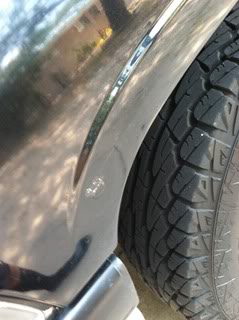
so im gonna go ahead and include some pictures of dents on the truck so I can go ahead and get your advice on them.


thanks a lot for all the info man! learned so much about body work already
thanks a lot for all the info man! learned so much about body work already
Professional
Joined: May 2011
Posts: 103
Likes: 0
From: GA
I thought you were only talking about the inside of the truck bed?
Or are going to Raptor line the whole truck? If you do I want to see finished pictures.
Just some heads up on the exterior dents... the one on the curved portion of the rear wheel well is going to be relatively difficult to fix. I know because I fixed a similar dent in the same area on my truck.
Another thing is, unless you'll be repainting the whole vehicle, matching the repaired area with the existing paint job. All though it can be done it's beyond my skill level. Sure you can buy the same brand and color paint to put on it but it will still not match unless you're extremely luckily.
BTW does your school have an auto body shop class?
More to come....
Or are going to Raptor line the whole truck?
If you do I want to see finished pictures. Just some heads up on the exterior dents... the one on the curved portion of the rear wheel well is going to be relatively difficult to fix. I know because I fixed a similar dent in the same area on my truck.
Another thing is, unless you'll be repainting the whole vehicle, matching the repaired area with the existing paint job. All though it can be done it's beyond my skill level. Sure you can buy the same brand and color paint to put on it but it will still not match unless you're extremely luckily.
BTW does your school have an auto body shop class?
More to come....
Last edited by garam; Jul 6, 2011 at 08:07 PM.
Thread Starter
|
Registered User
Joined: Jun 2011
Posts: 40
Likes: 0
From: Houston, Tx
no im only lining the bed lol :P the main dents I am concerned about are the two large one on the fender wells in the bed, I only included the others on the truck to see what you thought about them lol I am actually only gonna be a freshman and havnt been able to see if there is a auto body shop class because I am trying to get some of my basic courses out of the way but I am def gonna see if there is some kind of auto/shop club or extracurriculuar once the school year starts.
Professional
Joined: May 2011
Posts: 103
Likes: 0
From: GA
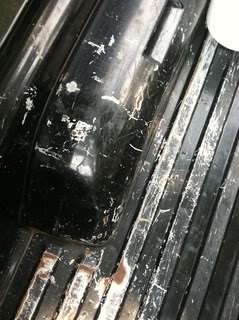
When you get your supplies go ahead and get a cheap auto body hammer and dolly set. I think I've seen them at parts stores for about $12.
Now the dent below can be knocked out with an auto body hammer (preferably) if you take the plastic cover off within the wheel well. But if you do that buy some new fasteners to replace them. But check the parts stores before cutting the old ones off.
Attachment 13530
This guy does an excellent job at explaining and demonstrating the proper way to use a dolly and hammer.
http://www.youtube.com/watch?v=yFkv6Ju2kDA
Now on this part above, you'll need some help with it. Also after you get the high spot knocked down you may need to start tapping the underside with the hammer and using the dolly on the topside. Like the guy in the video says avoid hitting hammer on dolly directly. Doing so can thin the metal.
Last edited by garam; Jul 1, 2012 at 05:47 PM.
Professional
Joined: May 2011
Posts: 103
Likes: 0
From: GA
If you can get some rust treatment and or rust preventatives, that's compatible with body fillers, use it where ever you go to bare metal. The existing rust spots can be sanded down. For the pitted rust spots you can use body fillers to fill them in.
BTW will the liner be inside the lip or applied to the top rail also?
Last edited by garam; Jul 7, 2011 at 11:54 AM.