


trans shift linkage removal


Thread Starter
|
All Star
Joined: Jul 2011
Posts: 792
Likes: 0
From: Missouri
Sorry for the questions...but I tryd to remove the auto trans shift linkage and I removed it from the steering colum&I removed the lock nut from the bottom but it's still not budging am I supposed to do something else?It is kind of late&I looked in the book but couldn't find what I need,also searched &got nada
Legend
Joined: Jul 2011
Posts: 8,259
Likes: 4
From: Austin, TX
I was thinking there is a clip that holds the rod on at the bottom...but it has been a while since I dropped my tranny. The only nut I recall is the linkage bracket but I am not sure.
I will head out to garage shortly and crawl under to refresh my memory.
See if this helps:
I will head out to garage shortly and crawl under to refresh my memory.
See if this helps:
Thread Starter
|
All Star
Joined: Jul 2011
Posts: 792
Likes: 0
From: Missouri
Number 10 is the lock nut&Im trying to remove the rod.Also figured since the other thread was titled towards help with my ebrake&I said I had already figured it out,it wouldnt do much good to add to it.So...Ive removed said nut.Any idea what now?And if it'll be better if I have any further questions about install of the bl Ill add it to existing post.
Champion
Joined: Sep 2011
Posts: 3,891
Likes: 8
From: NorCal
Agreed with Zman -- Merge all threads related to the body lift into the thread that started it all. 
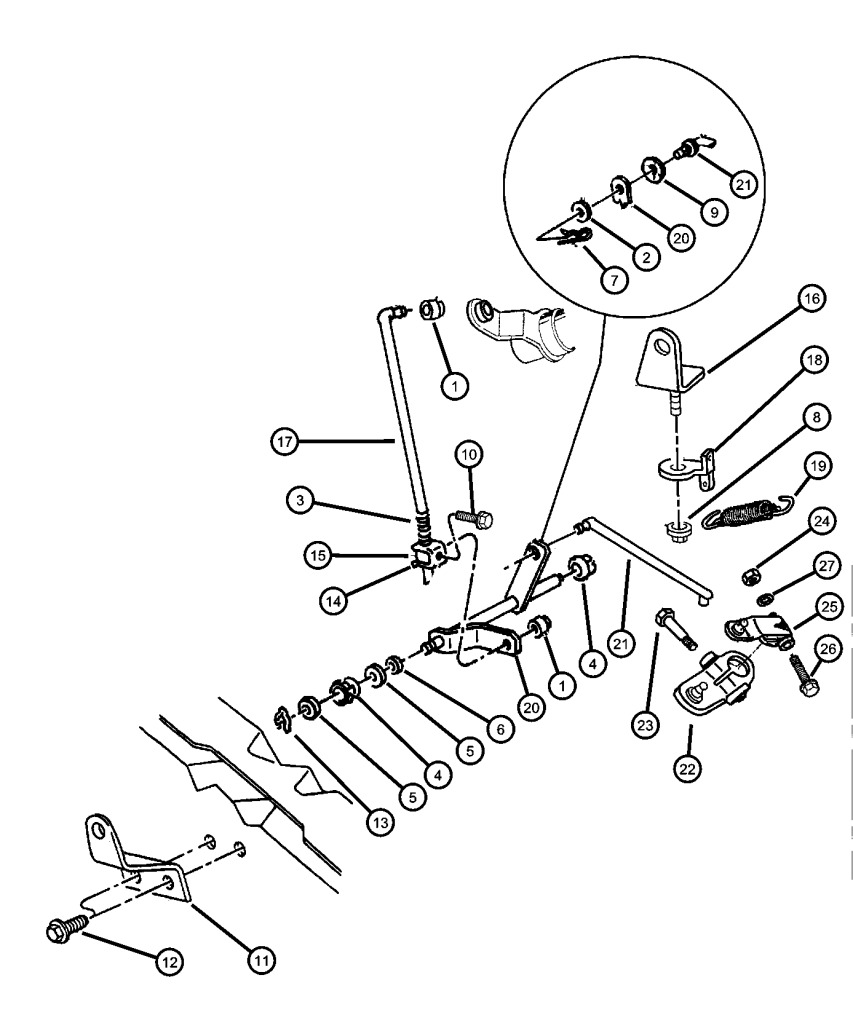
gdstock got the right diagram.
You shouldn't have to mess with the steering column at all. It's mostly contorting your body and hands to reach the linkage at the top, near the firewall.
Loosen the locknut (item 10) on the bottom at the transmission.
Then shoot some wd-40 or PB or w/e lube onto the rubber grommet of the top attachment point. I ended up using channel locks to get the leverage to pop it out. It is a PITA.
Also, it's better to replace the lever in reverse order. Top first, then feed the bottom into the sleeve w/ locknut. You'll be fighting the spring a little, but the transmission lever should already be in the down position to give you some play.
Another tip, b/c I believe you are taking out to do extension, BEFORE you cut the linkage SCRIBE a line lengthwise. Cut in the middle of that line to separate your linkage. Put extension in and align the scribe marks. This is so when you position the linkage for welding, the 2 ends are lined up where they need to be for replacement.
Legend
Joined: Jul 2011
Posts: 8,259
Likes: 4
From: Austin, TX
OK. I am totally confused. Cuttroat, what is it you are trying to do that this linkage needs to come off. When I dropped my tranny (three times) I did not mess with that bolt that adjuts the linkage at all.
Maybe if we knew what your goal is we could help more.
Maybe if we knew what your goal is we could help more.
Thread Starter
|
All Star
Joined: Jul 2011
Posts: 792
Likes: 0
From: Missouri
Agreed with Zman -- Merge all threads related to the body lift into the thread that started it all.
gdstock got the right diagram.
You shouldn't have to mess with the steering column at all. It's mostly contorting your body and hands to reach the linkage at the top, near the firewall.
Loosen the locknut (item 10) on the bottom at the transmission.
Then shoot some wd-40 or PB or w/e lube onto the rubber grommet of the top attachment point. I ended up using channel locks to get the leverage to pop it out. It is a PITA.
Also, it's better to replace the lever in reverse order. Top first, then feed the bottom into the sleeve w/ locknut. You'll be fighting the spring a little, but the transmission lever should already be in the down position to give you some play.
Another tip, b/c I believe you are taking out to do extension, BEFORE you cut the linkage SCRIBE a line lengthwise. Cut in the middle of that line to separate your linkage. Put extension in and align the scribe marks. This is so when you position the linkage for welding, the 2 ends are lined up where they need to be for replacement.
Trending Topics
Retired Moderator - RIP
Joined: May 2008
Posts: 18,729
Likes: 17
From: NH
Same thread would have been fine, I assume what you are doing is related to it. If you are adjusting linkeage, ALL the info you need to do it properly is in the Haynes and or FSM. #10 is a bolt not a "lock nut"
Thread Starter
|
All Star
Joined: Jul 2011
Posts: 792
Likes: 0
From: Missouri
Weld a extension in for the body lift