


HID Fog light wiring DIY!

Thread Starter
|
Veteran


Joined: Jul 2012
Posts: 436
Likes: 1
From: Hazlet, NJ
So I installed my HID kit this morning and it was a PITA. The bulbs didn't fit the fog housing right, and they didn't include the proper connector for the wire socket. So I had to get creative. This DIY is just going to be for the wiring side. Installing the bulbs is pretty straight forward.
I think it was mentioned here before that on most of the H16 LED and HID bulbs, the 3 little guide tabs on the bulbs don't come anywhere close to lining up with the 3 grooves on the fog housing. I don't have pics of this, but you basically just dremel all 3 tabs off your aftermarket bulb. *You DON'T modify the fog housing. Then the little snap clips will hold the bulb in place. When you get your kit, you'll see exactly what I mean.
Now, for the wiring. The kit I bought didn't include an H16 plug socket to connect to the factory fog light bulb plug. Pictured below is what was included, which was WAY too big to fit into the tiny connectors on the bulb plug:

So instead of going all crazy and splicing into the factory wiring for a connection, I made my own socket out of the stock H16 bulbs. To me, this was the best idea, and I'll explain why later. You start by taking a pair of pliers, and popping the glass capsule and metal collar off of the plastic bulb base. Just watch your eyes because there is pressure inside the glass and it will pop once you break it off. Should look exactly like this when you're done. You can cut down the filament wires if they are too long.

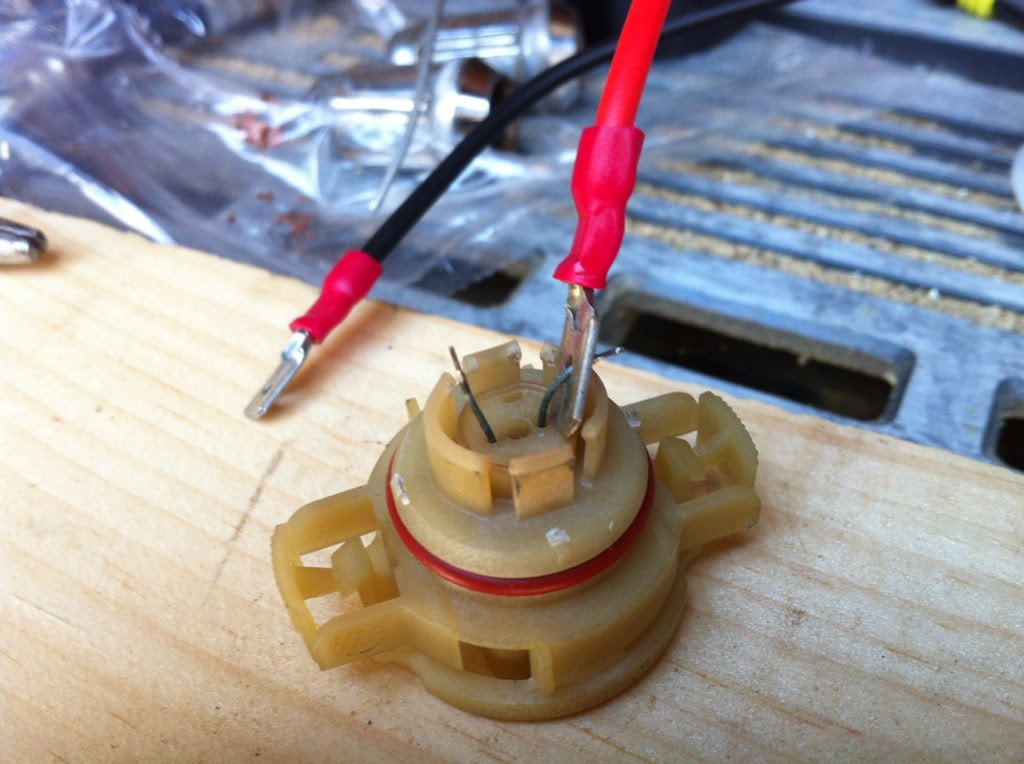
Now the next part is tricky and important. You have to plug the bulb base into the fog light plug, turn on the fog lights, grab a multimeter or test light, and verify which lead in the H16 socket is positive and which is negative. Once you verify, mark it somehow so you'll remember. I just bent the positive one way to the side. And do the same for the second socket. Now take the RED wire of the ballast plug and slip the positive lead through the little hole of the spade terminal like picture below:
Now drop a bit of solder on there and do the same for the BLACK wire (yeah, I know my soldering sucks. LOL):

Now if you want, you can plug up the wiring and HID kit to verify you soldered the correct polarity. *IMPORTANT: DO NOT let the solder for the red and black wires touch while you're testing or you might blow your fog light fuse. The leads are still pretty flimsey at this point. So be very careful before you turn on the light switch. Throw some electrical tape between the connections temporarily if it will make you feel safe.
Once you verify the socket works, disconnect it and grab some quick drying epoxy or high temp silicone. This is to isolate the red and black soldered connections from touching each other. I didn't have all day to wait, so I used some 4 minute epoxy. Works great, fast, and hardens up like a rock. The silicone is great too and tends to never come off like epoxy can from heat. But it takes forever to dry. If you have time to kill, you can go this route. However, this application won't be seeing too much extreme heat since it's just an electrical connection, so the epoxy should be fine for the long haul.
Just slop your poison in between the connections and smush and smooth it in with a flat head. Should look something like this:

Once the slop dries, you can bend the wires straight and tape it all up:

DONE! Now plug up your kit and secure your ballasts. I just zip tied mine to some of the factory wiring near the headlights. Couldn't find a good spot to actually bolt my ballasts to. 2 zip ties each ballast did the trick.
Now I know this is A LOT of work (actually only took me 40 minutes), but the major benefit is that your HID ballast will get the most tight, water sealed connection and you don't have to hack up your factory wiring. You can always just buy a new pair of bulbs if you ever need to go back to stock. The ballast is now basically connected as tight as a factory connection and you don't have to worry about moisture or corrosion getting into the plug and causing a poor connection like you do if you just use the spade connections the HID kit supplies. Happy soldering!
I think it was mentioned here before that on most of the H16 LED and HID bulbs, the 3 little guide tabs on the bulbs don't come anywhere close to lining up with the 3 grooves on the fog housing. I don't have pics of this, but you basically just dremel all 3 tabs off your aftermarket bulb. *You DON'T modify the fog housing. Then the little snap clips will hold the bulb in place. When you get your kit, you'll see exactly what I mean.
Now, for the wiring. The kit I bought didn't include an H16 plug socket to connect to the factory fog light bulb plug. Pictured below is what was included, which was WAY too big to fit into the tiny connectors on the bulb plug:
So instead of going all crazy and splicing into the factory wiring for a connection, I made my own socket out of the stock H16 bulbs. To me, this was the best idea, and I'll explain why later. You start by taking a pair of pliers, and popping the glass capsule and metal collar off of the plastic bulb base. Just watch your eyes because there is pressure inside the glass and it will pop once you break it off. Should look exactly like this when you're done. You can cut down the filament wires if they are too long.
Now the next part is tricky and important. You have to plug the bulb base into the fog light plug, turn on the fog lights, grab a multimeter or test light, and verify which lead in the H16 socket is positive and which is negative. Once you verify, mark it somehow so you'll remember. I just bent the positive one way to the side. And do the same for the second socket. Now take the RED wire of the ballast plug and slip the positive lead through the little hole of the spade terminal like picture below:
Now drop a bit of solder on there and do the same for the BLACK wire (yeah, I know my soldering sucks. LOL):
Now if you want, you can plug up the wiring and HID kit to verify you soldered the correct polarity. *IMPORTANT: DO NOT let the solder for the red and black wires touch while you're testing or you might blow your fog light fuse. The leads are still pretty flimsey at this point. So be very careful before you turn on the light switch. Throw some electrical tape between the connections temporarily if it will make you feel safe.
Once you verify the socket works, disconnect it and grab some quick drying epoxy or high temp silicone. This is to isolate the red and black soldered connections from touching each other. I didn't have all day to wait, so I used some 4 minute epoxy. Works great, fast, and hardens up like a rock. The silicone is great too and tends to never come off like epoxy can from heat. But it takes forever to dry. If you have time to kill, you can go this route. However, this application won't be seeing too much extreme heat since it's just an electrical connection, so the epoxy should be fine for the long haul.
Just slop your poison in between the connections and smush and smooth it in with a flat head. Should look something like this:
Once the slop dries, you can bend the wires straight and tape it all up:
DONE! Now plug up your kit and secure your ballasts. I just zip tied mine to some of the factory wiring near the headlights. Couldn't find a good spot to actually bolt my ballasts to. 2 zip ties each ballast did the trick.
Now I know this is A LOT of work (actually only took me 40 minutes), but the major benefit is that your HID ballast will get the most tight, water sealed connection and you don't have to hack up your factory wiring. You can always just buy a new pair of bulbs if you ever need to go back to stock. The ballast is now basically connected as tight as a factory connection and you don't have to worry about moisture or corrosion getting into the plug and causing a poor connection like you do if you just use the spade connections the HID kit supplies. Happy soldering!
Last edited by DJ Hellfire; Jan 14, 2013 at 10:24 AM.