Pacesetter LT headers DIY
#1
Join Date: Jan 2009
Location: Minot AFB, ND in person, the 'burgh at heart
Posts: 3,411
Likes: 0
Received 1 Like
on
1 Post
Finally got my LT headers installed today. Decided to do a quick write-up about since there wasnt one yet. Sorry for the crappy pics, had to use my phone cause i'm an idiot and didnt charge the camera battery. If you have any questions, feel free to PM me.
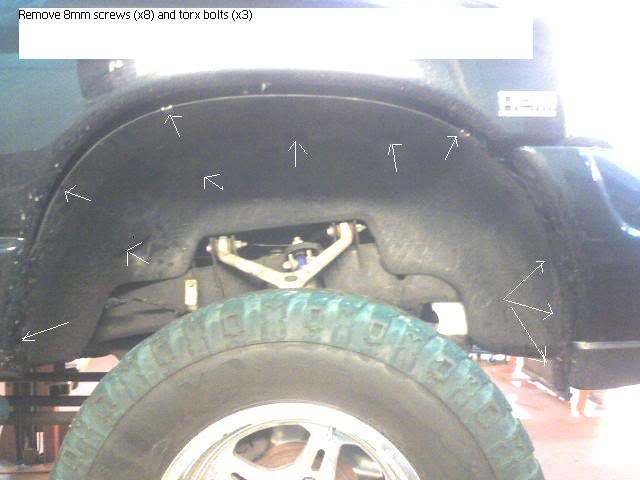
1. Remove the 11 screws holding on the wheel well liner and remove the liner. Before you can pull it all the way out, there is a plastic clip holding some wires. pull the clip out of the back of the wheel well liner.
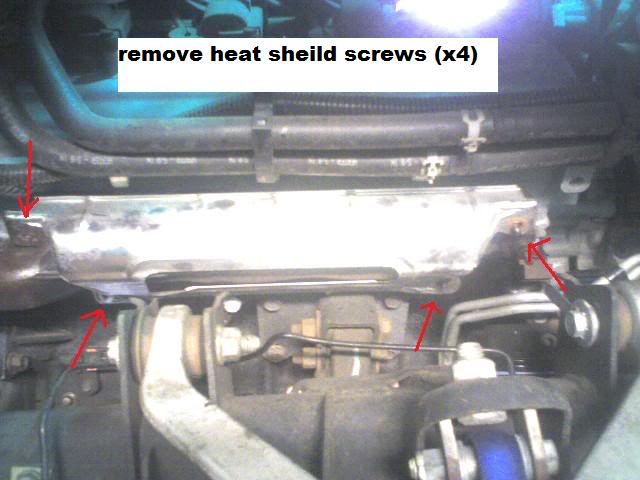
2. remove the 4 nuts holding on the aluminum heat sheild.
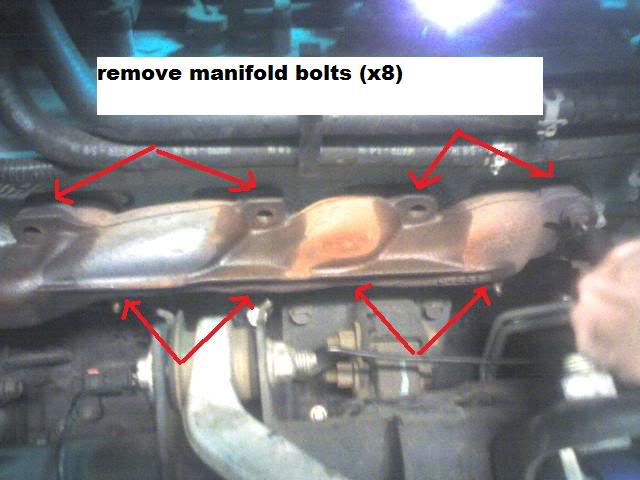
3. Remove the 8 manifold bolts. CAUTION: do NOT force them! If you even BEGIN to shear one off you're in a world of hurt. If you feel it start to seize up, spray some wd-40 or pb blaster in there and re-tighten. Then loosen it again. If it still sticks, spray again and tighten. By loosening and tightening, you're allowing the lubricant to soak into all the threads.
4. Loosen the two bolts connecting the manifold to the pipe. Remove manifold.
5. You'll need to figure out a way to get the exhaust back to the muffler out. You're not gonna need it, so hack away. I wasnt positive the setup was going to fit, so I kept everything in tact until I was sure it was going to work.
6. (4x4 only) Its possible you'll need to disconnect the front drive shaft to allow the old exhaust room to get out, and room for the new headers to slide in. Remove the 4 bolts holding on the front drive shaft (at the front yoke). Tip: either use an impact wrench or put the truck in 4x4 to keep the driveshaft from turning.
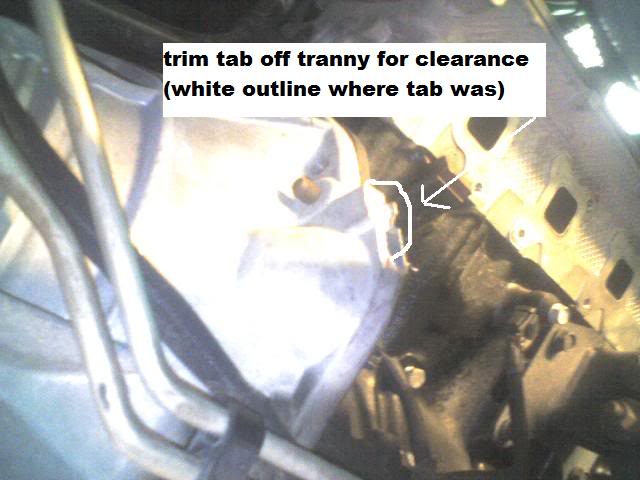
7. Once old exhaust is gone, test fit new headers. Its a tight sqeeze, but they will squeeze up there. To fit the passenger side, you may need to trim a small tab off the transmission bell housing to prevent rubbing on the header. A hack saw will take it off in about 3 minutes due to the soft metal. Cut right through the bolt hole (about 3/4" off). I cut a small peice of aluminum out of the old manifolds heat shield to cover the hole that will appear when removing the tab. I just tacked it in place with some jb weld. there is no reason other than to keep dirt out of the bell housing. Leaving the small opening there wouldnt really hurt anything.
8. Remove headers. (optional: plug exhaust chambers. Do NOT use paper towels or anything else that will leave dust/debris behind) Get some sandpaper (roughly 150 grit) and start sanding. Make sure to get off all carbon deposits (black stuff) and everything else not bare metal. The heads should be shiny when you're done. (the wet spots in the pics are wd-40 overspray from removing bolts before).
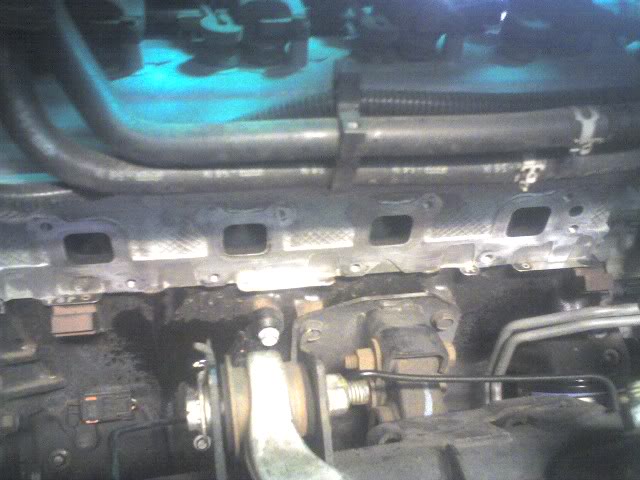
9. Spray some wd-40 on a rag and wipe down the heads to remove any leftover dust. DO NOT use an air hose to blow dust off. Doing so will cause an excess amount of debris to go into the exhaust chamber.
10. Put headers back in, line up, and put the new gasket in place. Be careful not to damage the gasket. Start putting bolts in finger tight. Do NOT torque anything yet.
11. Once all bolts are finger tight, torque the bolts to 23 ft lbs (or as otherwise instructed) going from inside out (see picture)
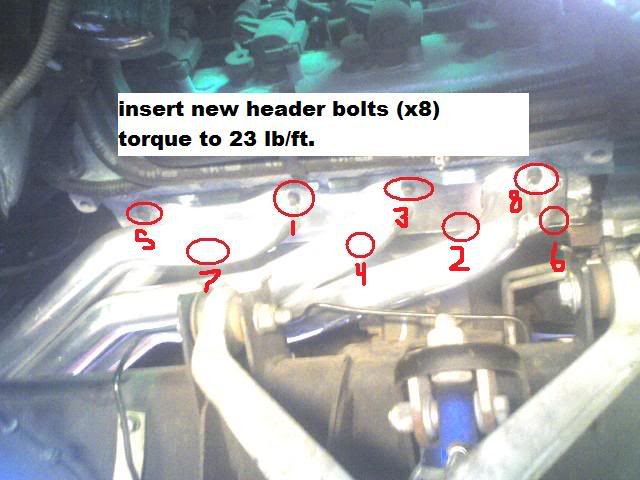
12. Once tight, start engine and run for 3-5 minutes. Allow headers to cool (blowing compressed air on them helps speed the process). Go back through and retorque.
13. If you choose to remove catalytic converters, see DIY "how to remove CEL light when removing cat". If you decide to keep your cats, you'll need to fab up a new y-pipe as well as extend your rear o2 sensor wires about 18". I used the y-pipe kit from moesperformance. its also jet hot coated and everything fit together perfectly...the way pre-bent stuff is supposed to be.
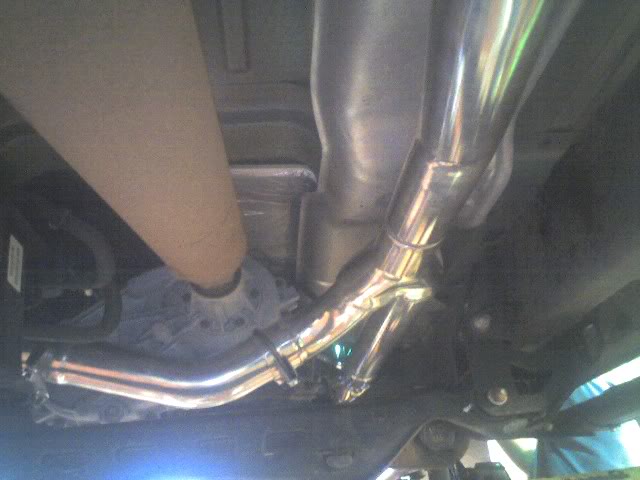
14. Once everything is in place, go back and double check all bolts are tight. If you disconnected the drive shaft, reconnect it.
15. Put the wheel well liners back in and tighten all 11 bolts.
16. Start engine, rev engine, listen to your HEMI purrrrrr.
Expect this install to take all day. Ideally, you will have 2 people. It took me about 6 hrs with a buddys help. If you're by yourself, good luck...
1. Remove the 11 screws holding on the wheel well liner and remove the liner. Before you can pull it all the way out, there is a plastic clip holding some wires. pull the clip out of the back of the wheel well liner.

2. remove the 4 nuts holding on the aluminum heat sheild.

3. Remove the 8 manifold bolts. CAUTION: do NOT force them! If you even BEGIN to shear one off you're in a world of hurt. If you feel it start to seize up, spray some wd-40 or pb blaster in there and re-tighten. Then loosen it again. If it still sticks, spray again and tighten. By loosening and tightening, you're allowing the lubricant to soak into all the threads.

4. Loosen the two bolts connecting the manifold to the pipe. Remove manifold.
5. You'll need to figure out a way to get the exhaust back to the muffler out. You're not gonna need it, so hack away. I wasnt positive the setup was going to fit, so I kept everything in tact until I was sure it was going to work.
6. (4x4 only) Its possible you'll need to disconnect the front drive shaft to allow the old exhaust room to get out, and room for the new headers to slide in. Remove the 4 bolts holding on the front drive shaft (at the front yoke). Tip: either use an impact wrench or put the truck in 4x4 to keep the driveshaft from turning.
7. Once old exhaust is gone, test fit new headers. Its a tight sqeeze, but they will squeeze up there. To fit the passenger side, you may need to trim a small tab off the transmission bell housing to prevent rubbing on the header. A hack saw will take it off in about 3 minutes due to the soft metal. Cut right through the bolt hole (about 3/4" off). I cut a small peice of aluminum out of the old manifolds heat shield to cover the hole that will appear when removing the tab. I just tacked it in place with some jb weld. there is no reason other than to keep dirt out of the bell housing. Leaving the small opening there wouldnt really hurt anything.

8. Remove headers. (optional: plug exhaust chambers. Do NOT use paper towels or anything else that will leave dust/debris behind) Get some sandpaper (roughly 150 grit) and start sanding. Make sure to get off all carbon deposits (black stuff) and everything else not bare metal. The heads should be shiny when you're done. (the wet spots in the pics are wd-40 overspray from removing bolts before).

9. Spray some wd-40 on a rag and wipe down the heads to remove any leftover dust. DO NOT use an air hose to blow dust off. Doing so will cause an excess amount of debris to go into the exhaust chamber.
10. Put headers back in, line up, and put the new gasket in place. Be careful not to damage the gasket. Start putting bolts in finger tight. Do NOT torque anything yet.
11. Once all bolts are finger tight, torque the bolts to 23 ft lbs (or as otherwise instructed) going from inside out (see picture)

12. Once tight, start engine and run for 3-5 minutes. Allow headers to cool (blowing compressed air on them helps speed the process). Go back through and retorque.
13. If you choose to remove catalytic converters, see DIY "how to remove CEL light when removing cat". If you decide to keep your cats, you'll need to fab up a new y-pipe as well as extend your rear o2 sensor wires about 18". I used the y-pipe kit from moesperformance. its also jet hot coated and everything fit together perfectly...the way pre-bent stuff is supposed to be.

14. Once everything is in place, go back and double check all bolts are tight. If you disconnected the drive shaft, reconnect it.
15. Put the wheel well liners back in and tighten all 11 bolts.
16. Start engine, rev engine, listen to your HEMI purrrrrr.
Expect this install to take all day. Ideally, you will have 2 people. It took me about 6 hrs with a buddys help. If you're by yourself, good luck...

