

DIY Remote Start for $170 or less

Thread Starter
|
Champion
Joined: Feb 2010
Posts: 3,686
Likes: 0
From: Greenfield, Wisconsin
Hey everyone,
I haven't seen much talk about the DBALL modules here, but long story short, the Ram trucks are remote start ready and these modules can be used to remote start your vehicle with 3x presses of the lock button. There is alot of information for the 09-12 Rams out there, and all is required is a flashed DBALL module and a wiring harness if you'd prefer. This will generally run you less than $75. For 2013's, you pay for the more expensive (and less available) harness and the ability to program with Key2Go. If you're interested in a kit, check out the XpressKit website, download the RSR Install Guide for your vehicle, and it will give you a good idea of whats involved.
For those in the same boat as I was, if you'd like the DBALL option for you 13+ Ram, a additional install process is required called Key2Go, and it required a dealer log in. There is an eBay seller (no affiliation) that provides this access with the purchase of the kit, so you can still DIY. The following is the link for the kit I purchased:
http://cgi.ebay.com/ws/eBayISAPI.dll?ViewItem&item=291031934517#ht_1279wt_922
If you want to install this on a 13 Ram but install it with hardwiring, use this kit:
http://www.ebay.com/itm/290949412594...84.m1423.l2649
For the 09-12s, there are a ton of different purchasing options you can take, including buying the module and flashing it yourself with the ~$25 xloader, or you can purchase from someone who will flash it for you, generally for free or low cost.
Below are some install instructions from my install yesterday. This applies for 13+ Rams only, as the 12's are different. There is information out there for the 12's and older, and the process is similar and slightly simpler. Just thought I would put the bug out there if anyone was interested in a system that works well.
I'll briefly go over what's involved and some of the obstacles I had. I definitely don't think it takes a rocket scientist to install this, but it's not something I'd recommend for everyone. If you have a general knowledge of car wiring and using a simple browser interface to load firmware on to a device, you should be fine.
I would highly recommend the harness for simplicity reasons, however it is totally possible to install this module without it. For 2012 and older models, there is a different harness available. Personally, I'm color blind so that's my hardest challenge when wiring. For the wiring that had to be done, I just had my brother assist me with picking out the right wires.
So whats you will receive from Doug (the ebay seller above) if you purchase his kit:
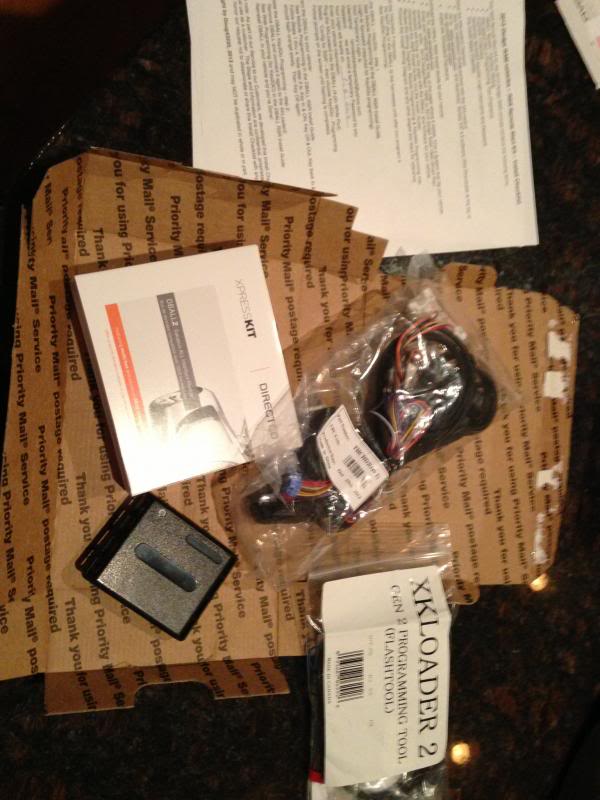
In a small box, you'll receive the DBall2 in original packaging with universal wiring, the XLoader, the harness, and some simple instructions that take you step-by-step. At this point I had already found the RSR wiring guide so I had an idea of what was involved. Doug's instructions are pretty similar, however they are a little more clear in the order that you should do them.
My first obstacle after reading the instructions were the login credentials for Key2Go. He provides your user ID on the instructions, but states he will email your password. At the time of arrival, I had no password. A quick eBay message to him though solved this. I was worried I was going to have to wait until Monday, but he responded in the late afternoon on Saturday with my credentials.
The wiring diagram on the RSR Install guide displays the harness as it comes, minus a few miscellaneous wires. Before taking it to the truck, I just zip tied the extra loose wires and left the two that I would need for parking lights and RAP OFF loose.
Next came the install of the harness.
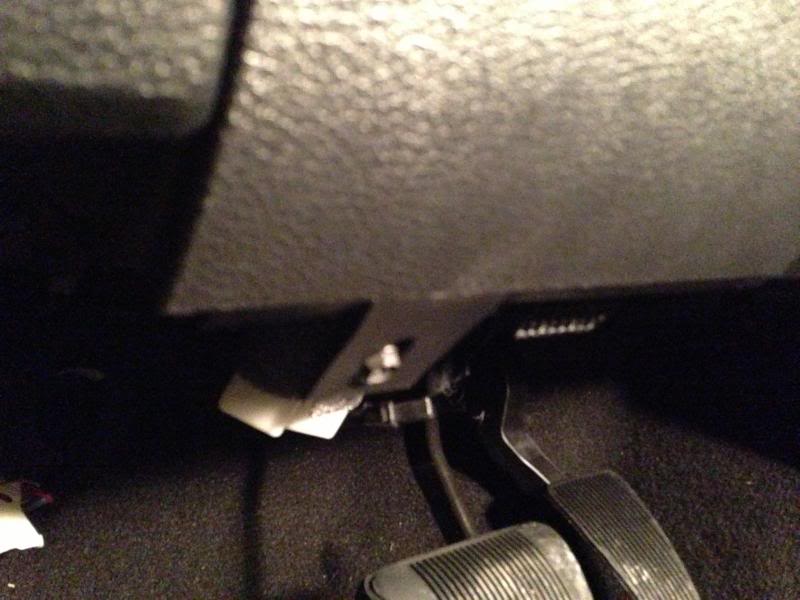
1. Remove the two screws at the bottom of the kick panel. The panel pulls out on the bottom, and lifts straight up and out.
2. Connect the OBDII to the harness. The harness replaces the current OBDII connection in the kick panel. Simply unclip it, put the harness OBDII in to the kick panel.
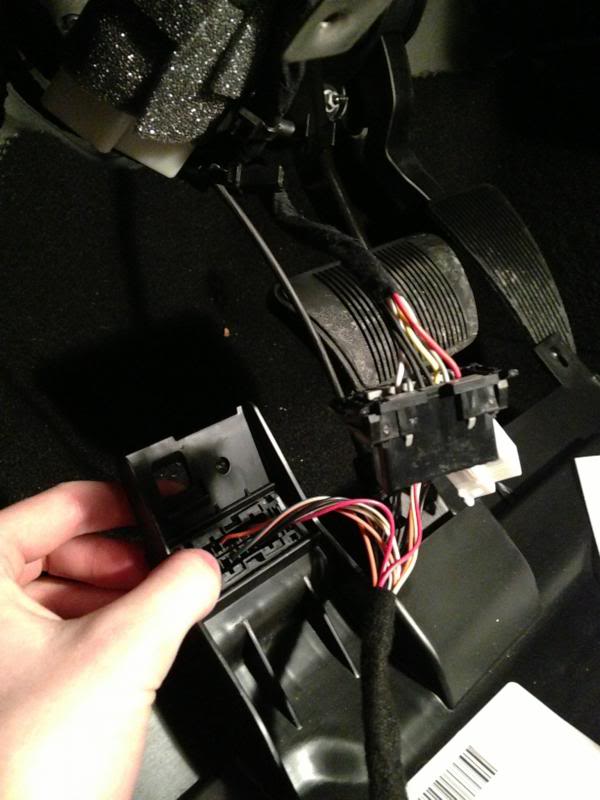
Connect and lock in the tab on the harness to the vehicle OBDII connection.
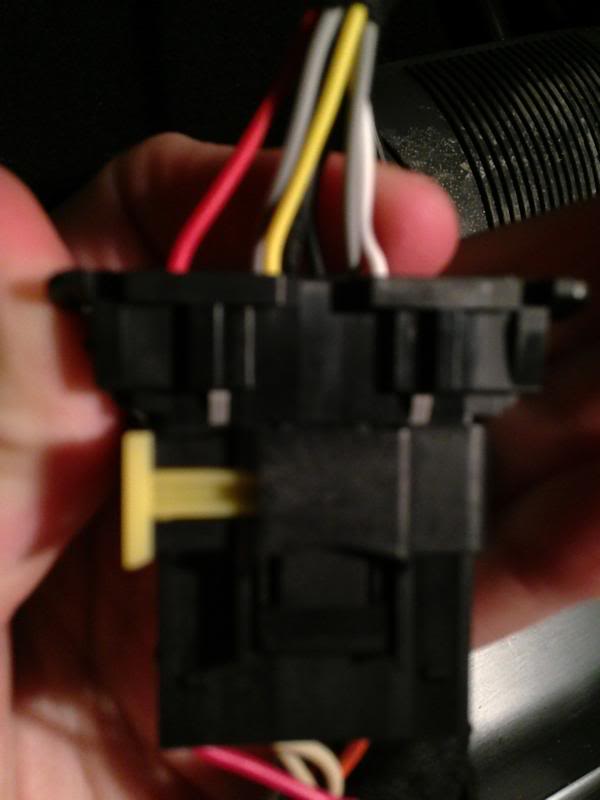
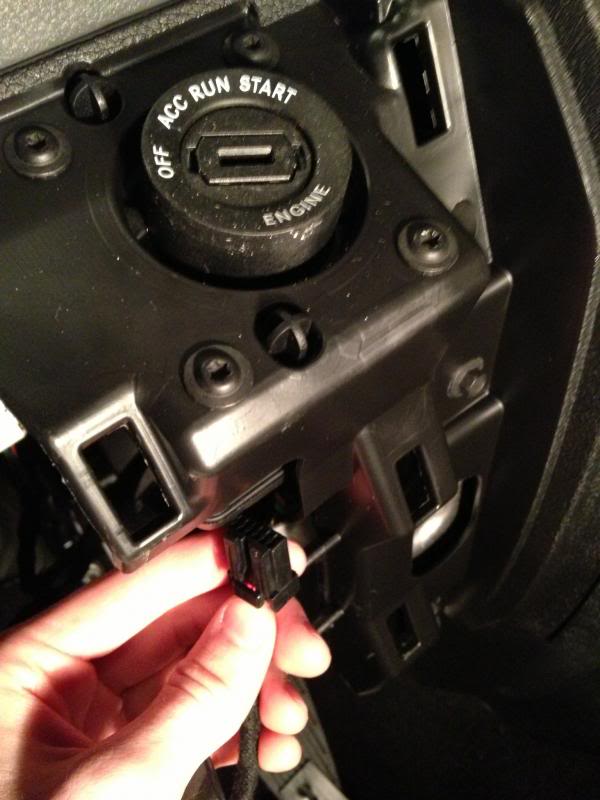
3. Make the connection to the ignition harness. This will be located on the back side of the key switch. There is a black connector that simply disconnects, connects to the harness, and the harness connects to the ignition. Be sure to follow the diagram and use the correct plugs (T-01 as labeled). Hint: look at the plug on the harness to see how it disconnects. There is a push tab on the side of the plug that faces the passenger side of the vehicle.
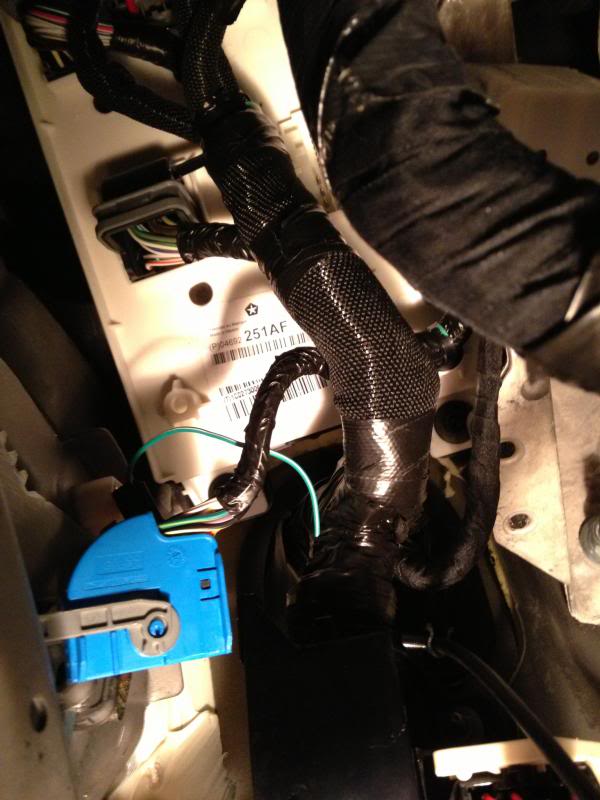
4. The trickiest part of the wiring is accessing the plugs connected to the BCM. The BCM is located above the parking brake, pretty much up behind the wheel. You can unplug the required two harnesses. They are on the side of the BCM facing the passenger side of the vehicle. These harness has large locking devices on them, so just be gentle to make sure you have the harness unlocked before tugging. If you have large arms, you might need help with this. In the photo below is the picture of the blue connector, and the white connector is floating behind it. The picture is taken from next to the parking brake. The harnesses only have a couple inches of slack, even after disconnecting the zip tie that the harnesses where held to the body with.
5. Locate the wires required to tap in to. Make sure you look at the harnesses from the wire side as these are how the pins are indicated according to the instructions. This was the next obstacle because usually I solder EVERYTHING due to the reliably and longevity of solder connections. I hate crimp connections, especially on small wires like 18ga, and I especially hate wire taps due to their likelihood of having a poor connection after a period of time. However, in this situation the only way I was getting the parking lights and RAP OFF wire connected, were through the use of wire taps. It would simply be impossible for me to solder in that location, much less strip the wire insulation off without cutting through the wire. Wire taps, in this situation, shouldn't pose an issue.
6. Now the fun part. Install the VIP 4.5 software from the Xpresskit home page. The software uses an IE plugin. You will need a Windows PC with IE. Install is pretty simple, and you will know you have successfully completed it when you receive a window that asks you to plug in your Xloader at this time, and allows you to launch Xpresskit.com.
7. Connect your Dball while on the Xpresskit homepage. You will see the plugin on the top right corner of the page, and your Dball information will load. Mine came with no firmware installed.
8. Login to the Xpresskit website using the credentials provided.
9. Pull up your vehicle using the drop down menus on the top left of the Xpresskit home page.
10. Under the correct Dball module, select the "Config for RSR" link and the plug-in will automatically bring up the firmware wizard. You will want to complete the Key2Go programming option.
11. Configure your Dball. This was probably the nicest part about having an Xloader. You're allowed to change the 3x lock timeout to up to 10 seconds. I have read several complaints about getting the vehicle to recognize 3 locks within 3 seconds. No worries here, as you can change the time to receive the lock commands. I set mine to 6. You can enable heated seats (if applicable) and/or the defroster/heated mirrors with the remote start, and set the temperature for at which point you would like them to come on. You are also allowed to change the run time to up to 60 minutes. There are a few other features in there, but none were applicable for an RSR install.
12. Click next and allow the module to be flashed. After flashing is complete, you will come to a page where Key2Go programming will be required. Go to the truck and plug in your module and follow the Key2Go programming sequence as described in the install guide. Once the programming is complete, unplug your module and take it back to your PC. Once the module is plugged in, refresh the page with the Key2Go request and you will find out if the programming was successful. If it allows you to "Submit Key2Go request" then everything worked. Allow it to finish the programming and this will be the end of the process. Note: It took me 3 attempts to get the Key2Go programming sequence at the vehicle to be recognized by the browser. I read while doing some research that others had the same issue and you are supposed to hit the "Lock" button during the Key2Go programming. I'm not exactly sure when you should hit the lock button, I ended up just pressing lock every time I removed the key from the ignition, including the last time. Between the failed attempts, I did not reflash or reset the module.
13. Go back to the vehicle and plug in your module for the last time. Be sure you plugged the harnesses that you removed from the BCM back in, or you'll get an engine light. If you forget, the truck will still start but your engine light will illuminate and your dash temp will read -40 (I know from experience). Simply recheck your connections, remove the positive battery connection for a couple minutes, and you should be good to go. Press your lock button 3 times, and your truck should start right up. Wire tie the module up in the dash along with the excess wiring from the harness, and put the kick panel back on.
Some observations:
1. You may ask why pit stop mode is not a feature on this install. Simple answer is with the key in the ignition, the lock button command from the remote is ignored from the truck making this function impossible. The reason this is not included on the Ram while it is on others isn't mentioned anywhere, but it was definitely a feature I was hoping it would have.
2. Take-over does not occur until your foot hits the brake. With the vehicle started, and your headlights on auto, only your parking lights will be illuminated until you hit the brake. When approaching the vehicle, the headlights will no longer illuminate if your remote start is active, and they will not turn on until you push the brake. Most factory systems allow take over once the key is turned to ON. The headlights illuminate like normal if remote start isn't active.
3. There are no safety devices on the remote start, unless you install the hood switch or use the safety switch on the harness. If you're used to Chrysler factory systems, this means doors can be ajar and your low fuel light can be on and the engine will still start. Also note, the engine starts and everything powers on including your radio and your wipers. Pay attention when getting out of the vehicle to your wipers, as this could be an easy way to destroy components if your windshield ices. Factory systems generally don't enable to wipers until the vehicle takeover has been completed.
5. This has been mentioned before on various install threads for this product. If you disable the "horn honk with lock" on your settings menu on the EVIC, you won't wake your neighbors up at night when you start your truck. Unfortunately, your aftermarket exhaust still will. You can also disable horn honk with the factory remote start if you didn't already know that.
4. Overall, this is an awesome add-on for a fraction of the factory system, and you get to keep the factory remote without any additional modules, unless you want to add a range extender/SmartStart. I saved $320 from the $500 quote I received from my dealer, and this module is more than worth it if you're happy with the range on your factory remote. Installation is extremely straight forward and simple with the harness. Without the harness, installation is still simple as the majority of the wires go to the OBDII and ignition harness, with the exception of the two hard-to-reach wires off of the BCM mentioned above.
I haven't seen much talk about the DBALL modules here, but long story short, the Ram trucks are remote start ready and these modules can be used to remote start your vehicle with 3x presses of the lock button. There is alot of information for the 09-12 Rams out there, and all is required is a flashed DBALL module and a wiring harness if you'd prefer. This will generally run you less than $75. For 2013's, you pay for the more expensive (and less available) harness and the ability to program with Key2Go. If you're interested in a kit, check out the XpressKit website, download the RSR Install Guide for your vehicle, and it will give you a good idea of whats involved.
For those in the same boat as I was, if you'd like the DBALL option for you 13+ Ram, a additional install process is required called Key2Go, and it required a dealer log in. There is an eBay seller (no affiliation) that provides this access with the purchase of the kit, so you can still DIY. The following is the link for the kit I purchased:
http://cgi.ebay.com/ws/eBayISAPI.dll?ViewItem&item=291031934517#ht_1279wt_922
If you want to install this on a 13 Ram but install it with hardwiring, use this kit:
http://www.ebay.com/itm/290949412594...84.m1423.l2649
For the 09-12s, there are a ton of different purchasing options you can take, including buying the module and flashing it yourself with the ~$25 xloader, or you can purchase from someone who will flash it for you, generally for free or low cost.
Below are some install instructions from my install yesterday. This applies for 13+ Rams only, as the 12's are different. There is information out there for the 12's and older, and the process is similar and slightly simpler. Just thought I would put the bug out there if anyone was interested in a system that works well.
I'll briefly go over what's involved and some of the obstacles I had. I definitely don't think it takes a rocket scientist to install this, but it's not something I'd recommend for everyone. If you have a general knowledge of car wiring and using a simple browser interface to load firmware on to a device, you should be fine.
I would highly recommend the harness for simplicity reasons, however it is totally possible to install this module without it. For 2012 and older models, there is a different harness available. Personally, I'm color blind so that's my hardest challenge when wiring. For the wiring that had to be done, I just had my brother assist me with picking out the right wires.
So whats you will receive from Doug (the ebay seller above) if you purchase his kit:

In a small box, you'll receive the DBall2 in original packaging with universal wiring, the XLoader, the harness, and some simple instructions that take you step-by-step. At this point I had already found the RSR wiring guide so I had an idea of what was involved. Doug's instructions are pretty similar, however they are a little more clear in the order that you should do them.
My first obstacle after reading the instructions were the login credentials for Key2Go. He provides your user ID on the instructions, but states he will email your password. At the time of arrival, I had no password. A quick eBay message to him though solved this. I was worried I was going to have to wait until Monday, but he responded in the late afternoon on Saturday with my credentials.
The wiring diagram on the RSR Install guide displays the harness as it comes, minus a few miscellaneous wires. Before taking it to the truck, I just zip tied the extra loose wires and left the two that I would need for parking lights and RAP OFF loose.
Next came the install of the harness.
1. Remove the two screws at the bottom of the kick panel. The panel pulls out on the bottom, and lifts straight up and out.

2. Connect the OBDII to the harness. The harness replaces the current OBDII connection in the kick panel. Simply unclip it, put the harness OBDII in to the kick panel.

Connect and lock in the tab on the harness to the vehicle OBDII connection.

3. Make the connection to the ignition harness. This will be located on the back side of the key switch. There is a black connector that simply disconnects, connects to the harness, and the harness connects to the ignition. Be sure to follow the diagram and use the correct plugs (T-01 as labeled). Hint: look at the plug on the harness to see how it disconnects. There is a push tab on the side of the plug that faces the passenger side of the vehicle.

4. The trickiest part of the wiring is accessing the plugs connected to the BCM. The BCM is located above the parking brake, pretty much up behind the wheel. You can unplug the required two harnesses. They are on the side of the BCM facing the passenger side of the vehicle. These harness has large locking devices on them, so just be gentle to make sure you have the harness unlocked before tugging. If you have large arms, you might need help with this. In the photo below is the picture of the blue connector, and the white connector is floating behind it. The picture is taken from next to the parking brake. The harnesses only have a couple inches of slack, even after disconnecting the zip tie that the harnesses where held to the body with.

5. Locate the wires required to tap in to. Make sure you look at the harnesses from the wire side as these are how the pins are indicated according to the instructions. This was the next obstacle because usually I solder EVERYTHING due to the reliably and longevity of solder connections. I hate crimp connections, especially on small wires like 18ga, and I especially hate wire taps due to their likelihood of having a poor connection after a period of time. However, in this situation the only way I was getting the parking lights and RAP OFF wire connected, were through the use of wire taps. It would simply be impossible for me to solder in that location, much less strip the wire insulation off without cutting through the wire. Wire taps, in this situation, shouldn't pose an issue.
6. Now the fun part. Install the VIP 4.5 software from the Xpresskit home page. The software uses an IE plugin. You will need a Windows PC with IE. Install is pretty simple, and you will know you have successfully completed it when you receive a window that asks you to plug in your Xloader at this time, and allows you to launch Xpresskit.com.
7. Connect your Dball while on the Xpresskit homepage. You will see the plugin on the top right corner of the page, and your Dball information will load. Mine came with no firmware installed.
8. Login to the Xpresskit website using the credentials provided.
9. Pull up your vehicle using the drop down menus on the top left of the Xpresskit home page.
10. Under the correct Dball module, select the "Config for RSR" link and the plug-in will automatically bring up the firmware wizard. You will want to complete the Key2Go programming option.
11. Configure your Dball. This was probably the nicest part about having an Xloader. You're allowed to change the 3x lock timeout to up to 10 seconds. I have read several complaints about getting the vehicle to recognize 3 locks within 3 seconds. No worries here, as you can change the time to receive the lock commands. I set mine to 6. You can enable heated seats (if applicable) and/or the defroster/heated mirrors with the remote start, and set the temperature for at which point you would like them to come on. You are also allowed to change the run time to up to 60 minutes. There are a few other features in there, but none were applicable for an RSR install.
12. Click next and allow the module to be flashed. After flashing is complete, you will come to a page where Key2Go programming will be required. Go to the truck and plug in your module and follow the Key2Go programming sequence as described in the install guide. Once the programming is complete, unplug your module and take it back to your PC. Once the module is plugged in, refresh the page with the Key2Go request and you will find out if the programming was successful. If it allows you to "Submit Key2Go request" then everything worked. Allow it to finish the programming and this will be the end of the process. Note: It took me 3 attempts to get the Key2Go programming sequence at the vehicle to be recognized by the browser. I read while doing some research that others had the same issue and you are supposed to hit the "Lock" button during the Key2Go programming. I'm not exactly sure when you should hit the lock button, I ended up just pressing lock every time I removed the key from the ignition, including the last time. Between the failed attempts, I did not reflash or reset the module.
13. Go back to the vehicle and plug in your module for the last time. Be sure you plugged the harnesses that you removed from the BCM back in, or you'll get an engine light. If you forget, the truck will still start but your engine light will illuminate and your dash temp will read -40 (I know from experience). Simply recheck your connections, remove the positive battery connection for a couple minutes, and you should be good to go. Press your lock button 3 times, and your truck should start right up. Wire tie the module up in the dash along with the excess wiring from the harness, and put the kick panel back on.
Some observations:
1. You may ask why pit stop mode is not a feature on this install. Simple answer is with the key in the ignition, the lock button command from the remote is ignored from the truck making this function impossible. The reason this is not included on the Ram while it is on others isn't mentioned anywhere, but it was definitely a feature I was hoping it would have.
2. Take-over does not occur until your foot hits the brake. With the vehicle started, and your headlights on auto, only your parking lights will be illuminated until you hit the brake. When approaching the vehicle, the headlights will no longer illuminate if your remote start is active, and they will not turn on until you push the brake. Most factory systems allow take over once the key is turned to ON. The headlights illuminate like normal if remote start isn't active.
3. There are no safety devices on the remote start, unless you install the hood switch or use the safety switch on the harness. If you're used to Chrysler factory systems, this means doors can be ajar and your low fuel light can be on and the engine will still start. Also note, the engine starts and everything powers on including your radio and your wipers. Pay attention when getting out of the vehicle to your wipers, as this could be an easy way to destroy components if your windshield ices. Factory systems generally don't enable to wipers until the vehicle takeover has been completed.
5. This has been mentioned before on various install threads for this product. If you disable the "horn honk with lock" on your settings menu on the EVIC, you won't wake your neighbors up at night when you start your truck. Unfortunately, your aftermarket exhaust still will. You can also disable horn honk with the factory remote start if you didn't already know that.
4. Overall, this is an awesome add-on for a fraction of the factory system, and you get to keep the factory remote without any additional modules, unless you want to add a range extender/SmartStart. I saved $320 from the $500 quote I received from my dealer, and this module is more than worth it if you're happy with the range on your factory remote. Installation is extremely straight forward and simple with the harness. Without the harness, installation is still simple as the majority of the wires go to the OBDII and ignition harness, with the exception of the two hard-to-reach wires off of the BCM mentioned above.