


Allgig Mopar camera install issues


Thread Starter
|
Registered User
Joined: Aug 2010
Posts: 21
Likes: 0
Wired everything up and have issues with the allgig and mopar install.
The allgig is working and currently allows DVDs to play in motion. HOWEVER, the mopar rear camera is not working. I installed the mopar camera with the power coming from the allgig output 1. Have tried programming the allgig a few times but all I get is a black screen that says watch your surroundings.
Main question on the mopar install has 3 wires. A light blue and white, a orange and white and a silver. It says to install these into your existing c3 connector. Which i did. Installed in bays 3, 4 and 5. However my c3 connector is gray. The supplied is white.
I have the RBZ screen. Frustrated, tired. Allgig is closed tomorrow. Any tips would be appreciated. Also if anyone has pictures of behind the screen to show if they are using the gray c3 connector and the white c3. There are 2 bays on the back. I currently just have the one gray installed. If I install the white, there will only be the 3 wires coming from the camera mounted into it.
Thread Starter
|
Registered User
Joined: Aug 2010
Posts: 21
Likes: 0
i bought my camera from a dealership. Mopar OEM camera. The only difficult part is running the wires really. But the one confusing part is that it supplies a white c3 connector. The way the instructions are written it says you can use the trucks current c3 (little plastic) connector. But at the next step it says the connector needs to be white.
Thread Starter
|
Registered User
Joined: Aug 2010
Posts: 21
Likes: 0
Solved... I'll post some pictures up later to show what my issue specifically was to aid others in the install.
When it gets to the step where you have three wires and you need to plug them into the harness. The way its written it states that if your truck already has the harness then you just plug it into it. Then the next step is refers to a white harness (provided with the kit for the camera). Well I took it literally that didn't matter the color of the harness and plugged the 3 wires into the existing harness. This didn't work. To solve I had to remove the three wires (PITA) but once I got them out I plugged them into the provided white harness. This attaches right next to the gray harness.
Fired the truck up and worked So, solved it through some trial and error. Camera working great. Was frustrated and tired but honestly minus this issue the install was pretty easy. Camera comes with a lot of extra wire length. I opted to power my camera directly from the all gig. So didn't have to splice or do anything crazy.
When it gets to the step where you have three wires and you need to plug them into the harness. The way its written it states that if your truck already has the harness then you just plug it into it. Then the next step is refers to a white harness (provided with the kit for the camera). Well I took it literally that didn't matter the color of the harness and plugged the 3 wires into the existing harness. This didn't work. To solve I had to remove the three wires (PITA) but once I got them out I plugged them into the provided white harness. This attaches right next to the gray harness.
Fired the truck up and worked
So, solved it through some trial and error. Camera working great. Was frustrated and tired but honestly minus this issue the install was pretty easy. Camera comes with a lot of extra wire length. I opted to power my camera directly from the all gig. So didn't have to splice or do anything crazy.


Amateur
Joined: Jan 2011
Posts: 44
Likes: 0
I am looking at installing the camera in my truck. Do I need to install the AllGig to use the camera? Please post some pics and let me know what I need to install this in my truck. I am not to worried abut having video in motion, but if this is the only easy way to power the camera, then I will do it. I noticed on the directions for the factory camera install, you have to run wires to the fuse box under the hood. That looked pretty difficult to me. Please provide a list of everything that is needed and how you did it.
Thanks,
Dan
Thanks,
Dan
Trending Topics
Thread Starter
|
Registered User
Joined: Aug 2010
Posts: 21
Likes: 0
You do not need the Allgig to use the camera. HOWEVER, if you do not use the all gig you will be splicing into the fuse box. For ease, I would recommend the all-gig. The truck still goes to the camera when put in reverse. Allgig powers the unit from output #1.
Because I used the all gig i did not have to run anything to the fuse box.
I will get the pictures posted shortly to help aid in keeping others from having the frustration i did.
Because I used the all gig i did not have to run anything to the fuse box.
I will get the pictures posted shortly to help aid in keeping others from having the frustration i did.
Thread Starter
|
Registered User
Joined: Aug 2010
Posts: 21
Likes: 0
ok pictures are worth a thousand words...
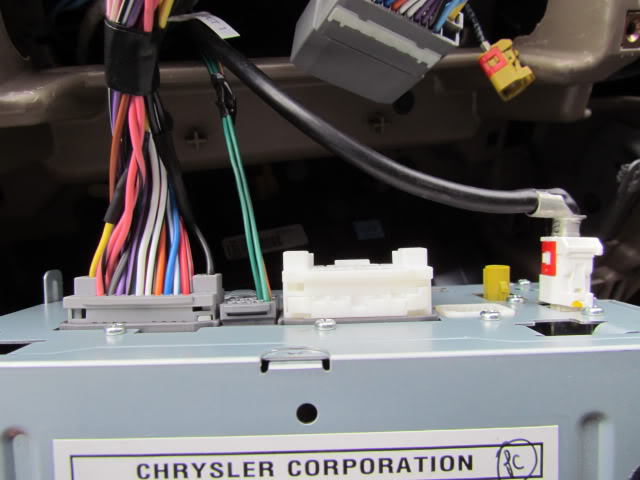
So, first picture shows how i initially wired up the allgig harness to the factory grey clip. Allgig harness connects from the back of the unit to the factory grey clip.

Second picture is a close up of the factory grey clip with the three mopar camera wires. Silver wire and the two to the right are the mopar install. This is where I screwed up on the install.

Two steps are listed below.
Connector supplied in kit.
I know now its obvious but you have got to use the white C3 connector. Some vehicles come with a grey and a white c3 connector. My truck only came with the grey. So to fix I had to move the 3 wires from the grey connector and move to the white c3. (so this picture is showing before I moved the wires to the white). Once I moved them, worked like a charm. Hope this helps others on their installs. Cheers! Z
So, first picture shows how i initially wired up the allgig harness to the factory grey clip. Allgig harness connects from the back of the unit to the factory grey clip.
Second picture is a close up of the factory grey clip with the three mopar camera wires. Silver wire and the two to the right are the mopar install. This is where I screwed up on the install.
Two steps are listed below.
NOTE: Install the harness into the existing C3 radio connector if equipped, if not use the kit supplied C3 connector.
48. Remove the white C3 connector from Radio (If Equipped). Some vehicles may have cavities 3,4, and 5, of the C3
connector populated remove existing terminals and proceed to next step.
Oct 17, 2008 K6869459 Rev. 1
17
49. Lift C3 terminal locking Tab, Insert Terminal as shown above. GY/LB into Cavity 3, GY/OR into cavity 4, Uninsulated
shield wire into Cavity 5. Relocate terminal locking tab. If Vehicle is not equipped with white C3 connector Populate
Connector supplied in kit.
I know now its obvious but you have got to use the white C3 connector. Some vehicles come with a grey and a white c3 connector. My truck only came with the grey. So to fix I had to move the 3 wires from the grey connector and move to the white c3. (so this picture is showing before I moved the wires to the white). Once I moved them, worked like a charm. Hope this helps others on their installs. Cheers! Z
Last edited by dakynz; Jan 25, 2011 at 11:16 PM.
Amateur
Joined: Jan 2011
Posts: 44
Likes: 0
Was it difficult running the wires through the firewall? Did you have to do anything special once you hooked up the wires for the camera? Ok, so you took the 3 wires out of the little gray connector and put them into the white connector? It seems a lot easier than running the wire to the fuse box? Where do I buy the AllGig?