

View Poll Results: Modifying the Caravan


Voters: 2. You may not vote on this poll
CaffeineTripp's 1990 3.0L Caravan C/V

Before I begin doing any write-ups whatsoever to the Caravan, I'll give a little background information on this specific vehicle's past, and the 3.0L engine as a whole.
My dad bought this Caravan C/V approximately 100,000 miles ago with a rebuilt engine (possible just the head). The mileage he bought it at was around the 100,000-130,000 mile range. Quite a bit, but with at least a freshly rebuilt head, it was in great working condition. The transmissions in these vans aren't the greatest in the world, he went through three. After he bought it for its intended use of being a work van for carpentry, hauling lots of tools and supplies, first thing's first, he would need to see out the back quite a bit better. He bought some windows from a scrapyard, cut out parts of the shell and mounted them in stock locations.
He used this vehicle for many years until he bought himself a new vehicle, a 1998 Ford Explorer XLT. In which case, he had no need for the Caravan anymore so he gave it to the company he worked for. They beat it up pretty bad.
Now, after my car getting rod knock, I needed the van for transportation. From the get-go it needed a full tune up, a gas line fix, new front tires (as all are different brands and different wear), wheel balance, wheel alignment, new rear shocks, front struts. The driver's side door does not close fully, the driver's side rear barn door has only one usable hinge, the sliding door barely moves. Only one window in the vehicle works well; the sliding door's which will make for hot summers. There is no carpet anymore in the rear, the brakes are so-so.
As of today, November 12th, 2008, nearly the whole tune-up has been done with the exception of tires and front-end work.
The engine that lies in the bay is a Mitsubishi 6G72. This is the same engine that is used in the base model Mitsubishi 3000GTs and Dodge Stealths as well as other Dodge and Mitsubishi vehicles.
The engine utilizes a single overhead camshaft, on each head, to compress and depress the valves on each head.
Chrysler's rating is 140 for horsepower and their torque rating for the 6G72 is 170 foot pounds. Not too bad actually.
Chrysler does however use a MAP sensor in their vehicles instead of Mitsubishi's choice of Karman Mass Air Flow sensors. The MAP sensor being the better of the two choices because it runs off of the intake manifold to the sensor itself whereas the Karman MAF is roughly the size of a plastic brick inside the air intake. This means adding power to the engine is easier and better flowing.
Now don't get me wrong, I know this is a Caravan and I definitely know it's in terrible shape. There is more rust, Bondo, rattle-can white, dents, dings, chipping paint than there is vehicle. But the write-ups that will follow aren't just for my vehicle, they're for anyone wishing to add a little more power to the 6G72.
In the following days/months/years I own this vehicle, I will be taking pictures, giving directions, showing costs, suggestions, gains, and so on about modifying the engine. What the pros and cons are to doing so and how hard it is to actually do.
The first write-up that will be posted will be of making a true cold air intake with minor modifications. This will follow suit in the next few days.
If there are any questions as to why I'm doing this, suggestions about what to do next, help, or anything whatsoever, input is more than welcome!
Note: Any of the modifications you do from my write-ups are to your own risk and your vehicle's own risk. I take no responsibility for any accidents that can or may occur. Any gains to your engine are general and under the "Your Mileage May Vary."
Last edited by CaffeineTripp; Nov 15, 2008 at 03:20 PM.
Fluid Capacities
1984-1990 Caravan
4 Cylinder 2.2L
-Crankcase: 4 Quarts
4 Cylinder 2.5L
-Crankcase: 4 Quarts
4 Cylinder 2.6L
-Crankcase: 5 Quarts
6 Cylinder 3.0L
-Crankcase: 4 Quarts
1991-1995 Caravan
4 Cylinder 2.5L
-Crankcase: 4.5 Quarts
6 Cylinder 3.0L
-Crankcase: 4.5 Quarts
6 Cylinder 3.3L
-Crankcase: 4.5 Quarts
1994-1995 Caravan
6 Cylinder 3.8L
-Crankcase: 4.5 Quarts
1984-1987 Transmissions
-Transmission:
--Manual 4 Speed: 4.8 Pints
--Manual 5 Speed: 4.8
--Automatic:
---A413/A470 (Except Fleet): 17.8 Pints
---A413/A470 (Fleet): 18.4 Pints
---A413/A460 with Lockup Converter: 17.0 Pints
---A604: 18.2 Pints
1988-1989 Transmissions
-Transmission:
--Manual 5 Speed: 5.0 Pints
--Automatic:
---A413/A470 (Except Fleet): 17.8 Pints
---A413/A470 (Fleet): 18.4 Pints
---A413/A460 with Lockup Converter: 17.0 Pints
---A604: 18.2 Pints
1990 Transmissions
-Transmission:
--Manual 5 Speed: 4.6 Pints
--Automatic:
---A413/A470 (Except Fleet): 17.8 Pints
---A413/A470 (Fleet): 18.4 Pints
---A413/A460 with Lockup Converter: 17.0 Pints
---A604: 18.2 Pints
1991 Transmissions
-Transmission:
--Automatic:
---A413/A470 (Except Fleet): 17.8 Pints
---A413/A470 (Fleet): 18.4 Pints
---A413/A460 with Lockup Converter: 17.0 Pints
---A604: 18.2 Pints
1992-1993 Transmissions
-Transmission:
--Manual 5 Speed: 4.8 Pints
--Automatic:
---A413/A470 (Except Fleet): 17 Pints
---A413/A470 (Fleet): 18.4 Pints
---A413/A460 with Lockup Converter: 17.0 Pints
---A604: 18.2 Pints
1994-1995 Transmissions
-Transmission:
--Manual 5 Speed: 4.6 Pints
--Automatic:
---A413/A470 (Except Fleet): 17 Pints
---A413/A470 (Fleet): 18.4 Pints
---A413/A460 with Lockup Converter: 17.0 Pints
---A604: 18.2 Pints
1991-1995 Power Transfer Unit
-1.22 Quarts
1984-1991 Fuel Tanks
-Standard: 15 Gallons
-Optional: 20 Gallons
1992-1995 Fuel Tanks
-Front Wheel Drive: 20 Gallons
-All Wheel Drive: 18 Gallons
1984-1986 Cooling System
4 Cylinder 2.2L
-8.5 Quarts
4 Cylinder 2.6L
-9.5 Quarts
*Add 1 Quart When Equipped with Rear Heater
1987-1991 Cooling System
4 Cylinder 2.2L
-8.5 Quarts
4 Cylinder 2.5L
-8.5 Quarts
4 Cylinder 2.6L
-9.5 Quarts
6 Cylinder 3.0L
-10.5 Quarts
*Add 1 Quart When Equipped with Rear Heater
1992-1993 Cooling System
4 Cylinder 2.5L
-9.5 Quarts
6 Cylinder 3.0L
-10.0 Quarts
6 Cylinder 3.3L
-10.0 Quarts
*Add 1 Quart When Equipped with Rear Heater
1994-1995 Cooling System
4 Cylinder 2.5L
-9.5 Quarts (Includes Heater and Coolant Recovery Bottle)
6 Cylinder 3.0L
-10.5 Quarts (Includes Heater and Coolant Recovery Bottle)
6 Cylinder 3.3L
-10.5 Quarts (Includes Heater and Coolant Recovery Bottle)
6 Cylinder 3.8L
-10.5 Quarts (Includes Heater and Coolant Recovery Bottle)
As listed in the Chilton's Guide for the 1984-1995 Caravan/Town and Country/Voyager
Last edited by CaffeineTripp; Nov 18, 2008 at 06:15 PM.
Custom Cold Air Intake
Cost: $25.00-$50.00
Difficulty: 1 out 10
Time Required: 30-45 minutes
Equipment:
Cone Filter
PVC Piping/Exhaust Tubing
Clamps
Tools:
8 mm socket
10 mm socket
13 mm socket
Extension
Socket Wrench
Flathead screwdriver
Universal Exhaust Hanger
Step 1: Bring your vehicle to get your A/C refrigerant discharged correctly, if this is not done, your A/C will leak into the atmosphere potentially causing problems to your breathing and the atmosphere itself.
Step 2: Remove the intake pipe from the throttle body and the air box.
Step 3: Remove the air box by unbolting the two 10mm bolts to the left and right of the air box which are attached to the manifold.

Step 4: Inspect the throttle body and intake pipe for excessive oil, if there is any, use a terry cloth to clean the throttle body's bore and the intake pipe itself.
Step 5: Cut off a section of the intake pipe so it looks as thus:
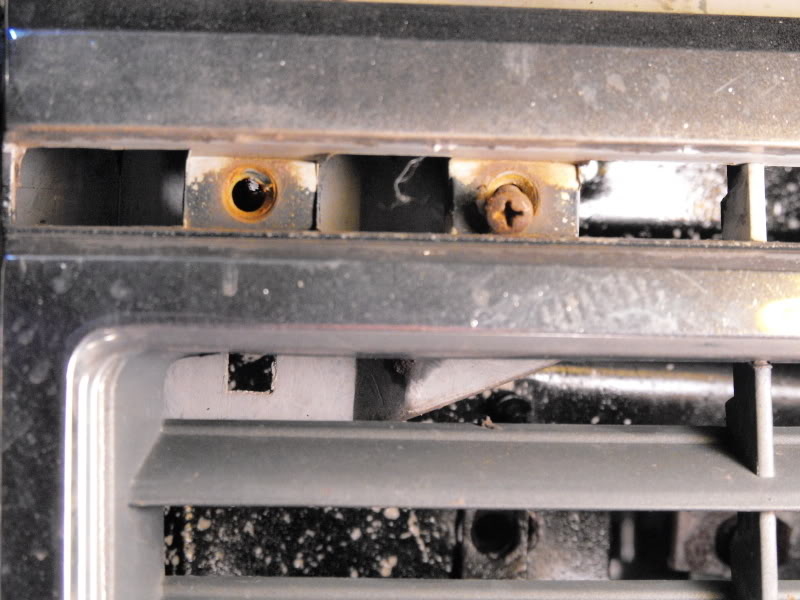
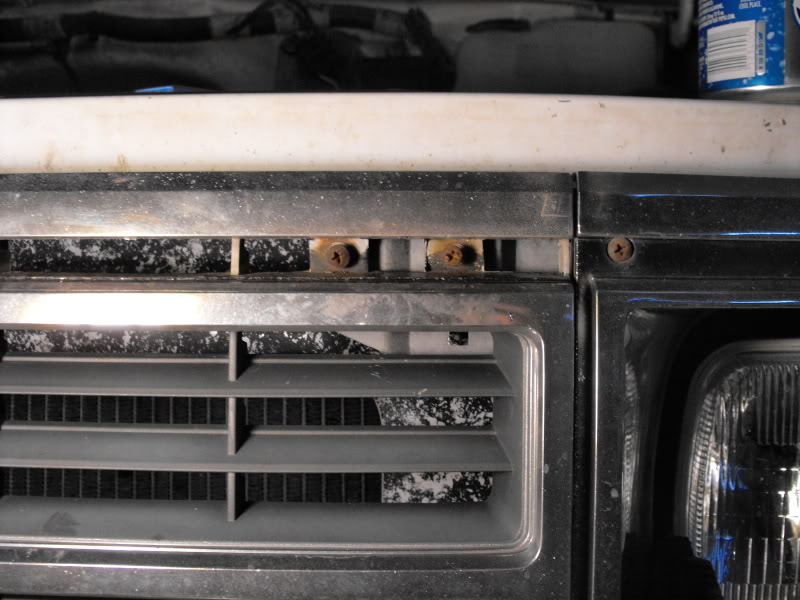
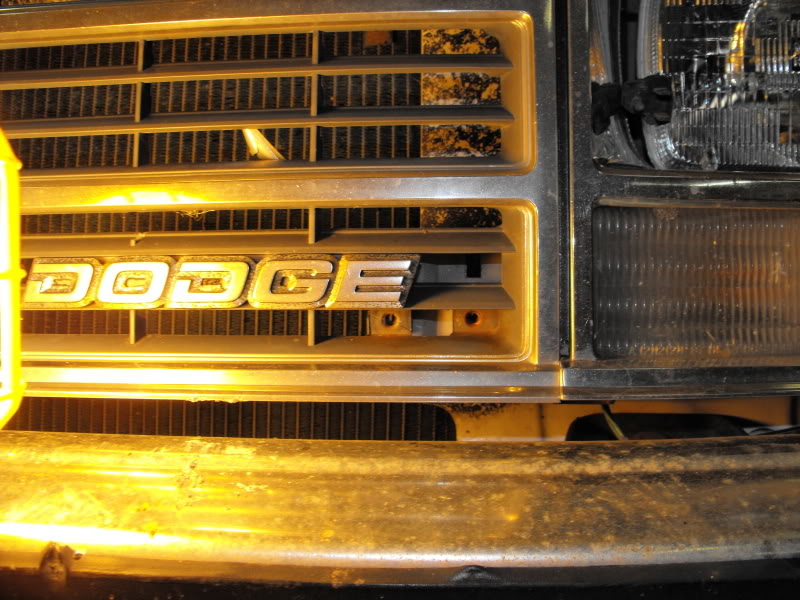
Step 6: Remove your grill by unscrewing the 8 screws which are located in each corner of the grill, two to a corner.

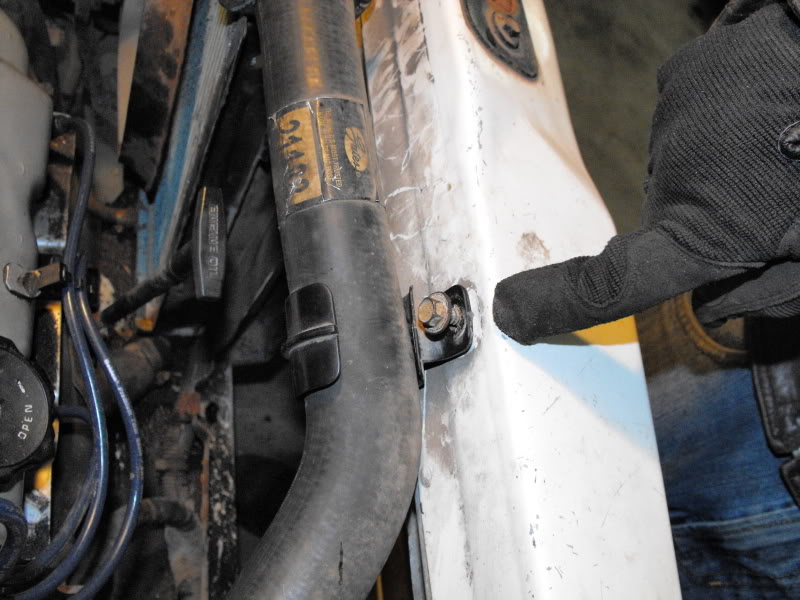
Step 7: Unbolt the hanger for the upper radiator hose then remove the A/C fan by unclipping the harness and unbolting the two 10mm bolts from the top of the fan. It may not slip out with ease, but it will fit the clearance.

Step 8: Unclip the harness on the cross beam.
Step 9: Unbolt the cross beam that runs down the middle with the 10mm socket. There is one up top, and one below. The screw on the middle of the cross beam is the other screw that holds the grill on, this screw is hidden and hard to get to. If you do not mind breaking this part of your grill you don't need to remove it. However, you can remove the cross beam and grill as an assembly by removing the cross beam bolts.
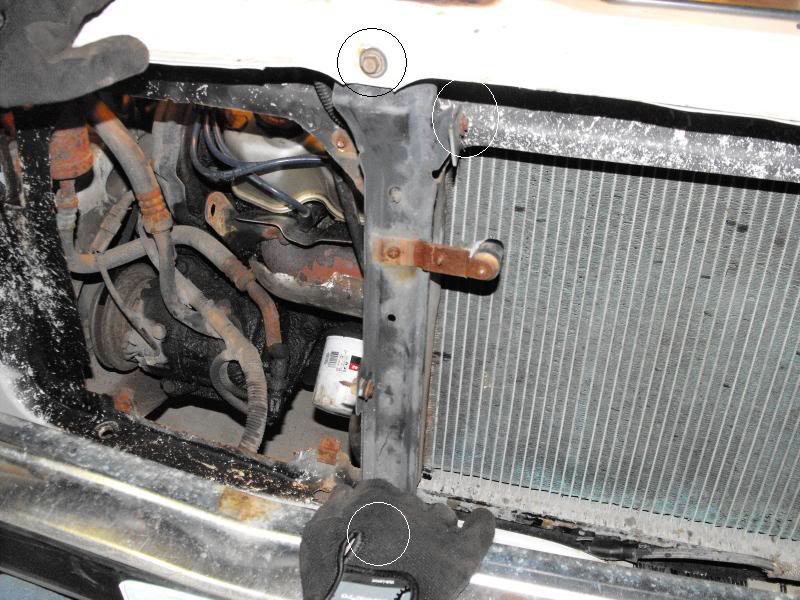
Step 10: Unbolt the two 10mm bolts from the front-side of the A/C Condenser. They are the bolts that are facing the grill.
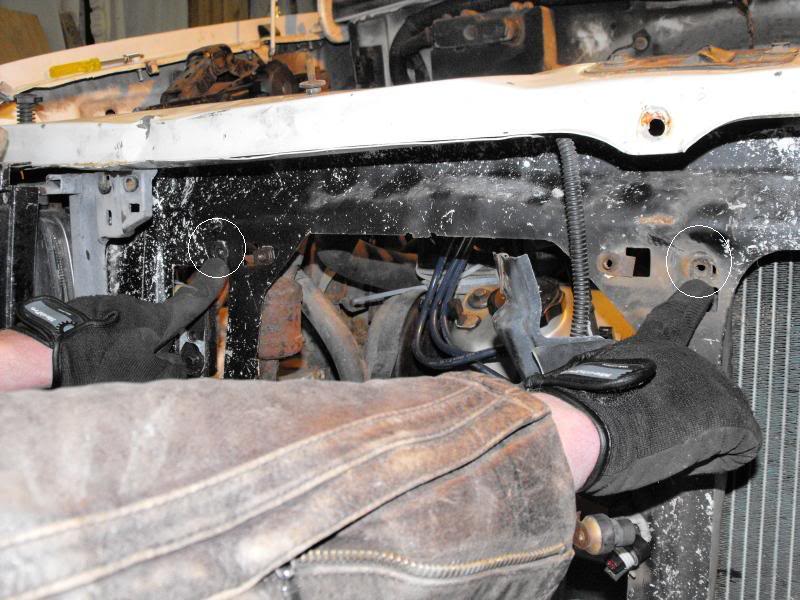
Step 11: Remove the A/C connection from the back of the A/C Condenser via the 13mm bolt, then pull out the condenser itself. Note: There still may be pressure in the system if you have not brought it to a certified mechanic to relieve the A/C pressure.
Step 12: Using a piece of PVC tubing or exhaust pipe, cut the length to around 10" to 12".
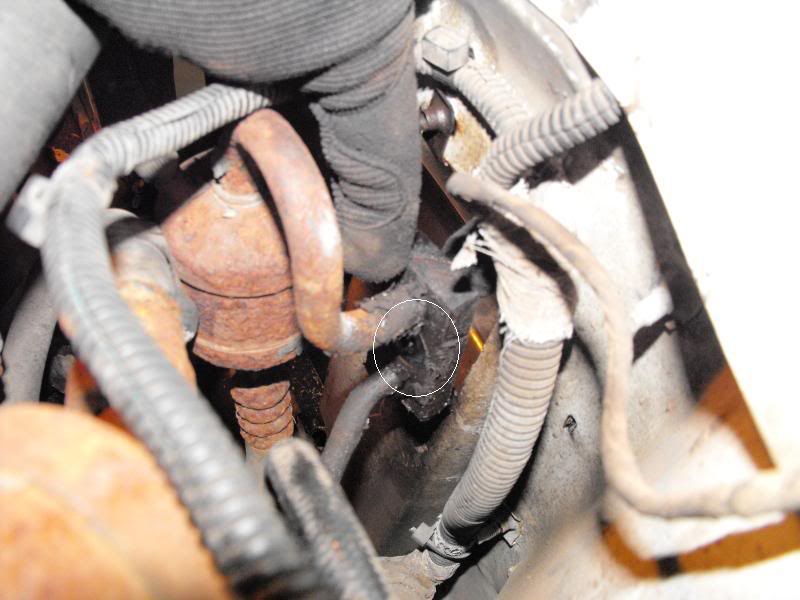
Step 13: Attach an end of the PVC or exhaust pipe to the stock rubber intake pipe. Reverse the tube's location so it runs towards the location of the A/C Condenser.
Step 14: Attach a piece of the universal exhaust hanger to where the cross beam is located and bolt the exhaust hanger and cross beam back on. The exhaust hanger will hold the pipe securely in place.
Step 15: Attach your cone filter to the end of the piping. Tighten down all clamps holding each piece of the intake pipe together and to the throttle body.
Step 16: Bolt on your grill once again by the 8 screws, two in each corner.
Step 17: The end result.
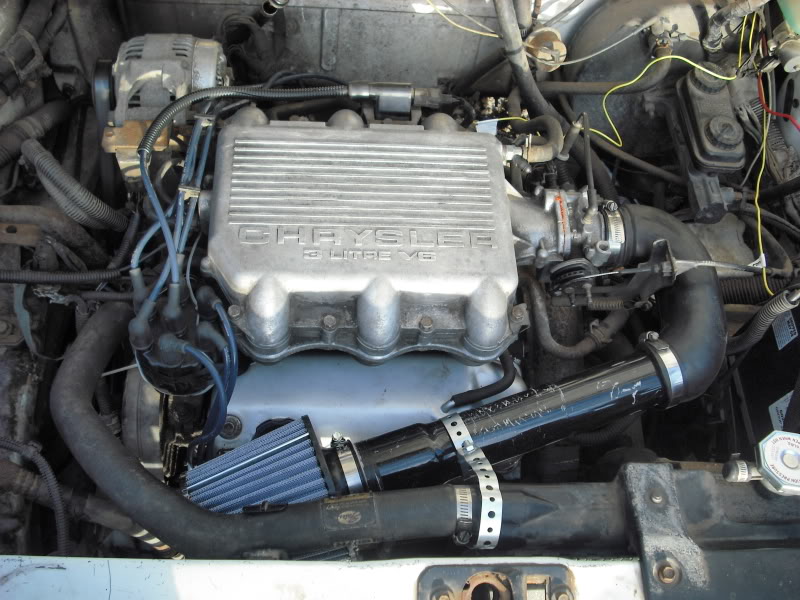
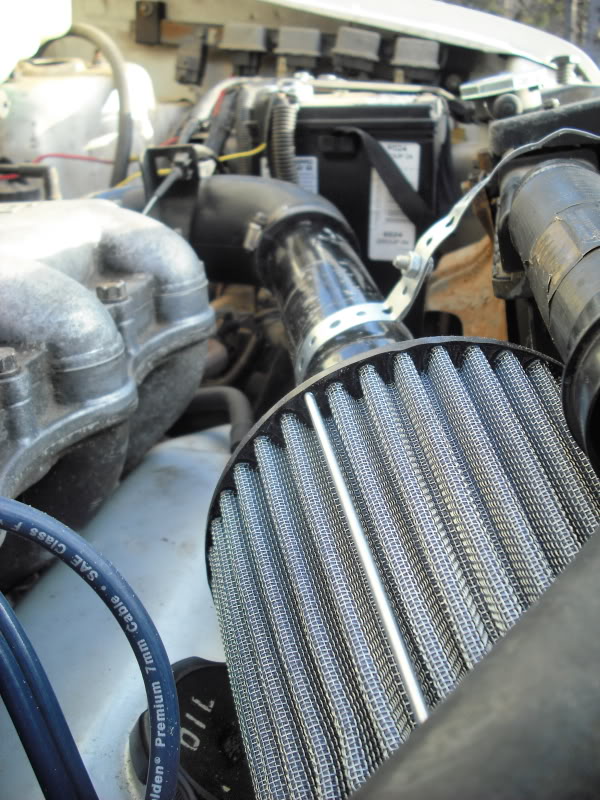
From the front behind the grill

The Gain: There is the obvious amount of gain from switching from a rear-mounted air box where there is hardly any flow whatsoever, to a front-mounted true Cold Air Intake. You will see a slight improvisation in gas mileage, horsepower, and maybe some torque.
Yes, this engine modification does rob you of your A/C for the summer, but overall, it's a good modification over all.
Suggestions: Once you've got your entire intake out of the vehicle, now is a good time to clean the piping itself. If you have a parts washer, that's a good decision to do for any metal, but not for the stock rubber hose. Using an engine degreaser or 409 works just as well to clean out the grim from the inside of the stock piping. Also, your throttle body probably needs a good cleaning now as well, you can do this with a normal dry rag to get just about everything, but to make sure that you do collect the larger pieces of dirt and oil, use a carburetor/throttle body spray on the rag and then wipe down the inside of the throttle body.
If you don't want to use your stock rubber tubing, ask your dealer to make a 90* bend and a 45* bend out of exhaust piping and then weld on a 2" long and 2" diameter pipe onto the bends, then a 10" long 2" diameter pipe to the end of the 45* bend. Or, bring in your stock set up with the PVC piping attached and have him make that. Remember though, you'll need to buy couplings for the new metal intake if you wish to have it made.
Note: Pictures will come later today.
Cost: $25.00-$50.00
Difficulty: 1 out 10
Time Required: 30-45 minutes
Equipment:
Cone Filter
PVC Piping/Exhaust Tubing
Clamps
Tools:
8 mm socket
10 mm socket
13 mm socket
Extension
Socket Wrench
Flathead screwdriver
Universal Exhaust Hanger
Step 1: Bring your vehicle to get your A/C refrigerant discharged correctly, if this is not done, your A/C will leak into the atmosphere potentially causing problems to your breathing and the atmosphere itself.
Step 2: Remove the intake pipe from the throttle body and the air box.
Step 3: Remove the air box by unbolting the two 10mm bolts to the left and right of the air box which are attached to the manifold.
Step 4: Inspect the throttle body and intake pipe for excessive oil, if there is any, use a terry cloth to clean the throttle body's bore and the intake pipe itself.
Step 5: Cut off a section of the intake pipe so it looks as thus:
Step 6: Remove your grill by unscrewing the 8 screws which are located in each corner of the grill, two to a corner.
Step 7: Unbolt the hanger for the upper radiator hose then remove the A/C fan by unclipping the harness and unbolting the two 10mm bolts from the top of the fan. It may not slip out with ease, but it will fit the clearance.
Step 8: Unclip the harness on the cross beam.
Step 9: Unbolt the cross beam that runs down the middle with the 10mm socket. There is one up top, and one below. The screw on the middle of the cross beam is the other screw that holds the grill on, this screw is hidden and hard to get to. If you do not mind breaking this part of your grill you don't need to remove it. However, you can remove the cross beam and grill as an assembly by removing the cross beam bolts.
Step 10: Unbolt the two 10mm bolts from the front-side of the A/C Condenser. They are the bolts that are facing the grill.
Step 11: Remove the A/C connection from the back of the A/C Condenser via the 13mm bolt, then pull out the condenser itself. Note: There still may be pressure in the system if you have not brought it to a certified mechanic to relieve the A/C pressure.
Step 12: Using a piece of PVC tubing or exhaust pipe, cut the length to around 10" to 12".
Step 13: Attach an end of the PVC or exhaust pipe to the stock rubber intake pipe. Reverse the tube's location so it runs towards the location of the A/C Condenser.
Step 14: Attach a piece of the universal exhaust hanger to where the cross beam is located and bolt the exhaust hanger and cross beam back on. The exhaust hanger will hold the pipe securely in place.
Step 15: Attach your cone filter to the end of the piping. Tighten down all clamps holding each piece of the intake pipe together and to the throttle body.
Step 16: Bolt on your grill once again by the 8 screws, two in each corner.
Step 17: The end result.
From the front behind the grill
The Gain: There is the obvious amount of gain from switching from a rear-mounted air box where there is hardly any flow whatsoever, to a front-mounted true Cold Air Intake. You will see a slight improvisation in gas mileage, horsepower, and maybe some torque.
Yes, this engine modification does rob you of your A/C for the summer, but overall, it's a good modification over all.
Suggestions: Once you've got your entire intake out of the vehicle, now is a good time to clean the piping itself. If you have a parts washer, that's a good decision to do for any metal, but not for the stock rubber hose. Using an engine degreaser or 409 works just as well to clean out the grim from the inside of the stock piping. Also, your throttle body probably needs a good cleaning now as well, you can do this with a normal dry rag to get just about everything, but to make sure that you do collect the larger pieces of dirt and oil, use a carburetor/throttle body spray on the rag and then wipe down the inside of the throttle body.
If you don't want to use your stock rubber tubing, ask your dealer to make a 90* bend and a 45* bend out of exhaust piping and then weld on a 2" long and 2" diameter pipe onto the bends, then a 10" long 2" diameter pipe to the end of the 45* bend. Or, bring in your stock set up with the PVC piping attached and have him make that. Remember though, you'll need to buy couplings for the new metal intake if you wish to have it made.
Note: Pictures will come later today.
Last edited by CaffeineTripp; Dec 5, 2008 at 12:40 PM.
The price of gasoline has fluctuated quite a bit over the past year, going from over $2.00 a gallon to over $4.00 and back down again. These prices can be quite the pain when filling up the tank. Even at $2.00 a gallon, to fill our tanks require at least thirty dollars.
There are the obvious ways to increase your gas mileage out of our minivans; change the air filter, do an oil change, check tire pressure. These really are the basics. But, if you want even better gas mileage than doing just the run-of-the-mill filter and fluid changes, why not give it a further look?
Filters
Air Filter:
Changing out the air filter from that grubby, dirt ridden, choked air filter helps a lot, but instead of getting yourself just another OE or Fram, why not go out and spend around $50 dollars on a K&N or an equivalent? High flowing air filters, like the K&N, not only outflow and still protect your engine providing excellent filtration with the cotton, but they can be cleaned and reused. OE air filters cost around $10-$15. They should be checked once every month depending on the conditions you usually drive your vehicle in. If your vehicle sees more dirt roads than pavement, definitely give it a check twice a month. At a low ball of changing your air filter twice a year, you'll be spending $20-$30. Now, most of us think that's a pretty good deal on a filter that helps protect good gas mileage. But really, why not get better gas mileage overall along with saving yourself quite a good chunk of money in the long run?
A high flowing air filter not only adds longevity to your money and engine, but it also increases horsepower, giving your minivan a little extra oomph when merging. An open element filter is even better than an OE style K&N. The open element filters, or cone filters, provide more surface area to suck in colder air. Colder air, being more dense than hot air, means more air into your combustion chambers leaning out your fuel mixture just a tad to provide better economy and more power.
Oil Filter:
Now, an oil filter is not just an oil filter. There are different amounts of flow and cleansing properties. Remember, the oil of your vehicle is it's blood, too choked with sludge, and your engine won't run correctly and with more friction upon the internal bearings. More friction requires more energy, in turn requiring more fuel.
With oil filters, you pay for what you get. However, some of the more expensive oil filters, like the Fram with TRT can create some odd noises to the engine. (Note: These noises are nothing harmful to your engine, merely lifter tick and it is annoying at best. Although, some people who have used the Fram oil filters with TRT have reported even worse sounds because of the extra "cleansing" agent infused in the filter.)
Along with a K&N air filter, K&N oil filters do a great job as well. There are other oil filters out there, but for general applications, a K&N would work just fine.
Automatic Transmission Filter:
Equipment from the dealer for your Chrysler transmission is recommended.
Lubricants
Engine Oil:
What your oil contains for additives makes a large difference in the grand scheme of things. Conventional motor oil does not have as many additives to it as fully synthetic oil, thereby breaking down faster and not lubricating your engine's internals as well. Conventional oil is recommended to be changed every three months or three thousand miles, whichever comes sooner. Fully synthetic oils can last anywhere from 4,000 miles to 7,500 miles. Yes, fully synthetic oil costs more than conventional, but with fully synthetic, you're paying for a world of difference. Synthetic oil lasts longer, provides better lubrication, "cleans" the internals, and provides a slight increase in horsepower overall (as a factor of the lubrication properties).
Though conventional oil may be cheaper now, you'll be paying more in the end with engine service, and as many of us know, $60-$100 an hour isn't cheap.
Mobil-1 Fully Synthetic lasts anywhere from 4,000 to 4,500 miles depending on the severity of your driving style. AMSOil lasts up to 7,500 miles depending on your driving style. AMSOil, being expensive ($7-$8 a quart) may not seem like a good deal immediately, but it can last twice as long as Mobil-1.
Automatic Transmission Fluid
Always use ATF+4 for a long-lasting, slip-free transmission.
Coolant
Not so much the brand of coolant matters, more along the lines of how much coolant. For your engine temperature not to fluctuate, always make sure that you have enough coolant in the system with no air bubbles. Do not forget to make sure there is enough coolant in your radiator's resevoir.
The amount of coolant in your engine directly affects your coolant temperature sensor given that the two are linked by the PCM. If there is not enough coolant in the system and the gauge fluctuates wildly, your engine will read hot, then cool, then hot yet again. This throws off the oxygen sensor which reports to the PCM telling it to use more fuel, then less fuel, then more fuel.
Mechanical
Thermostat:
Given that we know a cooler engine is a healthier, more reliable, and in effect more of a fuel-sipping engine, one place to look for better fuel economy is the thermostat. Purchasing a thermostat of a lower degree (180* in some cases) can help fuel economy as well. The thermostat will open when the coolant reaches the 180*+ mark allowing your engine to stay 12* cooler (theoretically). When the engine is cooler it allows the fuel to burn more efficiently (along with cooler, more dense air from the high-flow air filter) rather than when trying to burn fuel in a hot environment.
Air Conditioning:
If you have no use for your air conditioning system, do without it. Take your vehicle to a mechanic and have them purge the refrigerant system. Then, on your own, remove the air conditioning belt. Removing the belt frees up the air conditioning pump. The less amount of friction and rotating mass upon the accessories and crankshaft pulley the better. Relieving the engine of this added rotational mass allows the engine to spin more easily, more freely, and with even more efficiency than before. And more efficiency leads to better gas mileage and more power overall.
Intake Manifold:
Chances are, your intake manifold has been gummed up for quite some time, now is the time to clean the inside of it. There are two ways, removing the entire intake manifold and cleaning it by hand (for the purpose of saving money) or using a 1/4 can of SeaFoam by sucking it through the throttle body or a vacuum line connected to the throttle body.
Decreasing the amount of drag in your intake manifold allows the air to flow more freely and in greater quantities overall. The less resistance there is, the better.
Other
Tires:
Checking your tires for proper inflation is a big plus in retaining the gas mileage you were used to. Some tires may look properly inflated, but in actuality may be 10 PSi or under the proper inflation. Rear tires may be inflated slightly more than the front tires given there is not nearly as much weight carried upon the back half of the vehicle as there is upon the front half (under the assumption there is no load whatsoever in the back half of the vehicle).
The skinnier the tires you can fit upon your vehicle the better. Less tread upon the road means there is less friction, but at the same time, you would be sacrificing stopping, turning, and the tread life of the tires.
Weight:
Weight is another large, no pun intended, factor in the absence of good gas mileage. Excess weight in the vehicle means, obviously, that there is more to carry in effect putting more strain upon the engine. Load is a bad thing. Removing the rear seats can save quite a bit of weight from the vehicle in addition to other miscellaneous items that may have accumulated over the time you've owned your vehicle.
Overall, these are just a few simple, cost-effective, and sometimes free, things that you can do to save yourself some hard earned cash.
Remember; colder, flow, lighter, less friction, and proper inflation is better.
Would anyone happen to know the specifications on the 3.0L Sundance and the 3.0L Caravan fuel pressure regulators? I picked one up at a salvage yard under the assumption it would work though I haven't tested it yet and am not sure that I want to.
In any case, I'm hoping that the Shadow FPR will regulate the correct amount of pressure as the Caravan FPR. I checked part numbers online and they are different, but they don't say what the difference is. Visually, the Shadow FPR is smaller and the metal fuel hose is positioned different. It seems that it will bolt up correctly, but altogether I'm not sure.
Any information on either regulation of fuel pressure of the two would be much appreciated.

Registered User
Joined: Aug 2005
Posts: 20
Likes: 0
According to the Haynes Repair Manual, the fuel pressure on the caravan (3.0L, 3.3L, 3.8L) is 48 PSI, with torque spec. being 48 in-lbs.