Last edit by: IB Advertising
See related guides and technical advice from our community experts:
Browse all: Interior
- Dodge Ram 2nd Gen How to Replace Blower Motor
Step by step instructions for the do-it-yourself repairs.
Browse all: Interior
Front Blower Motor Replacement
#1
#4
I don't think I have seen any with photo's. The difference with the 2001 and the newer models is the recirculation door. The door is number 3 in the picture and there is a pivot that comes out the top of part 2. On the later models the pivot is very long and has a screw in the end with a large washer so when the bottom cover is removed, the door won't fall out. On the 2001, the pivot is very short and no screw in the end so when you remove the bottom cover, the door falls out and it is a huge pain to get it reassembled.


#6
2001 Minivan removal proceedure
REMOVAL
WARNING: REFER TO THE APPLICABLE WARNINGS AND CAUTIONS FOR THIS SYSTEM BEFORE PERFORMING THE FOLLOWING OPERATION. (Refer to 24 - HEATING & AIR CONDITIONING/PLUMBING - FRONT - WARNING - A/C PLUMBING), (Refer to 24 - HEATING & AIR CONDITIONING/PLUMBING - FRONT - CAUTION - A/C PLUMBING), and (Refer to 24 - HEATING & AIR CONDITIONING/PLUMBING - FRONT - WARNING - HEATER PLUMBING).
NOTE: The blower motor and blower wheel are serviced only as an assembly. If either component is faulty or damaged, the blower motor and blower wheel must be replaced.
REMOVAL
WARNING: On vehicles equipped with airbags, disable the airbag system before attempting any steering wheel, steering column, or instrument panel component diagnosis or service. Disconnect and isolate the battery negative (ground) cable, then wait two minutes for the airbag system capacitor to discharge before performing further diagnosis or service. This is the only sure way to disable the airbag system. Failure to take the proper precautions could result in an accidental airbag deployment and possible personal injury or death.
NOTE: The blower motor is located on the passenger side of the vehicle under the instrument panel. The blower motor can be removed from the vehicle without having to remove the HVAC housing.
REMOVAL
WARNING: REFER TO THE APPLICABLE WARNINGS AND CAUTIONS FOR THIS SYSTEM BEFORE PERFORMING THE FOLLOWING OPERATION. (Refer to 24 - HEATING & AIR CONDITIONING/PLUMBING - FRONT - WARNING - A/C PLUMBING), (Refer to 24 - HEATING & AIR CONDITIONING/PLUMBING - FRONT - CAUTION - A/C PLUMBING), and (Refer to 24 - HEATING & AIR CONDITIONING/PLUMBING - FRONT - WARNING - HEATER PLUMBING).
NOTE: The blower motor and blower wheel are serviced only as an assembly. If either component is faulty or damaged, the blower motor and blower wheel must be replaced.
- Remove the HVAC Housing from the vehicle (Refer to 24 - HEATING & AIR CONDITIONING/DISTRIBUTION/HVAC HOUSING - REMOVAL).
- Disconnect the blower motor wire harness connector from the blower motor resistor block or blower motor power module, depending on application (Lower Intake Air Housing).
- Remove the two screws that secure the recirculation door actuator to the lower air intake housing and remove the wire harness from the routing clips molded into the bottom of the lower air intake housing.
- Remove the one screw (from the top) that secures the lower air intake housing to the upper air intake housing.
- Remove the four screws (from the bottom) that secure the lower air intake housing to the lower half of the HVAC housing and the upper air intake housing.
- Push the rubber grommet on the blower motor wire harness through the hole in the lower intake air housing (Blower Motor Grommet - Typical).
- Feed the blower motor electrical connector through the grommet hole in the lower intake air housing.
- Position the recirculation air door as necessary to access and remove the three screws that secure the blower motor to the blower housing in the lower half of the HVAC housing (Blower Motor Mounting Tabs).
- Gently flex the recirculation-air door far enough to remove the blower motor and blower wheel from the blower housing in the lower half of the HVAC housing.
- Remove the blower motor and blower wheel from the vehicle.
REMOVAL
WARNING: On vehicles equipped with airbags, disable the airbag system before attempting any steering wheel, steering column, or instrument panel component diagnosis or service. Disconnect and isolate the battery negative (ground) cable, then wait two minutes for the airbag system capacitor to discharge before performing further diagnosis or service. This is the only sure way to disable the airbag system. Failure to take the proper precautions could result in an accidental airbag deployment and possible personal injury or death.
NOTE: The blower motor is located on the passenger side of the vehicle under the instrument panel. The blower motor can be removed from the vehicle without having to remove the HVAC housing.
- Disconnect and isolate the negative battery cable.
- Remove the passenger side cowl trim panel (Refer to 23 - BODY/INTERIOR/COWL TRIM - REMOVAL).
- Position the carpet to access the front upper screw that secures the air inlet housing (Lower Air Inlet Housing).
- Remove the recirculation door actuator (Refer to 24 - HEATING & AIR CONDITIONING/CONTROLS - FRONT/RECIRCULATION DOOR ACTUATOR - REMOVAL).
- Disconnect the blower motor wire lead connector from the blower motor resistor or power module, depending on application.
- Remove the one screw (from the top) that secures the lower air inlet housing to the upper air inlet housing.
- Remove the four screws (from the bottom) that secure the lower air inlet housing to the upper air inlet housing and the lower HVAC housing.
- Push the rubber grommet through the opening in the lower air inlet housing (Blower Motor Wire Lead Grommet).
- Route the blower motor wire lead through the opening in the lower air inlet housing and remove the lower air inlet housing from the vehicle.
- Position the recirculation-air door as necessary to access and remove the three screws that secure the blower motor to the lower half of the HVAC housing (Blower Motor Mounting Tabs).
- Gently flex the recirculation-air door downward to gain access to remove the blower motor from the HVAC housing. NOTE: To aid in installation, note the position of the blower motor mounting tabs prior to removal.
- Remove the blower motor from the HVAC housing by rotating and tilting the blower motor as necessary .
#7
I used my Helms manual when replacing the motor in mine about 6 months ago. There is one screw that is painful to remove on the blower casing, and just as painful to reinstall. It is out-of-site, against the firewall, and pushed up against the firewall insulation (use a small mirror to look behind the blower and you'll see it). I had to use a long flat-blade screwdriver to tear away the insulation directly under the screw to make room for access to it. I used a nut-driver on all other screws except this one. For this one, I used a 1/4" ratchet with a long extension and universal.
It takes a lot of patience and maybe two hours to replace.
By the way, if you have to replace the resistor pack too, Autozone sells them now. They are cheaper than the dealer and come with the standard lifetime warranty. I exchanged mine once before I finally had to replace the blower motor. Once I had the old motor out, I was surprised that it was still running at all. It was hard to turn by hand.
Trending Topics
#8
CAUTION
The Supplemental Inflatable Restraint (SIR) system must be disarmed before removing the blower motor assembly. Failure to do so may cause accidental deployment of the air bag, resulting in unnecessary SIR system repairs and/or personal injury.

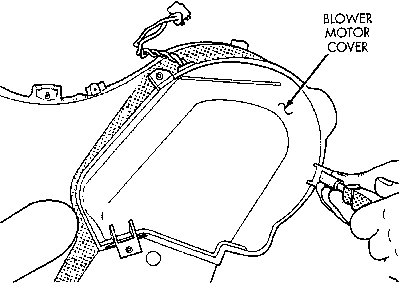
The blower motor is located behind the glovebox, behind the blower motor cover
Disconnect and isolate the negative battery cable, then wait 2 minutes before proceeding with the removal. This will effectively disable the air bag system preventing possible personal injury.
Remove the glove box from the instrument panel.
Remove the A/C-heater blower motor cover.
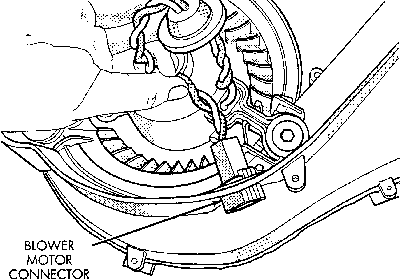
Disconnect the blower motor wiring connector.
Remove the blower motor wiring grommet and feed the wiring through the blower motor housing.
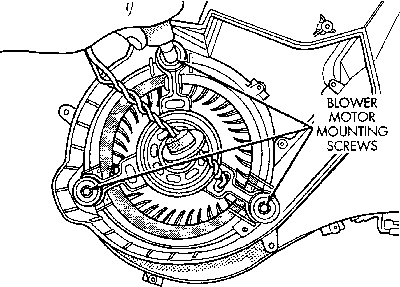
Remove the blower motor mounting screws.
Once the cover is removed, unplug the electrical connector and push it through the opening in the housing
The blower motor is secured to the housing with three small screws


Allow the blower motor assembly to drop downward to clear the instrument panel and remove from vehicle.
To install:
Place the blower motor assembly into position on the A/C-heater unit and tighten the mounting screws.
Route the blower motor wiring through the blower motor housing and seat the wiring grommet in the hole of the blower motor housing.
Reconnect the blower motor electrical connector.
Install the A/C-heater blower motor cover.
Install the glove box into the instrument panel.
Reconnect the negative battery cable. Check blower motor operation.
The Supplemental Inflatable Restraint (SIR) system must be disarmed before removing the blower motor assembly. Failure to do so may cause accidental deployment of the air bag, resulting in unnecessary SIR system repairs and/or personal injury.

The blower motor is located behind the glovebox, behind the blower motor cover
Disconnect and isolate the negative battery cable, then wait 2 minutes before proceeding with the removal. This will effectively disable the air bag system preventing possible personal injury.
Remove the glove box from the instrument panel.
Remove the A/C-heater blower motor cover.
Disconnect the blower motor wiring connector.
Remove the blower motor wiring grommet and feed the wiring through the blower motor housing.
Remove the blower motor mounting screws.
Once the cover is removed, unplug the electrical connector and push it through the opening in the housing
The blower motor is secured to the housing with three small screws


Allow the blower motor assembly to drop downward to clear the instrument panel and remove from vehicle.
To install:
Place the blower motor assembly into position on the A/C-heater unit and tighten the mounting screws.
Route the blower motor wiring through the blower motor housing and seat the wiring grommet in the hole of the blower motor housing.
Reconnect the blower motor electrical connector.
Install the A/C-heater blower motor cover.
Install the glove box into the instrument panel.
Reconnect the negative battery cable. Check blower motor operation.


