

Need help completing engine assembly


Thread Starter
|
Registered User
Joined: Apr 2010
Posts: 7
Likes: 0
Hi, I've been handed a project and am hoping to get some pointers along the way. The previous mechanic is unable to complete the work so it's up to me. It's not my favored thing to take on someone else's unfinished job but so be it. The problem began as a water leak past the pump gasket into the timing chain area. My task is to reassemble the parts on the front of an engine and get this van back on the road. He has replaced the timing chain and gears already and supposedly aligned things properly. It should be pretty straight forward work but not having seen the engine before dis-assembly I get to figure out how it all goes back together.
Do any of you know of a source for a picture I could look at of the front of a completed engine? I'm unfamiliar with this vehicle and something like that would help me a lot.
I am working on a 1985 Dodge B250 van with a 318. I was able to get a little information from the local library and see the special tool for installing the vibration damper. Unfortunately I have not been able to locate a source for renting one. Should I keep looking or is there an alternative to this tool?
I'm in need of any tips, pointers and/or advice from those of you who are knowledgeable on this topic. Things like lube this, or make sure that is clean, or do this before you do that, or be careful with this etc.
I'm no pro mechanic but am not completely a novice either. I'd say I'm smart enough and handy enough to not be intimidated, it's just that this is a little deeper into the front of an engine than I've been before. I simply wish to avoid mistakes.
Thanks for looking,
old

Record Breaker
Joined: Aug 2007
Posts: 1,146
Likes: 1
I recall needing a special tool to remove the harmonic balancer, but not to install it. I recall just giving the nut a couple burps with the air gun. I know a specific torque is recommended, and the crank must be kept from moving, so my buddy recommending a couple quick burps with the air gun worked for me.
I did not take any photos beforehand when I replaced my camshaft, and regretted it. I also did not keep inventory of where all the bolts, brackets and spacers went, and regretted that as well.
Since you will be doing this without even remembering the order or location of where such things go, I'll guess you will be doing even more cursing than I did, if you are prone to doing so.
I heavily recommend a couple dry runs, figuring out what length of bolts and what spacers and brackets go where, and making sure the belt pulleys line up nicely.
I had the radiator out for replacement and could get to the front end easy enough, but do not remember taking any photos likely to help you.
I'll look in my laptop and post any photos of my '89 318 that might help you.

Van & CUV Section Moderator


Joined: Nov 2006
Posts: 5,373
Likes: 115
I don't mean to sound like I'm brushing you off, but in all honesty I suggest you spend the $15 and grab a Haynes manual from the auto parts store. It has torque specs, disassembly and reassembly instruction along with various pictures to help you out. The book should take care of 95% of your questions and then we can fill in any of the blanks for you.
For the vibration damper, just use a block of wood and lightly tap the center to get it started onto the crankshaft. Then use the vibration damper's main center bolt to pull it on the rest of the way. Of course you'll have to keep the engine from turning.
For the vibration damper, just use a block of wood and lightly tap the center to get it started onto the crankshaft. Then use the vibration damper's main center bolt to pull it on the rest of the way. Of course you'll have to keep the engine from turning.
Thread Starter
|
Registered User
Joined: Apr 2010
Posts: 7
Likes: 0
I appreciate the input guys. I'm off to get a Haynes now. Hopefully I get a decent picture or two of stuff as there's a gizmo here I've never seen on any engine ever. Yes I do reserve the right to cuss a bit when the need arises. I've been cleaning stuff as it's pretty nasty in there so maybe I won't be cussing too much.
back later,
old (in Tacoma Wa)
back later,
old (in Tacoma Wa)
Thread Starter
|
Registered User
Joined: Apr 2010
Posts: 7
Likes: 0
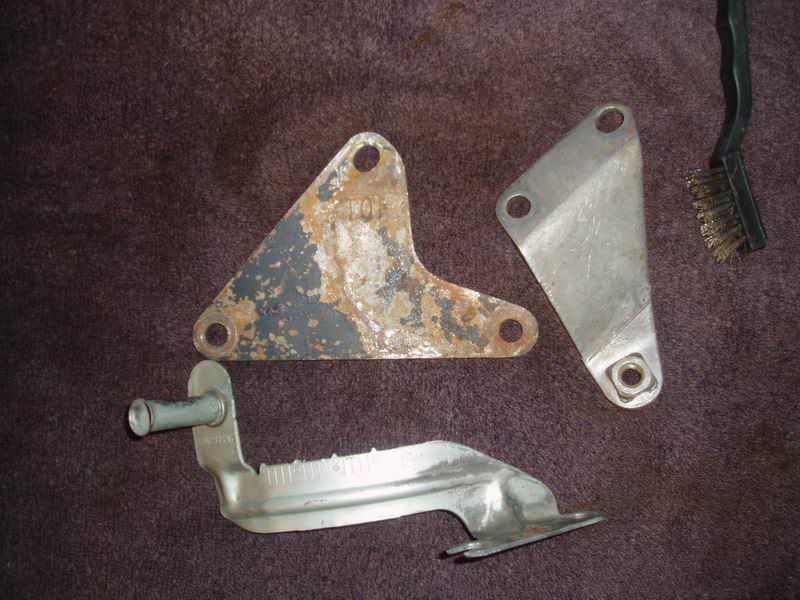
The Haynes book seems to be a little better than what I found at the library ($25 instead of $15 by the way) but there's no overall picture like I was hoping for, so I am asking if you might be able to identify this part and tell me where it goes. I'm referring to the one on the bottom though the others I'm also not sure about. I've perused the pages pretty good but don't see any of these brackets/gizmos.
I've been told I can somehow wedge or jam something like a big screwdriver into the torque converter to keep the engine from rotating. Any better ideas? I have located the Chevy version of the damper install tool but not the Dodge version. Old parts guys whom I respect have not heard of it so I'll have to go with your suggestion to just use the existing bolt and go for it. I've also been warned to be careful and not strip the threads while doing this. Wish me luck.
Thanks for looking,
old
Record Breaker
Joined: Aug 2007
Posts: 1,146
Likes: 1
I was just looking through a couple photos from my cam swap job, and didn't see anything that would likely help.
The bottom bracket in your photo is supposed to attach to some bolts on the drivers side, and the curved part is to fit within 1/2 inch of the harmonic balancer. It is for checking the timing.
The other brackets do not ring a bell with me.
The bottom bracket in your photo is supposed to attach to some bolts on the drivers side, and the curved part is to fit within 1/2 inch of the harmonic balancer. It is for checking the timing.
The other brackets do not ring a bell with me.
Trending Topics
Van & CUV Section Moderator
Joined: Nov 2006
Posts: 5,373
Likes: 115
In your picture, the black bracket is in the correct position. A water pump bolt first passes through the left hole of the bracket, then through the water pump and into the block. A second bolt first passes through the slotted PS pump bracket hole, then through the top hole of the black bracket, then through the water pump, then into the block.
The other bracket has to be flipped over so that welded nut is towards the rear of the vehicle. The it get bolted directly to the block though the two left holes. The third hole (threaded one) lines up with the right hole of the black bracket. If memory serves me, a spacer might go between these two brackets at the threaded hole. A bolt passes through the PS pump bracket, then through the front (black) bracket right hole, and then threads into the back bracket. This ends up being the pivot point for adjusting the power steering belt.
I have this picture, maybe it helps.
Thread Starter
|
Registered User
Joined: Apr 2010
Posts: 7
Likes: 0
Thanks for the input guys, that's exactly the kind of help I need. I should've figured the curvature of that part and the marks indicated something to do with timing. Makes sense. With the input I've gotten here and by trial fitting, I'm seeing now how those brackets go and where. alloro, the picture you show, though small and fuzzy is way better than anything else I have so I really appreciate it. It honestly does help. While I'm picking your brains, I just cleaned these parts and am hoping you can identify them.
edit: I now see the bottom bracket in that picture! The upper gizmo still eludes me.

Thanks for all the help,
old
edit: I now see the bottom bracket in that picture! The upper gizmo still eludes me.
Thanks for all the help,
old
Last edited by oldandintheway; Apr 17, 2010 at 05:48 PM.