

Question about oil level on my 2003 Stratus Coupe with the 2.4

Shocks are the biggest issue. Springs, unless they start sagging, I wouldn't replace them, but that's totally up to you.
Front rotors are a must, luckily the backs were already done. The tires are Firestone Affinity. I've never heard a noise like that from regular passenger car tires, especially new ones, I've only heard it on trucks with monster off road tires. I had the alignment done when the tires were put on but of course it will have to be redone with the new suspension pieces.
-Jack up the car so one front tire is off the ground.
-Grab the tire at the 12 and 6 o'clock position. It should be solid. If it moves and you hear any kind of banging noise, it's time for a ball joint.
-Grab the 3 and 9 o'clock positions. Again, it should be solid. If it moves or you hear noise (banging), your tie rods need replaced.
I'm sorry to hear your timing belt gave up the ghost. If you wouldn't mind pictures and or videos that would be great. I tend to think your right on the light especially because the engine runs so strong and smooth not to mention quiet but I'd still feel better checking it out just in case. By the way I forgot to mention with my other observations that the transmission shifts perfectly and buttery smooth. One piece of good news. Anyway thanks again for everything and talk to you soon.
Right now, I have the front tire off, splash guards removed, both belts off, the crank bolt out and radiator drained. Total time about 45 minutes using hand tools. I planned on taking the balance off tonight, but the pulley pullers my brother-in-law (BIL) let me borrow do not fit in the crank bolt hole (either to large or to small). So I stopped there. I am just taking my time and using basic hand tools (not to mention...does this fit...*try it*..nope, I need the next size up or down).
So far, (outside of removing the tire) you need the following....
1. A flat screw driver to get the splash guard plastic push pins out.
2. 3/8" socket/breaker bar to move the tensioner holding the main belt on. *I used my 1/2" breaker bar with a 1/2" to 3/8" adaptor (will take a picture of this)
3. 13mm wrench (boxed and open end) to loosen up the one bolt and one nut on the power steering pump (PSP) to move it and loosen up the tension on the power steering pump belt so you can remove the belt. (will take a picture of this)
4. Something to hold the crank pulley (I used a punch) and then a 3/4" socket to go on the crank pulley and my 1/2" breaker bar (turning it counter-clockwise) to break the bolt loose and then removed said bolt. (will take a picture of this).
There is how far I went tonight. The manual (Hanes) that I have for the car is nice, but....BUT, it is dealing with all the possible engines for the stratus, so the diagram it showed to loosen the PSP wasn't for my car with the 2.4DOHC engine. After loosening two bolts with a 13mm wrench that didn't need loosened...(DOH!), I felt like an idiot and saw how I needed to do so. That took all of 30 seconds. (felt my IQ lower to room temperature after that...LOL).
Anyways, before I start tomorrow, granted I get some AA batteries for my camera, I will take pictures for you and post them sometime this week. I will also take pictures how to swap rotors and pads (will provide them maybe next week).
Hope this helps and hope all is well.
I will add pictures when I am completely finished with this. I had to order a lower outer timing belt cover since mine ended up being cracked with a nice hole through it. <sigh>
Right now, the belt is on and the car starts right up and sounds great.
I still have to....
1. Install lower timing belt cover.
2. Install the alternator and its bracket.
3. Install the crank pulley and bolt.
4. Install a new PSP belt and the current accessory belt.
5. Install the splash shield.
6. Install the passenger side tire.
7. Fill up the cooling system.
Should be another hour after I receive the cover. I didn't take as many pictures as I wanted taking it apart, so I am taking the picture installing everything.
Ok, some pictures finally.
To drain the radiator, just forward of the splash shield (under side of the front bumper) you will see a square cutout. If you look up and to the left, you will see a small **** (tried getting a good pic but couldn't). You need to turn that **** to the left and the coolant will be flowing, so make sure you have a catch can under the spout. I let it drain over night.
After the fluid is drained, put the car up on jack stands (I did the just the front and blocked the rear wheels). I then put a jack with a 2x4 and put it under the oil pan.
Pic 1. Tire and splash shield is removed first.
- A 20mm or 3/4" socket will fit on the crank bolt. I used a 1/2" breaker bar to break the bolt loose and then just lefty loosened it and out it came. - Yellow lines are a few of the push pins you need to remove to remove the splash shield.
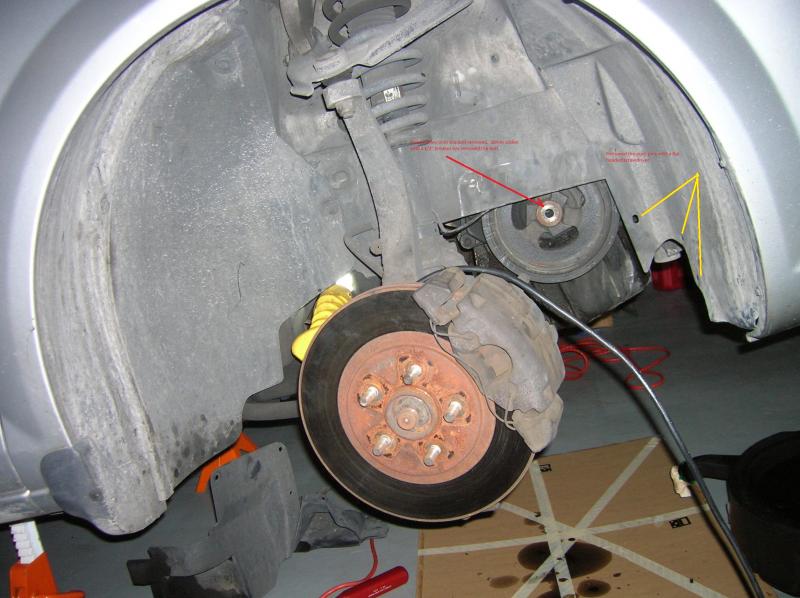
At this time, you will see a 3/8" square just to the upper left of the crank bolt. Put a breaker bar/ratchet in the square and turn. It will loosen up so you can take the belt off. The secondary belt will need the following.
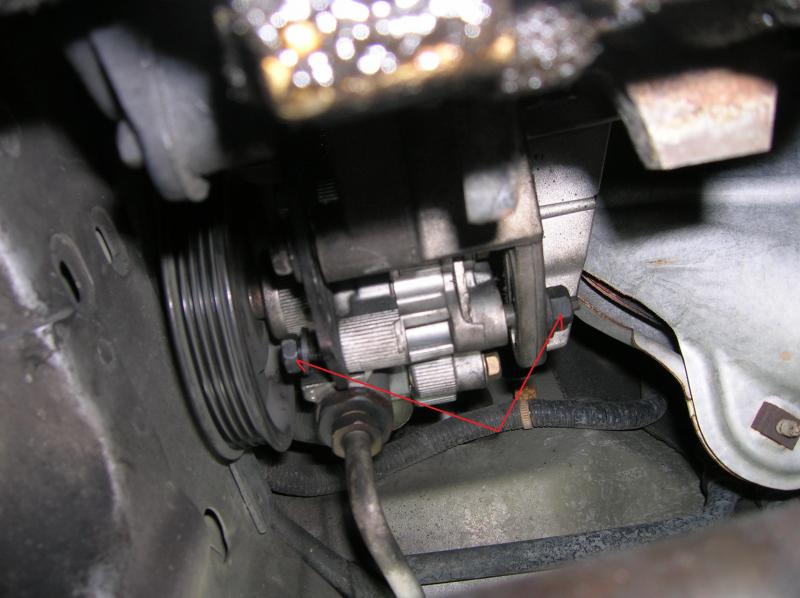
The two places I have the red arrow going to, one bolt, one nut, just loosen them up and then you can move the power steering pump (PSP) to get belt #2 off.
Next is getting the crank pulley off. I went to autozone and rented the 3 jaw pulley puller. I had to use my long 1/4" extension and place it inside the crank hole, then put the puller on it because the extensions included in the kit were just a touch to short. I put the puller on the flat area on the inside portion of the crank.
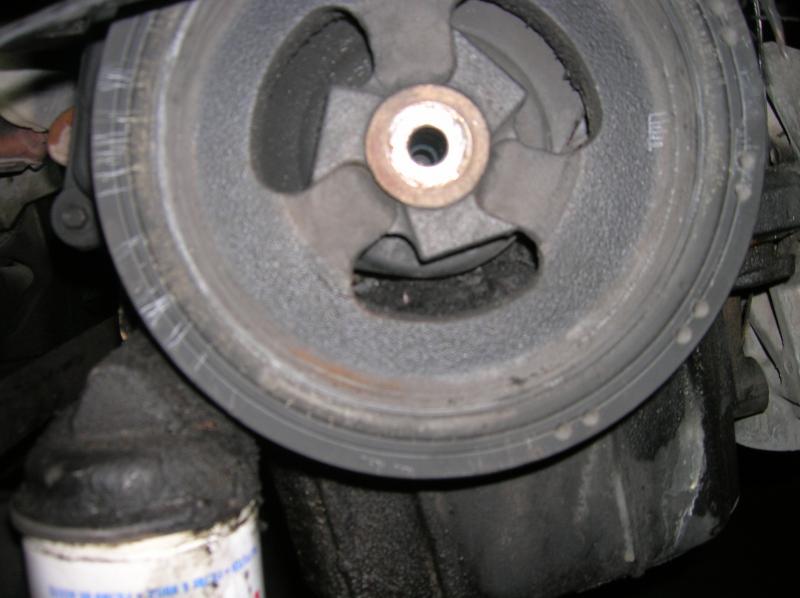
Now, you may get to this point and see that the pulley is going to hit the frame. I then disconnected the front motor mount (the one near the radiator) and slowly lowered the engine with the jack. It came down far enough were less than 1/8". I took the puller off and then grabbed it and pulled hard. It came off fairly easily.
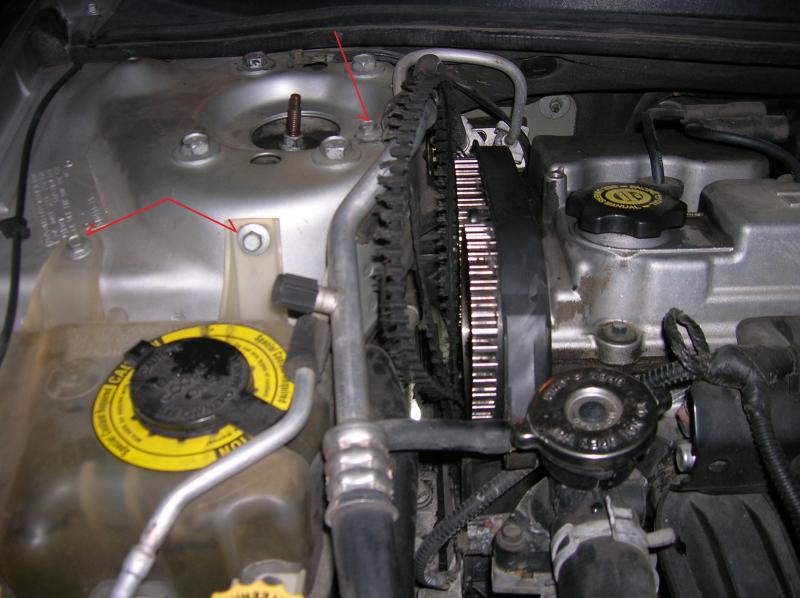
Next, remove the radiator over flow tank. Remove the line from just under the radiator cap and the following bolts (all in red).

And
(BTW, the belt you see there, was all that was left. I had a few strands and most of it turned into dust. Do not use anything but a Gates belt.)
You can pull the power steering reservoir out of the way as well as the AC drier. Once the overflow tank is out of the way you will see that those lines are easy to move. The rubber line to the connector by the radiator cap, I took off as well as the main radiator line.
The power steering line can be easily moved too. Only thing standing in your way at this point is the black metal line. It took me a while to find what was holding it on because I was working at night in a semi-lit garage.
EDIT: Do these next steps to make it easy to get the bolt holding in the metal line
1. Radiator lines.
Red lines...Squeeze the clamps and move them up the hose so you can pull the hoses off. Push the large hose out of the way (it will bend in front of the intake and stay there) and the small hose remove completely (it attaches to the black hard line near the motor mount).
Orange line...Wire loom which you can move this up and over the radiator cap to get it out of the way for future things.

Yellow lines...Squeeze the tabs to take off the gray cap. Then take a 13mm socket and remove the red line. This is the line that connects the alternator to the battery. If you haven't unhooked the battery, use electrical tape and wrap the end up and push the entire wire set aside (I wedged it to the right on the intake).
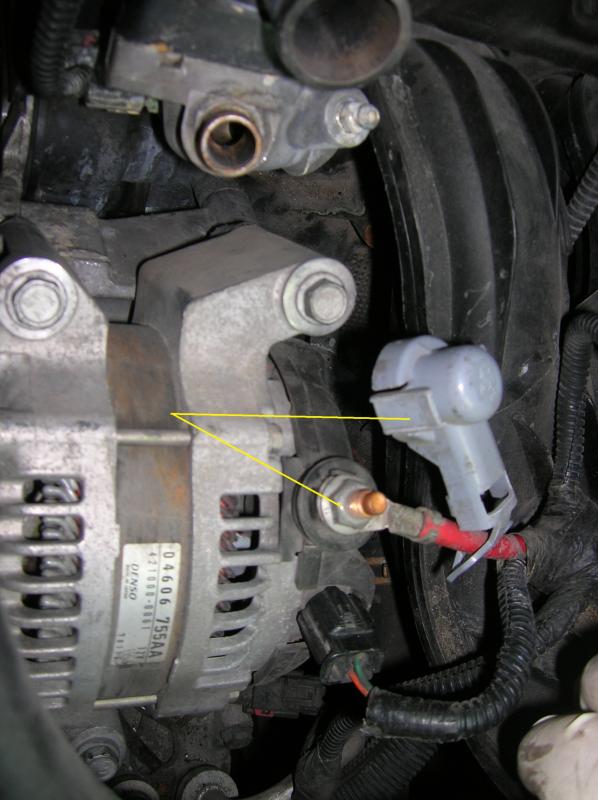
Yellow line...more squeezing...then set that connector off to the side.
Red lines...15mm socket removes these three bolts. Then the alternator pulls off.

Yellow line...one 13mm bolt holding the top of the spring tensioner on. That should be removed first. (Be extra careful here because I actually snapped that bolt off and had to take the bracket to a machine shop and have them pull the rest of the bolt out).
Red line...three more 15mm bolts holding on the alternator bracket.

Remember that black metal line that doesn't move to take the motor mount out? Here is the bolt you need to remove. Stand in front of the car about where the alternator is located and look at the passenger side frame under where the line makes its down turn. That screw needs to come out. I also disconnected the line to give me full access to the motor mount. Don't be surprised that some coolant may come out of that line.

Ok, so all the lines are now out and it's time to get that motor mount the heck out of there. Jack the motor up slightly to take the strain off the motor mount. Looking from the bottom of the car near where the crank pulley was, look upwards. It should look like this.
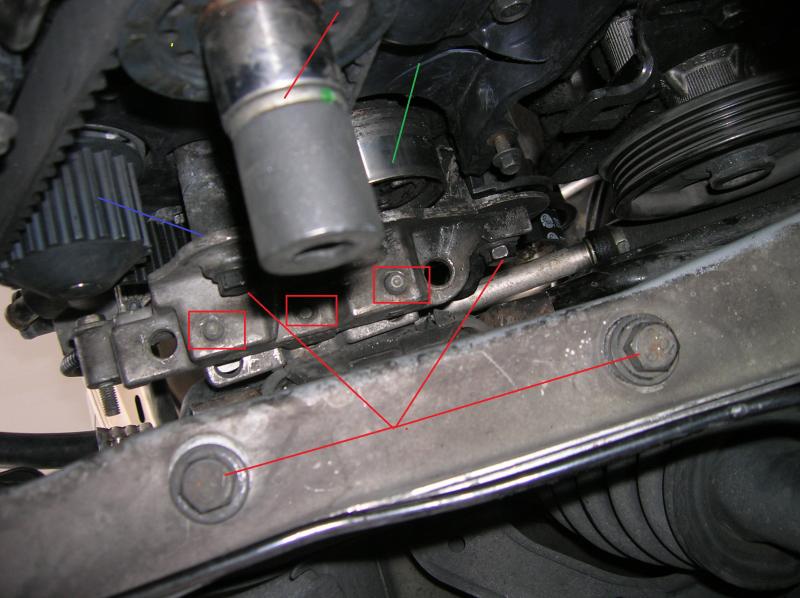
All the bolts that have a line to them need to be removed (minus the crank pulley....socket is still on it). All the bolts with squares need to be removed but from the top (after you move all the lines in the paragraphs above, you will see what I am talking about).
Blue line goes to the water pump.
Green is your tension pulley. I did NOT have to remove this.
Also in the pic...
Blue lines are pointing the two water pump bolts (two more under it)
Red lines are two of the four bolts holding the inner timing belt cover.
Red lines to the three black bolts which hold the alternator bracket (I just put the bolts back in the holes so I don't lose them).
Yellow line is to the small radiator hose.

To drain the radiator, just forward of the splash shield (under side of the front bumper) you will see a square cutout. If you look up and to the left, you will see a small **** (tried getting a good pic but couldn't). You need to turn that **** to the left and the coolant will be flowing, so make sure you have a catch can under the spout. I let it drain over night.
After the fluid is drained, put the car up on jack stands (I did the just the front and blocked the rear wheels). I then put a jack with a 2x4 and put it under the oil pan.
Pic 1. Tire and splash shield is removed first.
- A 20mm or 3/4" socket will fit on the crank bolt. I used a 1/2" breaker bar to break the bolt loose and then just lefty loosened it and out it came. - Yellow lines are a few of the push pins you need to remove to remove the splash shield.
At this time, you will see a 3/8" square just to the upper left of the crank bolt. Put a breaker bar/ratchet in the square and turn. It will loosen up so you can take the belt off. The secondary belt will need the following.
The two places I have the red arrow going to, one bolt, one nut, just loosen them up and then you can move the power steering pump (PSP) to get belt #2 off.
Next is getting the crank pulley off. I went to autozone and rented the 3 jaw pulley puller. I had to use my long 1/4" extension and place it inside the crank hole, then put the puller on it because the extensions included in the kit were just a touch to short. I put the puller on the flat area on the inside portion of the crank.
Now, you may get to this point and see that the pulley is going to hit the frame. I then disconnected the front motor mount (the one near the radiator) and slowly lowered the engine with the jack. It came down far enough were less than 1/8". I took the puller off and then grabbed it and pulled hard. It came off fairly easily.
Next, remove the radiator over flow tank. Remove the line from just under the radiator cap and the following bolts (all in red).
And
(BTW, the belt you see there, was all that was left. I had a few strands and most of it turned into dust. Do not use anything but a Gates belt.)
You can pull the power steering reservoir out of the way as well as the AC drier. Once the overflow tank is out of the way you will see that those lines are easy to move. The rubber line to the connector by the radiator cap, I took off as well as the main radiator line.
The power steering line can be easily moved too. Only thing standing in your way at this point is the black metal line. It took me a while to find what was holding it on because I was working at night in a semi-lit garage.
EDIT: Do these next steps to make it easy to get the bolt holding in the metal line
1. Radiator lines.
Red lines...Squeeze the clamps and move them up the hose so you can pull the hoses off. Push the large hose out of the way (it will bend in front of the intake and stay there) and the small hose remove completely (it attaches to the black hard line near the motor mount).
Orange line...Wire loom which you can move this up and over the radiator cap to get it out of the way for future things.

Yellow lines...Squeeze the tabs to take off the gray cap. Then take a 13mm socket and remove the red line. This is the line that connects the alternator to the battery. If you haven't unhooked the battery, use electrical tape and wrap the end up and push the entire wire set aside (I wedged it to the right on the intake).

Yellow line...more squeezing...then set that connector off to the side.
Red lines...15mm socket removes these three bolts. Then the alternator pulls off.

Yellow line...one 13mm bolt holding the top of the spring tensioner on. That should be removed first. (Be extra careful here because I actually snapped that bolt off and had to take the bracket to a machine shop and have them pull the rest of the bolt out).
Red line...three more 15mm bolts holding on the alternator bracket.

Remember that black metal line that doesn't move to take the motor mount out? Here is the bolt you need to remove. Stand in front of the car about where the alternator is located and look at the passenger side frame under where the line makes its down turn. That screw needs to come out. I also disconnected the line to give me full access to the motor mount. Don't be surprised that some coolant may come out of that line.
Ok, so all the lines are now out and it's time to get that motor mount the heck out of there. Jack the motor up slightly to take the strain off the motor mount. Looking from the bottom of the car near where the crank pulley was, look upwards. It should look like this.
All the bolts that have a line to them need to be removed (minus the crank pulley....socket is still on it). All the bolts with squares need to be removed but from the top (after you move all the lines in the paragraphs above, you will see what I am talking about).
Blue line goes to the water pump.
Green is your tension pulley. I did NOT have to remove this.
Also in the pic...
Blue lines are pointing the two water pump bolts (two more under it)
Red lines are two of the four bolts holding the inner timing belt cover.
Red lines to the three black bolts which hold the alternator bracket (I just put the bolts back in the holes so I don't lose them).
Yellow line is to the small radiator hose.
Last edited by ndtguy; Apr 18, 2013 at 01:55 AM.
I don't have any pictures of us putting the water pump or timing belt on, but here is what I can tell you.
First, the water pump.
The book said to remove the tensioner setup and the sprockets on the cams. I don't have a torque wrench or sprocket remover, so either of those were not going to happen.
I was reading on here that you can do the water pump without removing the inner timing belt cover. Just pull it out of the way. Yeah, I tried that. It broke. Luckily where it broke, it is held on by bolts or the motor mount bolts. <WHEW!>.
The water pump was a breeze. Four bolts, two shown in a picture above. Put the spill container under the water pump. Once the bolts are out, it will start dripping. I used a small screw driver and gave it a very small "tug" and the water pump came out very fast, SO, be forewarned!
I used a the supplied gasket with the pump. It went on no issues. I put all 4 bolts in and put them in by hand. I tightened them up inside out and filled up the radiator with de-ionized water and no leaks.
By this time, my friend Terry showed up. He's taken care of a few timing belts in his day. So I lined up the crank pulley with the mark on the block and on the crank timing gear.
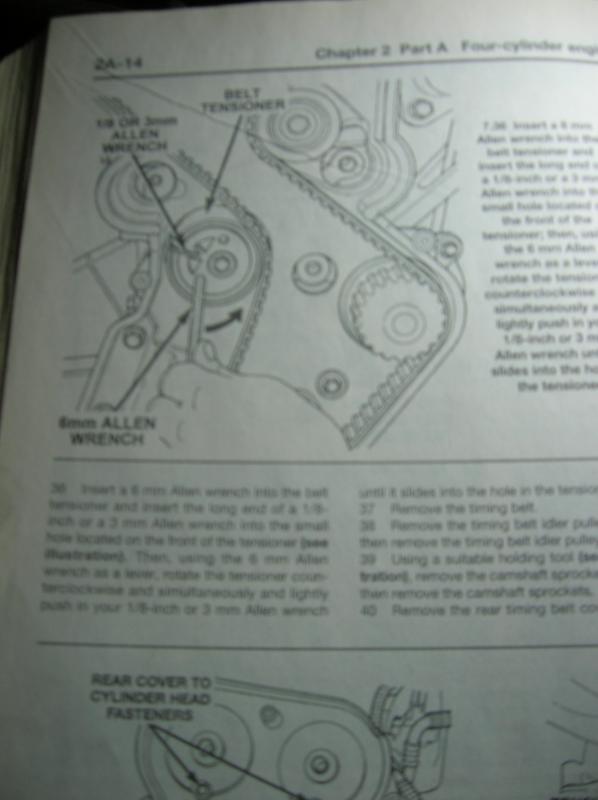
He used an 18mm box wrench to turn the cams. We put the belt on the cams first to keep them in line (EDIT: Used my small vise grips to hold the belt on the intake cam sprocket) then ran the belt around the idler and tensioner pullies, then the crank pulley and then using a 6mm hex wrench, I pulled the tensioner to full loose and pushed the belt onto the water pulley.
EDIT: Picture of what I am talking about...
When we first set the camshaft pulleys, we tried putting the exhaust mark about 1 tooth below the intake mark. Turned the crank two full revolutions and it wasn't right.
Here is a blurry picture of what you should be looking at when you have the belt on.

Terry ended up re-aligning things again with the exhaust mark about 2 teeth below the intake mark and it was as close as we were going to get it. So then I started it up and it fired up with "authority"! (as Cartman would say)
Now I'm just putting things back together. Like I said, I am waiting on a lower outer timing cover since mine cracked and has a huge hole in it.
I hope this helps, if there is anything else, let me know.
First, the water pump.
The book said to remove the tensioner setup and the sprockets on the cams. I don't have a torque wrench or sprocket remover, so either of those were not going to happen.
I was reading on here that you can do the water pump without removing the inner timing belt cover. Just pull it out of the way. Yeah, I tried that. It broke. Luckily where it broke, it is held on by bolts or the motor mount bolts. <WHEW!>.
The water pump was a breeze. Four bolts, two shown in a picture above. Put the spill container under the water pump. Once the bolts are out, it will start dripping. I used a small screw driver and gave it a very small "tug" and the water pump came out very fast, SO, be forewarned!
I used a the supplied gasket with the pump. It went on no issues. I put all 4 bolts in and put them in by hand. I tightened them up inside out and filled up the radiator with de-ionized water and no leaks.
By this time, my friend Terry showed up. He's taken care of a few timing belts in his day. So I lined up the crank pulley with the mark on the block and on the crank timing gear.
He used an 18mm box wrench to turn the cams. We put the belt on the cams first to keep them in line (EDIT: Used my small vise grips to hold the belt on the intake cam sprocket) then ran the belt around the idler and tensioner pullies, then the crank pulley and then using a 6mm hex wrench, I pulled the tensioner to full loose and pushed the belt onto the water pulley.
EDIT: Picture of what I am talking about...

When we first set the camshaft pulleys, we tried putting the exhaust mark about 1 tooth below the intake mark. Turned the crank two full revolutions and it wasn't right.
Here is a blurry picture of what you should be looking at when you have the belt on.

Terry ended up re-aligning things again with the exhaust mark about 2 teeth below the intake mark and it was as close as we were going to get it. So then I started it up and it fired up with "authority"! (as Cartman would say)
Now I'm just putting things back together. Like I said, I am waiting on a lower outer timing cover since mine cracked and has a huge hole in it.
I hope this helps, if there is anything else, let me know.
Last edited by ndtguy; Apr 18, 2013 at 01:41 AM.

All I can say is wow! That's fantastic how you did the pics and descriptions, very professional. You might consider a business doing this for people as clearly you have a gift for it. Anyway, thank you very much. Very informative and very helpful. I'll be interested in the other pics your going to take.
All I can say is wow! That's fantastic how you did the pics and descriptions, very professional. You might consider a business doing this for people as clearly you have a gift for it. Anyway, thank you very much. Very informative and very helpful. I'll be interested in the other pics your going to take.
I am not a mechanic, I am an inspector, NDI to be specific. I like modifying cars, mostly American Muscle cars, so I don't mind doing work like this. I will admit that it has taken me longer than I am use to. That motor mount was a bear to get because I didn't believe everything that had to be removed to take it off. I tried doing so with out removing it all. Removing all of it might take an extra 40 minutes, but it will save you from pulling your hair out. Putting it back in is tricky but just take your time. You'll get it.
I hope the write up will help you and others who is in our positions.
<~~Is not happy.
I ordered the part Saturday AM (lower outer timing cover) from mopar parts overstock dot com and holy crap. I just now received the confirmation that my part shipped. Over a week to ship said part for 15 dollars? The part isn't that big and weights next to nothing. "An English swallow could fly it across country quicker" (Monte Python joke).
I wouldn't care about the S/H of 15.00 of it showed up this week, but next week, specifically end of the day 16 April (Tuesday). Just be forewarned if you ever use them. Super high shipping/handling charge and takes forever to get here after actually buying said part.
I added some more pictures tonight. I basically have it buttoned up. I don't want to start the car because my daughter's rooms are right next to the garage and don't want to wake them up.
Tomorrow night when I get home, I will turn on the car and verify that the two accessory belts are good to go (tough to tell If everything is straight while laying at an angle under the car looking up) and then fill up the cooling system. After that, just put the splash shield and tire back on.
If you have any questions, feel free to ask. I hope this helps you out.