

2005 Forester X 2, 2.5 NA 5-speeds


Thread Starter
|
Captain

Joined: Oct 2005
Posts: 568
Likes: 8
From: The Summit, Queensland, Australia
My first one came when my wife bought it, then she came into some money and wanted to trade it and they offered her a huge loss...
The long and the short was she wanted me to have a nice car and we did a deal where I paid it off over two years. Never paid off a car before, always had old stuff I bought for cash.
Then, a couple of years on, I blew head gaskets, while there was a noise in the back. I figured the best thing to do was buy a damaged one at the auctions and so I did. But that one was too good to wreck, so I went back to the auction and bought another one which gave me the bits I needed for both.
So I have two 2005 Foresters and they do the bulk of the miles I cover these days...
Thread Starter
|
Captain
Joined: Oct 2005
Posts: 568
Likes: 8
From: The Summit, Queensland, Australia
Sadly I didn't get around to putting up pictures earlier...
The green one is the one bought by my wife in 2011...
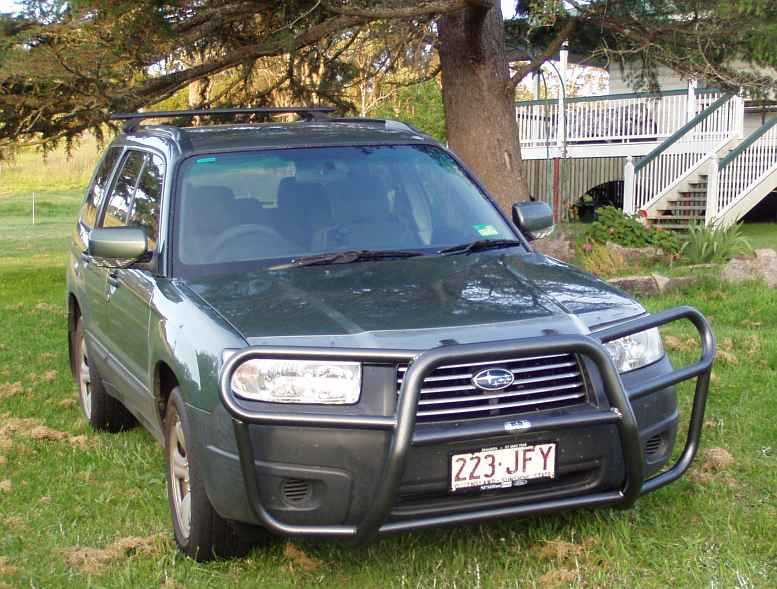
I fitted the 'roo bar assembly. And this was the scene as I transferred the differential from the rear of the 'spares car' to that when I was trying to trace the noise in the rear end... which turned out to be a wheel bearing. This seems to be a weakness with this model:
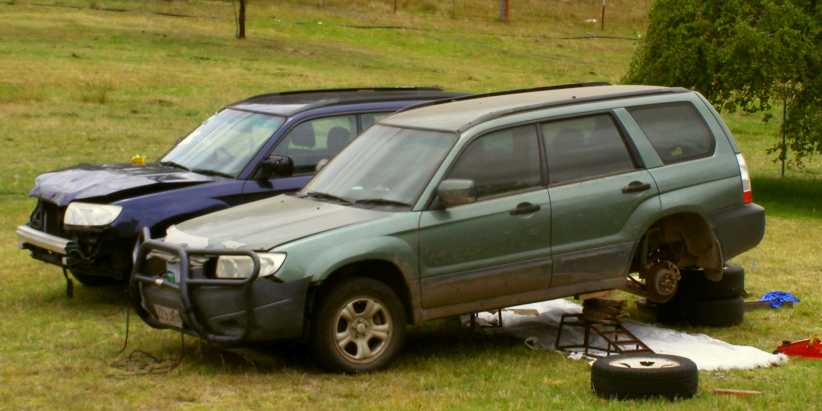
And this is where the front bumper right front suspension, right front subframe, right front fender, headlight etc went to enable me to put a 'wirte-off' back on the road:
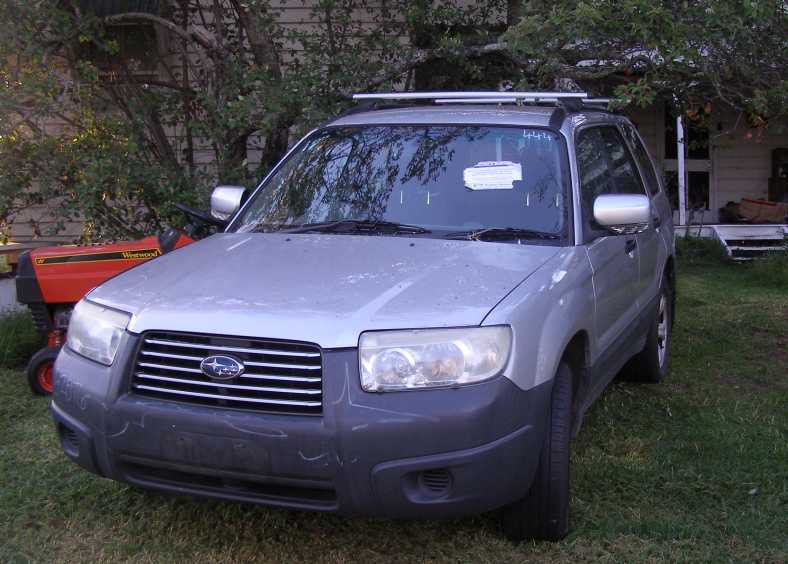
I've subsequently done about 100,000kms in this car, though due to an indiscretion of my own I've had to buy another wreck to get another engine.
And nobody talk to me about the difficulty of changing the transmission in these things, which I had to do with the green one earlier this year. It now has about 435,000kms on it.
The green one is the one bought by my wife in 2011...
I fitted the 'roo bar assembly. And this was the scene as I transferred the differential from the rear of the 'spares car' to that when I was trying to trace the noise in the rear end... which turned out to be a wheel bearing. This seems to be a weakness with this model:
And this is where the front bumper right front suspension, right front subframe, right front fender, headlight etc went to enable me to put a 'wirte-off' back on the road:
I've subsequently done about 100,000kms in this car, though due to an indiscretion of my own I've had to buy another wreck to get another engine.
And nobody talk to me about the difficulty of changing the transmission in these things, which I had to do with the green one earlier this year. It now has about 435,000kms on it.
Thread Starter
|
Captain
Joined: Oct 2005
Posts: 568
Likes: 8
From: The Summit, Queensland, Australia
And my wife has...
I know it only too well, I spent yet another day working on it today. A Ford Falcon EF model, about a 1994 build with the single overhead camshaft 4.0-litre inline six that's based on the old 144 (and 170, 200 etc) pushrod six.

This is a 'stock' picture, but apart from the wheels it's identical to her car (of which I don't have a pic). It's a 4-speed automatic with live rear axle. Back at the beginning of the year I had to do a lot of dismantling around the front to replace most (all?) of the air conditioning system. While I was at the wrecking yard buying bits (we fitted a recently-serviced compressor, the rest was new) I grabbed an oil cooler for the auto transmission which I fitted up but didn't connect because that would require that I take out the radiator.
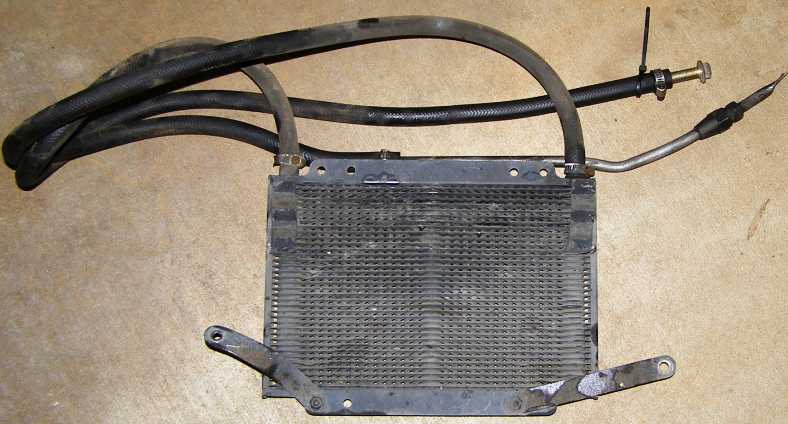
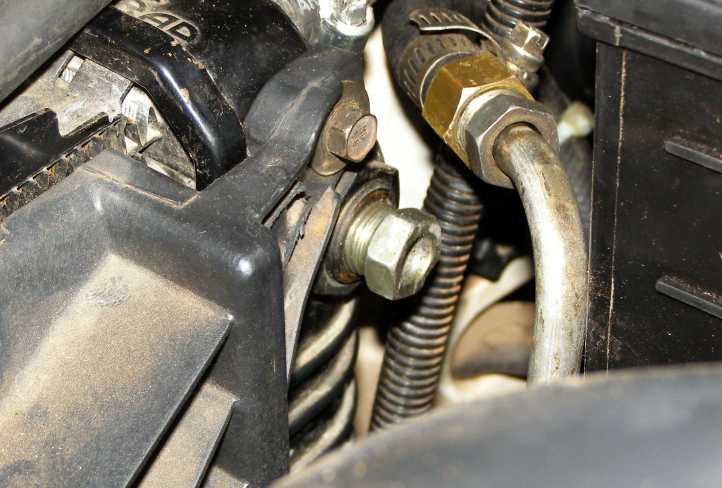
Well, I got my chance. A fitting broke off the plastic tank on the radiator the other day while I was changing the battery. So off to the wrecker's again and acquired another radiator. But with the radiator out I could now hook up that oil cooler. One line has an in-line joiner right under the harmonic balancer, so that's easy to get into:
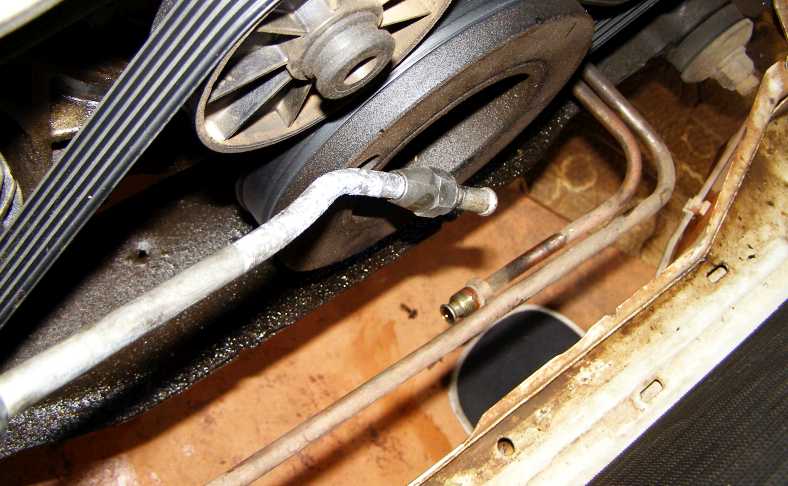
The other line comes in one piece right up to a high fitting in the radiator. Seeing as I was bypassing the cooler built into the radiator I decided it might be wise to plug the holes in case it's ever needed again. So I cut spare bits of tube and filled them with solder and screwed them in place:
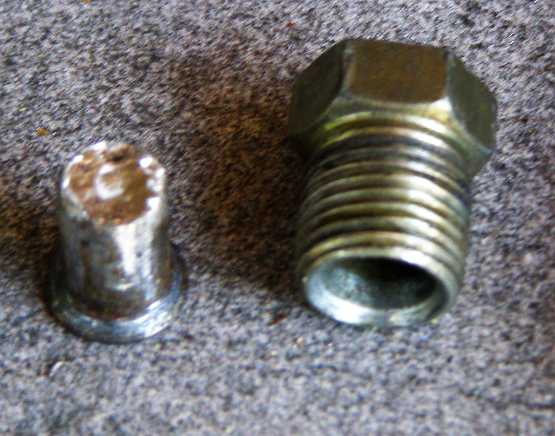
A bit of a twist to the top of the upper pipe has it neatly pointing into a corner of the engine bay ahead of the battery where there's room for the other hose to the oil cooler to fit in. You can see here the tube nut holding the blocked-off piece of tube too.
So that's another job done. I guess my next bout is when we replace the AC compressor again.
It is a Ford...
I know it only too well, I spent yet another day working on it today. A Ford Falcon EF model, about a 1994 build with the single overhead camshaft 4.0-litre inline six that's based on the old 144 (and 170, 200 etc) pushrod six.
This is a 'stock' picture, but apart from the wheels it's identical to her car (of which I don't have a pic). It's a 4-speed automatic with live rear axle. Back at the beginning of the year I had to do a lot of dismantling around the front to replace most (all?) of the air conditioning system. While I was at the wrecking yard buying bits (we fitted a recently-serviced compressor, the rest was new) I grabbed an oil cooler for the auto transmission which I fitted up but didn't connect because that would require that I take out the radiator.
Well, I got my chance. A fitting broke off the plastic tank on the radiator the other day while I was changing the battery. So off to the wrecker's again and acquired another radiator. But with the radiator out I could now hook up that oil cooler. One line has an in-line joiner right under the harmonic balancer, so that's easy to get into:
The other line comes in one piece right up to a high fitting in the radiator. Seeing as I was bypassing the cooler built into the radiator I decided it might be wise to plug the holes in case it's ever needed again. So I cut spare bits of tube and filled them with solder and screwed them in place:
A bit of a twist to the top of the upper pipe has it neatly pointing into a corner of the engine bay ahead of the battery where there's room for the other hose to the oil cooler to fit in. You can see here the tube nut holding the blocked-off piece of tube too.
So that's another job done. I guess my next bout is when we replace the AC compressor again.
It is a Ford...
Thread Starter
|
Captain
Joined: Oct 2005
Posts: 568
Likes: 8
From: The Summit, Queensland, Australia
January this year saw the air conditioning failing on both the Falcon and the silver Forester...
A new compressor less than a year after the 'guaranteed used' one was fitted fixed the Falcon, with a re-gas of course.
The Silver Forester hasn't had air conditioning working since I put it back on the road from its 'written off' condition. While the mobile AC man was at our place to do the Falcon he re-gassed the Forester And that gave me air conditioning, nice cool air in the middle of summer.
For about five minutes. And then it stopped working. Leave it a while and it will work again, but something was obviously amiss. I resorted to asking about it on a forum for Subaru Foresters and learned this common problem was caused by the clutch material wearing away and is fixed by removing thin spacers or shims. The trick is getting the clutch off the front spline of the compressor to take out the shims.
This led to me going with the method others had used on that forum,but I realised it was the wrong way to go (I did have a spare compressor to try it on first and others had experienced failures) and so I made a nice little puller to do the job:
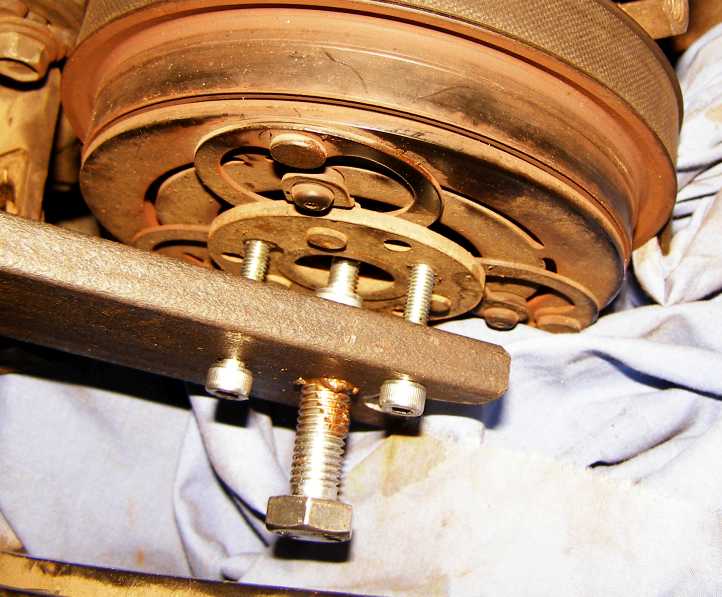
Materials cost me about $8 or something, I got some practice drilling and cutting threads and it did the job nicely. When it was done, which only really took half an hour to complete, the difference in driving the car was great. I've now loaned the puller to a friend who needs to fix his slightly later model Forester.
A new compressor less than a year after the 'guaranteed used' one was fitted fixed the Falcon, with a re-gas of course.
The Silver Forester hasn't had air conditioning working since I put it back on the road from its 'written off' condition. While the mobile AC man was at our place to do the Falcon he re-gassed the Forester And that gave me air conditioning, nice cool air in the middle of summer.
For about five minutes. And then it stopped working. Leave it a while and it will work again, but something was obviously amiss. I resorted to asking about it on a forum for Subaru Foresters and learned this common problem was caused by the clutch material wearing away and is fixed by removing thin spacers or shims. The trick is getting the clutch off the front spline of the compressor to take out the shims.
This led to me going with the method others had used on that forum,but I realised it was the wrong way to go (I did have a spare compressor to try it on first and others had experienced failures) and so I made a nice little puller to do the job:
Materials cost me about $8 or something, I got some practice drilling and cutting threads and it did the job nicely. When it was done, which only really took half an hour to complete, the difference in driving the car was great. I've now loaned the puller to a friend who needs to fix his slightly later model Forester.
Thread Starter
|
Captain
Joined: Oct 2005
Posts: 568
Likes: 8
From: The Summit, Queensland, Australia
I have it in mind that both Foresters need engine rebuilds...
Those rebuilds would be of their original engines, the ones in each of them at the moment are running fairly well but, well they aren't the originals. But one probably needs a crank grind or a replacement crankshaft (I forgot to check the oil and the bearings rattled), so to make it all easier, this week I bought yet another engine. It was a lot more work to remove because it came out of an automatic, I have to say.
This one will be fitted to the green car while I rebuild its engine. The crank from the one in there will then come out to use in the rebuild of the silver car's engine. Make sense? Then, when the green car's original engine is rebuilt (with 1mm oversize pistons because the bores got rusty while it's been out) the latest engine comes out to become a spare. Or maybe I'll sell it as the engine presently in the silver car could be my spare?
Last edited by Ray Bell; Jun 9, 2021 at 09:54 AM.
Thread Starter
|
Captain
Joined: Oct 2005
Posts: 568
Likes: 8
From: The Summit, Queensland, Australia
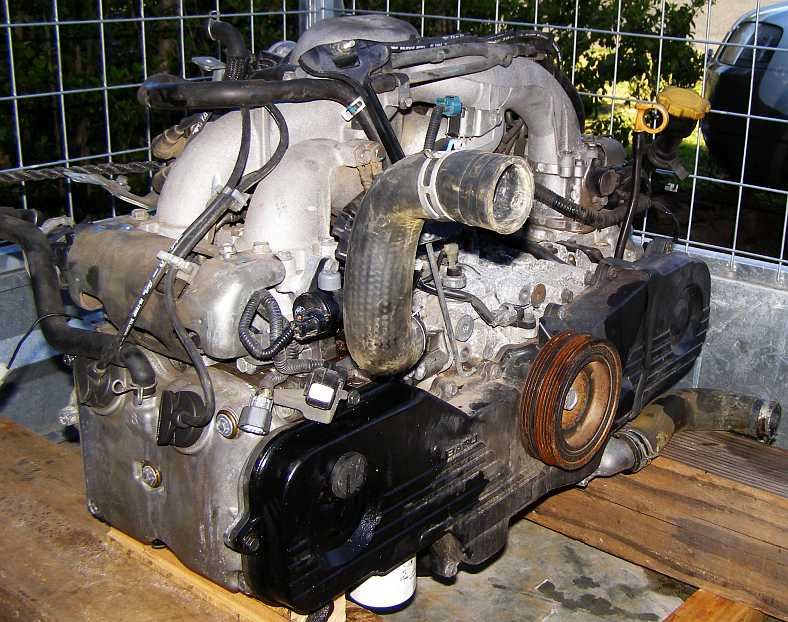
I made a start on the first engine rebuild today...
Getting to my shed at about 1pm, the primary purpose was to establish if I had a 3.23:1 Dodge centre for a bloke in Adelaide. I had look previously but not at the ones still in axle housings, so that was my task today. They were all 2.9s! Most of the others are 2.77s.
As a secondary task I wanted to get the green Forester's original engine out of its hiding place and start stripping it down for its rebuild. This meant clearing a path for the engine crane (after taking the new engine off the crane, of course) and assembling the engine stand ready to accept the engine. Of course the bolt for the engine stand was missing, so I had to find one to suit and, quite unexpectedly, I had one So the engine stand was reassembled for the first time since I rebuilt the 504 engine 19 years ago.
It took a little while to sort out bolts to bolt the engine to the stand, and to remove the flywheel too, but once I had it on the stand...
I had to remove the inlet assembly, which includes the full wiring harness for the engine so a few tricky clips to get undone, then I wanted to remove just one head to see what it was like inside. That was remarkably quickly achieved...
Then to attack the bolts which hold the crankcase halves together. These have been worrying me, they are a 12mm 12-point headed bolt and four of them are sunk into the water jackets of the block. But with my trusty breaker bar, a �" to ⅜" adaptor (no, a �" socket wouldn't fit!) and an extension bar I was able to use my ⅜" 12mm 12-point socket, though I sweated as I leaned heavily on it and hoped it wouldn't break. They came out okay:
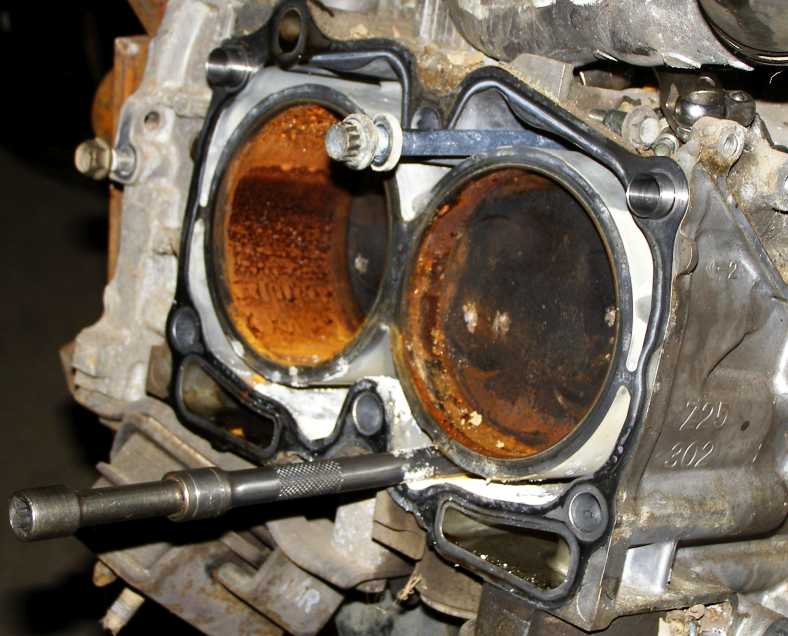
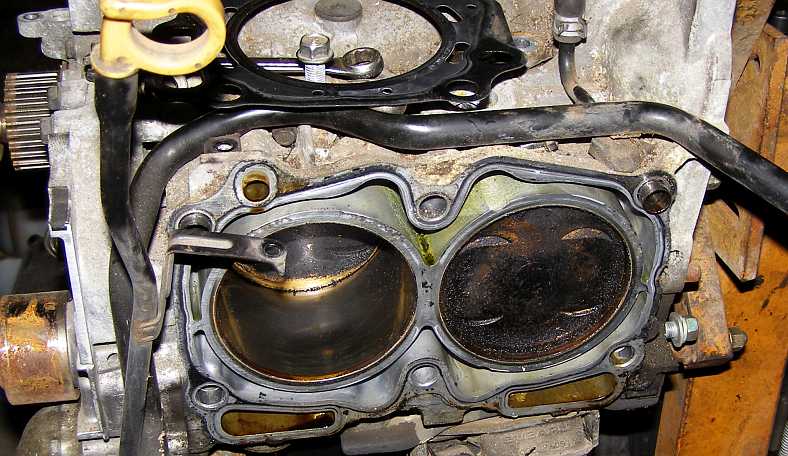
Exposing all of this shows what large ports the heads have:
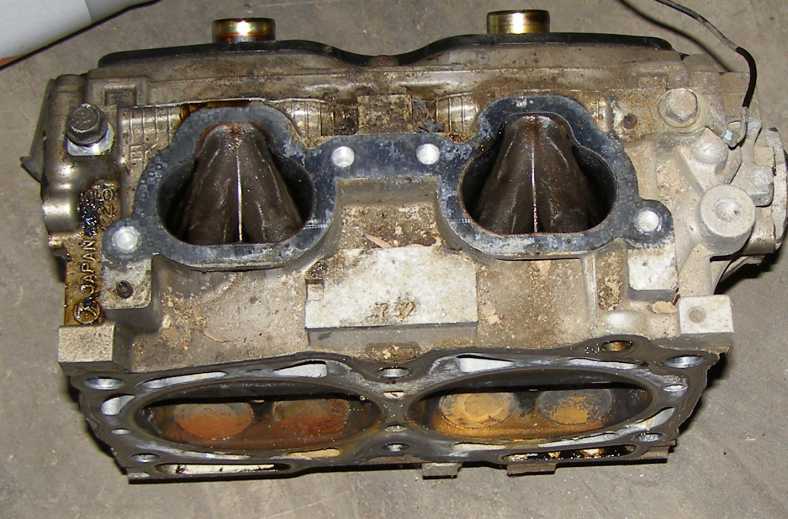
But I still have to worry about moving those pistons in the rusty bores. This engine has been out of the car for almost six years now, and while I initially used to give it a bit of a turn every so often it hasn't been moved in at least three years. It's very important to be able to move the pistons as that's the only way to get the pins out, they come through these plugged holes in the front and rear of the block sections:

So naturally you have to get the piston in place to line it up so it will come out, then you can take the crank and rods away from the pistons.
Next time I go over I'll take off the other head, which I hope won't uncover so much rusty bore. Then I have to get a tool (or make one) to get those plugs out.
This is the engine which is going to get the 1mm oversize pistons, so the bores don't matter much.
I completed the one and a half-hour drive home by 6:30, so like I said, it was a good afternoon's work.
Getting to my shed at about 1pm, the primary purpose was to establish if I had a 3.23:1 Dodge centre for a bloke in Adelaide. I had look previously but not at the ones still in axle housings, so that was my task today. They were all 2.9s! Most of the others are 2.77s.
As a secondary task I wanted to get the green Forester's original engine out of its hiding place and start stripping it down for its rebuild. This meant clearing a path for the engine crane (after taking the new engine off the crane, of course) and assembling the engine stand ready to accept the engine. Of course the bolt for the engine stand was missing, so I had to find one to suit and, quite unexpectedly, I had one So the engine stand was reassembled for the first time since I rebuilt the 504 engine 19 years ago.
It took a little while to sort out bolts to bolt the engine to the stand, and to remove the flywheel too, but once I had it on the stand...
I had to remove the inlet assembly, which includes the full wiring harness for the engine so a few tricky clips to get undone, then I wanted to remove just one head to see what it was like inside. That was remarkably quickly achieved...
Then to attack the bolts which hold the crankcase halves together. These have been worrying me, they are a 12mm 12-point headed bolt and four of them are sunk into the water jackets of the block. But with my trusty breaker bar, a �" to ⅜" adaptor (no, a �" socket wouldn't fit!) and an extension bar I was able to use my ⅜" 12mm 12-point socket, though I sweated as I leaned heavily on it and hoped it wouldn't break. They came out okay:
Exposing all of this shows what large ports the heads have:
But I still have to worry about moving those pistons in the rusty bores. This engine has been out of the car for almost six years now, and while I initially used to give it a bit of a turn every so often it hasn't been moved in at least three years. It's very important to be able to move the pistons as that's the only way to get the pins out, they come through these plugged holes in the front and rear of the block sections:
So naturally you have to get the piston in place to line it up so it will come out, then you can take the crank and rods away from the pistons.
Next time I go over I'll take off the other head, which I hope won't uncover so much rusty bore. Then I have to get a tool (or make one) to get those plugs out.
This is the engine which is going to get the 1mm oversize pistons, so the bores don't matter much.
I completed the one and a half-hour drive home by 6:30, so like I said, it was a good afternoon's work.
Last edited by Ray Bell; Aug 30, 2020 at 11:04 AM.
Thread Starter
|
Captain
Joined: Oct 2005
Posts: 568
Likes: 8
From: The Summit, Queensland, Australia
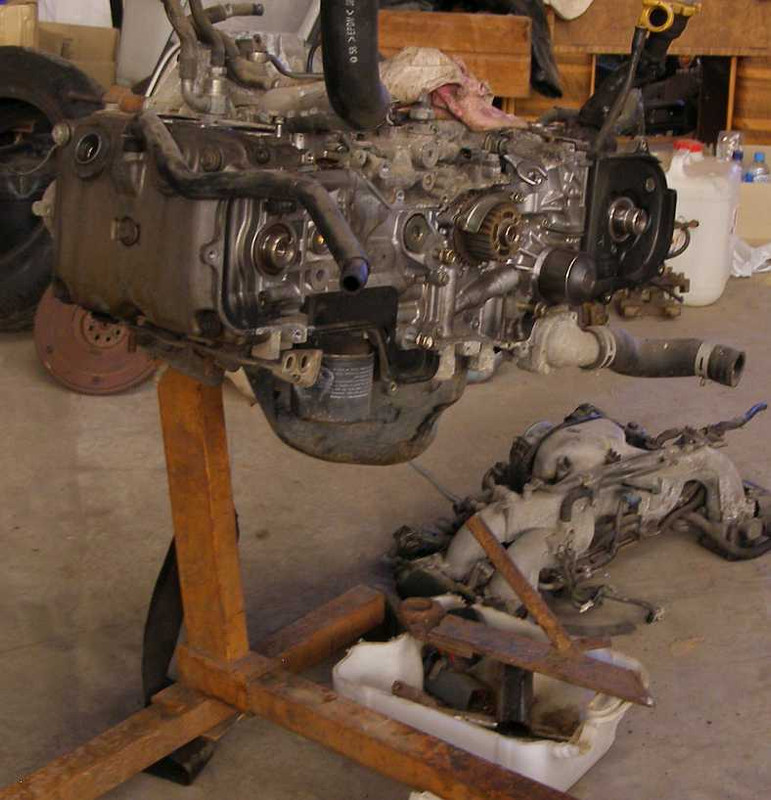
Continued the process of stripping the old engine this week...
The blocks and heads are now at my nephew's workshop and when he can fit the job in he'll be giving them a good cleaning, boring the cylinders, decking both blocks and heads. He will be taking pics when the time comes so I can post them as he does the job.
But in the meantime, we're still photographing bits in the raw:
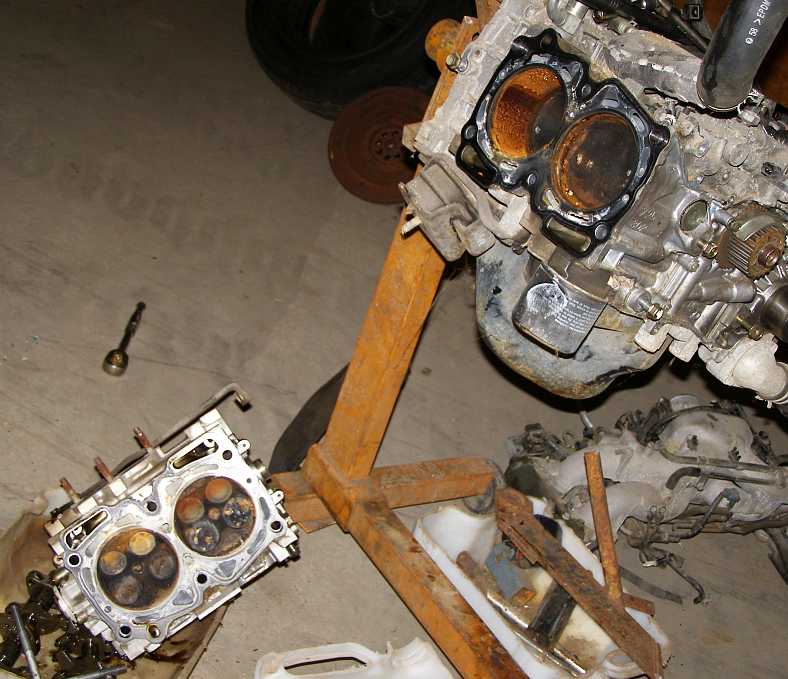
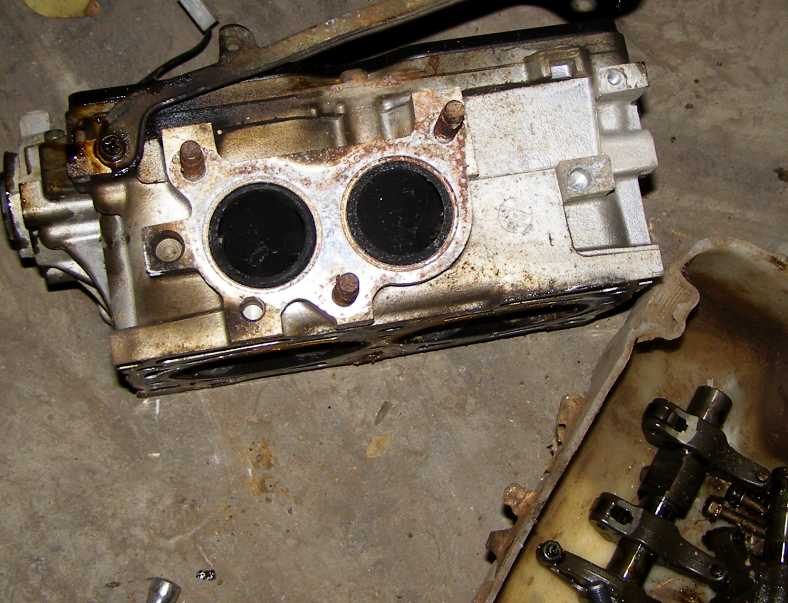
Not quite as bad. Removing the head from the left bank revealed bores not as badly rusted as those on the right (see last week's pictures).
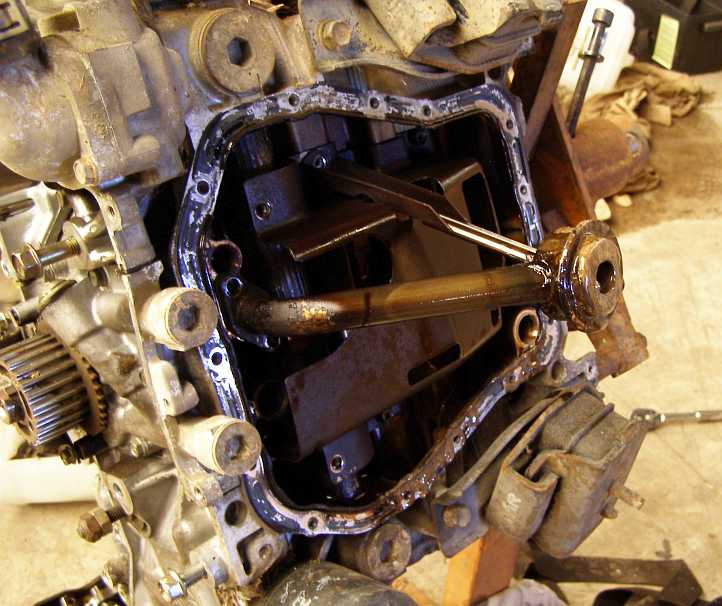
Sump off. The oil pickup and baffling fill the sump (or pan), which is really very small. The engine only takes a little over four litres of oil.
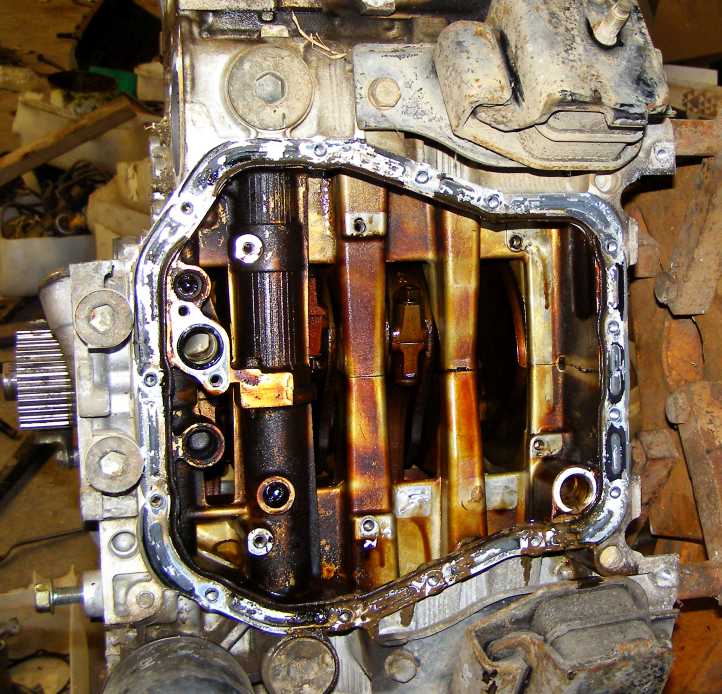
Inside engine. There's not a lot of room in there! The crank webs are very thin and clearances are not large at all.
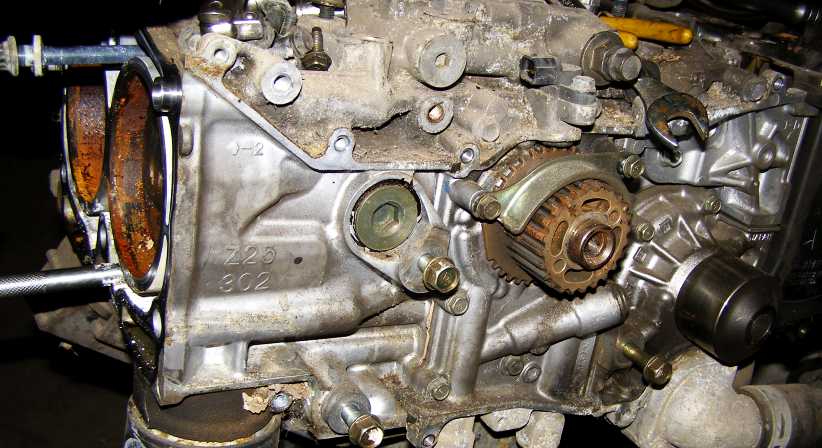
Gudgeon plugs. Or piston pin plugs. Those Allen-socket plugs are there for the removal of the pins, first step being to align the pistons so that a long-nose pair of pliers can get the circlips out.

Water pump off. By the time I'd removed the water pump I'd also borrowed a 14mm Allen key and taken out the plugs. The oil pump, which surrounds the front of the crankshaft has still to be removed.
It was, of course, necessary to turn the engine to get the pins in the right location for removal. With rust in the bores and the pistons not willing to move at all. I stood the engine up on the engine stand with the worst bores upward and put some diesel in to soak in for a short time.
I also scraped around the rust further up in the bores with the side of a big screwdriver, then tried turning. No go. A piece of wood on top of one piston and a couple of hits with the hammer got a little bit of movement, then I worked the crank back and forth, scraped some more and before long I could turn it over.
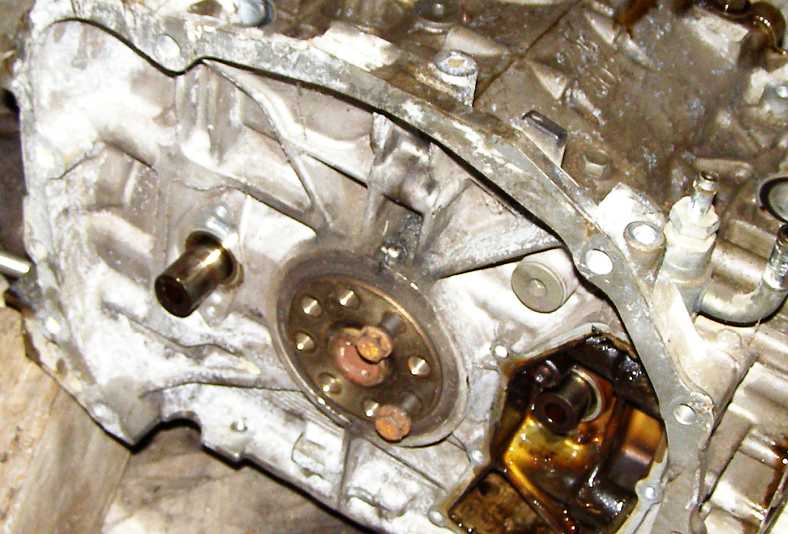
Removing the pins. Using a screwdriver to push through past the con-rod of the other cylinder, the pins are pushed out through their plug holes. There are plates covering these at this end of the engine which are held by 6mm x 1mm Phillips-head screws with countersunk heads. When I borrowed the Allen key I also borrowed an impact driver but still these screws' heads were damaged. I bought replacements with Allen-socketed heads.
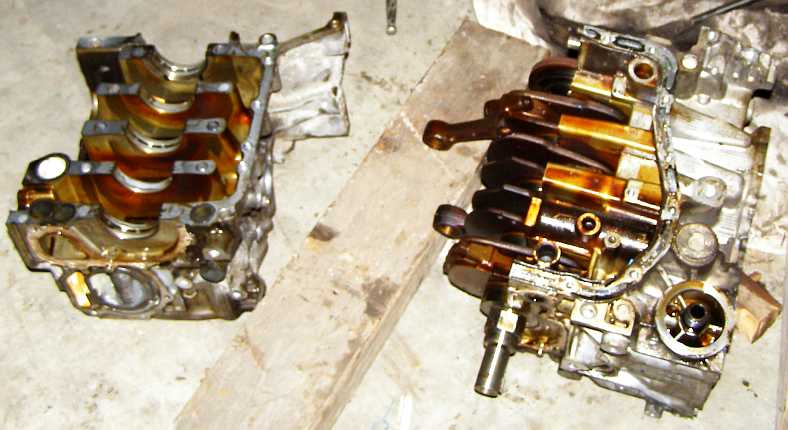
Cases split. After looking carefully all around to see I'd missed no bolts (they are everywhere!) I then had to do a short drop onto this piece of wood to break the seal of whatever was holding them together. The dowels are nice and tight and prevented it coming away too much, but I was able then to prise it all away and the thing was all apart.
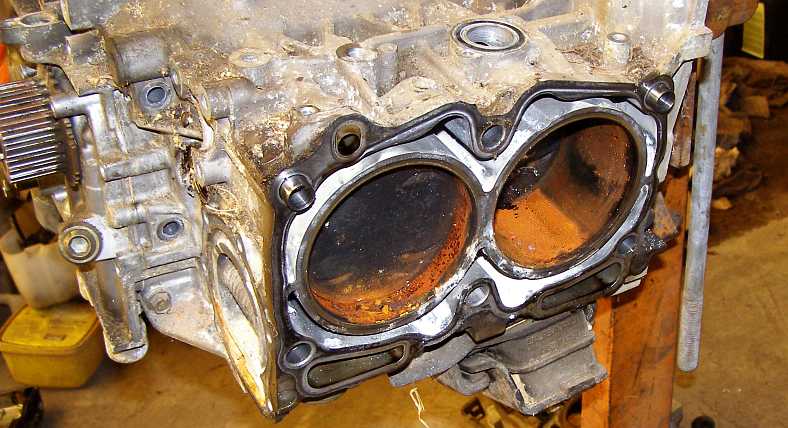
Second engine cleaner. No water in this one, its problem is in the crankshaft area. Bores are clean and inside the water jackets much better, reflecting its much lower mileage than the other engine's. The heads off this one will be put onto the first.
If anyone has any questions, please ask...
The blocks and heads are now at my nephew's workshop and when he can fit the job in he'll be giving them a good cleaning, boring the cylinders, decking both blocks and heads. He will be taking pics when the time comes so I can post them as he does the job.
But in the meantime, we're still photographing bits in the raw:
Not quite as bad. Removing the head from the left bank revealed bores not as badly rusted as those on the right (see last week's pictures).
Sump off. The oil pickup and baffling fill the sump (or pan), which is really very small. The engine only takes a little over four litres of oil.
Inside engine. There's not a lot of room in there! The crank webs are very thin and clearances are not large at all.
Gudgeon plugs. Or piston pin plugs. Those Allen-socket plugs are there for the removal of the pins, first step being to align the pistons so that a long-nose pair of pliers can get the circlips out.
Water pump off. By the time I'd removed the water pump I'd also borrowed a 14mm Allen key and taken out the plugs. The oil pump, which surrounds the front of the crankshaft has still to be removed.
It was, of course, necessary to turn the engine to get the pins in the right location for removal. With rust in the bores and the pistons not willing to move at all. I stood the engine up on the engine stand with the worst bores upward and put some diesel in to soak in for a short time.
I also scraped around the rust further up in the bores with the side of a big screwdriver, then tried turning. No go. A piece of wood on top of one piston and a couple of hits with the hammer got a little bit of movement, then I worked the crank back and forth, scraped some more and before long I could turn it over.
Removing the pins. Using a screwdriver to push through past the con-rod of the other cylinder, the pins are pushed out through their plug holes. There are plates covering these at this end of the engine which are held by 6mm x 1mm Phillips-head screws with countersunk heads. When I borrowed the Allen key I also borrowed an impact driver but still these screws' heads were damaged. I bought replacements with Allen-socketed heads.
Cases split. After looking carefully all around to see I'd missed no bolts (they are everywhere!) I then had to do a short drop onto this piece of wood to break the seal of whatever was holding them together. The dowels are nice and tight and prevented it coming away too much, but I was able then to prise it all away and the thing was all apart.
Second engine cleaner. No water in this one, its problem is in the crankshaft area. Bores are clean and inside the water jackets much better, reflecting its much lower mileage than the other engine's. The heads off this one will be put onto the first.
If anyone has any questions, please ask...
Last edited by Ray Bell; Sep 26, 2020 at 07:42 AM.