DodgeForum.com
  • LOG IN
  • REGISTER
  • Forums
    • General
      • New Member Area
      • Members Rides
      • Newsletter Archive
      • Brand News, Concepts & Rumors
      • Dodge Forum Site Issues and Suggestions
    • The DF Lounge
      • DodgeForum.com Club Section
      • Racing Talk
      • Regional
    • Dodge Trucks
      • Dodge Ram
      • Dodge Dakota
    • Dodge SUVs
      • Dodge Durango
      • Dodge Nitro
      • Ramcharger, Trailduster & Power Wagon
      • Jeeps
    • Dodge Cars
      • Dodge Avenger
      • Dodge Caliber
      • Dodge Challenger
      • The New Dodge Demon
      • Dodge Charger
      • Dodge Dart
      • Dodge Daytona
      • Dodge Intrepid
      • Dodge Magnum
      • Dodge Neon
      • Dodge Stealth
      • Dodge Stratus
      • Dodge Viper
    • Dodge Vans & CUVs
      • Dodge Caravan
      • Dodge Sprinter
      • Dodge Pro Master
      • Dodge Ram Van
      • Dodge Journey
    • A Blast From the Past
      • Dodge Muscle Cars
      • Dodge Classics
      • K-Cars
    • Technical Help & Information
      • DIY - Do It Yourself
      • Detailing
      • Audio/Visual Electronics
      • Wheels & Tires
      • Technical Archives
    • Dodge Classifieds
      • Vendor Group And Special Buys
      • User Classifieds
  • News
  • Marketplace
    • Vendor Directory
    • Become a Vendor
    • Member Marketplace
  • New Posts
  • Tools
    • Car Payment Calculator
    • Tire Rim Calculator
    • Vin Decoder
    • Recalls
    • Technical Service Bulletins (TSBs)
    • Members List
    • Live Feed
  • How-Tos
  • Gallery
  • View Dark Mode
    • Please register or login to enable Dark Mode.
  • Log In
  • Register
DodgeForum.com
    • Threads
      • Advanced
Dark Mode

Please register or login to enable Dark Mode.

Log In

Forgot your Password?

By logging into your account, you agree to our Terms of Use and Privacy Policy, and to the use of cookies as described therein.
or
 
  • Recent
  • Commented
  • Albums
  • My Pictures

Procedure for fixing "Y" connectors on heater hoses leaking coolant PartII

tomhanrath
January 17, 2013
 3
 0
Description:
Take note of the connections before removing
Write down how they are connected. You may not be able to understand what I've
written here but it was important to connect the correct "T" to the correct pipes. It doesn't
matter on one "T" which one connects to which...but don't mix up the "T" with the other
"T" hose connections.
I basically noted:
For the "Y" which connects to horizontally in the front left area (underneath the
spark plug wires)
1) One hose connects to the "TOP Aluminum tube behind the engine running left"
2) The other hose connects to the "BOTTOM" tube coming through the firewall above
the power steering bell housing (underneath the driver windshield)
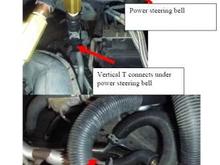
For the "Y" which connects vertically in the back of the engine compartment closer
to the driver
a) One hose connects to the "Bottom TOP Aluminum tube behind the engine running
left"
b) The other hose connects to the "TOP tube coming through the firewall above the
power steering bell housing (underneath the driver windshield)
Horizontal T

Read more ยป
Sort:
Default
  • Default
  • Most Recent
The notes you wrote down about which one connects where is going to be needed.
As well, when you duplicated the old assemblies you have them marked which is which.
I found it much easier to have the factory hose clamps already on the hose end. Then I
use the vise grips to hold it open while wiggling the hose over the van connector...which
ever one. It should slide on fairly easy...in fact it made me worry. However, with the
hose clamp in place...it did not leak.
I topped up my coolant resevoir to the line that says max and then started the engine with
all the heaters on. It still did quite a bit of vapour and smoke...but it was burning off the
previously leaked coolant. I used a flashlight to make sure it wasn't coming from a hose. 
Then I revved the engine slightly higher for a bit to ensure pressure. Still no leaks so I
jumped in and took it on the road. I'm probably going to take a garden hose to the inside
behind the engine rather than wait for any accumulated coolant to burn off. I don't like
the smell and it probably isn't healthy.
I promise to post something if a leak develops or I run into other trouble related.
tomhanrath@hotmail.com if you have questions...a read it every 4 or 5 days or so.
The notes you wrote down about which one connects where is going to be needed. As well, when you duplicated the old assemblies you have them marked which is which. I found it much easier to have the factory hose clamps already on the hose end. Then I use the vise grips to hold it open while wiggling the hose over the van connector...which ever one. It should slide on fairly easy...in fact it made me worry. However, with the hose clamp in place...it did not leak. I topped up my coolant resevoir to the line that says max and then started the engine with all the heaters on. It still did quite a bit of vapour and smoke...but it was burning off the previously leaked coolant. I used a flashlight to make sure it wasn't coming from a hose. Then I revved the engine slightly higher for a bit to ensure pressure. Still no leaks so I jumped in and took it on the road. I'm probably going to take a garden hose to the inside behind the engine rather than wait for any accumulated coolant to burn off. I don't like the smell and it probably isn't healthy. I promise to post something if a leak develops or I run into other trouble related. tomhanrath@hotmail.com if you have questions...a read it every 4 or 5 days or so.
0 2013/01/17 16:28:25 tomhanrath
Getting the hoses off
Put some kind of sled or garbage can lid under the engine in the back to catch any
coolant. You will lose about 1/2 litre.
Rember:
1) Label the Horizontal "Y" and the vertical "Y" with a twist tie or marker
2) You should already have a diagram and description of which hose goes where
NOW you are ready to remove things.
I thought it would be easy to pull the hose off. It's not. Basically after using the needle
nose vice grips to slide the manufacture's clamps off the hose or over the hump in the
tube...the hose still does not pull off. It's difficult to twist and pull (which is the correct
thing) because there is little room even for a twist...and the hose has some corrugated
coating (don't cut that) which keeps it from kinking...but also stops you from gripping the
hose. Just cut it.
A utility knife cut it from the end of the hose to past the hump and then a screwdriver to
pry the rubber open. Don't damage the tubing on the engine or van wall by "bending".
Not recommended way to get the hose off. Even after cutting it's pretty hard.
Getting the hoses off Put some kind of sled or garbage can lid under the engine in the back to catch any coolant. You will lose about 1/2 litre. Rember: 1) Label the Horizontal "Y" and the vertical "Y" with a twist tie or marker 2) You should already have a diagram and description of which hose goes where NOW you are ready to remove things. I thought it would be easy to pull the hose off. It's not. Basically after using the needle nose vice grips to slide the manufacture's clamps off the hose or over the hump in the tube...the hose still does not pull off. It's difficult to twist and pull (which is the correct thing) because there is little room even for a twist...and the hose has some corrugated coating (don't cut that) which keeps it from kinking...but also stops you from gripping the hose. Just cut it. A utility knife cut it from the end of the hose to past the hump and then a screwdriver to pry the rubber open. Don't damage the tubing on the engine or van wall by "bending". Not recommended way to get the hose off. Even after cutting it's pretty hard.
0 2013/01/17 16:28:25 tomhanrath
Assembling the new hose and "T" adapters
Remember which came from where when you pull them out of the van. Mark them and
build them one at a time to make sure you are going to spend next time.
I worked on the kitchen table (wife is very tolerant) to cut the hoses and assembly the
new "T" replacements.
Thread the pipe into the blocks with Teflon tape to prevent thread leaks.
Lay the "T" adapter approximately over top of the old plastic "Y" adapter and duplicate
the hose length. You should have a fairly close model to the old assemblies...it doesn't
have to be exact...in fact the "T" shape in some cases made it easier to end up where it
needed to connect. But you WILL need the corrugated plastic that covers the hoses...it
helps bend your new hoses without kinking them.
Be sure to Label the new "T" assembly the same as the label you put on the "Y" assembly
before removing it. It should say vertical or horizontal.
Also the ordinary hose clamp goes on each hose where it connects to your assembled
brass pipe. The factory clamps are for hose ends that connect to the vehicle.
Assembling the new hose and "T" adapters Remember which came from where when you pull them out of the van. Mark them and build them one at a time to make sure you are going to spend next time. I worked on the kitchen table (wife is very tolerant) to cut the hoses and assembly the new "T" replacements. Thread the pipe into the blocks with Teflon tape to prevent thread leaks. Lay the "T" adapter approximately over top of the old plastic "Y" adapter and duplicate the hose length. You should have a fairly close model to the old assemblies...it doesn't have to be exact...in fact the "T" shape in some cases made it easier to end up where it needed to connect. But you WILL need the corrugated plastic that covers the hoses...it helps bend your new hoses without kinking them. Be sure to Label the new "T" assembly the same as the label you put on the "Y" assembly before removing it. It should say vertical or horizontal. Also the ordinary hose clamp goes on each hose where it connects to your assembled brass pipe. The factory clamps are for hose ends that connect to the vehicle.
0 2013/01/17 16:28:25 tomhanrath
 

Top
DodgeForum.com
  • Contact Us
  • FAQ
  • Archive
  • Advertising
  • Cookie Policy
  • Privacy Statement
  • Terms of Service
  • Your Privacy Choices
  • Manage Preferences

© 2026 MH Sub I, LLC dba Internet Brands

Follow Us        


When you click on links to various merchants on this site and make a purchase, this can result in this site earning a commission. Affiliate programs and affiliations include, but are not limited to, the eBay Partner Network.