Dodge Ram 1994-2008: Why Am I Stuck in 4WD?
If your Ram's 4WD won't disengage, this article will help you troubleshoot and correct the problem to get your truck back in 2WD.
This article applies to the Dodge Ram 1500 2nd and 3rd Generation (1994-2008).
If you're an off-road junkie, your Ram's 2WD will get you where you want to be—crawling and climbing boulders in the steep, rocky terrain. And once you reach that rugged hill, the 4WD system will take over, allowing you to enjoy your truck's full potential. However, when you decide to go home and your truck fails to switch back to 2WD, you know there's a problem. Thankfully, diagnosing and fixing the problem can be cheap and relatively easy to do.
Before reading the rest of this article, you should first test if your truck really is stuck in 4WD. Just drive back to the off-road, and then hit the pedal back onto the on-road. If you get little to no wheel spin, then you know you're in 4H. If you do get rear wheel spin, you know your 2H is engaged.

Materials Needed
- Hydraulic floor jack and jack stands
- Multimeter or ohm reader
- Posi-Lok
After covering the basics, such as checking for blown fuses and addressing the check engine lights, read the additional steps below to properly diagnose your Ram's 4WD system yourself.
Step 1 – Check the vacuum lines and actuator switch
The lines might be cracked or loose, or the actuator might be damaged.
In most cases, especially if you go off-roading a lot, your truck probably has a vacuum issue. When shifting into 4WD, a synchronizer in the transfer case spins the front driveshaft and the shift lever engages the vacuum actuator switch. The vacuum lines then signal the vacuum solenoid on the front axle to slide the splined collar shaft. Once the splines of both axle stubs line up, the collar locks into place and 4WD engages.
For your truck to get stuck in 4WD, the vacuum lines simply might have ripped, or the vacuum actuator switch might have gone out. First check the vacuum lines connected to the central axle disconnect (CAD) system housing, which is located behind the front axle on the passenger's side. You will see two hoses attached to the CAD that are about an inch long. Make sure the lines aren't damaged or leaking, and if so, replace them.
If the vacuum lines are intact, test the vacuum actuator switch.
- Disconnect both vacuum lines and start your truck. You should feel a suction in one of the vacuum lines.
- Keep the engine running and shift into 4WD. If the suction in the vacuum lines do not switch, you have an issue with the vacuum actuator switch.
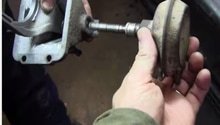
- To replace the vacuum switch, you can use a Posi-Lok axle engagement system to swap to a cable controlled actuator.
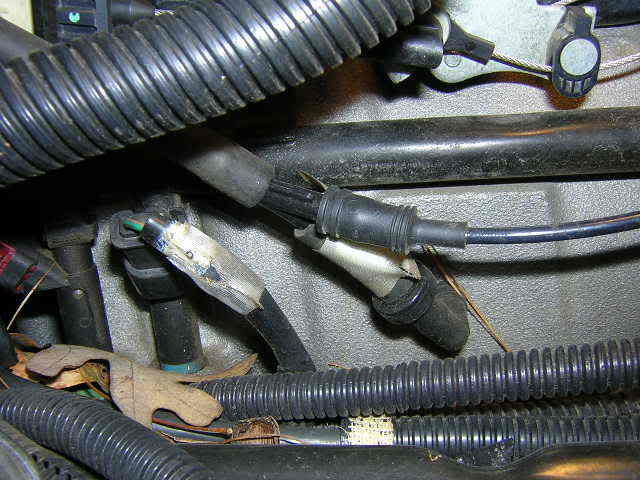
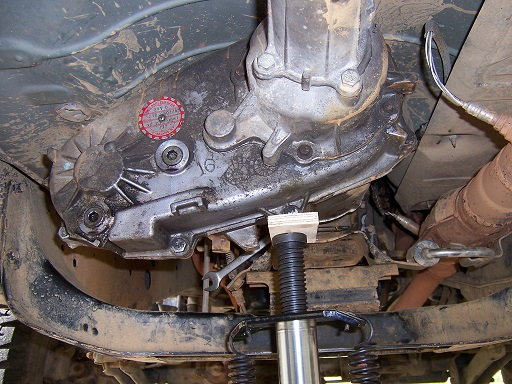
Figure 1. Inspect the 4WD front axle vacuum lines. 
Figure 2. Diagram of axle shift motor and actuator switch.
If the vacuum control system is functioning properly, move on to the next step.
Step 2 – Check the selector switch and TCCM
The selector switch and wiring may be damaged, or the TCCM might have gone bad.
The 4WD selector switch should also be addressed first because it's easy to diagnose and less of a hassle to fix.
- First, shift into 4WD.
- Engage the parking brake and jack up the truck.
- Try to spin the front wheels by hand. If the wheels don't turn, you most likely have a wiring problem.
- You can use a multimeter to determine if there's a power supply current being delivered to the 4WD switch, bulbs, and fuses. Also, check and ensure that all of the ground wires are clean as well as tightly secure.
If the selector switch isn't your problem, the transfer case control module (TCCM) might be it. The dashboard DIC warning light (indicating the need to “service 4WD”) will turn on. This can happen if TCCM senses a communication failure between itself and the powertrain control module (PCM). If this occurs, the TCCM turns on the warning light. If the light turns on after the vehicle has been driven awhile with no issues, the TCCM is the suspect.
To quickly determine the PCM is communicating properly with the TCCM:
- Turn the ignition on, but keep the engine off.
- Put the selector switch through all of its modes, while both watching the behavior of the dashboard warning light area and the selector switch lights, and listen carefully for component activation noises from under the front of the vehicle.
If the most obvious culprit looks to be the TCCM, you will find it behind the dash on the drivers' side. If the wiring or switch are not the problem, you’ll need to replace the TCCM.
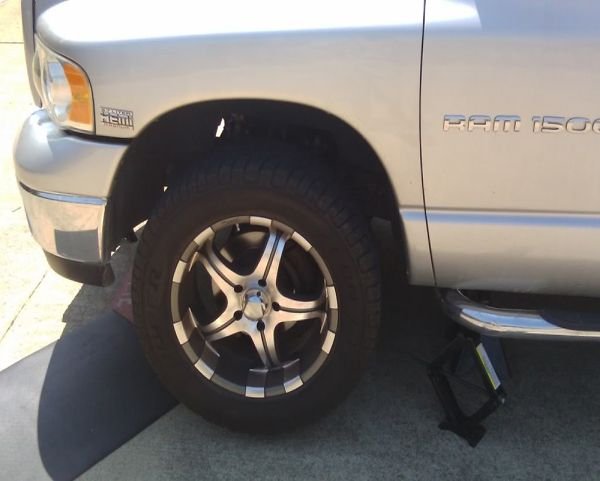
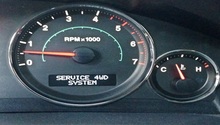
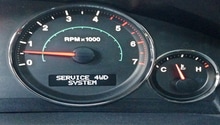
Figure 3. Turning the front wheel. 
Figure 4. Check the "Service 4WD System" light.
If the the wires, switch, and TCCM are all intact, move on to the following step.
(Related Article: Warning Lights - DodgeForum.com)
Step 3 – Check the transfer case
The shift linkage or inside components may have broken.
If you hear a grinding noise when 4WD is engaged, the transfer case is generally your problem. The first thing to do, if you haven't already, is replace the transfer case fluid. Chances are this service is long overdue and might solve the grinding problem. And if you're lucky, when shifting from 4WD back into 2WD, the system may have simply bound and got stuck. Sometimes, driving straight back in reverse might be enough to get your system back to normal.
If 4WD still fails to disengage, the shift linkage or transfer case itself might be the problem. To check the shift linkage, make your way under the truck and move the transfer case shift lever by hand, making sure it can cycle. The bushings tend to wear and crack, which might cause the linkage to go out.
Another cause might be that the components inside the transfer case are broken. When shifting into neutral between 4L and 2L, the gears might not grab and go straight to 4WD. If you've heard grinding noises before or when the 4WD system stopped working, you might need to replace the transfer case altogether.
(Related Article: How to Replace Transfer Case Shift Motor - DodgeForum.com)
Related Discussions
- Four Wheel Drive Stuck - DodgeForum.com
- Axle Stuck in 4WD - DodgeForum.com
- 4WD System Problem - DodgeForum.com
- Stuck in 4WD - DodgeForum.com