

2" Lift on '91 D150

Thread Starter
|
Veteran
Joined: Aug 2010
Posts: 449
Likes: 1
From: San Antonio, Texas
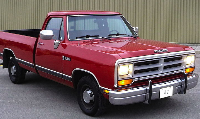
Well, finally got around to putting a 2" lift on my 1991 D150.
On the front, I went with some 2" lift coils from CSS (Coil Spring Specialties). I special ordered them and it took about a month to come in. I called and talked to a tech and came up with +2" lift, +300 lbs, and +15% articulation (more flexibility). The weight factor is for future projects such as extended bumper, light bar & driving lights, front hitch & winch. The new springs were physically 1.5" taller than the originals and had 8 coils vs. 6 original. Started a few days ahead of time saturating the bolts with PB Blaster Penetrating Catalyst which IMHO is way better than WD-40. I had to remove the sway bar end links, strut rod brace from the lower control arm, separate the lower ball joint, remove the shocks, and brake calipers. I reused my coil spring insulators. Be sure to always use a spring compresser for safety. I borrowed one from AutoZone for free with a deposit. Whoa daddy, I really needed it in order to compress it 2" to original size to fit it back in. The real hard part was trying to line up the strut brace back up to the lower control arm and install the bolts. It took a crow bar and a metal pipe to brace it on. This is where a 2nd person would have really come in handy so that I wouldn't have to let go of the crow bar to pop the bolts in. Always use eye protection and gloves. Crow bar popped out a couple of times and hit my face and knuckles a few times doing it alone. First side is always tough and the second side went in faster since I knew what I was doing already. I measured the gap between the top of the tire and the fenderwell lip before the lift as 4" and after as 7.5". I'm using P235/75R-15's right now. Here's some links:
http://www.coilsprings.com/
A little cheaper route if your interested:
http://www.eatonsprings.com/coil.htm
On the back, I went with Rancho Add-a-Leaf. Solid piece with some real good instructions and nice pads on both ends of the leaf. I used ATS for longer U-bolts. I didn't realize there were so many different types. It is recommended to change U-bolts but you really have to since the factory ones are not long enough. Once again PB Blaster really helped. You have to remove the shocks, axle vent tube, U-bolts & anchor plates, spring eye bolts & shackles, and support the axle with a jack. I greased up in between the leaf and pads. The installation was pretty straight forward with the exception of the the front eye bolt removal on the gas tank side. It is butted up against the tank making removal and install a bit tough. Other side was a breeze. Unfortunately, I forgot to measure before the install but afterwards it was 8" between the top of the tire and the fenderwell lip. It came out nearly level and looks great! Real happy with it. Here's some links:
http://www.autoandtrucksprings.com/c..._Kits-2-1.html
http://www.streetsideauto.com/c/add-...p-39l-239-cid/
Here's some pics:
Attachment 14103
Attachment 14104
Attachment 14105
Attachment 14106
Attachment 14107
Last edited by SixGun; Jun 4, 2012 at 02:26 PM.
Veteran
Joined: Dec 2009
Posts: 433
Likes: 0
From: converse tx orig. from pa.
hey sixgun, whats up??
that makes the truck look way better than all the people lowering these trucks. with out looking under the front,i would think its 4x4,not too high just about right.
i put rancho add-a leafs on mine last year,but now im taking them off and i ordered new leafs. should have them on saturday.
let me know if you ever need a good deal on rear leafs. i found a hell of a deal on the web. the manufacture JOHN R. SPRING. jrs34163 the best was JC WHITNEY @ $114.99 each. the even better was $68.70 each,same manuf. same part#. i could not believe it myself.
they are being shipped right from the manuf. to my house,cause the place i found them did not have them in stock.
every one needs to keep these older trucks up and running,maybe someday LMC and other companys will offer a line of good parts for all of us who love the older dodge trks. truck looks good!! thank you
Thread Starter
|
Veteran
Joined: Aug 2010
Posts: 449
Likes: 1
From: San Antonio, Texas
Thanks, appreciate the comments. I have to say that it was a long couple of days in that 110* sun. My wife kept me hydrated with iced tea and homemade lemonade. My neighbor thought I was a nut for spending all day out in that hot sun but it was worth it.
Just recently picked up a 2" square tube headache rack for only $30 from Pick-n-Pull. I want to use it as a light bar. It fits the contour of the cab perfectly but the flat bar to mount it to the sides of the bed are off a little and looked like it was cut with a torch or something. I cut those off and will have new flat bar welded on. Bought some brackets to weld on for the lights. I want to go with 4 - KCs Long Range 50 series 5" round Hilites. I like the shape so much on the headache rack that I will have the same shape and size tube put on the front for a light bar. I have 2 Hella 500 driving lights already. They clearanced them out at Walmart for $40 a pair.
Just recently picked up a 2" square tube headache rack for only $30 from Pick-n-Pull. I want to use it as a light bar. It fits the contour of the cab perfectly but the flat bar to mount it to the sides of the bed are off a little and looked like it was cut with a torch or something. I cut those off and will have new flat bar welded on. Bought some brackets to weld on for the lights. I want to go with 4 - KCs Long Range 50 series 5" round Hilites. I like the shape so much on the headache rack that I will have the same shape and size tube put on the front for a light bar. I have 2 Hella 500 driving lights already. They clearanced them out at Walmart for $40 a pair.
Last edited by SixGun; Sep 8, 2011 at 06:52 PM.
Legend


Joined: Jun 2009
Posts: 8,025
Likes: 72
From: orangeville ontario
$30 for a headache rack. that is a steal. i don't think i could even build one with $30 worth of metal.
to me it does not matter if it is too hot or humid out. if there is something that need to be fixed i will fix it but if it is raining i will try to put it off till it is not raining. last Friday it was pretty hot and humid but it was fairly comfortable under my truck were i was changing the oil pan.
to me it does not matter if it is too hot or humid out. if there is something that need to be fixed i will fix it but if it is raining i will try to put it off till it is not raining. last Friday it was pretty hot and humid but it was fairly comfortable under my truck were i was changing the oil pan.
Thread Starter
|
Veteran
Joined: Aug 2010
Posts: 449
Likes: 1
From: San Antonio, Texas
Ha ha... there was a couple of times in the past while in the garage with a box fan going and laying down on a creeper, I've fallen asleep. My wife found me just snoring away. Guess I was a little too comfortable.
Registered User
Joined: Nov 2011
Posts: 6
Likes: 0
Great Write up. I was just researching adding a lift to my 1988 D150 when I came across this. I was going to go with coil spacers I found in my search but I like what you did better. If I call CSS do you have any information I can give them from your order that would help me with my order. Thanks
I have read quite a few post on here of people trying to figure out how to lift there 2wd drive. Here are the spacers i was referring to if anyone is interested.
http://www.mcbayperformance.com/2WD_...00t_series.htm
I have read quite a few post on here of people trying to figure out how to lift there 2wd drive. Here are the spacers i was referring to if anyone is interested.
http://www.mcbayperformance.com/2WD_...00t_series.htm
Last edited by Mathew21; Nov 14, 2011 at 08:16 PM.
Thread Starter
|
Veteran
Joined: Aug 2010
Posts: 449
Likes: 1
From: San Antonio, Texas
Thanks Matt, I think that if had to do it all over, I would not have the extra weight factored into the front end and more articulation. I drive it around a lot and its pretty stiff. The front end lift drives nice and looks nice, no doubt about it. Once I get the weight added onto the front end it should give the coils some flexibility. I put on a steering damper to keep it on track because I remember my old similar lifted Ranger used to bounce and want to turn the steering wheel. I looked at the McBay coil spring spacers and would be interested to see some reviews or a write up. It looks easy enough to do. You game??BTW, finished the light bar and it looks real good. Excited to get it mounted and wired up. I tried to load some pics but they are too big to load and the attachment function doesn't work anymore. Trying to figure out how to resize them. Using a different computer now and can't seem to figure it out. I've also noticed that my paragraphs all run together now- no hard returns. http://www.dodge-chat.com/forums/sho...p?t=362&page=3
Trending Topics
Legend
Joined: Jun 2009
Posts: 8,025
Likes: 72
From: orangeville ontario
i think it has to do with them being posted on dodge-chat. when i try to open them in a new tab it brings me to the dodge-chat login page. you should really see about getting a photo bucket or Google account to use to post your pictures.