

Bed Tent: Writeup

Thread Starter
|
Veteran
Joined: Sep 2008
Posts: 344
Likes: 0
Again I apologize for not getting this done last summer when I made it. Right after I built it my buddy got my truck stuck and we basically pulled the bumpers off getting it unstuck so rebuilding it took most of my summer and money...but its back and better than ever. So without further a due here it is.
Materials:
1-12� X 15� canvas drop cloth
2-1/5� X 10� PVC piping
2- 45� PVC connectors
2- 90� 3-way PVC connectors (one end will be threaded)
2- PVC Threaded connector
1- PVC coupling
Sewing machine
Brass grommets
Tarp
Lots of bungee cords (I used the taskforce 24 variety pack)
Zipper (available at wal-mart)
Step 1: Making the Frame
So here you�re going to construct the skeleton of the tent. For this I cut the PVC pipe in the following various lengths.
2-19� pieces
1-71� piece (you will be cutting this in half later)
4-42� pieces
I began with the 2-19� pieces you will be placing these at the very back of the bed near the tailgate. Use a zip tie and attach the pieces of PVC to the cargo tie down bracket on each side of the bed, but don�t over tighten as you will leave this in for future use. Then use a bungee cord to connect the top half of the short pipe and place a 45� connector on the top of each.
DSC01872.jpg
DSC01871.jpg
DSC01875.jpg
Next make the end frames by taking 2-42� pieces and connecting them with the 90� connector. Do this for each side. Place one of the end pieces into the 45� connectors. For the other end wrap the two ends not in the 90� connector in a cloth of some kind to prevent scratching. Now place this simply between the cab and bed. It should rest there nicely and will be held in place simply by pressure once the tent is all-together.
DSC01873.jpg
DSC01877.jpg
Now take the 71� pieces and cut it in half and put in back together using the coupling or 180� connector. (This is to save space when its taken down not just a redundant step I made up.) Take the threaded connectors and place them one on each end of the reassembled 71� pieces. Now connect this to the two end pieces and you now have the skeleton complete.
DSC01874.jpg
Step 2: Making the Tent.
This is by far the most time consuming and tedious task. You will need some sewing skills here and lots of patience.
Take the canvas drop cloth and drape it over your frame. Try to get it as centered as you can and situated in a way that the entire bed is covered. I can�t remember what length went which way but I�m pretty sure it was the 15� end that went long ways and the 12� end went width ways. Not that you have a giant cloth on your frame take some safety pins and begin pinning it back so that it�ll form fit to the frame. This is a very tedious step and it�s important to take your time here. I pulled it off after each end and sewed it up because I didn�t have enough pins but it would be a time saver to get it all pinned up and sewn up at one time. I don�t have any pictures of this process but it should be self-explanatory and I�ll be glad to answer any questions. Also I sewed mine altogether but it might be possible to just use a bunch of safety pins if you have no clue how to sew or you don�t know any one who can.
DSC01879.jpg
Step 3: Door and tie down points.
Once you have the tent shaped and ready to go I took a grommet tool and scissors to each of the 4 corners. Here I added brass grommets to the corners allowing me to tie down the tent using bungee cords. I then attached the bungee to the body of the truck.
DSC01880.jpg

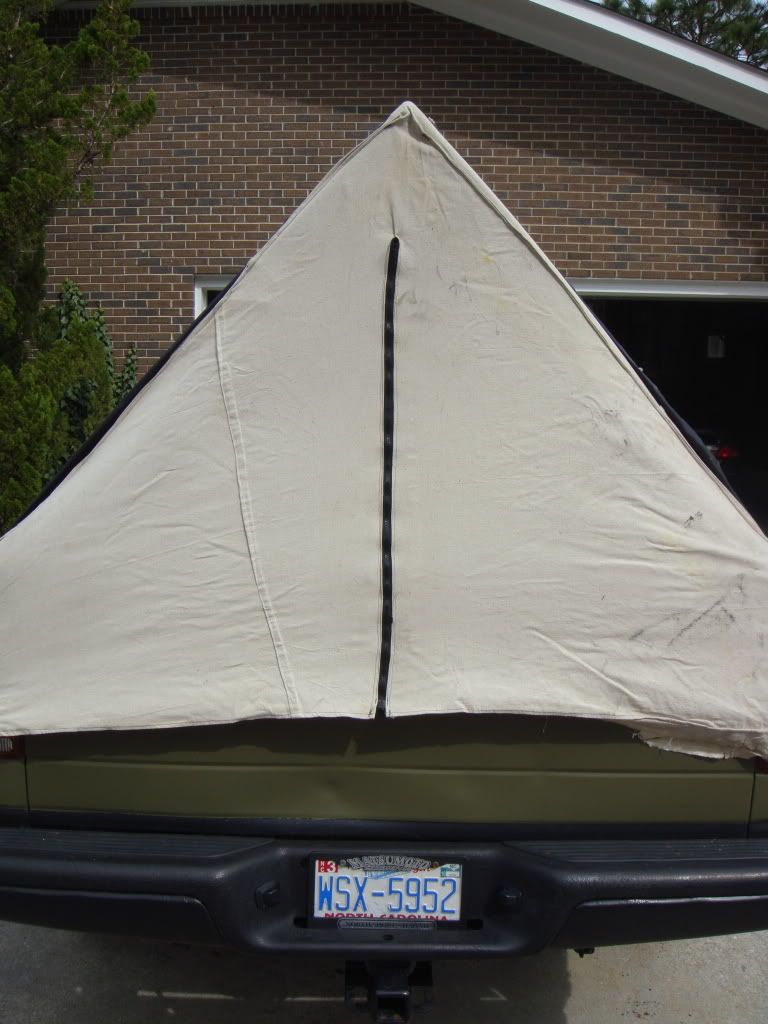
After the tent was secure I cut a line up the center of the tent at the back end. Once you have this slit cut you can sew in a zipper as a door. Make sure to cut only as long as your zipper.
Step 4: Rain Fly
While canvas is a good water resistant fabric I learned the hard way that it isn�t waterproof. So if you are planning on using this tent at any point where it rains frequently I would suggest making a rain fly out of a tarp. I made mine out of an old kiteboarding kite, but a tarp would work just as well. Simply take a tarp and cover the tent and use the bungee cords to secure it down.
DSC01884.jpg
That�s it! I made this tent in about one day and it only takes about 5 minutes to put up and take down. When I�m not using it I fold it up and throw in my tool box. I have spent a week in it at one time and was very comfortable and I�m 6�4. You might want to use an inflatable mattress to increase the comfort level; however, I�ve slept in it without one and was fine. I think memory foam is the best choice.
Inside:
DSC01886.jpg
DSC01888-1.jpg
Outside:
DSC01887.jpg
DSC01890.jpg
Let me know if you guys have any questions.
Materials:
1-12� X 15� canvas drop cloth
2-1/5� X 10� PVC piping
2- 45� PVC connectors
2- 90� 3-way PVC connectors (one end will be threaded)
2- PVC Threaded connector
1- PVC coupling
Sewing machine
Brass grommets
Tarp
Lots of bungee cords (I used the taskforce 24 variety pack)
Zipper (available at wal-mart)
Step 1: Making the Frame
So here you�re going to construct the skeleton of the tent. For this I cut the PVC pipe in the following various lengths.
2-19� pieces
1-71� piece (you will be cutting this in half later)
4-42� pieces
I began with the 2-19� pieces you will be placing these at the very back of the bed near the tailgate. Use a zip tie and attach the pieces of PVC to the cargo tie down bracket on each side of the bed, but don�t over tighten as you will leave this in for future use. Then use a bungee cord to connect the top half of the short pipe and place a 45� connector on the top of each.
DSC01872.jpg
DSC01871.jpg
DSC01875.jpg
Next make the end frames by taking 2-42� pieces and connecting them with the 90� connector. Do this for each side. Place one of the end pieces into the 45� connectors. For the other end wrap the two ends not in the 90� connector in a cloth of some kind to prevent scratching. Now place this simply between the cab and bed. It should rest there nicely and will be held in place simply by pressure once the tent is all-together.
DSC01873.jpg
DSC01877.jpg
Now take the 71� pieces and cut it in half and put in back together using the coupling or 180� connector. (This is to save space when its taken down not just a redundant step I made up.) Take the threaded connectors and place them one on each end of the reassembled 71� pieces. Now connect this to the two end pieces and you now have the skeleton complete.
DSC01874.jpg
Step 2: Making the Tent.
This is by far the most time consuming and tedious task. You will need some sewing skills here and lots of patience.
Take the canvas drop cloth and drape it over your frame. Try to get it as centered as you can and situated in a way that the entire bed is covered. I can�t remember what length went which way but I�m pretty sure it was the 15� end that went long ways and the 12� end went width ways. Not that you have a giant cloth on your frame take some safety pins and begin pinning it back so that it�ll form fit to the frame. This is a very tedious step and it�s important to take your time here. I pulled it off after each end and sewed it up because I didn�t have enough pins but it would be a time saver to get it all pinned up and sewn up at one time. I don�t have any pictures of this process but it should be self-explanatory and I�ll be glad to answer any questions. Also I sewed mine altogether but it might be possible to just use a bunch of safety pins if you have no clue how to sew or you don�t know any one who can.
DSC01879.jpg
Step 3: Door and tie down points.
Once you have the tent shaped and ready to go I took a grommet tool and scissors to each of the 4 corners. Here I added brass grommets to the corners allowing me to tie down the tent using bungee cords. I then attached the bungee to the body of the truck.
DSC01880.jpg
After the tent was secure I cut a line up the center of the tent at the back end. Once you have this slit cut you can sew in a zipper as a door. Make sure to cut only as long as your zipper.
Step 4: Rain Fly
While canvas is a good water resistant fabric I learned the hard way that it isn�t waterproof. So if you are planning on using this tent at any point where it rains frequently I would suggest making a rain fly out of a tarp. I made mine out of an old kiteboarding kite, but a tarp would work just as well. Simply take a tarp and cover the tent and use the bungee cords to secure it down.
DSC01884.jpg
That�s it! I made this tent in about one day and it only takes about 5 minutes to put up and take down. When I�m not using it I fold it up and throw in my tool box. I have spent a week in it at one time and was very comfortable and I�m 6�4. You might want to use an inflatable mattress to increase the comfort level; however, I�ve slept in it without one and was fine. I think memory foam is the best choice.
Inside:
DSC01886.jpg
DSC01888-1.jpg
Outside:
DSC01887.jpg
DSC01890.jpg
Let me know if you guys have any questions.

Thread Starter
|
Veteran
Joined: Sep 2008
Posts: 344
Likes: 0
Thanks guys. I forgot to mention that total cost was about $70 after everything. It handles great in the wind and rain. I've lived in it during thunderstorms for a week and I was the only dry person at the camp site. I've also stayed in it with 30mph winds and it was comfortable and felt solid. It's one of the best things I've built for my truck I always get compliments on it while using it and its way easier to put up and pack up than a regular tent.


All Star
Joined: Sep 2008
Posts: 829
Likes: 0
I like it, I know you don't have problems with the paint scratching, but do you think someone with regular paint would?
Trending Topics
Thread Starter
|
Veteran
Joined: Sep 2008
Posts: 344
Likes: 0
No I doubt it unless you're using a more abrasive fabric as the tent. Canvas is pretty soft. The Only place for me that was a potential problem for scratches was up near the cab where it rest between the bed but covering the ends in a cloth solved that.