

What's a good DRB3 emulator - needed for a transmission repair - P0700 and P1776


Thread Starter
|
Rookie


Joined: Jan 2009
Posts: 68
Likes: 4
From: Livingston County, MI
I have to repair the transmission on my in-laws' 2003 Intrepid (solenoid switch: P0700 and P1776 are the DTCs) which may require replacing the solenoid pack and then have to perform the learning procedure.
Is there a good PC/Laptop-based DRB3 emulator that someone can recommend? I have used similar tools for my VW (VAG-Com) and Volvo (VIDA), but I don't have a clear idea of what is a good one for Mopars of this era.
Thanks for any help!
Or, if someone has a DRB3 local to me (Livingston County, MI) and would be willing to loan/rent it for the repair, I would appreciate that, too!
Thread Starter
|
Rookie
Joined: Jan 2009
Posts: 68
Likes: 4
From: Livingston County, MI
Did some more digging around here and found a good discussion here:
https://dodgeforum.com/forum/2nd-gen...thread-12.html
But, it seems focused on engine and ABS codes, and no detail about transmission learn procedure, etc.
https://dodgeforum.com/forum/2nd-gen...thread-12.html
But, it seems focused on engine and ABS codes, and no detail about transmission learn procedure, etc.
Thread Starter
|
Rookie
Joined: Jan 2009
Posts: 68
Likes: 4
From: Livingston County, MI
Just an update: I still haven't identified a good DRB3 emulator.
I have dropped the transmission oil pan and removed the transmission filter. I'm preparing to remove the valve body with the attached solenoid pack. I haven't been able to find a good video or images in a how-to to figure out how to reach the solenoid pack connector and shift cable end to remove them. If someone is aware of a link, I'd appreciate it.
While I'm working on the Intrepid, I did put new spark plugs in (boy, did they need to be replaced), and I'll be polishing the headlights, too.
Thread Starter
|
Rookie
Joined: Jan 2009
Posts: 68
Likes: 4
From: Livingston County, MI
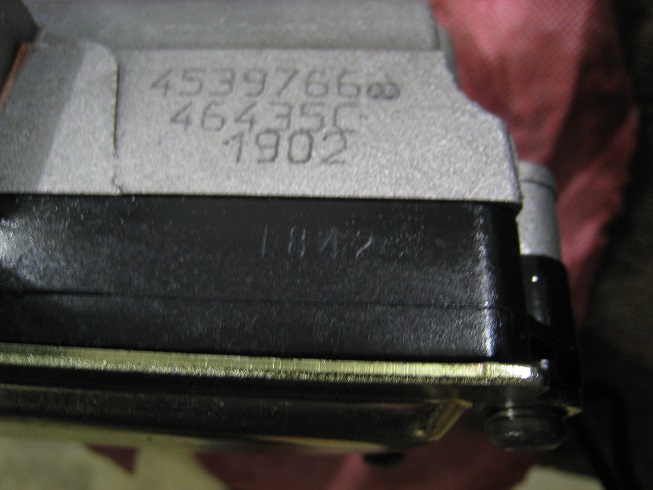
I removed the valve body and solenoid pack today. My solenoid pack definitely falls into the problem date range described by TSB 21-008-04 - the date code on mine is 1842 (184th day of 2002) From what I've read elsewhere on the web this issue with the solenoid packs built in the problem date range (3001 and 0603 - 300th day of 2001 and 60th day of 2003) is related to a trace in the PCB that goes bad. That explains why reworked packs which still have a core from this probelm date range will fail, as well.


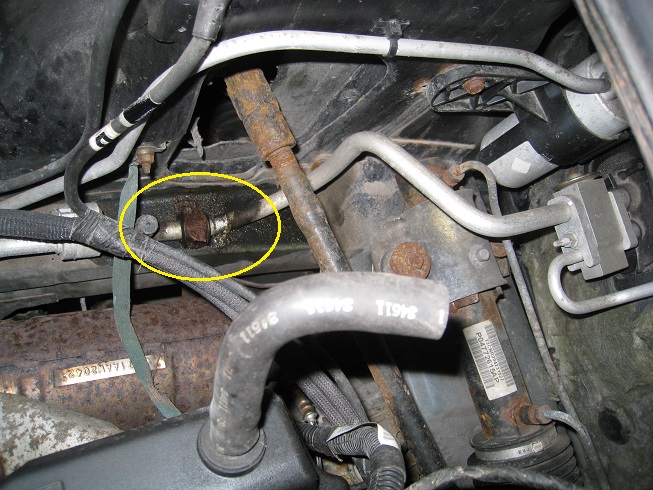
So, now I need to order the solenoid pack and reassemble everything and see if that fixes the issue. While I'm in there, the ground strap on the passenger side of the engine broke, so I'll replace that. And, I noticed one of the AC lines has rusted through at the point where it is clamped to the body, so replacement and an AC charge is in the cards, too.

Oh, and lastly, I have to replace the gear-range-selector/neutral-safety switch, too, because I forgot to disconnect it before pulling the valve body assembly down...oops.
So, now I need to order the solenoid pack and reassemble everything and see if that fixes the issue. While I'm in there, the ground strap on the passenger side of the engine broke, so I'll replace that. And, I noticed one of the AC lines has rusted through at the point where it is clamped to the body, so replacement and an AC charge is in the cards, too.
Oh, and lastly, I have to replace the gear-range-selector/neutral-safety switch, too, because I forgot to disconnect it before pulling the valve body assembly down...oops.
Thread Starter
|
Rookie
Joined: Jan 2009
Posts: 68
Likes: 4
From: Livingston County, MI
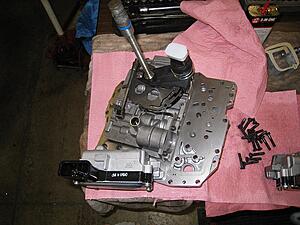
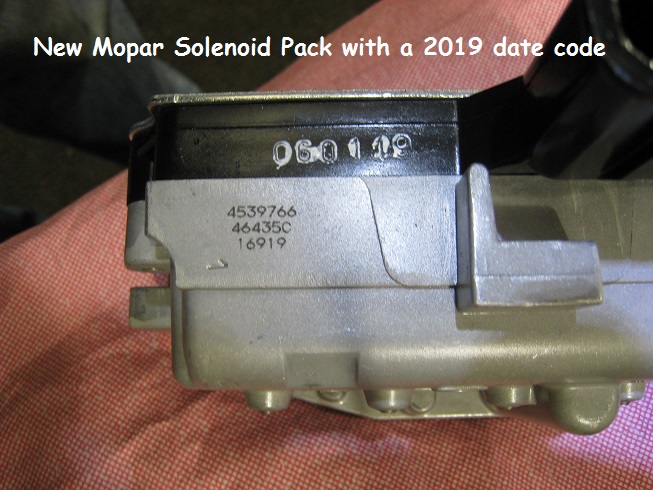
So, I received the new Solenoid Pack (it is a new Mopar unit with a 2019 date code) and I reinstalled everything. But, the transmission will not shift up from L.
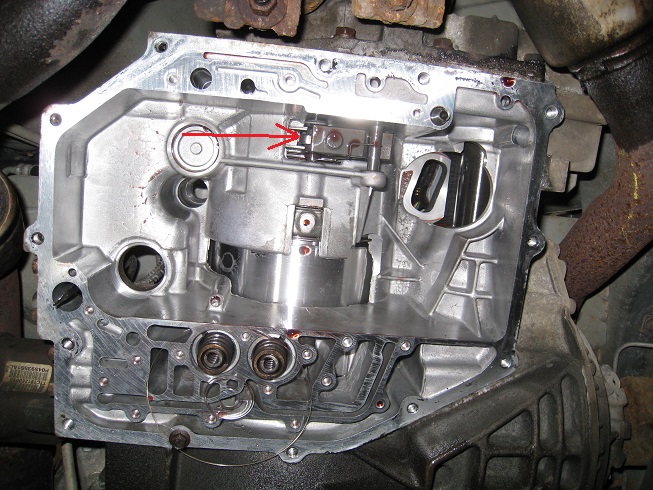
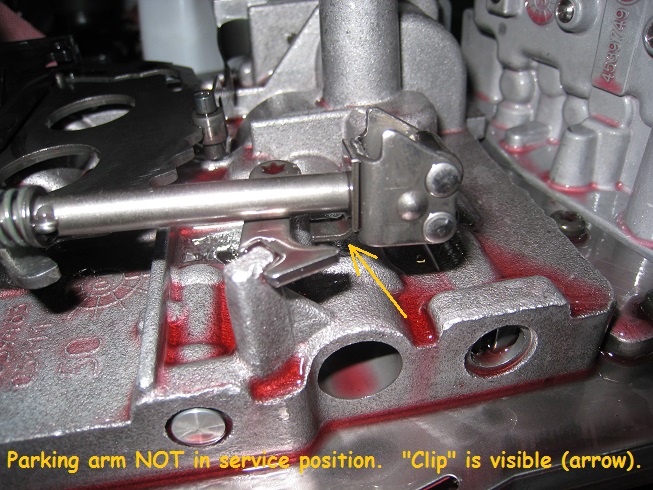
When I removed the valve body and solenoid pack, I was worried about the arm that comes off of the gear selector. My guess is that I don't have that in the right position from when I reinstalled the valve body. Is there a tip for that?
New solenoid pack

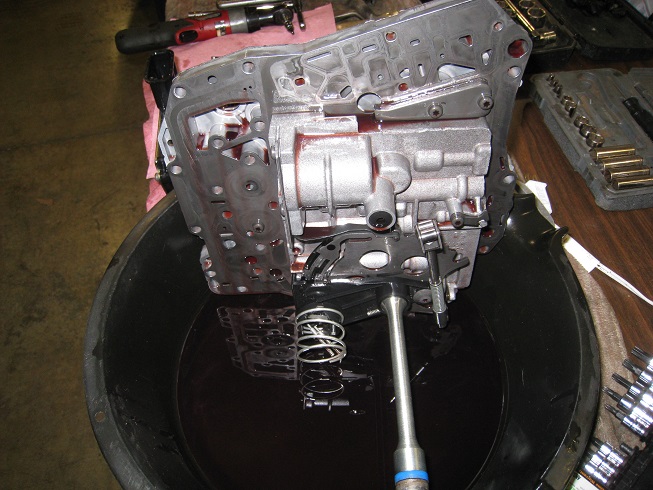
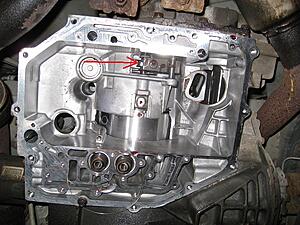
This arm - where is it supposed to sit in the transmission? Do you have to guide it into somewhere as you reinstall the valve body assembly?

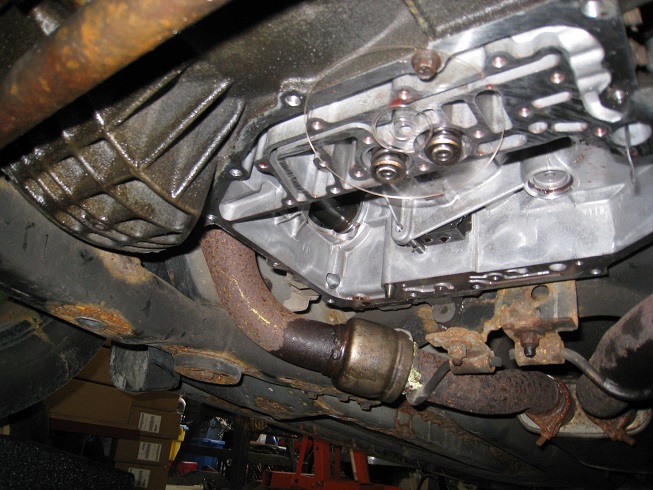
Another view of the valve body assembly before installation. I sat the arm a little straighter and then lifted the valve body into the transmission and fastened it down.
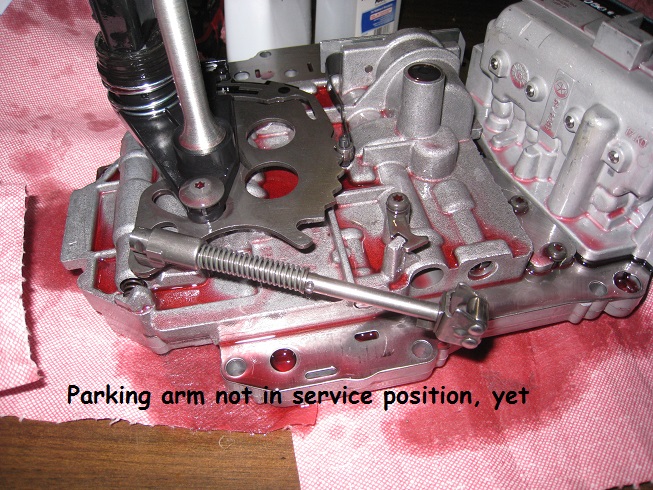
Where does the park arm sit in this area?
Another view of the inside of the transmisison in that area
This was the tool I created with what I had lying around, based on others I saw in the forums. I used a plastic spacer/protector that was at the bottom of a package of writeable CDs.

Thanks for some guidance!
When I removed the valve body and solenoid pack, I was worried about the arm that comes off of the gear selector. My guess is that I don't have that in the right position from when I reinstalled the valve body. Is there a tip for that?
New solenoid pack
This arm - where is it supposed to sit in the transmission? Do you have to guide it into somewhere as you reinstall the valve body assembly?
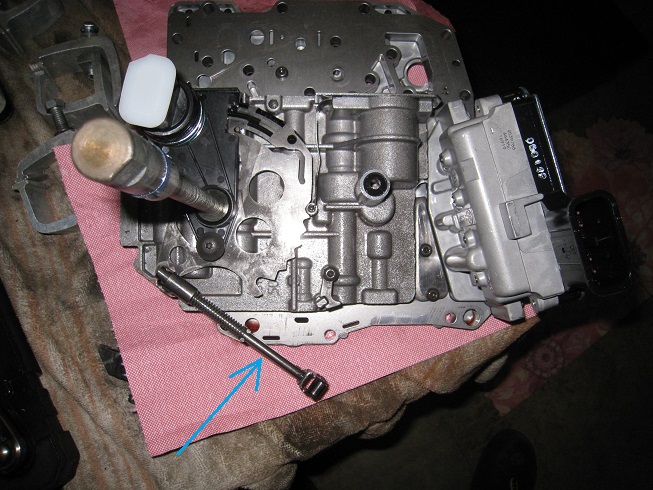
Another view of the valve body assembly before installation. I sat the arm a little straighter and then lifted the valve body into the transmission and fastened it down.

Where does the park arm sit in this area?

Another view of the inside of the transmisison in that area
This was the tool I created with what I had lying around, based on others I saw in the forums. I used a plastic spacer/protector that was at the bottom of a package of writeable CDs.
Thanks for some guidance!
Thread Starter
|
Rookie
Joined: Jan 2009
Posts: 68
Likes: 4
From: Livingston County, MI
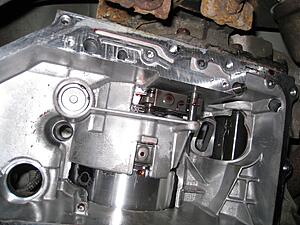
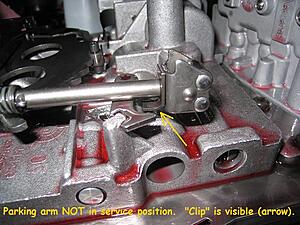
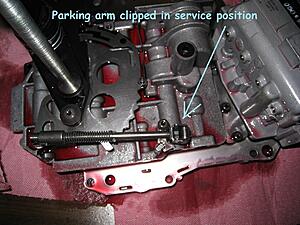
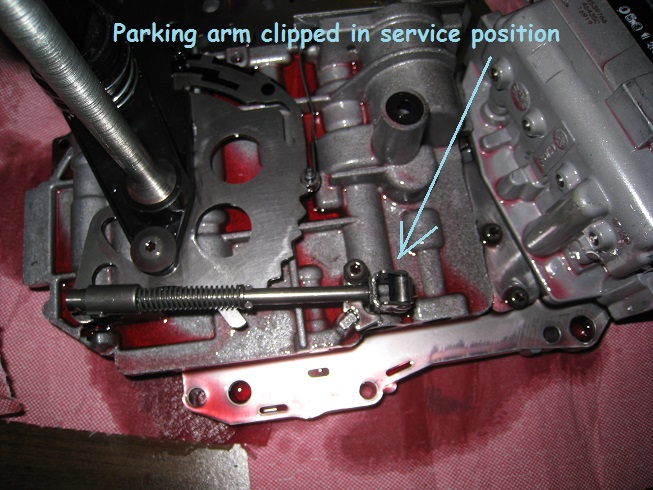
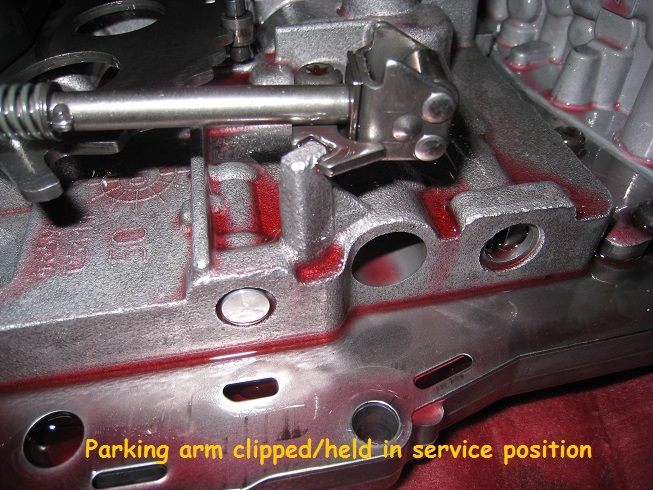
Using my newfound understanding from that video, I pulled out the valve body assembly again and correctly positioned the parking arm. Once everything was reinstalled, all the gears could be correctly selected - hallelujah!
Some pictures to provide context for the next person facing this job...


Some pictures to provide context for the next person facing this job...
Trending Topics
Thread Starter
|
Rookie
Joined: Jan 2009
Posts: 68
Likes: 4
From: Livingston County, MI
I reconnected everything, added fluid and started it up. I don't have a DRB III, so I couldn't run the "fast learn" procedure. It was shifting slow, slipping, and generally not behaving well at first (the engine was running fine, however). The transmission also threw a number of codes, but they were related to low pressure, bad signal, etc. - but in the end these were all because the fluid level still wasn't completely full.
I made a couple of trips up and down the street and then back to my garage in order to check the fluid level and add more ATF+4. Once the transmission fluid was fully warmed and I got the level correct, it began shifting and selecting gears just fine. I pulled the negative battery cable to clear the transmission codes once more, and then I went back out on the road for a final test drive. It is now working well, shifting up - and down - through all gears without issue. And, most importantly, without the P1776 code anymore and no more 2nd Gear Limp Mode!
So, what are my tips for the next person, after having completing this job?
- The toughest part of this job is accessing the connectors and gearshift connections. So, from my experience, to access the solenoid pack connector, you should remove the intermediate pipe between the airbox and the air intake at the firewall. Then you have to reach along the right/passenger side of the engine and back along the top of the transmission to reach the 10mm bolt that secures the plate that locks the Solenoid Pack connector in place. Once that bolt and plate is out, the connector pulls straight up and out (there are no additional locking tabs on that connector).
- To access the gear range selector connector, I accessed it from under the car, on the left/driver's side by reaching up between the frame rail and the transmission case. Others mention, there is a lock piece that has to be pushed to the side, and then press the release on the connector and remove it.
- For the gear cable, that pushes off the top of the pivot ball on the gear selector arm. I used a Snap-on trim panel tool to get up to it, around the shaft of the pivot ball, and then twist/lift the cable head off of the gear selector arm.
- To remove the gear selector arm, I used a stubby 10mm ratching wrench. If the nut on that bolt spins (it is a square nut), the nut head is 11mm. Before you remove the gear selector arm, be sure to turn the arm one click further than what would be the L gear selection. Viewing from above, that means it is fully turned clockwise - this is to make sure that the parking arm is in the service position which allows the valve body assembly to be removed without damaging the parking arm. Additionally, make sure this arm is in the service position before re-installing the valve body. This is where I blew it and had to go back in and correct the parking arm position.
- Once I had the gear selector arm off, I fully removed its bolt and then clamped the arm in a vice so that the square nut would not move when the gear selector arm was tightened down again.