

DIY - Fixing a Large Paint Chip On the Body

Well, as a few of you know, I found myself with a rather large chunk of my beautiful paint missing this week, and with the thought of the truck not going into the paint booth for another few months, I knew that I had to do something.
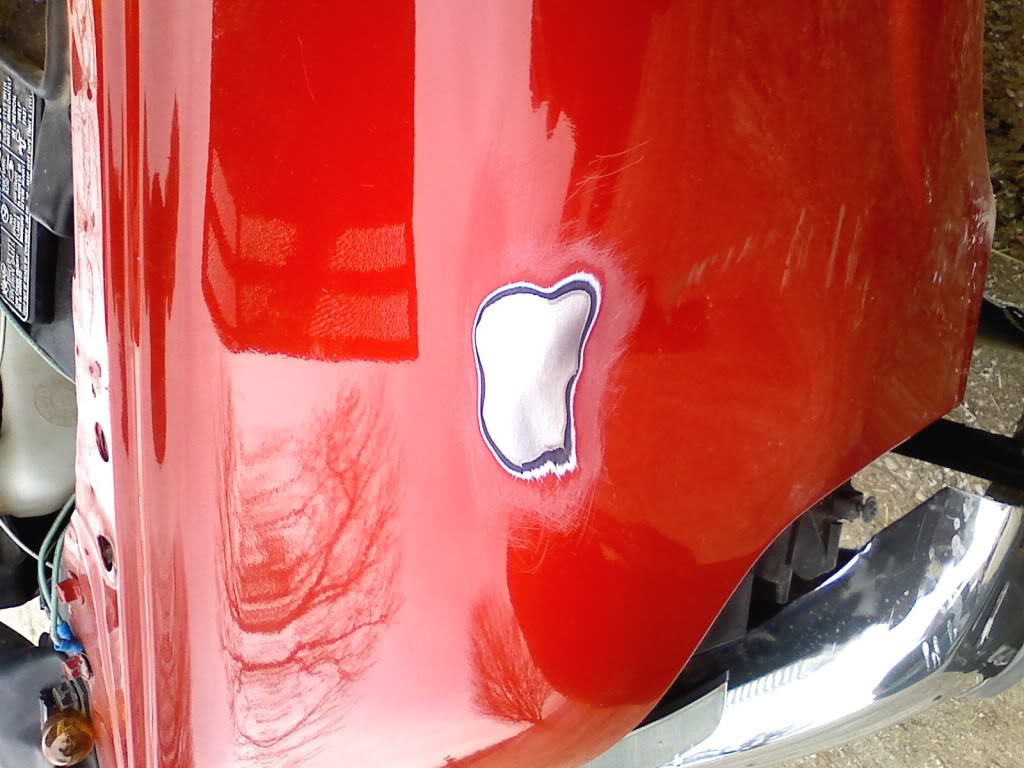
We start with this:

While I'm not sure what happened here, I knew that I had to get the hole covered up before rust became an issue.
Here is what I used, and I hope that some of you find this useable down the road at some point.
1. Clean the affected area off with a basic soap and water mixture so you can see what you are dealing with.
2. Take a knife and pry off the large chips that are loose.
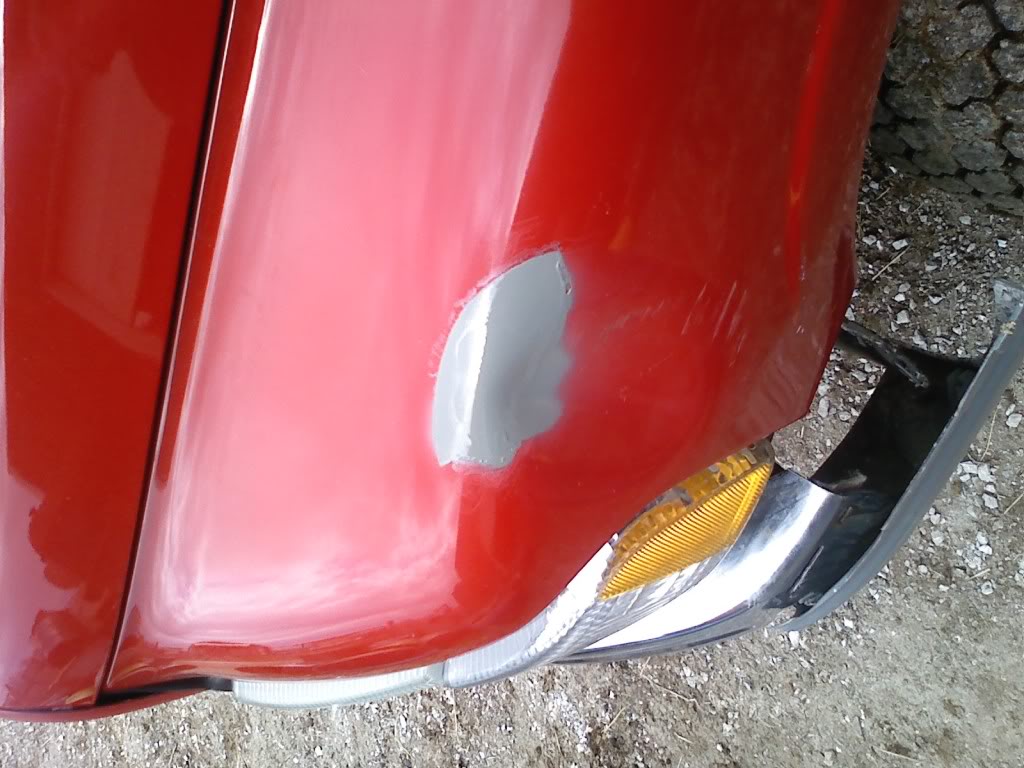
3. Use some 80 grit sand paper to feather out the paint and metal. What you're trying to accomplish is removing all the little cracks and chips in the surrounding area so they wont be there to flake off later down the road. Once you have that done, finesse it with some 320, then 600, then 1000 grit to clean up the harsh 80 grit sanding.
Below is a pic of step three done:
4. (Optional) If you have the material laying around, you can use a metal prep solution to remove all the dirt and other nasty compounds. What I used is a combo adhesion promoter and metal prep in one. (follow the can directions here)
5. Mask the area off. Making sure that you have areas in which you do not want areas covered in spray covered off. I used a light weight recycled paper that we buy in rolls for things like this.
6: Follow the directions on the primer can. In my case, I had to mix up some K86 epoxy primer as I didn't trust the old can of high build from dupont I had laying around.
7. Begin to lightly spray the area. Doing light coats and waiting 5 minutes in between each is key to cut down on runs and orange peel finish.
Below is a pic of spray and masking:

8. Once you have a sufficient amounts of coats down, let the primer sit for fifteen (15) minutes before trying to remove the masking paper. This allows the spray to skin over so to speak so you wont gouge it while removing the paper.

9. Once that is done, enjoy that matching splotch on your paint job that stands out like a sore thumb:
If you want to spray color on, you can do that as well, but in my case, this was just to seal the hole up so that rust wouldn't be an issue. As I said, this isn't a permanent fix as I'm waiting for spring and the salt to get off of the roads before I send her in to the body shop for the real painters to work on.
DF and myself takes no responsibility for any misinformation, harm, or any other unwanted circumstance that may arise from doing this procedure.
We start with this:
While I'm not sure what happened here, I knew that I had to get the hole covered up before rust became an issue.
Here is what I used, and I hope that some of you find this useable down the road at some point.
1. Clean the affected area off with a basic soap and water mixture so you can see what you are dealing with.
2. Take a knife and pry off the large chips that are loose.
3. Use some 80 grit sand paper to feather out the paint and metal. What you're trying to accomplish is removing all the little cracks and chips in the surrounding area so they wont be there to flake off later down the road. Once you have that done, finesse it with some 320, then 600, then 1000 grit to clean up the harsh 80 grit sanding.
Below is a pic of step three done:
4. (Optional) If you have the material laying around, you can use a metal prep solution to remove all the dirt and other nasty compounds. What I used is a combo adhesion promoter and metal prep in one. (follow the can directions here)
5. Mask the area off. Making sure that you have areas in which you do not want areas covered in spray covered off. I used a light weight recycled paper that we buy in rolls for things like this.
6: Follow the directions on the primer can. In my case, I had to mix up some K86 epoxy primer as I didn't trust the old can of high build from dupont I had laying around.
7. Begin to lightly spray the area. Doing light coats and waiting 5 minutes in between each is key to cut down on runs and orange peel finish.
Below is a pic of spray and masking:
8. Once you have a sufficient amounts of coats down, let the primer sit for fifteen (15) minutes before trying to remove the masking paper. This allows the spray to skin over so to speak so you wont gouge it while removing the paper.
9. Once that is done, enjoy that matching splotch on your paint job that stands out like a sore thumb:
If you want to spray color on, you can do that as well, but in my case, this was just to seal the hole up so that rust wouldn't be an issue. As I said, this isn't a permanent fix as I'm waiting for spring and the salt to get off of the roads before I send her in to the body shop for the real painters to work on.
DF and myself takes no responsibility for any misinformation, harm, or any other unwanted circumstance that may arise from doing this procedure.