


 Aug 6, 2015, 11:53 AM
Last edit by: IB Advertising
See related guides and technical advice from our community experts:
Browse all: Interior
- Dodge Ram 2nd Gen How to Replace A/C Evaporator
Step by step instructions for the do-it-yourself repairs.
Browse all: Interior

a/c evaporator replacement

Registered User
Joined: Mar 2011
Posts: 6
Likes: 0
From: Knoxville, TN
What can I add after 12 pages? A great thanks to all the helpful posts and pictures! We did this last weekend, only having printed out the basic steps from page 1 . . . had we known there were more steps added, plus pictures . . . that would have drastically shortened the time taken!
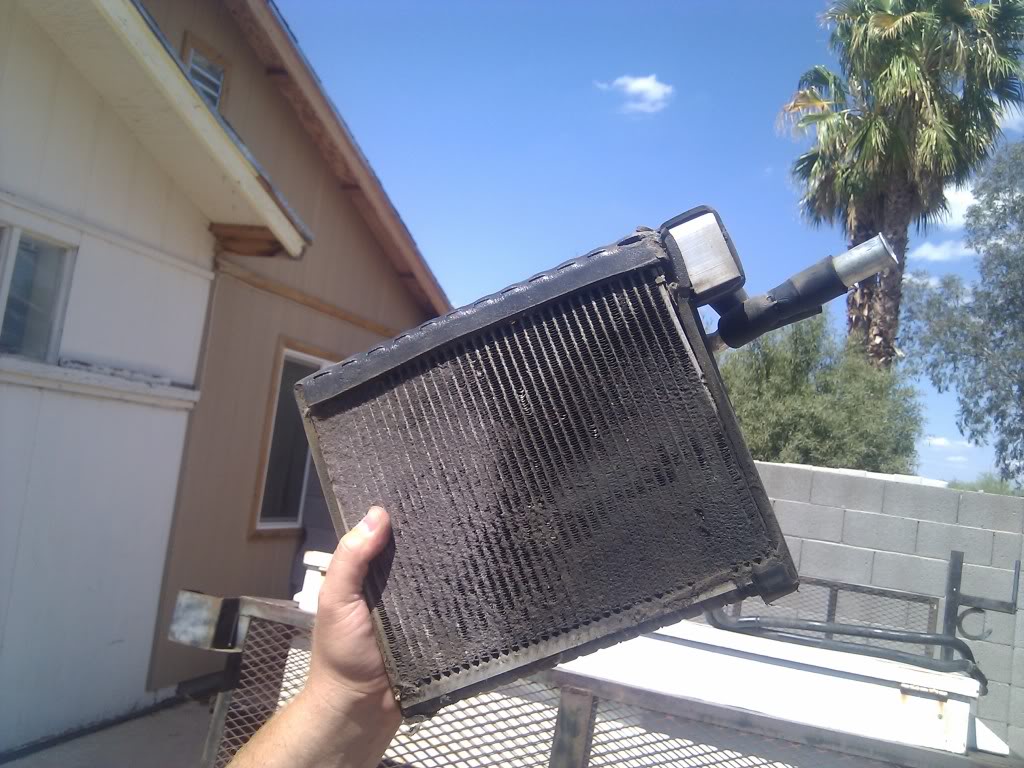
Should have kept the picture of the old evap core, it literally looked like an entire wasp nest was crammed in there, and secured in place by several pounds of mud.
Should have kept the picture of the old evap core, it literally looked like an entire wasp nest was crammed in there, and secured in place by several pounds of mud.

I just replaced my heater core and evaporator. I made a major mistake by not marking the vacuum lines that hook up to the heater box. Does anyone have a schematic showing where these lines hook up? This is for a 1998 Dodge Ram 1500 4X4.

Professional
Joined: Jul 2006
Posts: 100
Likes: 0
From: California
Try this. It for a 2001 but they should be close since they're the same Gen.
https://dodgeforum.com/forum/2nd-gen...ml#post2034361
https://dodgeforum.com/forum/2nd-gen...ml#post2034361


Registered User
Joined: Aug 2011
Posts: 3
Likes: 0
I followed these instructions yesterday and I found only one step missing and I took some pics. I however forgot to get a pic of the unit out of the truck. Some pics aren't here, if you need pictures for the steps that don't have them, you should be taking this to the mechanic.....I forgot to circle things in the pics, I will throw down with some MSPAINT soon to have the parts stand out.
1) Disconnect battery cable
2) Remove first screw on door sill both sides (these are the pieces that hold your carpet down)
3) Remove kick panels and panel under steering wheel.
4) Remove two nuts holding up steering wheel.

5) Remove five screws where dash meets the windshield.
6) Remove 2 bolts on the left and right side of the dash up against the side of truck (under kick panels)


7)Dashboard can now be pulled free toward seat.
8)On passenger side of dash tie rope or wire to flange where bolt went into side of truck and lift dash up to expose fan box. Secure rope to handle on side of A-post

9) Remove vacuum lines and unclip electrical connections. (Hint: temperature control cable has to be removed with pliers by pulling straight up, removing the entire clip.) On my 2000 Dodge Ram the vacuum lines are in a D shell connector.

10) Now the secret: there are two screws holding the box to the firewall on the inside (one has ground wire attached.) The other is in the upper right hand corner facing up.


11)There are four nuts holding it from the engine side of the firewall (one nut is accessed by removing the electrical panel on passenger side.) Remove all four nuts. Be careful when separating the housing from the firewall I tugged to hard and snapped a mounting post off the heater box
12)Remove heater hoses by removing clamps. Mine were stuck so I just cut the hoses and got new ones. The heater core is easy to replace once the box is out. Slides out of the top
13)Release A/C freon from LP side with gauges and disconnect A/C lines from firewall exit. ( This requires a simple 5 dollar tool that disconnects fuel and A/C connections. The tool is 5/8 clam shell style tool.

14) The heater box will now come free!
15) There are several screws holding heater box together. It will come apart in two halves. Go ahead and replace your heater core because you dont want to do this again in a month! Just a note you can get a gasket kit for reassembly from the dealer $25 but this does not include the gasket for the AC unit at the firewall. It does have all the material needed to wrap the AC and heater core units. Also there is a control vane inside the heater box that is very brittle. You must line of the pivot holes for the two control vanes. It didn't take much to snap mine off.
16)You may want to replace your accumulator as well (its fairly cheap $40)
17) Reassemble /reinstall box. Draw vacuum on A/C system for 30 mins. recharge with 134a.
18) One final note this totally ruined my already cracked dash beyond all hope. So I replaced it as well. This company makes a great replacement dash that is rock on.
http://www.lmctruck.com/dodge/ This dash fit like a glove and color matched perfect. All the holes for mounting were perfect. It was better than dealer quality.
19) To replace the dash remove the passenger side air bag five bolts. The glove box, all of the front mount screws, one screw each on the side corners of the dash. You will have to remove an anchor screw on each of the metal brackets holding the dash. A stubby Phillips or a 5/16 socket with a 3/8 adapter is what I used. Patience is required on these. Once you have done that get a hammer and careful break the old dash being careful around the vents. There are two screws in the metal support braces which hold the ducting on. Remove those screws and pop the center duct back out thru the back of the dash and the whole thing will lift out. Swap out your vents to the new dash and reassemble. Do the anchor screws on the at the windshield first you'll be able to lift the dash up to see what your doing then screw in the two duct work screws.
1) Disconnect battery cable
2) Remove first screw on door sill both sides (these are the pieces that hold your carpet down)
3) Remove kick panels and panel under steering wheel.
4) Remove two nuts holding up steering wheel.
5) Remove five screws where dash meets the windshield.
6) Remove 2 bolts on the left and right side of the dash up against the side of truck (under kick panels)
7)Dashboard can now be pulled free toward seat.
8)On passenger side of dash tie rope or wire to flange where bolt went into side of truck and lift dash up to expose fan box. Secure rope to handle on side of A-post
9) Remove vacuum lines and unclip electrical connections. (Hint: temperature control cable has to be removed with pliers by pulling straight up, removing the entire clip.) On my 2000 Dodge Ram the vacuum lines are in a D shell connector.
10) Now the secret: there are two screws holding the box to the firewall on the inside (one has ground wire attached.) The other is in the upper right hand corner facing up.
11)There are four nuts holding it from the engine side of the firewall (one nut is accessed by removing the electrical panel on passenger side.) Remove all four nuts. Be careful when separating the housing from the firewall I tugged to hard and snapped a mounting post off the heater box
12)Remove heater hoses by removing clamps. Mine were stuck so I just cut the hoses and got new ones. The heater core is easy to replace once the box is out. Slides out of the top
13)Release A/C freon from LP side with gauges and disconnect A/C lines from firewall exit. ( This requires a simple 5 dollar tool that disconnects fuel and A/C connections. The tool is 5/8 clam shell style tool.
14) The heater box will now come free!
15) There are several screws holding heater box together. It will come apart in two halves. Go ahead and replace your heater core because you dont want to do this again in a month! Just a note you can get a gasket kit for reassembly from the dealer $25 but this does not include the gasket for the AC unit at the firewall. It does have all the material needed to wrap the AC and heater core units. Also there is a control vane inside the heater box that is very brittle. You must line of the pivot holes for the two control vanes. It didn't take much to snap mine off.
16)You may want to replace your accumulator as well (its fairly cheap $40)
17) Reassemble /reinstall box. Draw vacuum on A/C system for 30 mins. recharge with 134a.
18) One final note this totally ruined my already cracked dash beyond all hope. So I replaced it as well. This company makes a great replacement dash that is rock on.
http://www.lmctruck.com/dodge/ This dash fit like a glove and color matched perfect. All the holes for mounting were perfect. It was better than dealer quality.
19) To replace the dash remove the passenger side air bag five bolts. The glove box, all of the front mount screws, one screw each on the side corners of the dash. You will have to remove an anchor screw on each of the metal brackets holding the dash. A stubby Phillips or a 5/16 socket with a 3/8 adapter is what I used. Patience is required on these. Once you have done that get a hammer and careful break the old dash being careful around the vents. There are two screws in the metal support braces which hold the ducting on. Remove those screws and pop the center duct back out thru the back of the dash and the whole thing will lift out. Swap out your vents to the new dash and reassemble. Do the anchor screws on the at the windshield first you'll be able to lift the dash up to see what your doing then screw in the two duct work screws.

Professional
Joined: May 2007
Posts: 172
Likes: 0
From: MI
so I used the instructions and worked like a charm, but I have 2 questions
1. the nut that bolts to the studs coming through the firewall for the box assembly; anyone know what size? I dropped one
2. there is a part that fell off the column after removing the cover and I know it is for the shift indicator cable, but not sure how it goes back on
3.
Kudos to whomever started this thread - I saved $1000 today - thank you
btw - I used the heater core with the swivels - seems fine. I also had the same debris pattern on the evap that I saw in all the other pics