


Transfer case seals

Retired Moderator - RIP
Joined: May 2008
Posts: 18,729
Likes: 17
From: NH
yea, drain the TC first. But, if you raise the rear of the truck as far as you can(and use jack stands for safety) you will minimize the amount,if any, of the fluid coming out of the tranny. Plus you"ll have some extra room.

Registered User
Joined: Nov 2009
Posts: 16
Likes: 0
From: Alaska
Good tip. Thanks. Also I just verified whether my seal from the tranny to the t-case was bad. I checked my t-case fluid level.... next to nothing (glad I haven't been using it hardly at all). Tranny fluid level is full.
So I am hoping this sounds like it is the main gasket between the 2 halves of the t-case, the extension gasket and maybe the extension seal to the rear driveshaft
Sheriff did you ever get the right #'s for the seals n such? All we have up here in Alaska is Schuck's (O'Reilly's) and Napa.
I found 2 for the rear at Schucks so I was curious
4333N 34.99
15629 29.99
Last edited by wolf0994; Nov 4, 2009 at 01:45 PM.
Thread Starter
|
Grand Champion
Joined: Apr 2008
Posts: 7,055
Likes: 7
From: Lee County, North Carolina
I have the 231D transfer case (standard in all ram 1500's).
Transfer case removal starts with the drive shafts.
To get the front drive shaft off you need to stick a prybar in the yoke and let it hit one of the control arms to break the bolts loose.
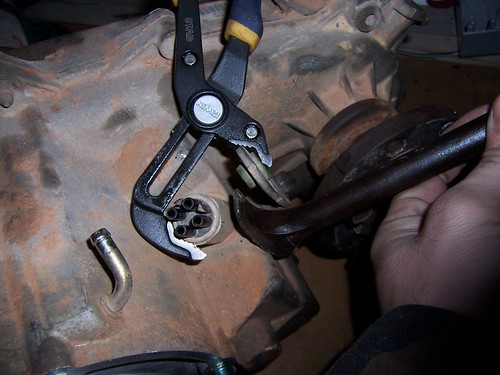
Next, you will need to remove the vacuum and vent lines along with the shift lever. You can see where all three hook up in this picture. I used my channel-locks and a prybar to get the shift lever out of its grommet. Gently squeeze the channel-locks so you can pry on the shift lever without bending the bar that it attaches to.
Next, is the cross member.
Place your jackstand under the back of the transmission on the black steel plate that is attached to the transmission mount. Jack it up a little bit (maybe an inch or so) then set it down on the jackstand. Now, the weight of the transmission/transfer case is off of the crossmember.
First, take the bolt off the vacuum lines that are attached to the front of the crossmember.
Then, take the two nuts off the bottom of the transmission mount.
Take all eight bolts off the ends that are attached to the frame,
then move it straight down/back and forth to wiggle it out. You might need to do a little convincing with a hammer.

After getting the crossmember off you will need to remove the plate that is attached to the transmission along with the transmission mount.
Put another jackstand under the transfer case and lift it up a little bit to get it off the other jackstand.
Now, take the bolts out of the end of the transmission mount followed by the four bolts that attach the plate to the transmission.
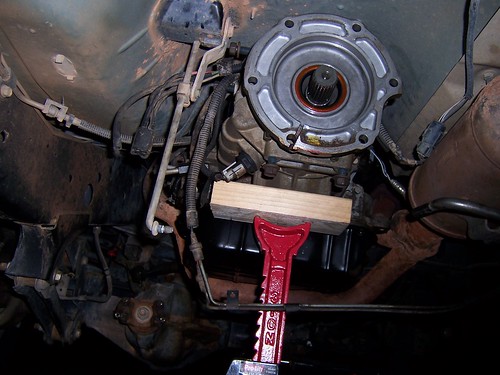
Next, put the first jackstand where it was originally with a block of wood on top of it and remove the rear jackstand.
Now, you need to take all six nuts off the transfer case and remove it.
I put a knee on the extension housing and slid the transfer case back with my hands on the sides of it then lowered it to my chest then set it on the ground. If you aren't that strong, then you can use a jack and maybe some straps to keep it steady because it isn't the same weight from side to side and can fall off a jack easily.
After taking the transfer case out you can change the transmission output seal. A seal puller is a good investment.

Use a piece of cardboard like I did because it is easy to gouge aluminum.
To change the transfer case input shaft seal you need to remove the retainer plate that it is in.
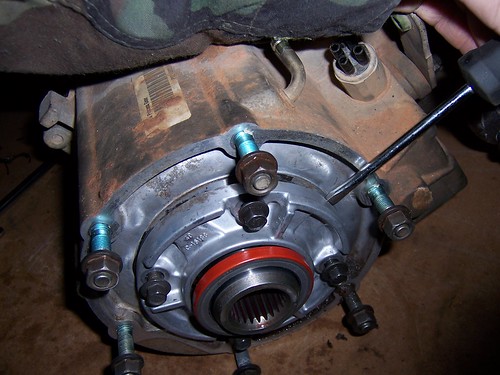
There is a small recess where you can insert the tip of a flat head screwdriver to break the silicone seal under the retainer plate. Remember, that part is aluminum and gouges easily.
There are four bolts holding the retainer plate on.
You can knock the seal out from the inside with the seal driver or a big socket or you can clamp it to a wooden table with a wood block between the clamp and the retainer plate, then use the seal puller.
To drive the new seals in I got a ball joint removal kit from Advance Auto Parts because it has a couple of cups that are the perfect size and they didn't have a seal driver kit.

The retainer plate that the input shaft seal is in should be coated with black RTV and bolted back on. Then, installation is reverse of removal. Do not block the fluid return cavity with the RTV as that can cause the new seal to fail. The return cavity is the one hole that is not threaded and you need to match the retainer plate groove up with that hole so it will be able to drain.
Bolt sizes and torque specs
Retainer plate bolts -10mm - 16 ft-lbs.
Transfer case to transmission nuts - 14mm - 20 to 30 ft-lbs.
Rear drive shaft bolts - 15mm
Front drive shaft bolts - 5/8"
Front drive shaft bands - 8mm - 168 in-lbs
Part Numbers
Transmission output shaft seal - Timken 710058
Transfer case input shaft seal - Timken 3173
Transfer case removal starts with the drive shafts.
To get the front drive shaft off you need to stick a prybar in the yoke and let it hit one of the control arms to break the bolts loose.
Next, you will need to remove the vacuum and vent lines along with the shift lever. You can see where all three hook up in this picture. I used my channel-locks and a prybar to get the shift lever out of its grommet. Gently squeeze the channel-locks so you can pry on the shift lever without bending the bar that it attaches to.
Next, is the cross member.
Place your jackstand under the back of the transmission on the black steel plate that is attached to the transmission mount. Jack it up a little bit (maybe an inch or so) then set it down on the jackstand. Now, the weight of the transmission/transfer case is off of the crossmember.
First, take the bolt off the vacuum lines that are attached to the front of the crossmember.
Then, take the two nuts off the bottom of the transmission mount.
Take all eight bolts off the ends that are attached to the frame,
then move it straight down/back and forth to wiggle it out. You might need to do a little convincing with a hammer.
After getting the crossmember off you will need to remove the plate that is attached to the transmission along with the transmission mount.
Put another jackstand under the transfer case and lift it up a little bit to get it off the other jackstand.
Now, take the bolts out of the end of the transmission mount followed by the four bolts that attach the plate to the transmission.
Next, put the first jackstand where it was originally with a block of wood on top of it and remove the rear jackstand.
Now, you need to take all six nuts off the transfer case and remove it.
I put a knee on the extension housing and slid the transfer case back with my hands on the sides of it then lowered it to my chest then set it on the ground. If you aren't that strong, then you can use a jack and maybe some straps to keep it steady because it isn't the same weight from side to side and can fall off a jack easily.
After taking the transfer case out you can change the transmission output seal. A seal puller is a good investment.
Use a piece of cardboard like I did because it is easy to gouge aluminum.
To change the transfer case input shaft seal you need to remove the retainer plate that it is in.
There is a small recess where you can insert the tip of a flat head screwdriver to break the silicone seal under the retainer plate. Remember, that part is aluminum and gouges easily.
There are four bolts holding the retainer plate on.
You can knock the seal out from the inside with the seal driver or a big socket or you can clamp it to a wooden table with a wood block between the clamp and the retainer plate, then use the seal puller.
To drive the new seals in I got a ball joint removal kit from Advance Auto Parts because it has a couple of cups that are the perfect size and they didn't have a seal driver kit.
The retainer plate that the input shaft seal is in should be coated with black RTV and bolted back on. Then, installation is reverse of removal. Do not block the fluid return cavity with the RTV as that can cause the new seal to fail. The return cavity is the one hole that is not threaded and you need to match the retainer plate groove up with that hole so it will be able to drain.
Bolt sizes and torque specs
Retainer plate bolts -10mm - 16 ft-lbs.
Transfer case to transmission nuts - 14mm - 20 to 30 ft-lbs.
Rear drive shaft bolts - 15mm
Front drive shaft bolts - 5/8"
Front drive shaft bands - 8mm - 168 in-lbs
Part Numbers
Transmission output shaft seal - Timken 710058
Transfer case input shaft seal - Timken 3173
Last edited by Miami_Son; Nov 15, 2009 at 08:06 PM. Reason: Fixed grammar and spelling
Registered User
Joined: Nov 2009
Posts: 16
Likes: 0
From: Alaska
So I got the TC out finally. I didnt realize that how much I would have to disassemble now that I am looking at it in the FSM. I just want the halves to separate. Think I could just remove all the rear stuff and leave the front intact? Or do I need to disassemble the front too? I am sure hoping I can do just the rear.
Thread Starter
|
Grand Champion
Joined: Apr 2008
Posts: 7,055
Likes: 7
From: Lee County, North Carolina
from what i was reading i think you'll have to take off the front pinion. i think thats the name, its where the drive shaft hooks up.
i've never taken one apart before but the FSM should have you covered on dis-assembly. just read over the procedures closely and watch for where they talk about replacing something associated with a complete rebuild instead of just taking the two halves apart.
maybe you should take a few pictures along the way to put in this thread as well, so you can help out the next guy.
Thread Starter
|
Grand Champion
Joined: Apr 2008
Posts: 7,055
Likes: 7
From: Lee County, North Carolina
well i wanted to get it back together before i went to bed and i got most of the way there about an hour and a half past bedtime. looks like only 4 hours of sleep for me today.
i got the transfer case hooked back up and the crossmember is on. all i have left is the drive shafts. and i only busted (bloodied) four knuckles in the process. that cross member is quite resistant, but persistence with a 3lb. dead blow eventually made it realize that i was going to win that round.
i got the transfer case hooked back up and the crossmember is on. all i have left is the drive shafts. and i only busted (bloodied) four knuckles in the process. that cross member is quite resistant, but persistence with a 3lb. dead blow eventually made it realize that i was going to win that round.
Retired Moderator - RIP
Joined: May 2008
Posts: 18,729
Likes: 17
From: NH
I don't think you had to remove the cross member to begin with! LOL (plus I didn't have to use a jack,Just picked it up and put it on top of the cross member) I didn't with mine(remove the cross member),and like you said in the other thread, you were able to pick it up and place it. It's not that heavy.
Thread Starter
|
Grand Champion
Joined: Apr 2008
Posts: 7,055
Likes: 7
From: Lee County, North Carolina
i believe the metal plate that is bolted to the transmission that the rubber mount is attached to was blocking the bottom nuts on the transfer case.
if i could have gotten it off without removing the cross member then i didn't realize it when i was out there in the cold at 10pm.
either way it's too late now. i've already taken it off and put it back on.
if i could have gotten it off without removing the cross member then i didn't realize it when i was out there in the cold at 10pm.
either way it's too late now. i've already taken it off and put it back on.