


'96 1500 - Damage Advice


Thread Starter
|
Registered User
Joined: Feb 2013
Posts: 4
Likes: 0
Hello,
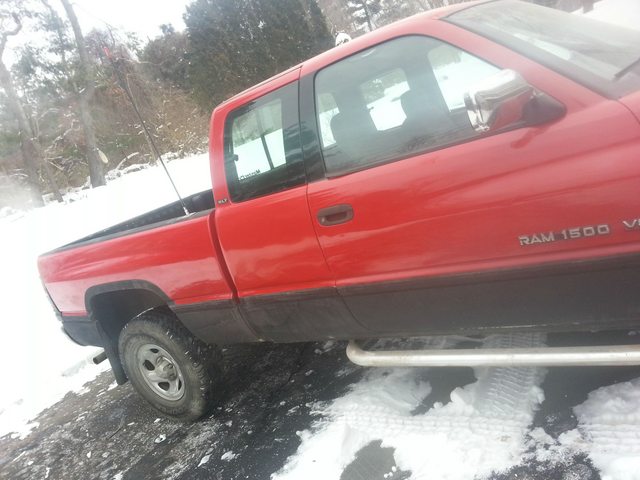
I just picked up this previously loved '96 1500 SLT. As you can see in the picture below the previous owner had a bad day a while ago and left some damage on the passenger side. Originally I was just going to leave the damage for the price I paid, however I have since fallen for the truck and it has really started to bother me. I was wondering if anyone had any advice as to how to go about repairing this, if possible, short of taking it in to a body shop. Can I somehow shape the metal back to near original and use body filler, does anywhere sell body panels for just this section of the truck? The repair doesn't have to be perfect, just better than this. Thanks, any and all advice is greatly appreciated!
I just picked up this previously loved '96 1500 SLT. As you can see in the picture below the previous owner had a bad day a while ago and left some damage on the passenger side. Originally I was just going to leave the damage for the price I paid, however I have since fallen for the truck and it has really started to bother me. I was wondering if anyone had any advice as to how to go about repairing this, if possible, short of taking it in to a body shop. Can I somehow shape the metal back to near original and use body filler, does anywhere sell body panels for just this section of the truck? The repair doesn't have to be perfect, just better than this. Thanks, any and all advice is greatly appreciated!
Last edited by hcgregg3; Jan 5, 2014 at 02:24 PM.
Legend
Joined: Jul 2011
Posts: 8,259
Likes: 4
From: Austin, TX
Two options that come to mind, and hopefully, kejobe will post up with better advice.
Keep amount of body filler to as little as you can, as think filler will shring and crack and fall out. You can get a stud welder and pull most of it out. Pull slightly more than where it ned,s and wlrk back into place with hammer and dolly (remove inner panel...). Sand and shape until it is as close as you can get then fill as needed, then sand and shape and sand more.
Or you can (after pulling inner panel) hammer from inside to bring it out.
Another option is to get a panel from a plcae such as www.c2cfabrications.com and cut the old piece slighly smaller than new panel. Get a panel crimper and crimp edge on new panel, fit into place, and weld it in. Caution with welding....skip welds, and not a solid runner as the heat will cause warpage. Sand and fill seam.
For the crimp and seal, see if you can find my "Ram Body Work" thread as I had to cut and weld to replace panels behind rear wheels. I'll see if I can find it and post a link. HERE it is...
Then sand, prime, paint and clear.
Last edited by gdstock; Feb 14, 2013 at 11:24 PM.
Record Breaker
Joined: Aug 2010
Posts: 2,241
Likes: 12
From: Ohio
With the bodyline there, itll be a real pain in the @ss to try and save it. I wouldnt even try. The best thing to do would be either see if you can find a new panel to weld in or find a good one in the junk yard. Cut it out and weld on yours. Either way, youll save A LOT of time by replacing it rather than trying to fix it.
Thread Starter
|
Registered User
Joined: Feb 2013
Posts: 4
Likes: 0
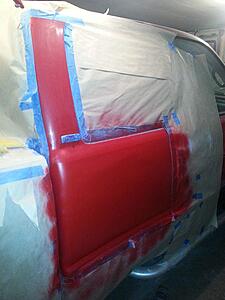
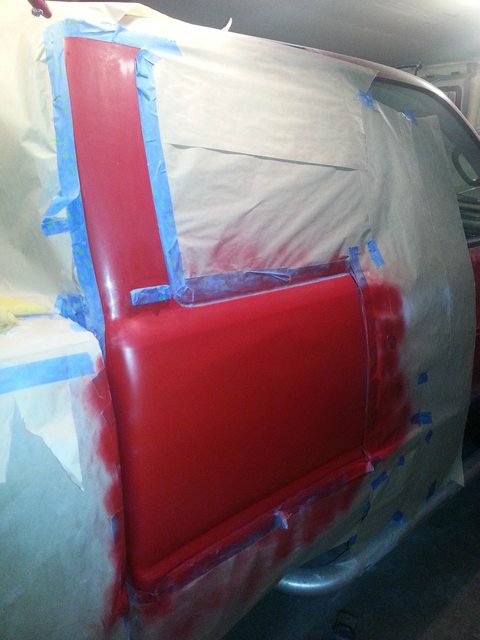
Hey guys, forgot to say thank you all for your helpful input. Since I got the truck for a good price I figured why not try to teach myself on it, plus it served as a good activity to keep myself entertained. I had rolled on bed-liner to the rocker panels as I didn't really like the gray sometime last year. I set out the week before Christmas with ever coat gold body-filler a, hammer, automotive touch up paint from automotivetouchup.com, and a lot of sandpaper. I did this all over the course of about 4 or 5 days in a garage with a space heater for heat and plenty of ventilation so I really put these materials to the test haha.
First I banged and tried the shape the panel as best I could, then I ground down the rust and prepped the area for the body filler. Threw that on, sanded down and repeated a couple times till I got something satisfying. Then I just followed the directions on the paint cans and voila. It's no where near the perfection I would have gotten from just replacing the area, but it was fun, and a good learning experience. Plus to me it looks 100 times better.
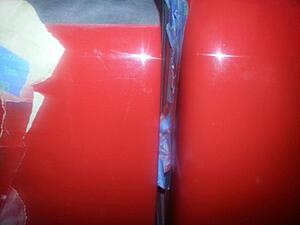
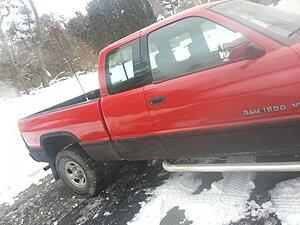
In order to place these pics in context I had absolutely zero painting or body-work experience before starting out on this project. First pic is pre clear-coat. Second picture is showing how well the factory paint matched (left is original, right is new). And the last picture is the trusty truck in all its glory, the part painted only looks different because I had just wiped it off and there's a layer of dust on the rest of the truck ha.
First I banged and tried the shape the panel as best I could, then I ground down the rust and prepped the area for the body filler. Threw that on, sanded down and repeated a couple times till I got something satisfying. Then I just followed the directions on the paint cans and voila. It's no where near the perfection I would have gotten from just replacing the area, but it was fun, and a good learning experience. Plus to me it looks 100 times better.
In order to place these pics in context I had absolutely zero painting or body-work experience before starting out on this project. First pic is pre clear-coat. Second picture is showing how well the factory paint matched (left is original, right is new). And the last picture is the trusty truck in all its glory, the part painted only looks different because I had just wiped it off and there's a layer of dust on the rest of the truck ha.

Last edited by hcgregg3; Jan 5, 2014 at 02:23 PM.


 Good Work!