


Quality Headlight Replacements??

Professional
Joined: Jan 2013
Posts: 121
Likes: 0
From: Hinsdale, N.Y.
Well I have been behind the new headlamps, both before and after the HD wire harness.
The headlight assemblies made a drastic improvement by themselves!!
Here are my.old ones compared to the new ones
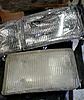
The adjustment of the assemblies I got were pretty darn close to the original ones I took out. Before removing, I marked the beam location on my garage door wit a couple of tape X's
After installing the HD wire harness the lighting was back to 100%!!
Thank you to UnregisteredUser for supplying the link to that, and thank you to HeyYou for helping me overcome that DUMB moment!!!
All of you that chimed in helped more than I could ever express.
In my opinion you can't go wrong with these headlamp assemblies OR the LMC HD wire harness with relays
Professional
Joined: Oct 2012
Posts: 202
Likes: 0
From: Topeka Kansas
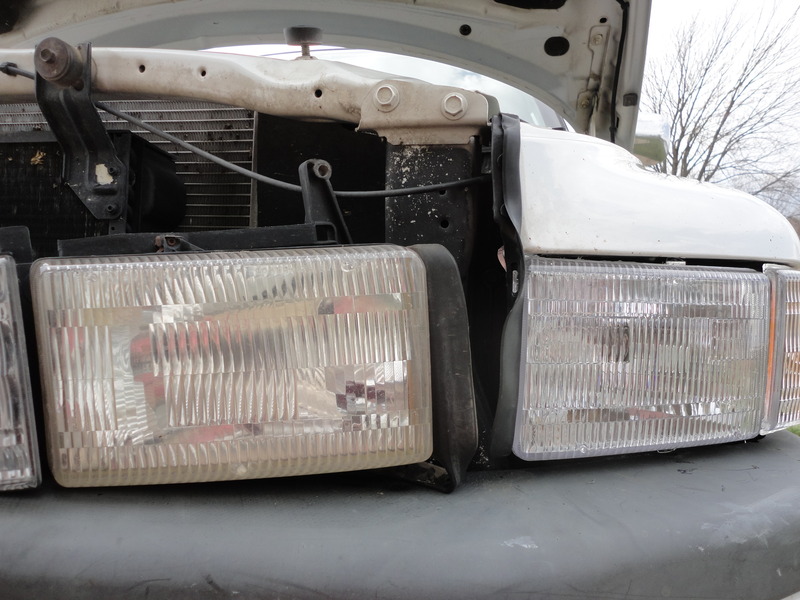
I got those same headlamp assemblies in this morning. Went pretty easy, I put side/turn in after getting headlight started. Had a heck of a time with bulb on driver side, went much better after I read instructions. Bulb on passenger side went fine without reading instructions. I had bulb hooked to wiring harness and was putting everything in at once- not good. Worked much better when better when inserting bulb first, then ring, then wiring harness. Now to find level surface to aim or take it somewhere for aiming. I measured old and set new same before installing, but who knows what that will do. In garage they are a lot brighter, tested with just one replaced. Looking at them, I thought, wow in the rain a lot of water will go in around them headlights, but the old ones were likely the same, just never looked at them closely.
Will be in Lenexa on 3rd of April. Might go by and get that special wiring harness???
Will be in Lenexa on 3rd of April. Might go by and get that special wiring harness???
Professional
Joined: Jan 2013
Posts: 121
Likes: 0
From: Hinsdale, N.Y.
I got those same headlamp assemblies in this morning. Went pretty easy, I put side/turn in after getting headlight started. Had a heck of a time with bulb on driver side, went much better after I read instructions. Bulb on passenger side went fine without reading instructions. I had bulb hooked to wiring harness and was putting everything in at once- not good. Worked much better when better when inserting bulb first, then ring, then wiring harness. Now to find level surface to aim or take it somewhere for aiming. I measured old and set new same before installing, but who knows what that will do. In garage they are a lot brighter, tested with just one replaced. Looking at them, I thought, wow in the rain a lot of water will go in around them headlights, but the old ones were likely the same, just never looked at them closely.
Will be in Lenexa on 3rd of April. Might go by and get that special wiring harness???
Will be in Lenexa on 3rd of April. Might go by and get that special wiring harness???
Glad to hear you got them in!!
I should have been more detailed on my install write up!!
I took that phillips head screw, that holds the side marker/turn lens to the actual headlight assembly out, and slid the marker off the headlight assembly. That made putting the bulb in easier, I thought.
You are correct about the bulbs, I put the bulbs in with the ring in the headlight, and left the wire to the bulb OFF until mounted then plugged the harness into back of bulb.
KEEP AN EYE ON and make sure those little black rubber weatherstrip stay aligned correctly when you first shut your hood the first couple times, until they get "formed" to remain in that contour!!! The first time I shut my hood, they were not where they would do thier job, and sorta looked like Hell. But I formed and held them in place the first time I shut the hood, now they are fine.
We're yours yellowed like mine?

Professional
Joined: Oct 2012
Posts: 202
Likes: 0
From: Topeka Kansas
Good point on rubber seal, it was not as should be. Don't think my headlamps were as bad as yours. You can see the rubber seal hasn't formed straight yet. I didn't notice on old headlights if there was that much space on top and bottom of lens and in between turn.

Last edited by diverjer; Mar 24, 2017 at 05:07 PM.
Professional
Joined: Jan 2013
Posts: 121
Likes: 0
From: Hinsdale, N.Y.
Yeah, yesh, that's what I'm talkin about! It looks like you DID notice the weatherstrip needed to be "persuaded" too!. Well IMO, those were mere hurdles to overcome for the price, and the shipping was FAST from Texas to here where o live in N.Y. state.
You'll love them
You'll love them
Grand Champion
Joined: Apr 2010
Posts: 5,011
Likes: 6
From: Meeker, CO

Professional
Joined: Oct 2012
Posts: 202
Likes: 0
From: Topeka Kansas
Lights are a whole lot better, not as bright as wife's 2013 Elantra, doubt I can get that brightness. Noticed the new assembly had kind of a cylinder inside the lamp assembly, the 9004 bulb actually fit inside the cylinder. That wasn't the way the old assemblies were. Think it must be to reflect the light off the back more?
Still thinking about wire harness. I believe the correct part number is 55-9595. I seen a post where you have to remove the battery tray, that things appear to have two bolts and two nuts on tray, but still more underneath by horn or something. Something holding that on front underneath. Always wondered what that button switch or whatever on bottom of tray, must just be there to close a circuit if battery installed?
Yes those Ebay people mailed the parts and I got them Fedx in two days. That was good service. Hope they last, there is a lot of heat in those units.
Professional
Joined: Oct 2012
Posts: 202
Likes: 0
From: Topeka Kansas
Thanks, that is amazing, but I guess I shouldn't be surprised. Wish I hadn't sold my 75 Blazer, so much easier to work on and I knew every bolt. Retired, moved to town, sold Blazer, boat, tractor, loader, disc, plows, welders all kinds of equipment. Five years later, we couldn't stand city living, so back out somewhat in country on 5.03 acres. I sure did like that blazer, just wasn't room for everything in the city.
Professional
Joined: Jan 2013
Posts: 121
Likes: 0
From: Hinsdale, N.Y.
Lights are a whole lot better, not as bright as wife's 2013 Elantra, doubt I can get that brightness. Noticed the new assembly had kind of a cylinder inside the lamp assembly, the 9004 bulb actually fit inside the cylinder. That wasn't the way the old assemblies were. Think it must be to reflect the light off the back more?
Still thinking about wire harness. I believe the correct part number is 55-9595. I seen a post where you have to remove the battery tray, that things appear to have two bolts and two nuts on tray, but still more underneath by horn or something. Something holding that on front underneath. Always wondered what that button switch or whatever on bottom of tray, must just be there to close a circuit if battery installed?
Yes those Ebay people mailed the parts and I got them Fedx in two days. That was good service. Hope they last, there is a lot of heat in those units.
Still thinking about wire harness. I believe the correct part number is 55-9595. I seen a post where you have to remove the battery tray, that things appear to have two bolts and two nuts on tray, but still more underneath by horn or something. Something holding that on front underneath. Always wondered what that button switch or whatever on bottom of tray, must just be there to close a circuit if battery installed?
Yes those Ebay people mailed the parts and I got them Fedx in two days. That was good service. Hope they last, there is a lot of heat in those units.
https://dodgeforum.com/forum/2nd-gen...s-install.html