


Quad hid retrofit SUCCESS!


Thread Starter
|
Professional
Joined: Aug 2011
Posts: 111
Likes: 0
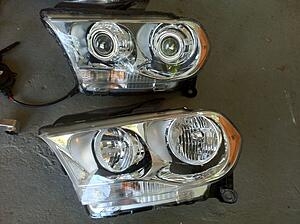
I was daring enough to break open my headlights and retrofit the halogens with projectors.
projector bulb specs:
rx330 low beams
fx-r 1.0 lo/hi beam
morimoto 3five ballasts
Matsu****a gen IV ballasts
morimoto 3five 4300k d2s bulbs
phillips 85122+ bulbs
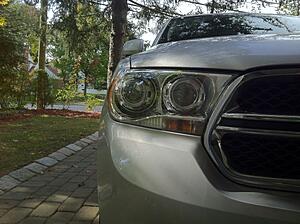
I just installed them today and I can say its WAY brighter than the oem halogen
feel free to ask any questions


projector bulb specs:
rx330 low beams
fx-r 1.0 lo/hi beam
morimoto 3five ballasts
Matsu****a gen IV ballasts
morimoto 3five 4300k d2s bulbs
phillips 85122+ bulbs
I just installed them today and I can say its WAY brighter than the oem halogen
feel free to ask any questions


Champion
Joined: Jun 2006
Posts: 4,822
Likes: 4
From: Indiana
What steps did you take to get the housings open without breaking them?
What efforts were done to properly aim the replacements? My concerns are that being off just a little could be dramatic and dangerous for the poor soul driving up on you going the other way.
Looks great from a cosmetic standpoint BTW!
IndyD
What efforts were done to properly aim the replacements? My concerns are that being off just a little could be dramatic and dangerous for the poor soul driving up on you going the other way.
Looks great from a cosmetic standpoint BTW!
IndyD
Thread Starter
|
Professional
Joined: Aug 2011
Posts: 111
Likes: 0
I have to aim the headlights still and I will be sure to take pics tomorrow night.
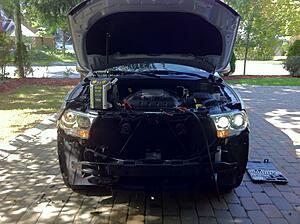
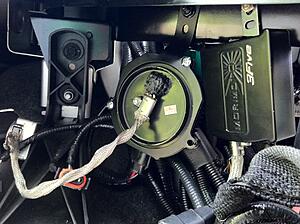
to open the headlights I used a dremel. to align the headlights was actually easy. when the headlight is open the highbeam and lowbeam are actually one solid piece. I put that on the ground and taped off the position it sat in, then using a jump pack I fired up the low beam outputting the light about 20ft. across my basement onto the wall. I then taped off the "cutoff" and at the most intensely lit area I made an step like the projector would have. it also helped because I retrofitted the highbeam side first so I was sure I had my fx-r's in perfect because I could still compare it to the low beam. once mounted I then cut out the low beam and put the rx330 projector in and used the markings on the wall and the fx-r's for reference. they are almost perfect in terms of cutoffs and rotation but the rx330 projector with clear lenses are inherent to flairing of the cutoff and I failed miserably at making curved shield to correct this... so I will live with alittle flairing. I will say the horizontal and rotational alignment is so key because the headlight only has up/down adjusters, and the method I used to align the projectors will never be perfect but its pretty close.
to open the headlights I used a dremel. to align the headlights was actually easy. when the headlight is open the highbeam and lowbeam are actually one solid piece. I put that on the ground and taped off the position it sat in, then using a jump pack I fired up the low beam outputting the light about 20ft. across my basement onto the wall. I then taped off the "cutoff" and at the most intensely lit area I made an step like the projector would have. it also helped because I retrofitted the highbeam side first so I was sure I had my fx-r's in perfect because I could still compare it to the low beam. once mounted I then cut out the low beam and put the rx330 projector in and used the markings on the wall and the fx-r's for reference. they are almost perfect in terms of cutoffs and rotation but the rx330 projector with clear lenses are inherent to flairing of the cutoff and I failed miserably at making curved shield to correct this... so I will live with alittle flairing. I will say the horizontal and rotational alignment is so key because the headlight only has up/down adjusters, and the method I used to align the projectors will never be perfect but its pretty close.
Thread Starter
|
Professional
Joined: Aug 2011
Posts: 111
Likes: 0
thank you guys. functionally im REALLY happy, cosmetically it looks pretty good, if I had to do it again I would get the heat headlights since the bezel is black, and paint the hi/low beam section black. I used aluminum tape to cover up stuff, I managed to put my fingers all over the hi/lo piece, and scratched them up through careless handling, and jb weld etc getting on them. so if you were to get eye to eye with the headlight and studied the headlight you would be able to tell, but walking by glancing one would never be able to tell the aluminum tape vs. the oem chrome finish.
Registered User
Joined: Oct 2011
Posts: 17
Likes: 0
Great job, been thinking of ordering the stock ones from a citidel or R/T to install in the
wife's Crew, thinking it could be more plug n play. After seeing this I now have a plan
B. Thanks.
wife's Crew, thinking it could be more plug n play. After seeing this I now have a plan
B. Thanks.
Trending Topics
Thread Starter
|
Professional
Joined: Aug 2011
Posts: 111
Likes: 0
you cant go wrong either way. the oem hid's are not that bad from the pics I saw but they are very expensive.... $700 per side, and I dont believe they come with ballasts or hid bulbs. I cant say my setup was cheaper, but it really performs well. mine cost about 440 for the headlights, $700 for bulbs, ballasts, projectors, wiring, misc. stuff, plus about 10-12 hours of time.
I will take night pics tonight, and see if I can get a few shots of the output vs my m3's e46 hid.


Thread Starter
|
Professional
Joined: Aug 2011
Posts: 111
Likes: 0
the garage is not a flat the right hand side is a few feet further back than the left. you can see the flair on the left side, and the projectors arent "perfect" they are maybe 1 or 2 degrees off from each other.