


Poor Sound from Alpine Stereo


Rookie
Joined: Apr 2012
Posts: 58
Likes: 0

I recently removed my aftermarket speakers because I am trading my 2012 for a 2014. Is very simple to do. Just take your time and be careful not to break the retaining clips. You will have to remove 3 screws, a 7mm, 10mm and a small Phillip.
1. Using a trim stick or another suitable wide flat-bladed tool, pry the bezel of the front door switch module up and away from the front door trim panel arm rest far enough to disengage the four spring steel retainers of the switch from the arm rest opening.
2. Pull the switch module away from the mounting hole of the arm rest far enough to access and disconnect the door wire harness connector from the switch connector receptacle.
3. Remove the switch module from the vehicle.

4. Remove the trim cover from the armrest pull cup and remove the 7mm screw

5. Remove the door handle trim cover . Pull the door handle and insert a small screw driver on the left side to remove the plastic cover. After the cover is remove you will see one Phillips screw and a 10mm screw.

6. Using a trim stick or equivalent, carefully pull the front door trim panel away from the door far enough to release the plastic door trim panel retaining clips from the door. (From the bottom up)
7. Lift the rear of the panel upward slightly to disengage the interior door latch lock link and **** from the rear of the door panel and the inner belt seal.

8. Remove the door handle from the panel by pulling on it and carefully pushing in towards the rear of the trim panel.

9. Position the front door trim panel far enough away from the door to access the door wire harness connectors .
10. Disconnect the door wire harness.

11. Remove the trim panel to access the speaker.

Note: I have a 2012 Citadel so this should work on all 3rd Gen Durango (2011-2014)
The rear door trim panel removal are almost exactly the same with the exception that you won't be able to completely remove the panel. I believe the door lock mechanism is attached . I am sure there is a way to completely remove it I just had a friend hold the panel for me while I replaced the speakers.
To re-install the panel just do everything in reverse. Be careful not to put too much force on the retaining clips as they have a little bit of play and some of them wont line up . You will have to line them up as you work from top to bottom.
I hope this helps...
Last edited by Blue659; Nov 29, 2013 at 02:24 PM.
Rookie
Joined: Apr 2012
Posts: 58
Likes: 0
Yes they do and that's what I said. I can't remember exactly what it was but on the rear doors, the locking mechanism or the harness itself was attached with one of those one way only type of connectors. You know, the one that are very hard to remove and re-use. Sometimes you have to cut them and get a new ones. God only knows what they are called. I didn't want to cut them and leave the wire or cable hanging. I removed a couple of those from the subwoofer harness when I installed my new sub and I could not re-use them. I am sure I could buy new ones but I didn't want to postpone my install to another day. That's all I was trying to say. Besides that, is pretty much the same .
Now that I am thinking about it, I am going to research them and buy a bag or two just to have around.
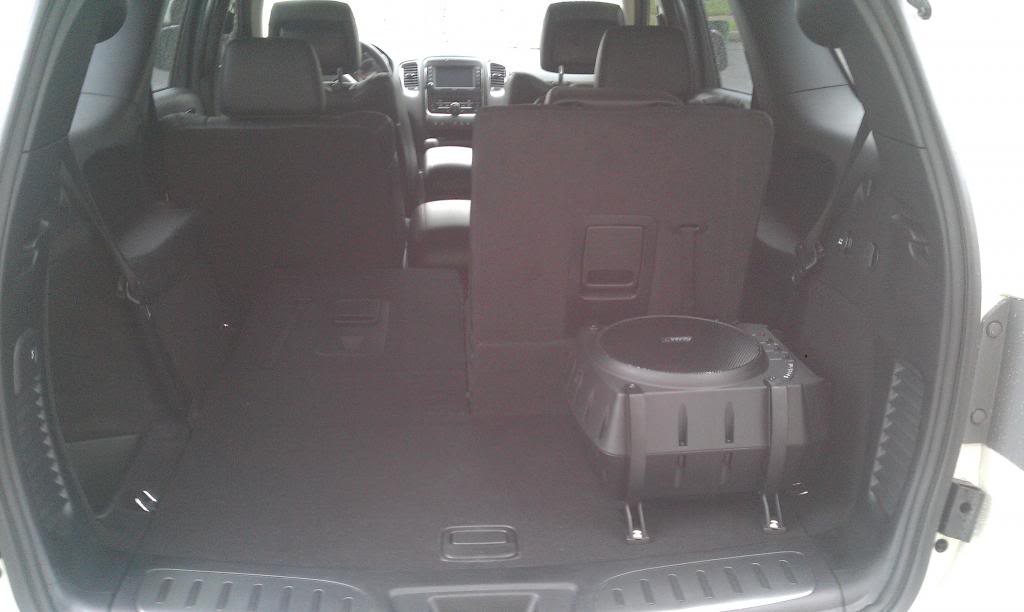
I just replaced my Infinity Bass Link 10" sub ( internal amp blew ) with another one, this time with an extended warranty from Crutchfied and love the low end it provides to the system. Maybe down the road I will replace door speakers with better one's but for now I'm good.
Last edited by V for Victory; Nov 30, 2013 at 04:12 PM. Reason: add pic
Rookie
Joined: Apr 2012
Posts: 58
Likes: 0
I put one of those in my wife's car. They sound really nice but I didn't want to have something that big in the trunk area. I wish that could fit where the stock amp is. Instead a put two alpine amps on the same location. I posted it somewhere, lol. I just removed them and put everything back to stock waiting for my new ride to arrive. I hope you didn't make the same mistake I made and drilled the cover. I couldn't find materially that match. I was also hoping to take the cover apart but it was not the case. After that I made that mistake I realized that the material is not glue to the trunk compartment cover so all I had to do was make a cross cut just big enough to peel it and them drill the holes. That way, if I ever removed the amps (like I just did) all I had to do was fill the holes and then fold and glue the material back. I managed to fill the holes with the material that I use for the amp cover that I made to protect the amps (See Mod on next page) but Is not a perfect match. I was going to buy the cover but it's around 250.00. Just for the cover...
The new 8 sub sound better than the stock but I need a bit more base. I am thinking about getting a 10" sub next. I going to make a new trunk compartment cover from plywood like I did for the amp covers on my mod. I hate to lose the compartment so I am going to have to get creative. I also looked into the stealth box but they are so expensive. They are nice but, for that price I would expect a bit more. I want something like that but with the cover and hidden trunk compartment.
http://www.jlaudio.com/car-audio-ste...-durango-11-up
I posted my mod on the next page and you can clearly see that I made quite a few holes on the trunk cover. A few of them are big... I won't do that again...
Last edited by Blue659; Dec 1, 2013 at 09:24 AM.